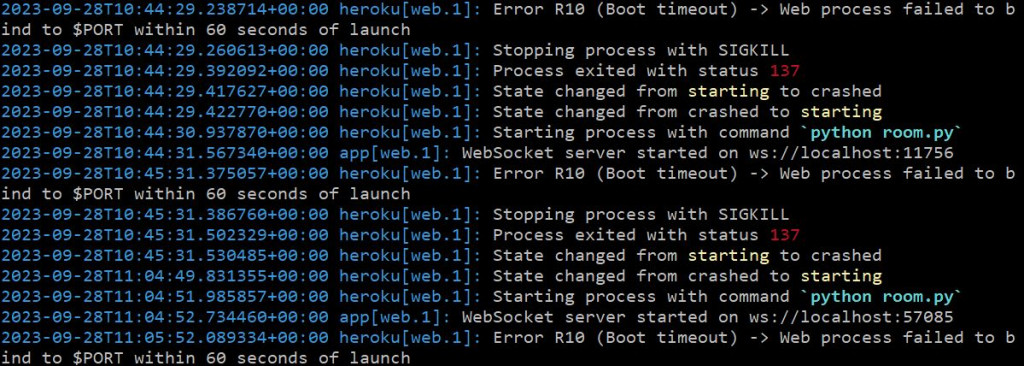
今天沒有部署成功,雖然前面排除掉了不少問題,但部署上去之後機器還是跑不動。目前還在解決問題中,也在此摘要一下部署的過程。更:後來問題解掉了,也學會了寶貴的經驗 :)
帳號驗證需要信用卡,但可以不用選擇訂閱,有一個 Basic 方案,看敘述是每個月帳單最多 7 鎂,機器會自己休眠,運作一小時 0.01 鎂,最多可以用滿七百小時 (一個月 24 * 31 = 744 小時)。
另外一個方案是 Eco,每小時費率是 Basic 的一半,最多可以用一千小時,然後帳單最多 5 鎂。但有一個小缺點是額度從月初起算,像今天 9/28 已經快月底了,現在訂閱絕對是當盤子。
兩者差異可以看這篇有完整說明
安裝所需的工具:python, horoku CLI
撰寫相關的 Procfile 這部分是 heroku 自己的架構文件,部署的時候會根據裡面提供的配置建立執行程序
準備 python 環境需要的檔案:runtime.txt, requirements.txt, setup.py, Pipfile
這邊我沒有很懂,大概就是抄網路上給的範例改一下,這個在 repo 上也可以查
配妥相關檔案之後,就可以推上去讓 heroku 幫你部署了
大概記錄一下自己沒設定好的地方
$ git push heroku main
Enumerating objects: 36, done.
Counting objects: 100% (36/36), done.
Delta compression using up to 2 threads
Compressing objects: 100% (32/32), done.
Writing objects: 100% (36/36), 13.23 KiB | 1.02 MiB/s, done.
Total 36 (delta 5), reused 4 (delta 0), pack-reused 0
remote: Updated 21 paths from a8431b9
remote: Compressing source files... done.
remote: Building source:
remote:
remote: -----> Building on the Heroku-22 stack
remote: -----> Determining which buildpack to use for this app
remote: -----> Python app detected
remote: -----> Using Python version specified in runtime.txt
remote:  !     Requested runtime 'python-3.10' is not available for this stack (heroku-22).
remote:  !     For supported versions, see: https://devcenter.heroku.com/articles/python-support
remote:  !     Push rejected, failed to compile Python app.
remote:
remote:  !     Push failed
remote: Verifying deploy...
remote:
remote: !       Push rejected to shrouded-castle-56322.
remote:
To https://git.heroku.com/shrouded-castle-56322.git
 ! [remote rejected] main -> main (pre-receive hook declined)
error: failed to push some refs to 'https://git.heroku.com/shrouded-castle-56322.git'
需要設定最新版的 python,然後 3.11 會說太短不行,最後改成 3.11.5

heroku 的系統會自動派發 port 給應用程式使用,這個沒辦法透過 config 設定,所以應用程式需要從環境參數或命令列參數的方式想辦法把 $PORT 的參數吃進來。測試過兩個方法都可以,最後選擇直接從環境參數存取 $PORT 的值。寫法如下:
import os
server_port = int(os.environ.get("PORT"))
後來才知道問題除了 port,還有 host。最早本地開發測試的時候設定為 'localhost'。localhost 的特性是只能從內部網路到達,外部網路沒辦法把資料傳進 localhost (安全性考量),需要設定成 '0.0.0.0' 才能接收所有外部網路的封包。另外根據 websockets 官方文件提供的說明,其實設定為 '' 或 None 也是同樣的效果。
最後終於在 heroku logs 看到部署成功的訊息。這時候要調整 client 頁面中 ws://localhost:8765 的寫法。根據官方文件 的路由說明,heroku 本身有使用 load balance 的技術可以自動把送到 *.herokuapp.com 的封包轉送到部署的應用程式,heroku 也會自動處理掉 port 對應的問題,所以我們只需要打 ws://*.herokuapp.com 就好了,超方便 :D
以上改動都發布到 repo 的 deploy 分支了,有興趣研究的看官們可以過去看看囉
明天應該會再講一些部署的注意事項,也預祝大家中秋節愉快~
