這次要結合的地方是RecyclerView的點擊事件,當點擊了RecyclerView中的某一個項目後就執行跳轉頁面,將資料跟著傳入到目的地頁面,再將傳入的資訊顯示出來,這次實作預計會結合前幾篇講到的Api資料,將資料丟進RecyclerView顯示點擊某個選項後,就跳到下個頁面將所有資訊顯示出來。
    implementation 'com.squareup.retrofit2:converter-gson:2.9.0'
    implementation 'com.squareup.retrofit2:retrofit:2.9.0'
    //Retrofit

    implementation 'com.squareup.retrofit2:adapter-rxjava3:2.9.0'
    implementation 'io.reactivex.rxjava3:rxjava:3.1.6'
    implementation 'io.reactivex.rxjava3:rxandroid:3.0.0'
    //RxJava
<uses-permission android:name="android.permission.INTERNET" />
這次的實作除了原本的主畫面外,還有新增一個給Intent跳轉的頁面
<?xml version="1.0" encoding="utf-8"?>
<LinearLayout xmlns:android="http://schemas.android.com/apk/res/android"
    xmlns:app="http://schemas.android.com/apk/res-auto"
    xmlns:tools="http://schemas.android.com/tools"
    android:layout_width="match_parent"
    android:layout_height="match_parent"
    tools:context=".MainActivity"
    android:orientation="vertical">

    <Space
        android:layout_width="match_parent"
        android:layout_height="0dp"
        android:layout_weight="0.2" />

    <Button
        android:id="@+id/search"
        android:layout_width="match_parent"
        android:layout_height="0dp"
        android:layout_weight="0.1"
        android:text="搜尋"
        android:textSize="30sp"
        android:textStyle="bold" />

    <androidx.recyclerview.widget.RecyclerView
        android:id="@+id/recyclerView"
        android:layout_width="match_parent"
        android:layout_height="0dp"
        android:layout_weight="0.7"
        android:paddingTop="15dp"
        tools:listitem="@layout/recycleritem"/>
</LinearLayout>
主畫面設定了一個搜尋按鈕,按下後就會將資料填入下方的RecyclerView。
<?xml version="1.0" encoding="utf-8"?>
<LinearLayout xmlns:android="http://schemas.android.com/apk/res/android"
    android:layout_width="match_parent"
    android:layout_height="150dp"
    android:background="@drawable/border"
    android:orientation="vertical">

    <LinearLayout
        android:layout_width="match_parent"
        android:layout_height="match_parent"
        android:layout_weight="1"
        android:orientation="horizontal">

        <TextView
            android:layout_width="0dp"
            android:layout_height="match_parent"
            android:layout_weight="0.2"
            android:gravity="center"
            android:textSize="20sp"
            android:textColor="@color/black"
            android:textStyle="bold"
            android:text="Name :" />

        <TextView
            android:id="@+id/tv_name"
            android:layout_width="0dp"
            android:layout_height="match_parent"
            android:layout_weight="0.8"
            android:gravity="center_vertical"
            android:textSize="20sp"
            android:textColor="@color/black"
            android:text="TextView" />
    </LinearLayout>

    <View
        android:layout_width="match_parent"
        android:layout_height="1dp"
        android:background="@color/black" />

    <LinearLayout
        android:layout_width="match_parent"
        android:layout_height="match_parent"
        android:layout_weight="1"
        android:orientation="horizontal">

        <TextView
            android:layout_width="0dp"
            android:layout_height="match_parent"
            android:layout_weight="0.2"
            android:gravity="center"
            android:textSize="20sp"
            android:textColor="@color/black"
            android:textStyle="bold"
            android:text="Email :" />

        <TextView
            android:id="@+id/tv_email"
            android:layout_width="0dp"
            android:layout_height="match_parent"
            android:layout_weight="0.8"
            android:gravity="center_vertical"
            android:textSize="20sp"
            android:textColor="@color/black"
            android:text="TextView" />
    </LinearLayout>

</LinearLayout>
item的設計也很簡單,就是把每一筆資料附的name跟email顯示出來。
<?xml version="1.0" encoding="utf-8"?>
<androidx.constraintlayout.widget.ConstraintLayout xmlns:android="http://schemas.android.com/apk/res/android"
    xmlns:app="http://schemas.android.com/apk/res-auto"
    xmlns:tools="http://schemas.android.com/tools"
    android:layout_width="match_parent"
    android:layout_height="match_parent"
    tools:context=".MainActivity2">

    <TextView
        android:id="@+id/result"
        android:layout_width="374dp"
        android:layout_height="496dp"
        android:layout_marginStart="19dp"
        android:layout_marginTop="132dp"
        android:layout_marginEnd="18dp"
        android:layout_marginBottom="103dp"
        android:background="@drawable/border"
        android:gravity="center"
        android:text="TextView"
        android:textColor="@color/black"
        android:textSize="20sp"
        app:layout_constraintBottom_toBottomOf="parent"
        app:layout_constraintEnd_toEndOf="parent"
        app:layout_constraintHorizontal_bias="0.0"
        app:layout_constraintStart_toStartOf="parent"
        app:layout_constraintTop_toTopOf="parent" />

    <Button
        android:id="@+id/back"
        android:layout_width="wrap_content"
        android:layout_height="wrap_content"
        android:layout_marginStart="17dp"
        android:layout_marginTop="55dp"
        android:layout_marginEnd="304dp"
        android:layout_marginBottom="30dp"
        android:text="返回"
        android:textSize="20sp"
        app:layout_constraintBottom_toTopOf="@+id/result"
        app:layout_constraintEnd_toEndOf="parent"
        app:layout_constraintStart_toStartOf="parent"
        app:layout_constraintTop_toTopOf="parent" />
</androidx.constraintlayout.widget.ConstraintLayout>
這個介面我新增了一個TextView將接收到的資料顯示出來,並且增加了一個按鈕,用來將現在這個介面返回到前一頁。
<?xml version="1.0" encoding="utf-8"?>
<selector xmlns:android="http://schemas.android.com/apk/res/android">
    <item>
        <shape>
            <stroke android:width="3dp"
                    android:color="#2EA9DF"/>
        </shape>
    </item>
</selector>
這個部分跟之前的寫法一樣,這邊就跳過不重講一次,詳情可以看之前的文章Day15。
這次我在要取資料用了比較不一樣的方式將資料加進我的ArrayList,因此這裡就單獨將這個部分拉出來講
private void searchCommentData() {
        getApi.getCommentData()
                .observeOn(AndroidSchedulers.mainThread())
                .subscribeOn(AndroidSchedulers.mainThread())
                .subscribe(new DisposableObserver<List<DataResponse>>() {
                    @Override
                    public void onNext(@NonNull List<DataResponse> dataResponses) {
                        for (DataResponse data : dataResponses){
                            HashMap hashMap = new HashMap();
                            hashMap.put("postId",data.postId);
                            hashMap.put("id",data.id);
                            hashMap.put("name",data.name);
                            hashMap.put("email",data.email);
                            hashMap.put("body",data.body);
                            mArrayList.add(hashMap);
                        }
                        setRecyclerView(mArrayList);
                    }
                    @Override
                    public void onError(@NonNull Throwable e) {}
                    @Override
                    public void onComplete() {}
                });
    }
在onNext的部分我使用了for迴圈走訪抓下來的資料,然後再將資料給丟進我建立好的ArrayList裡面,最後再將資料傳進我的RecyclerView裡面
        for (DataResponse data : dataResponses){
            HashMap hashMap = new HashMap();
            hashMap.put("postId",data.postId);
            hashMap.put("id",data.id);
            hashMap.put("name",data.name);
            hashMap.put("email",data.email);
            hashMap.put("body",data.body);
            mArrayList.add(hashMap);
        }
        setRecyclerView(mArrayList);
首先我設定了一個DataResponse的變數data,這樣我的data就會代表DataResponse裡面的元素,這麼做最大的原因是因為得到的資料也是屬於DataResponse的元素,這麼做就可以順利地走訪得到的資料,接著下面在將每次的資料用HashMap存起來,在放進ArrayList裡面。
最後在設定RecyclerView,像這樣將程式的先後順序用呼叫函式的方法分開,不讓他一次執行,就可以降低讓程式報錯的機率。
import androidx.appcompat.app.AppCompatActivity;
import androidx.recyclerview.widget.LinearLayoutManager;
import androidx.recyclerview.widget.RecyclerView;

import android.os.Bundle;
import android.util.Log;
import android.widget.Button;

import java.util.ArrayList;
import java.util.HashMap;
import java.util.List;

import io.reactivex.rxjava3.android.schedulers.AndroidSchedulers;
import io.reactivex.rxjava3.annotations.NonNull;
import io.reactivex.rxjava3.observers.DisposableObserver;
import io.reactivex.rxjava3.schedulers.Schedulers;

public class MainActivity extends AppCompatActivity {
    private ArrayList<HashMap<String,String>> mArrayList;
    private MyListAdapter myListAdapter;
    private RecyclerView recyclerView;
    private Button search;
    private ApiClient apiClient;
    private GetApi getApi;
    @Override
    protected void onCreate(Bundle savedInstanceState) {
        super.onCreate(savedInstanceState);
        setContentView(R.layout.activity_main);

        search = findViewById(R.id.search);
        recyclerView = findViewById(R.id.recyclerView);
        apiClient = new ApiClient();
        getApi = apiClient.getCommentApi().create(GetApi.class);
        mArrayList = new ArrayList<>();

        search.setOnClickListener(view -> searchCommentData());
    }

    private void searchCommentData() {
        getApi.getCommentData()
                .observeOn(AndroidSchedulers.mainThread())
                .subscribeOn(AndroidSchedulers.mainThread())
                .subscribe(new DisposableObserver<List<DataResponse>>() {
                    @Override
                    public void onNext(@NonNull List<DataResponse> dataResponses) {
                        for (DataResponse data : dataResponses){
                            HashMap hashMap = new HashMap();
                            hashMap.put("postId",data.postId);
                            hashMap.put("id",data.id);
                            hashMap.put("name",data.name);
                            hashMap.put("email",data.email);
                            hashMap.put("body",data.body);
                            mArrayList.add(hashMap);
                        }
                        setRecyclerView(mArrayList);
                    }
                    @Override
                    public void onError(@NonNull Throwable e) {}
                    @Override
                    public void onComplete() {}
                });
    }
    private void setRecyclerView(ArrayList<HashMap<String, String>> mArrayList) {
        myListAdapter = new MyListAdapter(mArrayList);
        recyclerView.setLayoutManager(new LinearLayoutManager(getApplicationContext()));
        recyclerView.setAdapter(myListAdapter);
    }
}
基本設定的部分這邊一樣也跳過,詳細可以看之前的文章Day8
這邊會講解怎麼設定RecyclerView的點擊事件,以及怎麼跟Intent跳轉頁面做結合
    @Override
    public void onBindViewHolder(@NonNull MyListAdapter.ViewHolder holder, int position) {
        holder.name.setText(mArrayList.get(position).get("name"));
        holder.email.setText(mArrayList.get(position).get("email"));

        holder.itemView.setOnClickListener(view -> {
            HashMap data = mArrayList.get(position);
            Intent intent = new Intent();
            intent.putExtra("data",data);
            intent.setClass(view.getContext(), MainActivity2.class);
            view.getContext().startActivity(intent);
        });
    }
RecyclerView點擊事件要用到itemView裡面的點擊事件,並且設定在點擊到某個選項後,就將點擊到的資料都存進一個HashMap,接著就可以將資料用putExtra的方式把資料丟給Intent,然後在將本地的Context以及目的地的Class填好,最後就可以呼叫startActivity將Intent傳入,讓他執行跳轉頁面的指令。
import androidx.appcompat.app.AppCompatActivity;

import android.annotation.SuppressLint;
import android.content.Intent;
import android.os.Bundle;
import android.util.Log;
import android.widget.Button;
import android.widget.TextView;

import java.util.ArrayList;

public class MainActivity2 extends AppCompatActivity {
    private TextView result;
    private Button back;
    private ArrayList data;
    @SuppressLint("MissingInflatedId")
    @Override
    protected void onCreate(Bundle savedInstanceState) {
        super.onCreate(savedInstanceState);
        setContentView(R.layout.activity_main2);

        result = findViewById(R.id.result);
        back = findViewById(R.id.back);

        data = new ArrayList();
        Intent intent = getIntent();
        if (intent != null){
            data.add(intent.getSerializableExtra("data"));
        }
        result.setText(data.get(0).toString());

        back.setOnClickListener(view -> finish());
    }
}
首先看到這個部分
        Intent intent = getIntent();
        if (intent != null){
            data.add(intent.getSerializableExtra("data"));
        }
        result.setText(data.get(0).toString());
因為這次的資料型態較複雜所以要用到getSerializableExtra,填入傳入資料時設定的key,就能將資料丟給ArrayList去存取,最後在將資料丟給TextView去顯示。
接著看到按鈕的設定
back.setOnClickListener(view -> finish());
這邊要說明一下,可以想像一下有一個容器用來存取每個開啟的頁面,當使用Intent跳轉頁面時,就是在一個容器中將目的地的頁面也加進一個容器中,大概就像這樣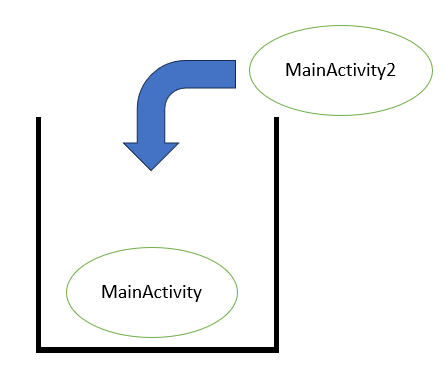
接著我設定了,當點擊這個按鈕後就執行finish()這個指令,finish可以把當前的這個頁面給關掉,可以想像成將後面添加的頁面給丟掉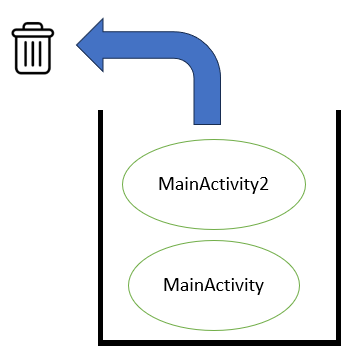
最後就會剩下MainActivity這個頁面,也就會自動跳回上一頁囉~