這一篇將會是實作的最後一篇,本篇會講解登入畫面跟放置功能列表的介面,以及MainActivity的設定,最後這裡附上本次實作的GitHub
    <string name="weather_function">天氣狀況</string>
    <string name="calculator_function">計算機</string>
    <string name="game_function">小遊戲</string>
新增function的名稱,在後面會使用name來抓取資料
public class SharedPref {
    private SharedPreferences sharedPreferences;
    private SharedPreferences.Editor editor;
    public SharedPref(Context context){
        sharedPreferences = context.getSharedPreferences(
                context.getResources().getString(R.string.app_name),Context.MODE_PRIVATE);
        editor = sharedPreferences.edit();
    }

    public void setAct(String account){
        editor.putString("act",account).commit();
    }
    public void setPwd(String password){
        editor.putString("pwd",password).commit();
    }

    public String getAct(){return sharedPreferences.getString("act","error");}
    public String getPwd(){return  sharedPreferences.getString("pwd","error");}
}
這個部分就跟在Day26設定的一樣,這邊會簡單的帶過怎麼寫,詳細解釋可以看Day26
public class MainActivity extends AppCompatActivity implements NavigationView.OnNavigationItemSelectedListener
首先要implements Navigation Drawer的監聽器
    private DrawerLayout drawerLayout;
    private NavigationView navigationView;
    private Toolbar toolbar;
接著將該宣告的物件宣告
    setFindById();
    setNavigationDrawer(savedInstanceState);
onCreate設定的部分
    setSupportActionBar(toolbar);
    navigationView.setNavigationItemSelectedListener(this);

    ActionBarDrawerToggle toggle = new ActionBarDrawerToggle(this, drawerLayout, toolbar,R.string.Nav_Open
                ,R.string.Nav_Close);
    drawerLayout.addDrawerListener(toggle);
    toggle.syncState();

    if (savedInstanceState == null){
        getSupportFragmentManager().beginTransaction().replace(R.id.frameLayout, new LoginFragment()).commit();
        navigationView.setCheckedItem(R.id.login);
    }
這邊就是Navigation Drawer的基本設定,包括:Navigation Drawer的點擊事件設定、剛開始介面的設定、ToolBar的設定
    @Override
    public boolean onNavigationItemSelected(@NonNull MenuItem item) {
        if (item.getItemId() == R.id.login){
            getSupportFragmentManager().beginTransaction().replace(R.id.frameLayout, new LoginFragment()).commit();
            //當選到login選項時,就跳到login的分頁
        } else if (item.getItemId() == R.id.home) {
            getSupportFragmentManager().beginTransaction().replace(R.id.frameLayout, new HomeFragment()).commit();
            //當選到home選項時,就跳到home的分頁
        } else if (item.getItemId() == R.id.logout) {
            Toast.makeText(this,"以登出",Toast.LENGTH_SHORT).show();
            getSupportFragmentManager().beginTransaction().replace(R.id.frameLayout, new LoginFragment()).commit();
            //當選到logout時就跳回login的頁面,並且顯是以登出
        }
        drawerLayout.closeDrawer(GravityCompat.START);//設定像開始的地方關閉Navigation Drawer
        return true;
    }
當Navigation Drawer的選項被點擊時,就會呼叫這個方法,這裡就是設定會去判斷選到的選項的id,依據不同id就做不同的事,並且設定Navigation Drawer關閉的時候關閉方向是往左側關閉
    @Override
    public void onBackPressed() {
        if (drawerLayout.isDrawerOpen(GravityCompat.START)){
            drawerLayout.closeDrawer(GravityCompat.START);
        }else{
            super.onBackPressed();
        }
    }
這個部分事在改寫當使用者按下手機的返回後執行的事,如果沒做修改當使用者按下返回鍵就會將App關閉
多了這個指令就可以設定成當選單是展開狀態時,按下返回鍵只會關閉選單而不是整個App關閉
這個部分我使用了MVP架構,因此這裡要先建立LoginContract、LoginPresenter
public interface LoginContract {
    interface view{
        void accountInformationSuccess(boolean success);
        void successfulSetAccountInformation(boolean success);
    }
    interface presenter{
        void checkAccountInformation(String account, String password);
        void setAccountInformation(String account, String password);
    }
}
public class LoginPresenter implements LoginContract.presenter{
    private LoginContract.view view;
    private SharedPref pref;
    public LoginPresenter(LoginContract.view view, Context context){
        this.view = view;
        pref = new SharedPref(context);
    }
    @Override
    public void checkAccountInformation(String account, String password) {
        String act = pref.getAct(); String pwd = pref.getPwd();
        Log.d("test", "checkAccountInformation: "+act+"\n"+pwd);
        if (act.equals(account) && pwd.equals(password)) view.accountInformationSuccess(true);
        else view.accountInformationSuccess(false);
    }

    @Override
    public void setAccountInformation(String account, String password) {
        if (account.isEmpty() || password.isEmpty()) view.successfulSetAccountInformation(false);
        else {
            pref.setAct(account);  pref.setPwd(password);
            view.successfulSetAccountInformation(true);
        }
    }
}
因為這次將帳號密碼的相關設定寫到Presenter裡面,所以這裡就要使用到SharedPreference,但是因為SharedPreference在初始化時要用到context,所以這裡的建構元就要要求調用的介面也傳入context,這樣在初始化時才可以直接使用
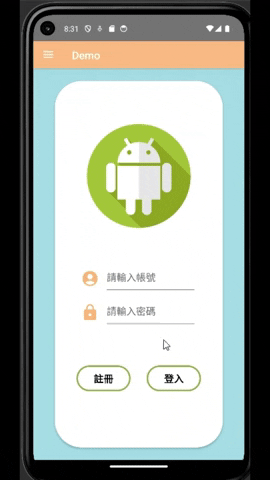
public class LoginFragment extends Fragment implements LoginContract.view{
    private EditText et_act,et_pwd;
    private Button btn_register,btn_login;
    private Dialog dialog;
    private LoginPresenter presenter;
    //宣告
就跟前面介紹的MVP架構一樣,這裡要implements 接口的view
    @Override
    public void onCreate(Bundle savedInstanceState) {
        super.onCreate(savedInstanceState);
        dialog = new Dialog(getContext());
        presenter = new LoginPresenter(this,getContext());
    }//初始化
接著在onCreate進行初始化
    @Override
    public View onCreateView(LayoutInflater inflater, ViewGroup container,
                             Bundle savedInstanceState) {
        // Inflate the layout for this fragment
        return inflater.inflate(R.layout.fragment_login, container, false);
    }//連結布局檔
綁定布局
    private void setListener() {
        btn_login.setOnClickListener(view -> presenter.checkAccountInformation(
                et_act.getText().toString(),et_pwd.getText().toString()));
        //按下 登入 按鈕後,就將輸入的帳號密碼丟到Presenter幫忙檢查,往下看到accountInformationSuccess
        btn_register.setOnClickListener(view -> setRegisterDialog());
        //按下 註冊 按鈕後,就開啟註冊的對話框,往下看到setRegisterDialog
    }//設定監聽器
按下登入按鈕時就呼叫presenter裡面的檢查帳號密碼的方法
按下註冊按鈕就呼叫設定對話框的方法,這邊先看到當檢查帳密傳回成功的訊息後會做的事
    @Override
    public void accountInformationSuccess(boolean success) {
        if (success){//如果帳戶資料比對成功,就創建一個Home的Fragment並且將LoginFragment替換掉
            Toast.makeText(getContext(),"成功登入",Toast.LENGTH_SHORT).show();
            // 創建 HomeFragment 實例
            Fragment homeFragment = new HomeFragment();

            // 使用 FragmentManager 替換當前的 Fragment
            FragmentTransaction transaction = getFragmentManager().beginTransaction();
            transaction.replace(R.id.frameLayout, homeFragment);
            transaction.addToBackStack(null); // 如果需要加入回退堆疊,可以使用 addToBackStack
            transaction.commit();
        }else Toast.makeText(getContext(),"帳號或密碼錯誤",Toast.LENGTH_SHORT).show();
        //比對結果為失敗,就用Toast告知帳號密碼輸入錯誤
    }//繼承Contract的view後得到的方法,這個方法在點擊 登入 按鈕後,會將比對帳密的成果回傳到view,也就是這裡
用if判斷當傳回true時就執行跳轉Fragment的工作,傳回false就用Toast提醒帳密輸入錯誤
    private void setRegisterDialog() {
        dialog.setContentView(R.layout.register_dialog);
        EditText act_register = dialog.findViewById(R.id.act_register);
        EditText pwd_register = dialog.findViewById(R.id.pwd_register);
        CheckBox checkBox = dialog.findViewById(R.id.checkbox_register);
        Button btn_create = dialog.findViewById(R.id.btn_create);
        //綁定dialog的頁面跟綁定dialog的物件id

        btn_create.setEnabled(false);
        checkBox.setChecked(false);
        //將建立按鈕跟checkbox初始化
        dialog.show();
        //設定完成將對話框顯示出來

        checkBox.setOnCheckedChangeListener(new CompoundButton.OnCheckedChangeListener() {
            @Override
            public void onCheckedChanged(CompoundButton compoundButton, boolean b) {
                if (checkBox.isChecked()) btn_create.setEnabled(true);//如果checkbox有打勾,就解鎖 註冊 按鈕
                else btn_create.setEnabled(false);//反之就鎖定 註冊 按鈕
            }
        });//checkbox的監聽器

        btn_create.setOnClickListener(view -> presenter.setAccountInformation(//將資料丟到Presenter幫忙判斷是否有不合個的帳密出現(空白)
                act_register.getText().toString(),pwd_register.getText().toString()));//註冊按鈕的點擊事件
    }//設定註冊的對話框
首先綁定在Dialog裡面的物件id,接著將按鈕設定成不能點選的狀態,以及將CheckBox設定成為選取的狀態
接著CheckBox設定成當CheckBox是選取狀態時就把按鈕解鎖
最後註冊按鈕下後會呼叫presenter的檢查要註冊的帳號密碼的方法
    @Override
    public void successfulSetAccountInformation(boolean success) {
        if (success) dialog.dismiss();//比對註冊的帳密格式是否正確後,會回傳是否成功的訊息,成功就將對話框關閉
        else Toast.makeText(getContext(),"帳號或密碼不能為空白",Toast.LENGTH_SHORT).show();//反之就用Toast說明原因
    }//判斷註冊的帳密是否符合規定
接著當註冊的帳密被檢驗為合乎規定後,就會回傳true,這裡接收到後就將對話框關閉,反之就說明失敗的原因
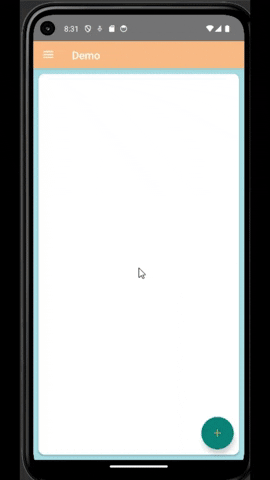
這個部分的主體為一個RecyclerView,而功能會以CardView包裝起來並放到RecyclerView顯示,並且使用了浮動式按鈕點下後就會跳出一個Dialog,Dialog裡面有CheckBox,當CheckBox選擇狀態時就為陣列加入被選中的功能的資料,按下新增按鈕就更新RecyclerView,以此來增加或減少RecyclerView裡面資料的數量
public class HomeFragment extends Fragment {
    private FloatingActionButton floatingActionButton;
    private Dialog dialog;
    private ArrayList<String> mArrayList;
    private ArrayList<Integer> picture;
    private RecyclerView recyclerView;
    private HomeListAdapter homeListAdapter;
宣告,因為有圖片跟功能名稱這兩個資料要傳到RecyclerView,所以新增了兩個陣列來儲存相關的資料
    @Override
    public void onCreate(Bundle savedInstanceState) {
        super.onCreate(savedInstanceState);
        mArrayList = new ArrayList<>();
        picture = new ArrayList<>();
        dialog = new Dialog(getContext());
        //初始化
    }
初始化
    @Override
    public View onCreateView(LayoutInflater inflater, ViewGroup container,
                             Bundle savedInstanceState) {
        // Inflate the layout for this fragment
        return inflater.inflate(R.layout.fragment_home, container, false);
        //綁定介面
    }
綁定介面
    @Override
    public void onViewCreated(@NonNull View view, @Nullable Bundle savedInstanceState) {
        super.onViewCreated(view, savedInstanceState);

        setFindById(view);//綁定物件id
        setListener();//設定監聽器
    }
onViewCreated的設定
    private void setListener() {
        floatingActionButton.setOnClickListener(view -> setDialog());
        //這裡的浮動式按鈕做的不是關閉介面,而是設定Dialog
    }//設定物件的監聽氣
監聽器設定
        dialog.setContentView(R.layout.addfunction_dialog);
        CheckBox weather = dialog.findViewById(R.id.weather_function);
        CheckBox game = dialog.findViewById(R.id.game_function);
        CheckBox calc = dialog.findViewById(R.id.calculator_function);

        Button add = dialog.findViewById(R.id.add_btn);
        //對話框物件的id綁定

        dialog.setCanceledOnTouchOutside(false);
        //將對話框設定為按對話框的區域也不會關閉,因此一定要按下新增按鈕才可以關閉
        if (mArrayList.contains("天氣狀況")) weather.setChecked(true);
        if (mArrayList.contains("計算機")) calc.setChecked(true);
        if (mArrayList.contains("小遊戲")) game.setChecked(true);
        //先判定之前有沒有將function的資料放進陣列裡面,有的話就讓checkbox設定成以打勾

        dialog.show();
        //顯示對話框
首先綁定在Dialog的介面以及物件id,接著原本Dialog在點擊對話框之外的區域時會直接關閉Dialog,但是在這次實作這麼做會讓更新RecyclerView時有問題,所以索性就設定必須要按下新增按鈕才可以關閉Dialog,強制讓RecyclerView可以更新
接著設定CheckBox如果陣列裡面已經有功能的資料存在了,就將該CheckBox設定為選取狀態,最後再將dialog顯示出來
    add.setOnClickListener(view -> {
        setRecyclerView(mArrayList, picture);
        //按下按鈕後就將跟新過的資料傳給RecyclerView設定
        homeListAdapter.notifyDataSetChanged();
        //按下按鈕後就提醒RecyclerView更新內容
        dialog.dismiss();
        //按下按鈕後就關閉對話框
        Toast.makeText(getContext(),"功能列表以更新",Toast.LENGTH_SHORT).show();
        //用Toast提醒功能列表已更新
    });//新增按鈕的點擊事件
新增按鈕的點擊事件,按下後將資料傳給RecyclerView並更新RecyclerView,接著關閉對話框
        weather.setOnCheckedChangeListener(new CompoundButton.OnCheckedChangeListener() {
            @Override
            public void onCheckedChanged(CompoundButton compoundButton, boolean b) {
                if (weather.isChecked()) {//當天氣checkBox有被點擊後,就檢查現在的狀態,如果是打勾狀態就將資料丟給各自代表的陣列
                    int functionResourceId = getResources().getIdentifier("weather_function","string",getContext().getPackageName());
                    mArrayList.add(getResources().getString(functionResourceId));
                    //這次使用抓String的name的方式來指定加入的資料
                    picture.add(R.drawable.weather);
                    //將天氣相關的圖片加進picture
                }else {
                    mArrayList.remove("天氣狀況");
                    //當checkBox被點擊時,結果當下狀態不是打勾,就所以
                    int index = picture.indexOf(R.drawable.weather);
                    if (index != -1) {
                        picture.remove(index);
                    }
                }
            }
        });//checkBox的設定
CheckBox的設定,當CheckBox的選項選取狀態有變動時,先判斷是否為選取狀態,接著把對應的資料加進對應的陣列,功能的名稱在string撰寫再以名稱查找資料,並加進陣列之中,圖片的資料則是直接讀取放在drawable中對應的圖片的id
當CheckBox是取消選取選項時就將對應的資料從陣列中移除,剩下的計算機和小遊戲的CheckBox也是一樣的設計,這邊就跳過不展示了
    private void setRecyclerView(ArrayList<String> mArrayList, ArrayList<Integer> picture) {
        homeListAdapter = new HomeListAdapter(mArrayList, picture, getContext());
        recyclerView.setLayoutManager(new LinearLayoutManager(getContext()));
        recyclerView.setAdapter(homeListAdapter);
    }
RecyclerView的設定,像裡面傳入兩個儲存資料的陣列,還有傳入context,傳入context是為了要執行跳轉頁面(Intent)的指令
public class HomeListAdapter extends RecyclerView.Adapter<HomeListAdapter.ViewHolder> {
    private ArrayList mArrayList;
    private ArrayList<Integer> pictureList;
    private Context context;
    public HomeListAdapter(ArrayList<String> arrayList, ArrayList<Integer> picture, Context context){
        this.mArrayList = arrayList;
        this.pictureList = picture;
        this.context = context;
    }
RecyclerView的基本設定,以及建構元的設定
    public class ViewHolder extends RecyclerView.ViewHolder {
        private ImageView imageView;
        private TextView textView;
        public ViewHolder(@NonNull View itemView) {
            super(itemView);
            imageView = itemView.findViewById(R.id.function_image);
            textView = itemView.findViewById(R.id.function_name);
        }
    }
綁定物件id
    @NonNull
    @Override
    public HomeListAdapter.ViewHolder onCreateViewHolder(@NonNull ViewGroup parent, int viewType) {
        View view = LayoutInflater.from(parent.getContext()).inflate(R.layout.recyclerview_item,parent,false);
        return new ViewHolder(view);
    }
綁定RecyclerView的item
        holder.textView.setText(mArrayList.get(position).toString());
        holder.imageView.setImageResource(pictureList.get(position));

        holder.itemView.setOnClickListener(new View.OnClickListener() {
            @Override
            public void onClick(View view) {
                Intent intent = new Intent();
                switch (mArrayList.get(position).toString()){
                    case "天氣狀況":
                        intent.setClass(context, WeatherFunction.class);
                        break;
                    case "計算機":
                        intent.setClass(context, CalculatorFunction.class);
                        break;
                    case "小遊戲":
                        intent.setClass(context, GameFunction.class);
                        break;
                }
                context.startActivity(intent);
            }
        });
設定將陣列內的資料填到物件,並且設置點擊事件,點擊後先判斷點擊的CardView的選項為哪一個,就跳到哪一個功能的介面
    @Override
    public int getItemCount() {
        return mArrayList.size();
    }
最後就是依據傳入的陣列長度設定RecyclerView的長度