本篇要來介紹當使用者滑到該圖或該組件時,才載入圖或組件的應用
還記得我們在16篇以及17篇分別提到
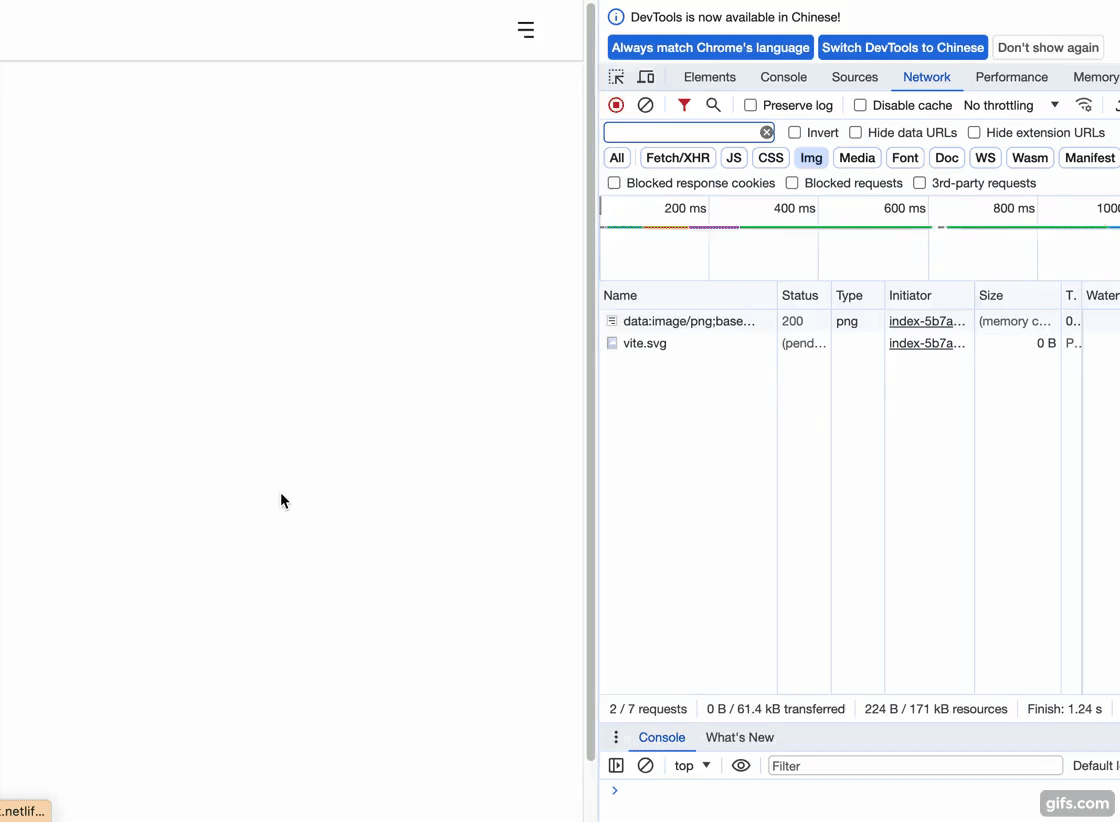
▲ 而16篇只提到Javascipt的寫法,因此這篇我們要將程式碼改為vue3 + IntersectionObserver API寫法
及
異步組件是指在需要的時候才會被加載和渲染的組件,這樣可以提高應用程序的性能
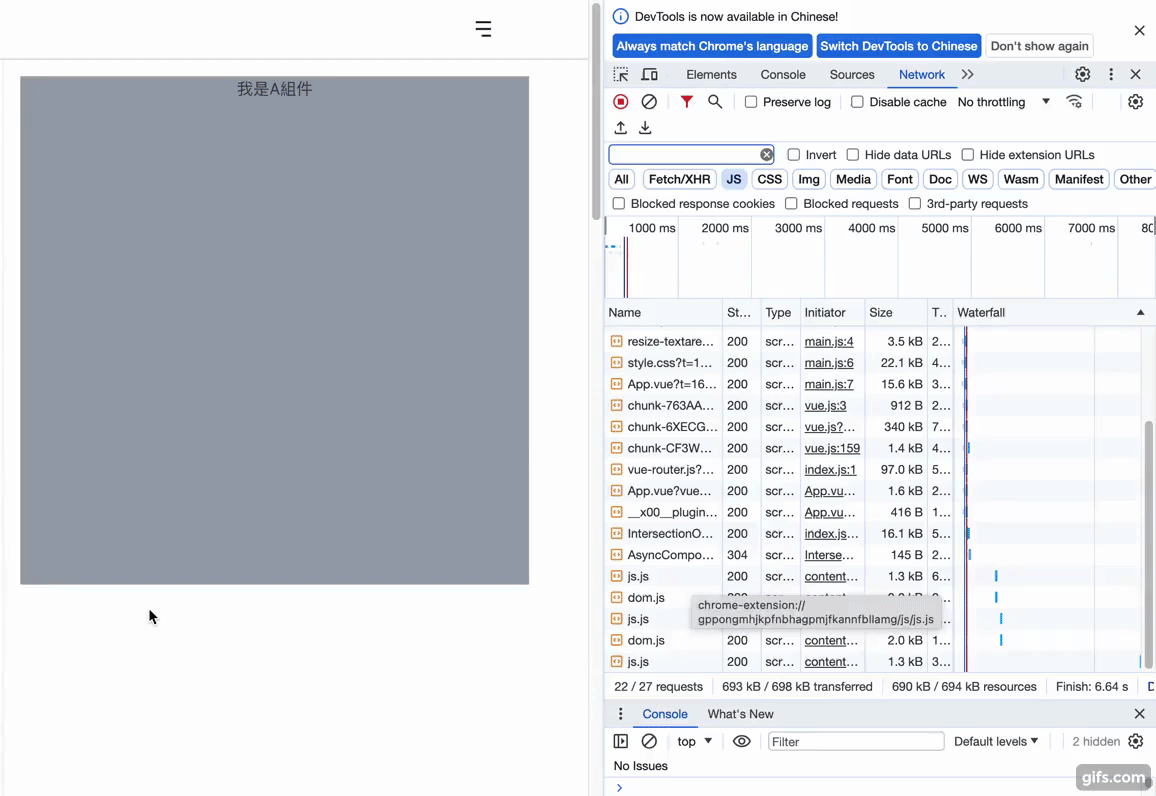
▲ 因此這篇我們要加可視範圍情境並使用vue3 + defineAsyncComponent +IntersectionObserver API寫法
首先先來做圖片懶加載,
功能大綱
▲ 成果
Demo網址:https://hahasister-ironman-project.netlify.app/#/intersectionObserverImg
(單一組件內)
<template>
    ...
    <div class="image-container">
      <img
        v-for="(image, index) in images"
        src="/src/assets/icon/loading-bar.png"
        :key="image.id"
        :data-src="image.src"
        :alt="image.alt"
        :ref="itemRef(index)"
        width="400"
        height="400"
      />
    </div>
    ...
</template>
<script setup>
import { ref, onMounted } from 'vue';
import { images } from '../lib/imgList'; // 引入照片清單

const itemRefs = ref([]); // img的DOM陣列

const observer = new IntersectionObserver(
  (entries, observer) => {
    entries.forEach(entry => {
      if (entry.isIntersecting) { // 如果在可見範圍
        const img = entry.target;
        const src = img.getAttribute('data-src');

        if (src) {
          img.src = src; // 將圖片路徑改為真正的路徑
          img.removeAttribute('data-src');  //移除不需要的屬性值
          observer.unobserve(img); // 不再監視已經加載的圖片
        }
      }
    });
  },
  {
    threshold: 0.5 // 在一半的圖片進入可見區域時觸發
  }
);

onMounted(() => {
  itemRefs.value.forEach(img => { // 將每一個img進入觀察
    if (img) {
      observer.observe(img);
    }
  });
});

const itemRef = index => el => {
  if (el) {
    itemRefs.value[index] = el; // 匯入每一個img的DOM
  }
};
</script>

<style lang="scss" scoped>
img {
  display: block;
  margin: 1em 0;
}
</style>
這樣就完成拉!當然程式碼還需優化,這只是簡單的範例
程式碼有以下重點
threshold則是0(代表只要圖片可見,就會加載)本範例這樣設計只是為了讓你明白,在還沒判定要加載時,預設會是走src=loading的圖,判斷該載入時才是原本的src
data-src 是自訂資料屬性,只是為了將圖片網址暫存在這個屬性內,之後方便取得
使用ref來獲取 DOM 元素
還記得監控的一個元素時,要使用observer.observe(需要監控的DOM)在Javascript中我們可以用 document.get...來取得,而在vue中可以用ref來獲取 DOM 元素,所以當< img >有多個時,我們其中一種寫法可以
<img
  v-for="(image, index) in images"
  :ref="itemRef(index)"
  ...
/>
也就是每次 v-for 迴圈創建一個新的< img >元素時,itemRef(index) 會被調用,並返回一個新的函數。這個返回的函數會接收一個參數 el,這個 el 就是剛剛創建的< img >元素的實際 DOM 節點。
當這個< img >元素被插入到 DOM 中後,Vue 會自動調用這個返回的函數,並將 el 作為參數傳入。在這個函數內部,它會檢查 el 是否存在,如果存在,就會將它存儲到itemRefs.value 陣列的相應索引位置。
接著我們來做簡易版的組件懶加載
功能大綱
Demo網址:https://hahasister-ironman-project.netlify.app/#/intersectionObserverComponent
(組件內)
今天的寫法,概念跟17篇差不多,
<template>
  <div>
    <div ref="componentA" class="mb-[600px] w-[500px] h-[500px]">
      <AsyncComponentA v-if="loadedA" />
    </div>
    <div ref="componentB" class="mb-[600px] w-[500px] h-[500px]">
      <AsyncComponentB v-if="loadedB" />
    </div>
    <div ref="componentC" class="w-[500px] h-[500px]">
      <AsyncComponentC v-if="loadedC" />
    </div>
  </div>
</template>

<script setup>
import { ref, onMounted, defineAsyncComponent } from 'vue';
const componentA = ref(null);
const componentB = ref(null);
const componentC = ref(null);

const loadedA = ref(false);
const loadedB = ref(false);
const loadedC = ref(false);

const AsyncComponentA = defineAsyncComponent(() =>
  import('../components/AsyncComponent/AsyncComponentA.vue')
);
const AsyncComponentB = defineAsyncComponent(() =>
  import('../components/AsyncComponent/AsyncComponentB.vue')
);
const AsyncComponentC = defineAsyncComponent(() =>
  import('../components/AsyncComponent/AsyncComponentC.vue')
);

onMounted(() => {
  const observer = new IntersectionObserver(entries => {
    entries.forEach(entry => {
      if (entry.isIntersecting) {
        switch (entry.target) {
          case componentA.value:
            loadedA.value = true;
            observer.unobserve(componentA.value); // 停止觀察
            break;
          case componentB.value:
            loadedB.value = true;
            observer.unobserve(componentB.value);
            break;
          case componentC.value:
            loadedC.value = true;
            observer.unobserve(componentC.value);
            break;
        }
      }
    });
  });

  observer.observe(componentA.value);
  observer.observe(componentB.value);
  observer.observe(componentC.value);
});
</script>
這樣就完成拉!當然程式碼還需優化,這只是簡單的範例
程式碼有以下重點
元素一開始沒有設定寬高會有什麼關係?
如果你的 div 元素一開始沒有設定寬高,那麼 IntersectionObserver 可能會立即觸發 isIntersecting 為 true,因為還沒載入之前這些 div 元素沒有寬高會被認為是在視窗內。
不是寫了defineAsyncComponent就有動態載入?為什麼還要寫變數(v-if)來判斷是否渲染?
動態載入組件,還是在需要的時候才能判斷是否加載,而什麼時候是需要的時候?通常是指以下幾種情況:事件觸發條件(例如點擊、滑鼠懸停、時間延遲...等)或是條件判斷,是讓組件從 "不載入" 變為 "載入" 的觸發因素。
那我們明天再見了~