今天來探究一下 Provide/Inject 的用法
參考一下W3School_Vue的說明
Vue Provide/Inject
https://www.w3schools.com/vue/vue_provide-inject.php
採用的是 Options+SFC的模式
分成4個檔案 main.js,App.vue,FoodAbout.vue,FoodKinds.vue
有了先前的練習,再來看這些範例,理解就會加快許多
main.js
import { createApp } from 'vue'

import App from './App.vue'
import FoodAbout from './components/FoodAbout.vue'
import FoodKinds from './components/FoodKinds.vue'

const app = createApp(App)
app.component('food-about', FoodAbout)
app.component('food-kinds', FoodKinds)
app.mount('#app')
這裡除了App.vue,另外2個是Component,FoodAbout.vue及FoodKinds.vue
匯入後的名稱是 FoodAbout,FoodKinds
然後 加入 App 中,成為App的Component
App 再掛載到 <div id="app"></div>
這裡有一些元件匯入時名稱的設定,感覺有點複雜
import FoodAbout from './components/FoodAbout.vue'
app.component('food-about', FoodAbout)
原始的檔名 './components/FoodAbout.vue'
import 的名稱 FoodAbout
加入App 的名稱 'food-about'
App.vue
<template>
  <h1>Food</h1>
  <div @click="this.activeComp = 'food-about'" class="divBtn">About</div>
  <div @click="this.activeComp = 'food-kinds'" class="divBtn">Kinds</div>
  <div id="divComp">
    <component :is="activeComp"></component>
  </div>
</template>

<script>
export default {
  data() {
    return {
      activeComp: 'food-kinds',
      foods: [
        { name: 'Pizza', imgUrl: 'img_pizza.svg' },
        { name: 'Apple', imgUrl: 'img_apple.svg' },
        { name: 'Cake', imgUrl: 'img_cake.svg' },
        { name: 'Fish', imgUrl: 'img_fish.svg' },
        { name: 'Rice', imgUrl: 'img_rice.svg' }
      ]
    }
  },
  provide() {
    return {
      foods: this.foods
    }
  }
}
</script>

<style scoped>
  .divBtn {
    display: inline-block;
    text-decoration: none;
    text-align: center;
    background-color: white;
    border: solid 2px #04AA6D;
    border-radius: 10px;
    font-family: Verdana,sans-serif;
    color: black;
    padding: 10px;
    margin: 10px;
  }
  .divBtn:hover {
    background-color: #04AA6D;
    color: white;
    cursor: pointer;
  }
  #divComp {
    border: dashed black 1px;
    border-radius: 10px;
    padding: 20px;
    margin: 10px;
    width: 400px;
  }
</style>
從App.vue來觀察一下
宣告了2個變數 activeComp,foods
activeComp 的初值是 'food-kinds' 用是切換 'food-kinds' 及 'food-about'
foods 則是一個陣列,內容是不同食物的資料,有名稱 name 及圖檔檔名 imgUrl
另外看到有一個名為 provide()
用來傳送 資料到子元件,宣告了1個變數foods來傳送
再來是 2個click事件
@click="this.activeComp = 'food-about'"
@click="this.activeComp = 'food-kinds'"
click 不同的按鈕,this.activeComp 就會切換到不同的components元件名稱'food-about','food-kinds'
最後是 <component :is="activeComp"></component>
代表會根據 is屬性,切換不同子元件的內容:is="activeComp 則是將 is屬性綁定到 activeComp
這樣大致了解App.vue的流程
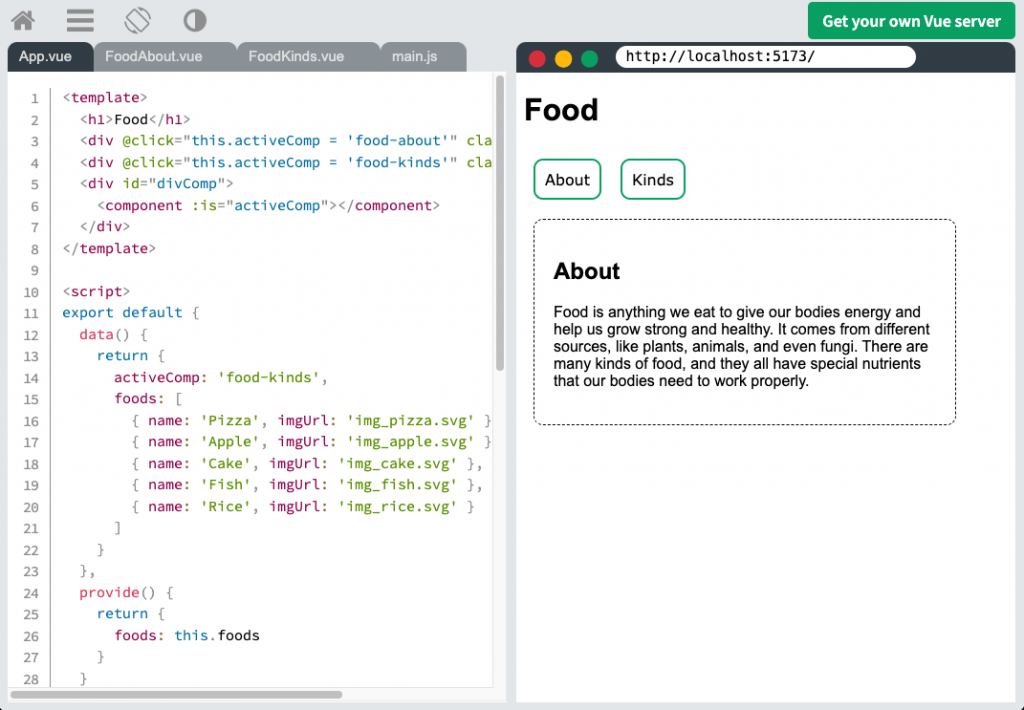
FoodAbout.vue
<template>
    <h2>About</h2>
    <p>Food is anything we eat to give our bodies energy and help us grow strong and healthy. It comes from different sources, like plants, animals, and even fungi. There are many kinds of food, and they all have special nutrients that our bodies need to work properly.</p>
</template>
FoodAbout -> 'food-about'
內容比較單純,有2個元素<h2>,<p>
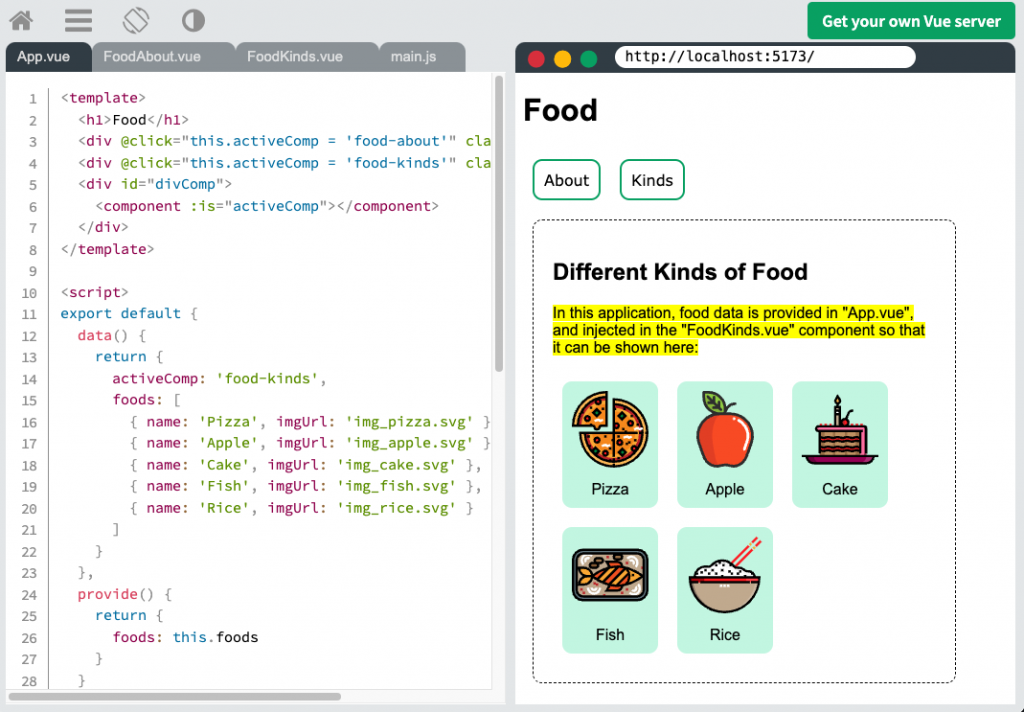
FoodKinds.vue
<template>
    <h2>Different Kinds of Food</h2>
    <p><mark>In this application, food data is provided in "App.vue", and injected in the "FoodKinds.vue" component so that it can be shown here:</mark></p>
    <div v-for="x in foods">
        <img :src="x.imgUrl">
        <p class="pName">{{ x.name }}</p>
    </div>
</template>

<script>
export default {
    inject: ['foods']
}
</script>

<style scoped>
    div {
        margin: 10px;
        padding: 10px;
        display: inline-block;
        width: 80px;
        background-color: #28e49f47;
        border-radius: 10px;
    }
    .pName {
        text-align: center;
        margin: 10px 0 0 0;
    }
    img {
        width: 100%;
    }
</style>
在 FoodKinds.vue中
有看到一個設定 inject: ['foods'] 宣告用來接收父元件傳來的資料,名稱是 'foods'
所以
App.vue
export default {
  provide() {
    return {
      foods: this.foods
    }
  }
}
FoodKinds.vue
export default {
    inject: ['foods']
}
形成對應關係
接收到foods資料後
接著在 v-for 中將 foods的資料列示出來
<div v-for="x in foods">
    <img :src="x.imgUrl">
    <p class="pName">{{ x.name }}</p>
</div>
x 是 foods中的每一筆資料
:src="x.imgUrl" => x.imgUrl 綁定 src{{ x.name }} => x.name 綁定 <p> 的內容
另外 在foods的部份
foods: [
  { name: 'Pizza', imgUrl: 'img_pizza.svg' },
  { name: 'Apple', imgUrl: 'img_apple.svg' },
  { name: 'Cake', imgUrl: 'img_cake.svg' },
  { name: 'Fish', imgUrl: 'img_fish.svg' },
  { name: 'Rice', imgUrl: 'img_rice.svg' }
]
是JSON格式,通常是最上層是一個陣列,陣列中的每個元素是物件的格式 { name: 'Pizza', imgUrl: 'img_pizza.svg' }
接下來則是由子元件傳送資料到父元件的方式


 iThome鐵人賽