今天來再次研究一下 子元件傳資料給父元件 的方式
有時一些Vue的語法需要不斷反覆練習
將一些
有疑慮的問題點一一釐清,
在實際專案的設計中,才能更直覺得使用
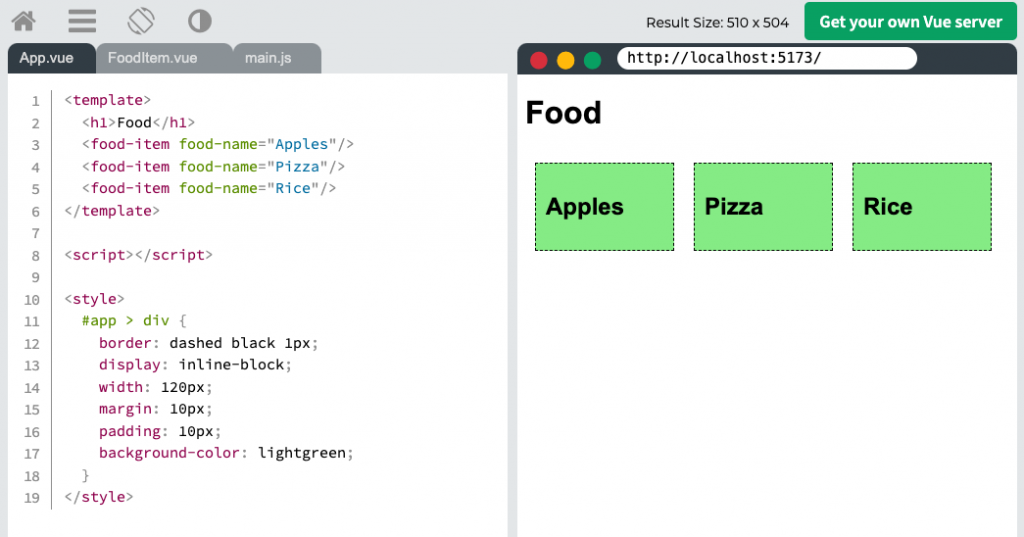
先從props 的範例看起
main.js
import { createApp } from 'vue'

import App from './App.vue'
import FoodItem from './components/FoodItem.vue'

const app = createApp(App)

app.component('food-item', FoodItem)

app.mount('#app')
這部份己經鼠熟悉了
接著是
App.vue
<template>
  <h1>Food</h1>
  <food-item food-name="Apples"/>
  <food-item food-name="Pizza"/>
  <food-item food-name="Rice"/>
</template>

<script></script>

<style>
  #app > div {
    border: dashed black 1px;
    display: inline-block;
    width: 120px;
    margin: 10px;
    padding: 10px;
    background-color: lightgreen;
  }
</style>
這裡看到 <food-item food-name="Apples"/> 這個 food-item 的元件tag
屬性是 food-name,數值是 "Apples"
一共有3個 <food-item>
再來是
FoodItem.vue
<template>
    <div>
        <h2>{{ foodName }}</h2>
    </div>
</template>

<script>
export default {
    props: [
        'foodName'
    ]
};
</script>

<style></style>
可以看到有用到props
    props: [
        'foodName'
    ]
代表從父元件接收資料的變數是 foodName
然後就可以連動到 {{ foodName }}
整個串接起來就是
main.jsimport FoodItem from './components/FoodItem.vue'
從FoodItem.vue檔案匯入,並命名為 FoodItem
app.component('food-item', FoodItem)
將FoodItem物件加入App變成 component,元件的tagname是 food-item
App.vue<food-item food-name="Apples"/>
FoodItem.vueprops: [ 'foodName' ]{{ foodName }}
元件<food-item>的屬性food-name會綁定到 FoodItem 子元件 中的 foodName
這裡有一個地方要注意,就是命名的規則
在JS的部份,變數名稱採用的是 camelCase 格式,就是 FoodItem
在Vue 的Component的tag 或屬性的名稱採用的是 kebab-case 格式,就是 food-item
因此 在名稱上是相對應的
FoodItem -> food-itemfoodName -> food-name
整理一下 props 的語法
import FoodItem from './components/FoodItem.vue'

app.component('food-item', FoodItem)

<food-item food-name="Apples"/>

props: [ 'foodName' ]

{{ foodName }}
在上一篇發文中
有看到 provide() / inject 的語法
import FoodKinds from './components/FoodKinds.vue'

app.component('food-kinds', FoodKinds)

<component :is="activeComp"></component>

activeComp ='food-kinds' -> FoodKinds.vue

export default {
  provide() {
    return {
      foods: this.foods
    }
  }
}

export default {
    inject: ['foods']
}

<div v-for="x in foods">
//----------<component :is="activeComp"></component> 的作用是方使切換不用的component
原本應該可以寫成
<food-kinds />
<food-about />
不過因為不同的component會有不同的接收資料項目,或是沒有接收資料
所以在 <food-kinds />,<food-about /> 沒有加上屬性
而是在需要接收資料的component上
設定 inject: ['foods'] 就可以了
這個跟
<food-item food-name="Apples"/>
props: [ 'foodName' ]
透過加入屬性food-name 及 props的方式有所不同,
因此在學習上,常常會在這種地方產生混淆,
若不釐清的話,再加上新的語法後,就會更混亂了
//----------------------------
接下來是 emit 的用法
參考W3School的範例
Vue $emit() Method
https://www.w3schools.com/vue/vue_emit.php
$emit() 的作用是如果子元件要傳送資料給父元件,利用 $emit() 觸發一個事件傳送到父元件
這部份要確認一下,用component的方法會回傳component的<template>的內容
用props接收父元件傳來的資料,
那麼 $emit() 像是在子元件有後續操作的時候,可以傳送資料給父元件,
父元件經過一些處理,將結果透過props再回給 子元件,子元件再更新<template>的內容
最後再回到父元件中的 component tag 的內容
看起來是經過了一段這樣的流程
也可能是 在子元件有後續操作的時候,透過$emit()傳送資料給父元件,然後改變父元件本身<template>的內容
來看一下範例的說明
main.js
import { createApp } from 'vue'

import App from './App.vue'
import FoodItem from './components/FoodItem.vue'

const app = createApp(App)

app.component('food-item', FoodItem)

app.mount('#app')
這部份OK, 沒問題了
接下來是
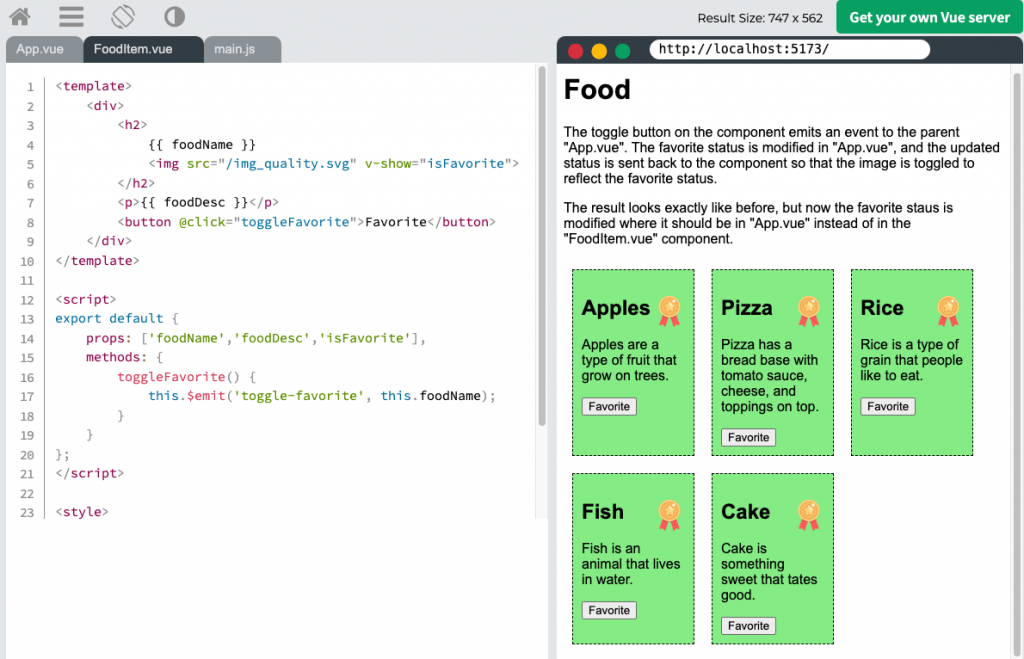
App.vue
<template>
  <h1>Food</h1>
  <p>The toggle button on the component emits an event to the parent "App.vue". The favorite status is modified in "App.vue", and the updated status is sent back to the component so that the image is toggled to reflect the favorite status.</p>
  <p>The result looks exactly like before, but now the favorite staus is modified where it should be in "App.vue" instead of in the "FoodItem.vue" component.</p>
  <div id="wrapper">
    <food-item
      v-for="x in foods"
      :key="x.name"
      :food-name="x.name"
      :food-desc="x.desc"
      :is-favorite="x.favorite"
      @toggle-favorite="receiveEmit"/>
  </div>
</template>

<script>
export default {
  data() {
    return {
      foods: [
        { name: 'Apples', desc: 'Apples are a type of fruit that grow on trees.', favorite: true},
        { name: 'Pizza', desc: 'Pizza has a bread base with tomato sauce, cheese, and toppings on top.', favorite: false},
        { name: 'Rice', desc: 'Rice is a type of grain that people like to eat.', favorite: false},
        { name: 'Fish', desc: 'Fish is an animal that lives in water.', favorite: true},
        { name: 'Cake', desc: 'Cake is something sweet that tates good.', favorite: false}
      ]
    };
  },
  methods: {
    receiveEmit(foodId) {
      let foundFood = this.foods.find(
        food => food.name === foodId
      );
      foundFood.favorite = !foundFood.favorite;
    }
  }
}
</script>

<style>
  #wrapper {
    display: flex;
    flex-wrap: wrap;
  }
  #wrapper > div {
    border: dashed black 1px;
    flex-basis: 120px;
    margin: 10px;
    padding: 10px;
    background-color: lightgreen;
  }
</style>
這裡有看到
宣告了 foods: []的陣列變數
內容是各個food item的資料,有 name, desc, favorite
接著看到
<food-item
  v-for="x in foods"
  :key="x.name"
  :food-name="x.name"
  :food-desc="x.desc"
  :is-favorite="x.favorite"
  @toggle-favorite="receiveEmit"/>
這個 <food-item>會依據 v-for="x in foods" 來產生多個 <food-item> 項目
每個 <food-item>的屬性綁定為 :key,:food-name,:food-desc,:is-favorite
這代表 這些屬性除了有綁定到 x in foods 中的x,也就是 foods 的每一個元素
也會傳送到 <food-item> component本身
另外還有一個 @toggle-favorite 的事件觸發,這個事件是由子元件的 $emit()發送出來的
觸發後,會執行 receiveEmit 的函式
然後就是
receiveEmit(foodId) {
  let foundFood = this.foods.find(
    food => food.name === foodId
  );
  foundFood.favorite = !foundFood.favorite;
}
在 receiveEmit(foodId)中,foodId是 $emit() 傳過來的資料
let foundFood = this.foods.find(
  food => food.name === foodId
);
要讀取 return { foods: [] } 的資料
要用this.foods 再利用陣列的 find() 取得 food.name === foodId 的元素
然後將取得的元素 foundFood.favorite = !foundFood.favorite;
改變 favorite 的狀態 true / false
大致理解後
再來是
FoodItem.vue
<template>
    <div>
        <h2>
            {{ foodName }}
            <img src="/img_quality.svg" v-show="isFavorite">
        </h2>
        <p>{{ foodDesc }}</p>
        <button @click="toggleFavorite">Favorite</button>
    </div>
</template>

<script>
export default {
    props: ['foodName','foodDesc','isFavorite'],
    methods: {
        toggleFavorite() {
            this.$emit('toggle-favorite', this.foodName);
        }
    }
};
</script>

<style>
    img {
        height: 1.5em;
        float: right;
    }
</style>
先從 export default { } 看起
props: ['foodName','foodDesc','isFavorite'] 是設定從<food-item>接收的資料項目 有 'foodName','foodDesc','isFavorite' 這3項
還有一個 方法 method 是 toggleFavorite()
當按下 <button> 時會觸發 toggleFavorite<button @click="toggleFavorite">Favorite</button>
toggleFavorite 執行的內容是
toggleFavorite() {
    this.$emit('toggle-favorite', this.foodName);
}
利用 $emit 觸發父元件的 toggle-favorite事件,同時傳送資料 this.foodName
父元件接著執行 receiveEmit(foodId) 這時 的 foodId 就是 $emit傳送的this.foodName
整理一下, 連動執行的程序
<button @click="toggleFavorite">Favorite</button>

toggleFavorite() {
    this.$emit('toggle-favorite', this.foodName);
}

<food-item
  v-for="x in foods"
  :key="x.name"
  :food-name="x.name"
  :food-desc="x.desc"
  :is-favorite="x.favorite"
  @toggle-favorite="receiveEmit"/>

receiveEmit(foodId) {
  let foundFood = this.foods.find(
    food => food.name === foodId
  );
  foundFood.favorite = !foundFood.favorite;
}

:is-favorite="x.favorite"  -> isFavorite

props: ['foodName','foodDesc','isFavorite']

<img src="/img_quality.svg" v-show="isFavorite">

v-show 根據 isFavorite 狀態決定是否要顯示 <img src="/img_quality.svg">
由以上流程可看出,整個過程是互相連動的
需要很清楚 互相綁定,事件的關係
才不會規模越大的時候,越加混亂


 iThome鐵人賽