paramaterize 與功能驗證本次的程式碼與目錄結構可以參考 FastAPI Tutorial : Day22 branch
我們在 Day20 完成了 pytest 的安裝與設定
在 tests 目錄中建立 pytest.ini 與 conftest.py
並透過 pytest-asyncio 來讓我們可以在測試中使用 async function
使用 httpx 來建立 AsyncClient 來作為測試的 client
今天我們會完成 test_user.py 中的測試
parametrize 來帶入不同測試資料先檢查之前定義 createUser 的 Schema 格式
schemas/user.py
class UserCreate(UserBase):
    password:str = Field(min_length=6)
    name: str  = Field(min_length=3)
    avatar: Optional[str] = Field(min_length=3)
    age: int = Field(gt=0,lt=100)
    email: EmailStr = Field()
    birthday: date = Field()

    model_config {
        # ...
    }
就可以依據以上的 Schema 建立我們要來測試的資料
我們將測試資料建立在 tests/data/user_data.json 中
到時候就可以透過 json.load 來讀取測試資料
mkdir tests/data
touch tests/data/user_data.json
接著就可以放心使用 ChatGPT 來幫我們產生合法的隨機測試資料了 !
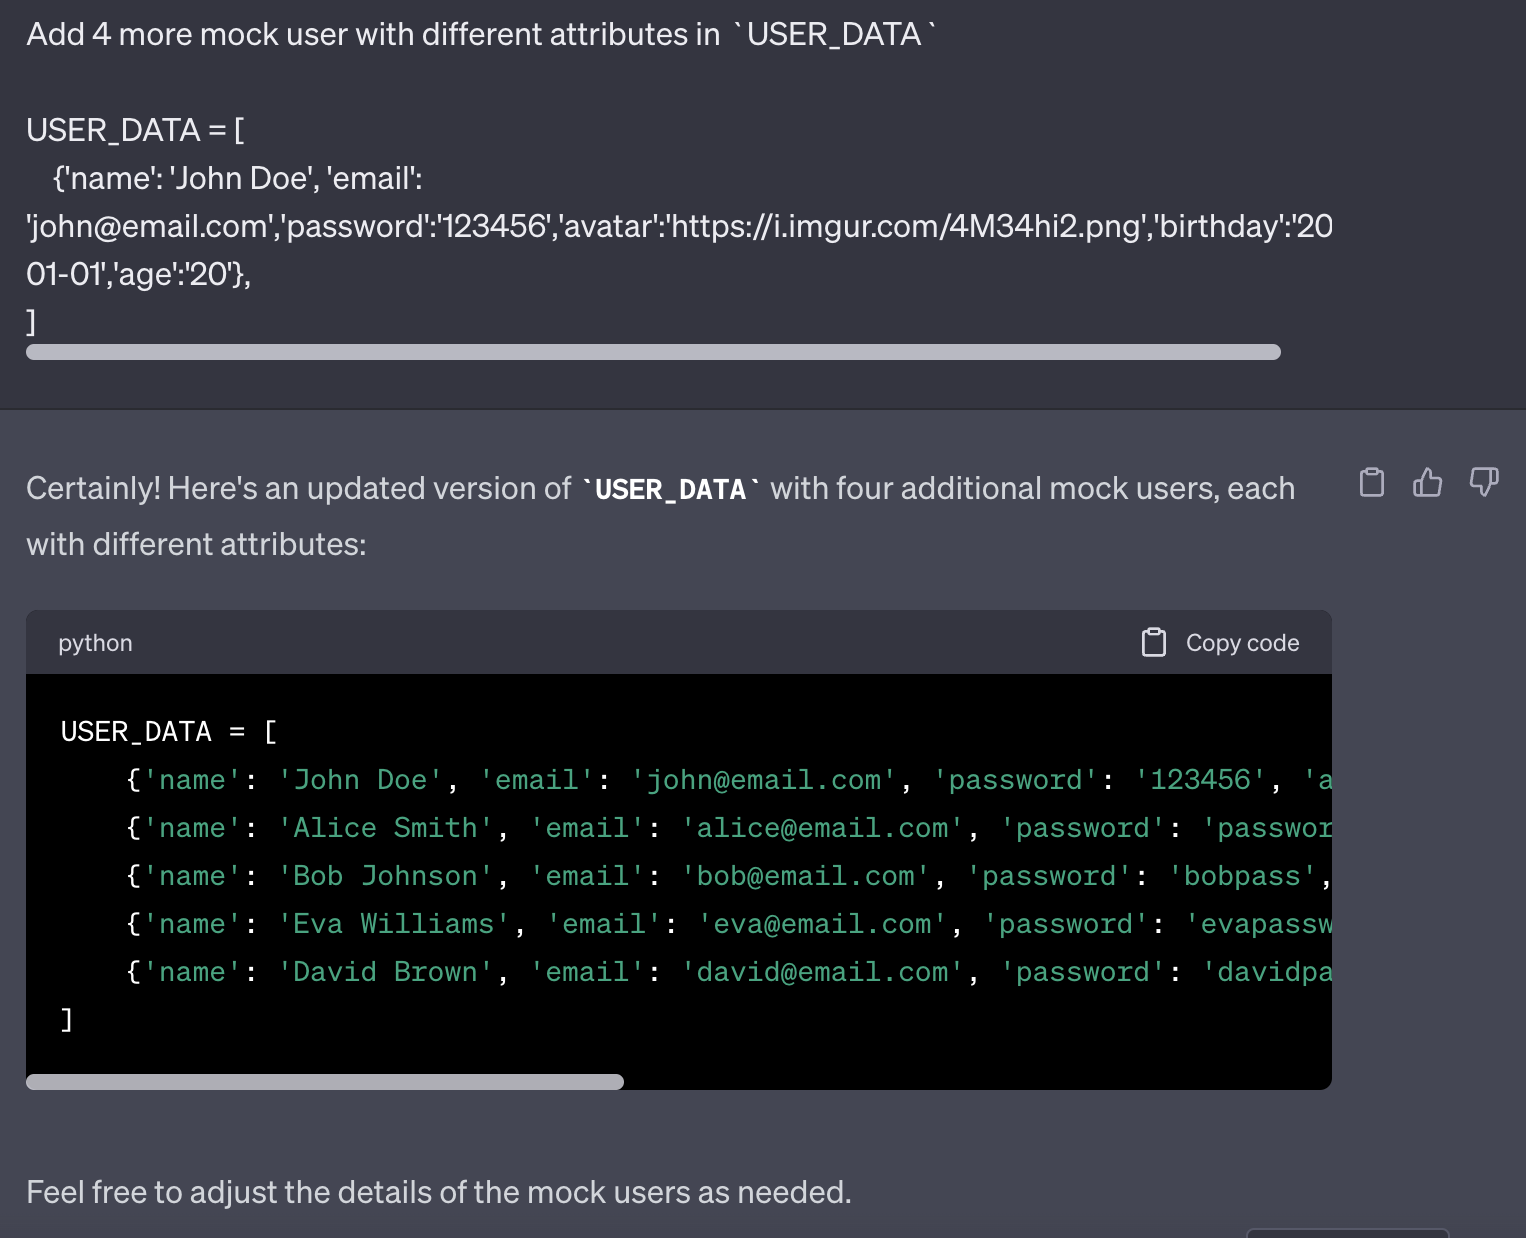
tests/data/user_data.json
[
    {"name": "John Doe", "email": "john@email.com", "password": "123456", "avatar": "https://i.imgur.com/4M34hi2.png", "birthday": "2003-01-01", "age": "20"},
    {"name": "Alice Smith", "email": "alice@email.com", "password": "password123", "avatar": "https://i.imgur.com/abc123.png", "birthday": "1995-05-15", "age": "28"},
    {"name": "Bob Johnson", "email": "bob@email.com", "password": "bobpass", "avatar": "https://i.imgur.com/xyz789.png", "birthday": "1980-11-30", "age": "42"},
    {"name": "Eva Williams", "email": "eva@email.com", "password": "evapassword", "avatar": "https://i.imgur.com/def456.png", "birthday": "1998-08-22", "age": "25"},
    {"name": "David Brown", "email": "david@email.com", "password": "davidpass", "avatar": "https://i.imgur.com/567mno.png", "birthday": "1990-04-10", "age": "33"}
]
user_data fixture那要如何將剛剛建立的 mock data 帶入測試中呢 ?
我們可以在 conftest.py 中定義一個 user_data 的 fixture
user_data 會讀取 tests/data/user_data.json
透過 json.load 來載入測試資料
tests/conftest.py
# ...
import json

# ...

@pytest.fixture(scope="module")
async def get_user_data():
    with open("data/user_data.json") as f:
        data = json.load(f)
    return data
就可以在 test_user.py 中使用 get_user_data 這個 fixture
tests/test_user.py
@pytest.mark.asyncio
async def test_create_user(async_client,get_user_data):
    user_data = await get_user_data
    user = random.choice(user_data)
    response = await async_client.post("/api/users",json=user)

    assert response.status_code == 201
    assert response.json()["name"] == user["name"]
    assert response.json()["email"] == user["email"]
parametrize 來帶入不同測試資料 ?那如果我們想要測試所有剛剛建立的 mock user 呢 ?
延續剛剛的寫法
應該只能在同一個 test_create_user function 中
透過 for loop 來測試所有的 mock user
tests/test_user.py
@pytest.mark.asyncio
async def test_create_user(async_client,get_user_data):
    user_data = await get_user_data

    for user in user_data:
        response = await async_client.post("/api/users",json=user)

        assert response.status_code == 201
        # ...
但是這樣的寫法會導致
當其中一個 mock user 測試失敗時
整個測試就會中斷
也不好觀察是哪一個 mock user 導致測試失敗的
parametrize 的好處如果是使用 parametrize 的話
它可以將一個 list 中的所有 element
分別帶入該 test function 中
並且是將每個帶入的 element當作是一個獨立的測試
有就是說
當其中一個 mock user 測試失敗時
不會影響到其他 mock user 的測試
也可以清楚的知道是哪一個 mock user 導致測試失敗的
parametrize 的使用方式parametrize 的使用方式如下
在 @pytest.mark.parametrize decorator 中
第一個參數是要帶入的是一個字串代表 參數名稱格式
接著是一個 list 代表我們要分別帶入的參數值
@pytest.mark.parametrize("arg1,arg2",[(1,2),(3,4)])
def test_parametrize(arg1,arg2):
    assert arg1 < arg2
而在 test function 中
就可以直接依據 參數名稱格式
在 function body 中使用該參數
拿上面的例子來說
參數名稱格式 是 "arg1,arg2"
代表會有兩個參數 arg1 和 arg2
所以在 function body 中就可以直接使用 arg1 和 arg2 變數
parametrize 來測試所有 mock user但因為 parametrize 需要直接帶入 list
沒辦法直接使用 get_user_data 這個 fixture
所以我們改成在 test_user.py 中直接讀取 tests/data/user_data.json
tests/test_user.py
# ...
import json
from functools import lru_cache
import random


@lru_cache()
def get_user_data():
    with open("data/user_data.json") as f:
        data = json.load(f)
    return data

def get_random_user():
    return [ random.choice(get_user_data()) ]
因為在每個需要帶入所有 mock users 的 test funciton 都會叫到 get_user_data
所以我們同樣可以透過 @lru_cache 將 get_user_data 的結果 cache 起來
剛剛有特別說到 parametrize 要帶入的是一個 list
所以在 get_random_user 中
我們也必須將將 random.choice 的結果再包成一個 list
test_create_user 使用 parametrize接著就可以在 test_create_user 中使用 parametrize 來帶入所有 mock user
tests/test_user.py
@pytest.mark.parametrize("user",get_user_data())
@pytest.mark.asyncio
async def test_create_user(async_client,user):
    response = await async_client.post("/api/users",json=user)

    assert response.status_code == 201
    assert response.json()["name"] == user["name"]
    assert response.json()["email"] == user["email"]
要驗證 test_create_user 的 id 是否正確
我們可以額外再寫一個 get_user_id 的 helper function
tests/test_user.py
# ...

async def get_user_id(async_client,user):
    response = await async_client.get(f"/api/users?last=0&limit=50&keyword={user['name']}")
    assert response.status_code == 200
    return response.json()[0]["id"]

# ...

@pytest.mark.parametrize("user",get_user_data())
@pytest.mark.asyncio
async def test_create_user(async_client,user):
    response = await async_client.post("/api/users",json=user)
    # ...

    assert response.json()["email"] == user["email"]
    assert response.json()["id"] == await get_user_id(async_client,user) # <--- 驗證 id 是否正確
執行測試( 要在 tests 目錄下執行 )
poetry run pytest
可以看到 test_create_user 會被執行 5 次
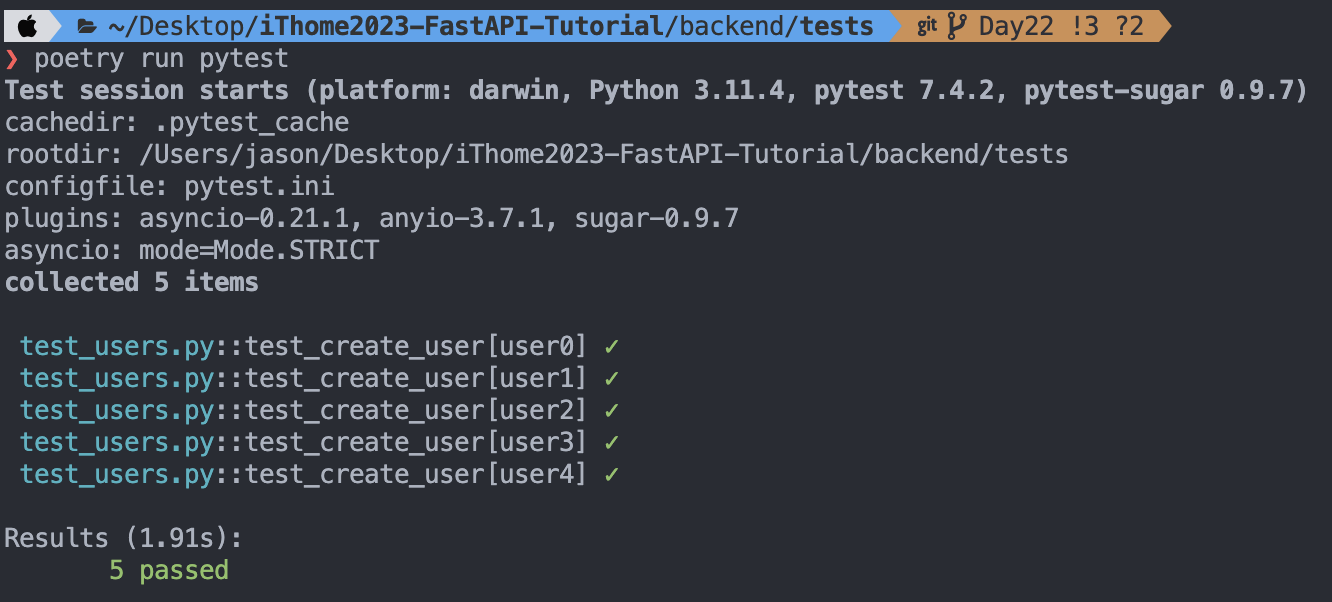
並且透過 parametrize 帶入所有 mock user 會被當作是 5 個獨立的測試
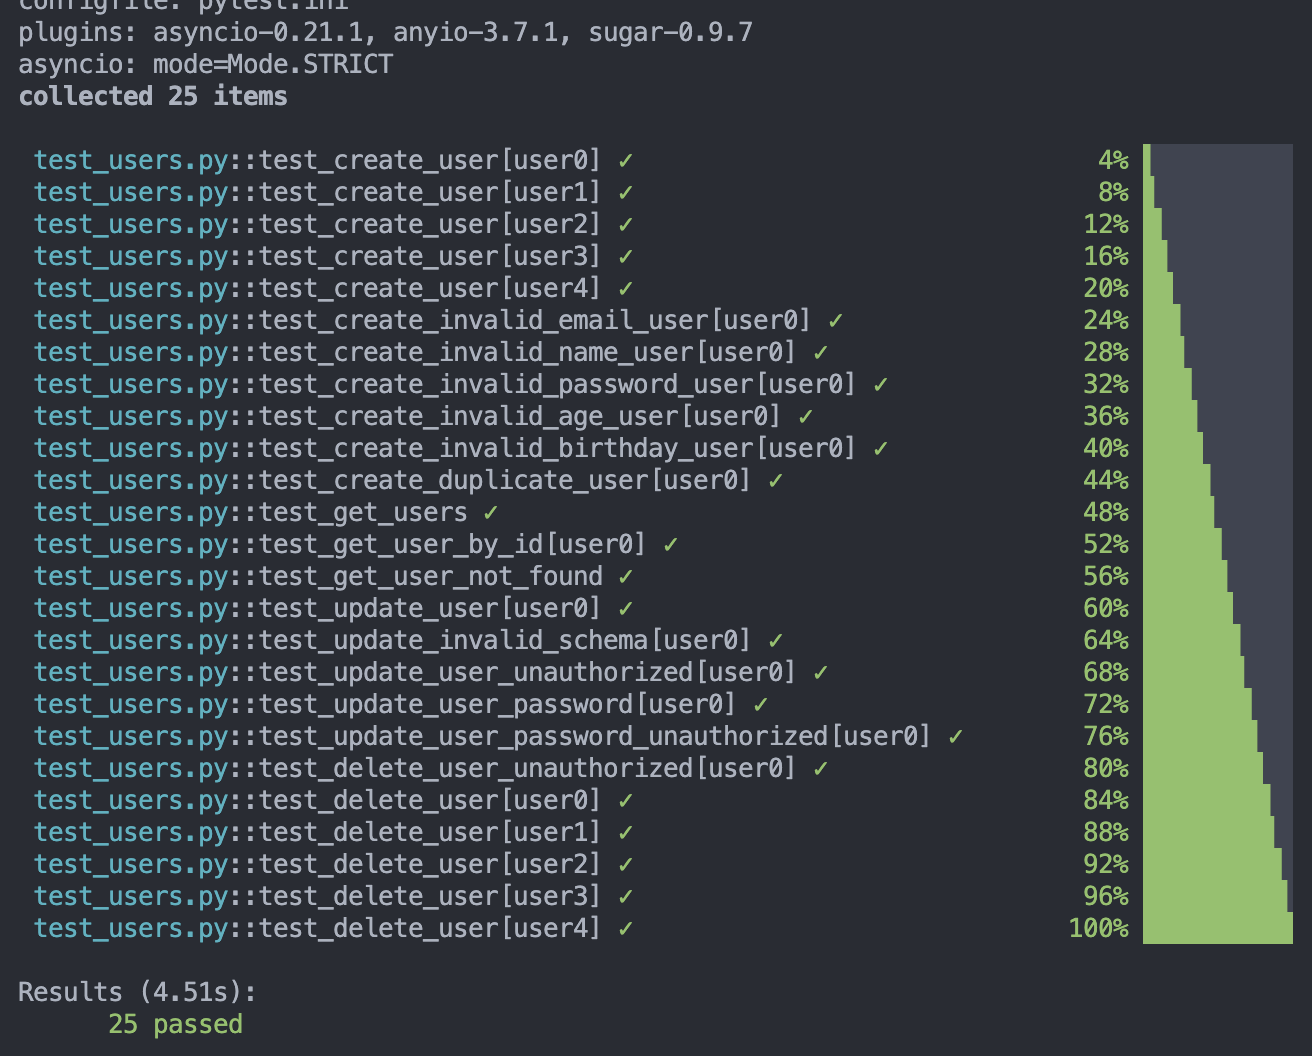
還需要完成的測試有:
test_create_duplicate_user
test_create_invalid_email_user
test_create_invalid_password_user
test_create_invalid_age_user
test_create_invalid_birthday_user
test_create_invalid_name_user
test_get_users
test_get_user_by_id
test_get_user_not_found
test_get_user_by_keyword
test_update_user
test_update_user_unauthorized
test_update_invalid_schema
test_update_user_not_found
test_update_user_password
test_update_user_password_unauthorized
test_delete_user
test_delete_user_unauthorized
大概列出常見的測試項目
完成的測試項目可以參考 Day22 : test_user.py
這邊就不佔篇幅了
執行測試後,應該可以看到通過測試的漂亮結果!
今天我們了解透過 parametrize 來帶入不同的測試資料的好處
並且完成了 User 相關的測試撰寫
可以直接透過 pytest 自動化驗證我們的 API 是否正常運作
pytest by command line ?
pytest : Quick start fixture & fixture scope