這篇再來replay一下把後端塞進前端,試著把自動產訊息的功能塞進前端tauri app。
先安裝隨機功能(用來產生隨機秒數):
@@ app/src-tauri/Cargo.toml @@
 [dependencies]
+rand = "0.8.5"
在tauri裡加一個game_message 的 mod:
@@ app/src-tauri/src/tic_tac_toe/mod.rs @@
+pub mod game_message;
接著就可以實作polling_message的方法了:
// app/src-tauri/src/tic_tac_toe/game_message.rs
use std::time::Duration;
use rand::random;
use tauri::Manager;
use tokio::time;
#[tauri::command]
pub async fn polling_message(app: tauri::AppHandle) {
tokio::spawn(async move {
loop {
let secs = random::<u64>() % 9_000 + 1_000; // 產生隨機豪秒
time::sleep(Duration::from_millis(secs)).await; // 等待
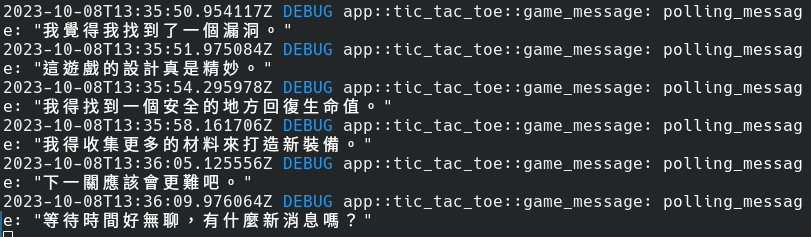
let message = my_core::game_message::message_factory();
tracing::debug!("polling_message: {:?}", message);
app.emit_all("message", message).unwrap(); // 發送事件
}
});
}
這裡有一個東西跟之前寫在web端不太一樣:tauri::AppHandle是用來管理整個應用程式App使用而提供的API,因為後端通知前端不是用request/response機制,而是使用事件監聽的方式。tauri提供我們調度事件的api,而這個AppHandle就可以用來派發事件,emit_all是對tauri程式所開啟的視窗發送訊息。emit_all有兩個參數,第一個是事件名稱(event name),而第二個則是該事件要夾帶的資料內容(payload)。tauri要求payload要實現Serialize才能進行傳遞。
這裡的tauri::AppHandle使用注入的方式使用,我們在tauri builder中透過invoke_handler註冊的command指令都可以直接使用:
// app/src-tauri/src/main.rs
use tic_tac_toe::game_message::polling_message;
async fn main() -> Result<(), Box<dyn std::error::Error>> {
    // ... 略
    tauri::Builder::default()
        .manage(context)        // 註冊為tauri的狀態物件
        // ... 略
        .invoke_handler(tauri::generate_handler![
            // ... 略
            polling_message,
        ])
    // ... 略
雖然這個方式可以自動注入 AppHandler,不過放handler裡的都是指令(command),需要前端呼叫tauri command才會觸發。如果我們想要讓程式一啟動就執行的話,還有另外一種管道取得app handler,具體怎麼做呢:
// app/src-tauri/src/main.rs
tauri::Builder::default()
    .setup(|app| {
        let app_handle = app.handle();
        tokio::spawn(async move {
            polling_message(app_handle.clone()).await;
        });
        Ok(())
    })
    // ... 略
在tauri啟動的builder(建築工)模式裡,呼叫setup可帶出 App(指正在跑的tauri應用程式),在這裡點開setup可以看到它所需傳入的參數型別是FnOnce,可是我們放的是閉包||{}呀。在rust裡會把閉包編譯成函數(有FnOnce, Fn, FnMut三種,詳見下面補充說明)。而這裡放的是FnOnce,看名稱也可以猜出它應該是一次性呼叫的用途,所以這裡放的閉包function不能在裡面blocking(阻塞)。是不是有人想到利用分身了,沒錯,我們在這裡借用tokio::spawn開另一個執行緒,再把app_handle傳遞一份副本給polling_message方法,交由分身專注負責不定期派送訊息,如此就不會影響主線程式的運行。
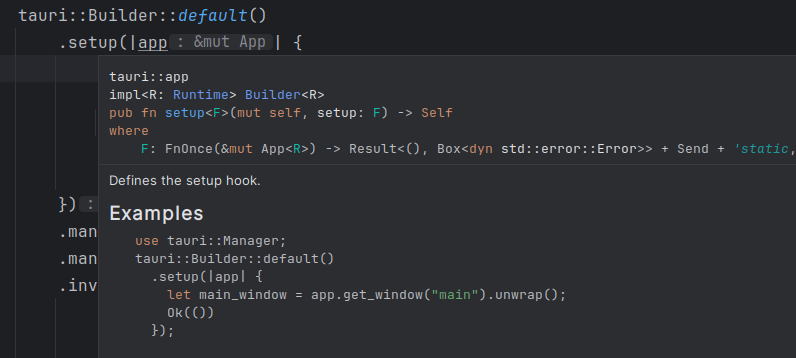
可以看到這個FnOnce的簽章,回傳值是Result<(), ..>,表其Ok的變體的型別為(),所以我們閉包最後面需要加一個Ok(())。
在遊戲的畫面中加入事件監聽的處理,一樣需要透過tauri提供的javascript api呼叫:
<!-- app/src/routes/tic_tac_toe/+page.svelte -->
<script lang="ts">
  import { onDestroy, onMount } from "svelte";
  import type { Event } from '@tauri-apps/api/event'
  import { listen } from '@tauri-apps/api/event'
  import { invoke } from '@tauri-apps/api/tauri';

  let unlisten = () => { }                // 取消訂閱使用的function
  const subscribe = async () => {
    if (typeof window !== 'undefined' && window.__TAURI_IPC__) {
      unlisten();                         // 先取消上一回訂閱,避免重覆
      unlisten = await listen('message', (event: Event<string>) => {
        addNotification({                 // 呼叫notify 套件
          text: event.payload,            // 訊息為event的資料
          position: 'top-right',          // 顯示在右上角
          type: 'success',                // 類別使用不同顏色,區隔ws
          removeAfter: 3000,              // 3秒後關閉
        });
      });
      console.log('已訂閱tauri message');
    }
  };
  const unsubscribe = () => {
    if (typeof window !== 'undefined' && window.__TAURI_IPC__) {
      unlisten();
      console.log('已取消訂閱tauri message');
    }
  };
</script>
執行tauri的listen方法,會回傳一個callback function,用來取消監聽用的,所以命名為unlisten,而listen第一個參數就是tauri裡emit的事件名稱,以本例而言是message,而listen第二個參數是tauri裡emit的payload,在這個tauri的程式裡只傳出字串,所以event.payload接到的就是tauri裡面emit送過來的字串。
接著在svelte的元件生命週期裡面進行訂閱及取消訂閱的呼叫:
<!-- app/src/routes/tic_tac_toe/+page.svelte -->
<script lang="ts">
  onMount(async () => {        // 元件載入時執行
    await newGame();           // 載新遊戲(先前寫的)
    await subscribe();         // 訂閱訊息
  });

  onDestroy(() => {            // 元件關閉時執行
    unsubscribe();             // 取消訂閱
  });
</script>
在離開元件時記得執行取消訂則,避免像上回在ws裡,切換不同頁面又造成重覆出現訊息的情形。如果沒有執行取消的話,程式執行的時候會再另外指派一個新的訂閱,把unlisten變數置換成新的,舊的沒有結束就會被擱在一旁,也沒有變數指向它,就會一直跳出重覆的訊息,也無法取消。
我們剛剛設定服務一開啟app就啟動,有些人可能覺得這樣的方式,明明就沒事還一直在tauri的終端畫面一直跳訊息有點焦慮(?)。這次我們試一下另外一個方式,就是透過手動方式啟用/關閉,在rust需要存放狀態,所以我們加一個static的欄位:
// app/src-tauri/src/tic_tac_toe/game_message.rs
static mut IS_POLLING: bool = false;    // 可變的static變數

fn status() -> &'static str {           // 顯示狀態
    unsafe {                            // 讀取static mut需放unsafe裡
        if IS_POLLING {
            "執行中。"
        } else {
            "停止。"
        }
    }
}

#[tauri::command]
pub async fn polling_message(app: tauri::AppHandle) {
    tracing::info!("收到啟動訊息服務的指令,現在狀態為{}", status());
    unsafe {
        if IS_POLLING {                 // 避免重覆開啟服務
            return;                     // 若執行中則不再開
        }
        IS_POLLING = true;              // 設定註記為已開啟
    }
    tokio::spawn(async move {           // 開啟分身
        loop {
            unsafe {
                if !IS_POLLING {        // 若狀態為關閉
                    break;              // 則離開loop
                }                       // (關閉分身)
            }
            // ... 略
        }
    })
}

#[tauri::command]
pub async fn stop_polling_message() {
    tracing::info!("收到停止訊息服務的指令,現在狀態為{}", status());
    unsafe {
        IS_POLLING = false;             // 關閉連線
    }
}
這裡首次出現unsafe,rust裡針對不安全的程式碼有一些規範,這裡先知道在使用static mut就要放unsafe裡,詳見下方補充說明。
我們使用服務標記來控制要不要開分身執行,而在分身每次準備發送訊息時判斷服務是否已關閉,這是相對比較簡單的實作。另一種實作是之前用到的mpsc,使用上會比較麻煩,但mpsc本身就是用來跨不同線程溝通訊息用的,如果要用mpsc實作的話,就要放在AppState裡,然後在起分身的時候把rx放進去,如果接受到訊息就中斷執行,再讓接受中斷指令的程式呼叫tx,傳送中斷訊號給予polling服務。(有沒有覺得頭暈暈的,其實概念上就是把IS_POLLING的讀改rx,寫改tx這樣。)
main裡要註冊剛剛加的command:
// app/src-tauri/src/main.rs
use tic_tac_toe::game_message::{polling_message, stop_polling_message};
async fn main() -> Result<(), Box<dyn std::error::Error>> {
tauri::Builder::default()
.invoke_handler(tauri::generate_handler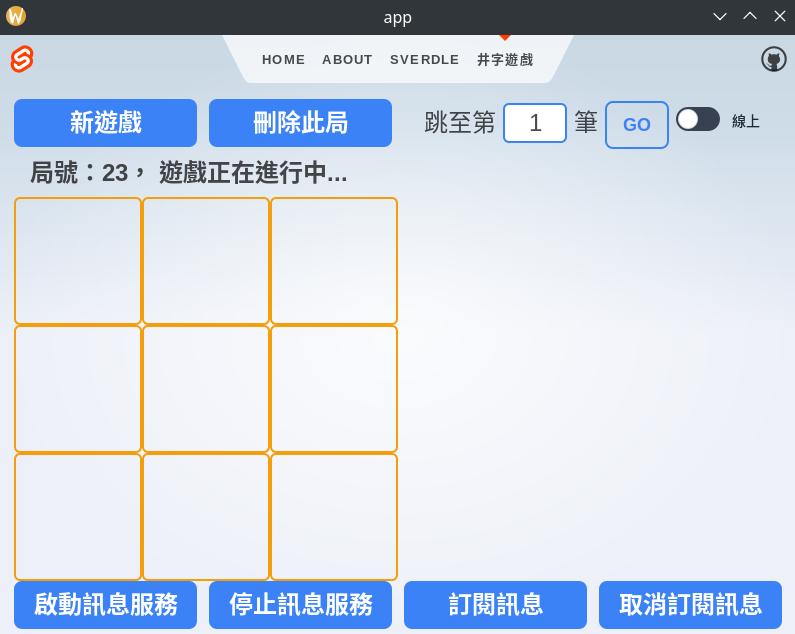
前兩個是控制後端(tauri),後兩個是控制前端:
舉個例子,如果要顯示訊息,就要後端啟動且前端有訂閱才可以正確顯示。但是各自可以獨立執行不會有錯誤,比如後端啟動前端無訂閱,或是前端有訂閱但後端服務是關閉的,這些都沒有問題,因為是走事件通道,所以不會強耦合。
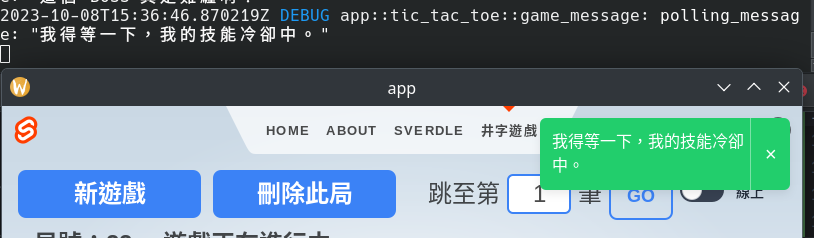
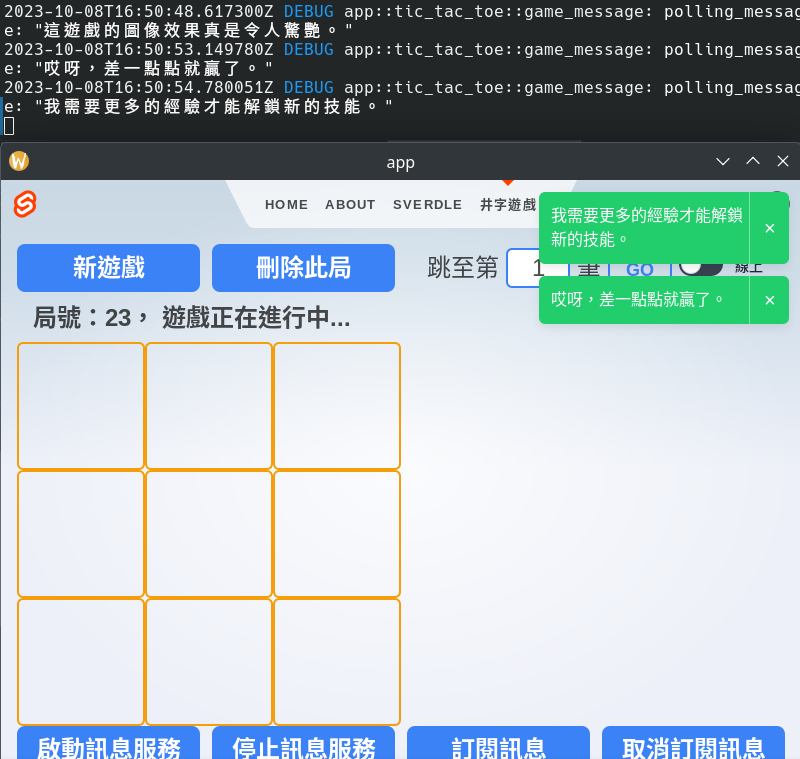
驗證一下,程式正確執行,前後端訊息有串接上:
不安全的明確宣告,是對開發人員提醒這邊的操作比較危險要小心,也是對rust編譯器開啟的 後門 超能力(?)。
unsafe開啟的功能:
在本次的案例中我們使用到了第1項,順道再介紹一下第2項,以前面的例子在讀取POLLING狀態時,我們把unsafe區塊包在status()裡面,所以其他地方呼叫是沒有問題的。另一種寫法是:
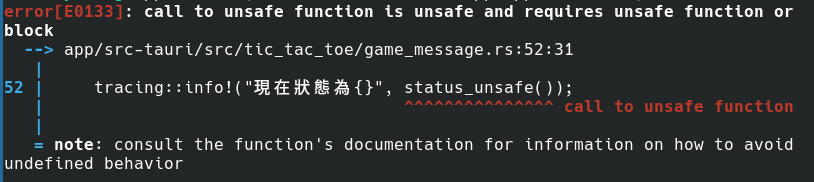
unsafe fn status_unsafe() -> &'static str {
    if IS_POLLING { "執行中。" } else { "停止。" }
}
相當於整個fn都落在了 unsafe 的 block 區塊中,在這個fn裡不用再寫unsafe區塊,不過在呼叫的地方就必需要使用unsafe,比如:
#[tauri::command]
pub async fn stop_polling_message() {
    // tracing::info!("現在狀態為{}", status_unsafe());  // 不OK
    unsafe {
        tracing::info!("現在狀態為{}", status_unsafe()); // OK
        IS_POLLING = false;
    }
}
上例中如果把unsafe外的註解取消,編譯器就會報錯如下:
附帶一提,rust的不安全模式下,該有的所有權借用檢查還是一樣會做,之所有加入這些unsafe區塊,某種程度是要限縮危險的範圍,以利除錯,畢竟還是有些呼叫外部C語言,或是處理比較接近機器的部分,無可避免地需要碰到比較不安全的地方。基本上rust編譯器就是把能抓的錯都先抓出來了,剩下的幾個特定情境再使用unsafe處理。
官方說明文件明確地指出,FnOnce是其他2個的super trait,也就是說基本型為FnOnce,我們只要呼叫一次就好,這個最沒有問題了。
我們開一個範例程式碼演示一下:
examples/function/
├── Cargo.toml
└── src
    └── main.rs
# examples/function/Cargo.toml
[package]
name = "example-function"
version = "0.1.0"
edition = "2021"
~/demo-app$ cargo watch -q -c -w examples/function/ -x 'run -p example-function'
開始前先說明一下泛型的語法,一般我們寫參數型別是加在:後面:
fn fn_once_say_hello(f: impl FnOnce(String) -> String) -> String { }
但是這樣很長,所以我們可以把 impl FnOnce(String) -> String 當成是一個類別T(stands for Type),或是我們這裡用F(stands for Function),就只是個類別名字,用A, B, C都可以,我們想把一串東西用一個類別符號代表,就要讓這個fn變成泛型fn,用<>包起指定的類別,然後用where限定類別的條件,看下例就很容易明白:
// examples/function/src/main.rs

// fn fn_once_say_hello(f: impl FnOnce(String) -> String) -> String
fn fn_once_say_hello<F>(f: F) -> String        // fn名稱後要接<型別名稱>
    where F: FnOnce(String) -> String,         // where 指明型別限制
{
    let greeting = f("Hello".to_string());     // 閉包參數為Hello字串
    greeting + "!"                             // 結尾加!
}
組字串而已沒什麼,再把另外兩個版本也加上去再來看差異:
// examples/function/src/main.rs
fn fn_say_hello<F>(f: F) -> String
    where F: Fn(String) -> String,            // 只有這裡改Fn
{
    let greeting = f("Hello".to_string());
    greeting + "!"
}

fn fn_mut_say_hello<F>(mut f: F) -> String
    where F: FnMut(String) -> String,        // 只有這裡改FnMut
{
    let greeting = f("Hello".to_string());
    greeting + "!"
}
看起來好像都一樣,喔因為這是對參數進行限制,也就是說這個參數就是我們在使用的閉包,rust在轉換閉包時會套用不同的Fn行為,實際用看看:
// examples/function/src/main.rs
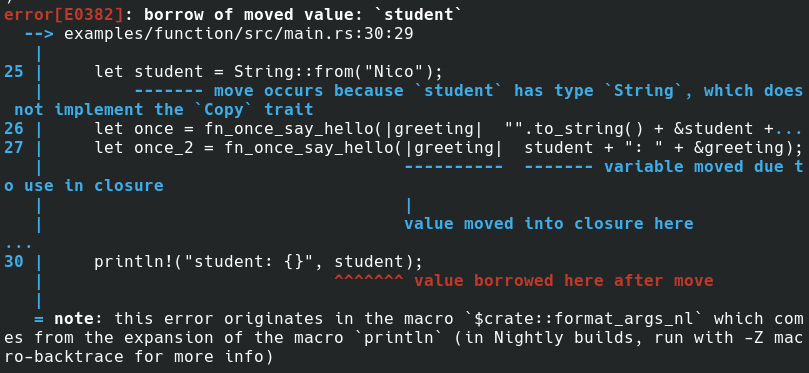
fn main() {
let student = String::from("Nico");
let once = fn_once_say_hello(|greeting|
"".to_string() + &student + ": " + &greeting); // 借用student
let once_2 = fn_once_say_hello(|greeting|
student + ": " + &greeting); // 傳遞student
println!("once: {}", once);
println!("once_2: {}", once_2);
// println!("student: {}", student); // student已move
}
第一個很簡單用起來也很直觀,因為限定只能呼叫一次,所以要借用外面的變數,或把外面變數move進去都可以,就像once_2裡把student移交進去後,最後一行的sutdent就不能使用了,如果移除註解就會報錯如下:
我們再來看看Fn,在閉包裡借用student是OK的:
let student = String::from("Nico");
let once = fn_say_hello(|g| {
    "".to_string() + &student + ": " + &g    // 借用student沒問題
});
println!("[Fn] greeting: {}", once);
如果改成剛剛move的寫法:
let student = String::from("Nico");
let once = fn_say_hello(|g| {
    student + " " + &g    // 這裡student從外面move進來
});
println!("[Fn] greeting: {}", once);
這時候rust檢查就不過了:
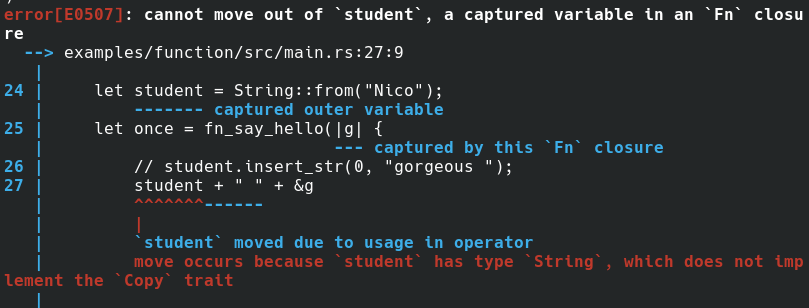
這裡也很容易可以理解,Fn不只要執行一次,也就是說要能執行好幾次,那麼第一次就把student的所有權拿走了,如果再執行第二次的話,因為student已不復存在,就會是空指標,當然不給過。這個理解的話,那麼FnMut只是在Fn下再加上可變參照:
fn main() {
    let mut student = String::from("Nico");
    let greeting = fn_mut_say_hello(|g| {
        student.insert_str(0, "gorgeous ");    // 修改student
        "".to_string() + &student + ": " + &g
    });
    println!("[FnMut] greeting: {}", greeting);
    println!("[FnMut] student: {}", student);
}
上面student傳進 fn_mut的閉包裡,因為是可變參考,所以在裡面可以進行修改,執行完後,原資料就被異動了。

本系列專案源始碼放置於 https://github.com/kenstt/demo-app


 iThome鐵人賽