顯然跟目標網頁比較還有點小地方可以調整,主要是 CSS 上面的調整。
CSS 是一種描述語言,用於描述 HTML 的呈現方式。也就是說,在網頁上看到各種顏色、佈局和字體設計,背後都是由 CSS 控制和定義的。當然現在通常都是用別人寫好的模組來進行套用,畢竟站在巨人的肩膀上才是更好省力的~
那接下來首先就是先更改
// components/SalesTable.tsx

import React from 'react';
import { SaleRecord } from './types';

type Props = {
    data: SaleRecord[];
};

const SalesTable: React.FC<Props> = ({ data }) => {

    const formatCurrency = (amount: number): string => {
        return new Intl.NumberFormat('zh-TW', { style: 'currency', currency: 'TWD' }).format(amount);
    };

    return (
        <table style={{ width: '100%', borderCollapse: 'collapse' }}>
            <thead>
                <tr style={{ borderBottom: '2px solid black' }}>
                    <th style={{ padding: '8px 15px', textAlign: 'center' }}>週</th>
                    <th style={{ padding: '8px 15px', textAlign: 'center' }}>價錢</th>
                    <th style={{ padding: '8px 15px', textAlign: 'center' }}>存貨</th>
                    <th style={{ padding: '8px 15px', textAlign: 'center' }}>銷售</th>
                    <th style={{ padding: '8px 15px', textAlign: 'center' }}>剩餘存貨</th>
                    <th style={{ padding: '8px 15px', textAlign: 'center' }}>營收</th>
                    <th style={{ padding: '8px 15px', textAlign: 'center' }}>累計營收</th>
                </tr>
            </thead>
            <tbody>
                {data.map(record => (
                    <tr key={record.week}>
                        <td style={{ padding: '8px 15px', textAlign: 'center' }}>{record.week}</td>
                        <td style={{ padding: '8px 15px', textAlign: 'center' }}>{formatCurrency(record.price)}</td>
                        <td style={{ padding: '8px 15px', textAlign: 'center' }}>{record.initialStock}</td>
                        <td style={{ padding: '8px 15px', textAlign: 'center' }}>{record.sales}</td>
                        <td style={{ padding: '8px 15px', textAlign: 'center' }}>{record.remainingStock}</td>
                        <td style={{ padding: '8px 15px', textAlign: 'center' }}>{formatCurrency(record.revenue)}</td>
                        <td style={{ padding: '8px 15px', textAlign: 'center' }}>{formatCurrency(record.accumulatedRevenue)}</td>
                    </tr>
                ))}
            </tbody>
        </table>
    );
};

export default SalesTable;
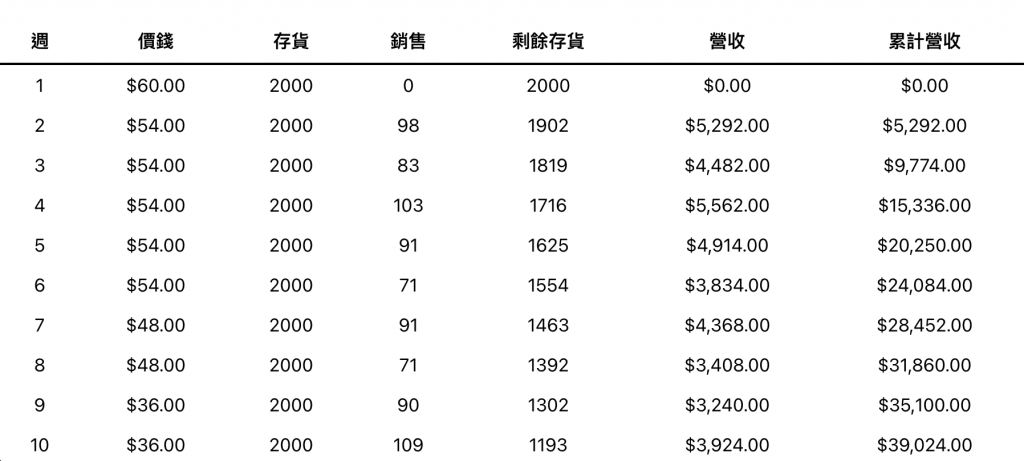
主要稍微修改一下 CSS 上的呈現,還有價格為台幣千分位之類的~
width:設定元素的水平寬度。
px, em, rem 等)%,表示相對於父元素的寬度)auto:由瀏覽器自動計算元素的寬度。borderCollapse:表格邊框合併或分隔。
collapse:相鄰的單元格邊框將合併成一個單一邊框。separate:單元格具有各自分開的邊框。padding:元素內部的邊距,即元素邊緣與其內容之間的空間。textAlign :文字與其父元素對齊的方式。
left:內容對齊左側。right:內容對齊右側。center:內容居中對齊。justify:兩側對齊。const formatCurrency : 處理千分位,中間用了 new Intl.NulberFormat 來幫忙處理一下。// components/PricingControl.tsx
import React, { useState } from 'react';
type Props = {
onSelect: (price: number) => void;
};
const PricingControl: React.FC<Props> = ({ onSelect }) => {
const [selectedPrice, setSelectedPrice] = useState<number | null>(null);
const prices = [60, 54, 48, 36];
return (
<div style={{ display: 'flex', marginBottom: '20px' }}>
{prices.map((price) => (
<button
key={price}
onClick={() => {
setSelectedPrice(price);
onSelect(price);
}}
disabled={selectedPrice !== null && price > selectedPrice}
style={{
flex: 1,
padding: '10px',
backgroundColor: (selectedPrice !== null && price > selectedPrice) ? '#E0E0E0' : 'green',
color: 'white',
border: 'none',
borderRadius: '5px',
cursor: (selectedPrice !== null && price > selectedPrice) ? 'default' : 'pointer',
margin: '0 5px',
transition: 'background-color 0.3s'
}}
onMouseOver={(e) => {
if (!(selectedPrice !== null && price > selectedPrice)) {
e.currentTarget.style.backgroundColor = '#4CAF50';
}
}}
onMouseOut={(e) => {
if (!(selectedPrice !== null && price > selectedPrice)) {
e.currentTarget.style.backgroundColor = 'green';
}
}}
>
NT${price}
</button>
))}
</div>
);
};
export default PricingControl;
CSS
onMouseOver 和 onMouseOut :當滑鼠靠近和沒靠近的時候,按鈕背景顏色變化。style :稍微修改一下呈現方式。
CSS Flexible Box Layout,簡稱 Flexbox 的一部分,主要用於在複雜的佈局和對齊中設定和調整子元素的尺寸和順序。說真的,這個真的很推!!!border-width, border-style, 和 border-color,例如:border: 1px solid red。pointer(表示可點擊)、wait(表示等待)、text(表示可編輯的文字)還有很多。disabled :來確保不會有點低價賤賣後還可以選高價格~// App.tsx
import React, { useState } from 'react';
import LineChart from './Component/LineChart';
import PricingControl from './Component/PricingControl';
import { SaleRecord } from './Component/types';
import { simulateSales } from './Component/salesLogic';
import SalesTable from './Component/SalesTable';
const INITIAL_STOCK = 2000;
const App: React.FC = () => {
const [salesData, setSalesData] = useState<SaleRecord[]>([
{ week: 1, price: 60, initialStock: INITIAL_STOCK, sales: 0, remainingStock: INITIAL_STOCK, revenue: 0, accumulatedRevenue: 0 },
]);
const handlePricingSelect = (price: number) => {
const currentWeek = salesData.length;
const previousRecord = salesData[currentWeek - 1];
const sales = simulateSales(previousRecord.remainingStock);
const newRemainingStock = previousRecord.remainingStock - sales;
const revenue = sales * price;
const accumulatedRevenue = previousRecord.accumulatedRevenue + revenue;
const record: SaleRecord = {
week: currentWeek + 1,
price,
initialStock: INITIAL_STOCK,
sales,
remainingStock: newRemainingStock,
revenue,
accumulatedRevenue,
};
setSalesData([...salesData, record]);
};
return (
<div className="App" style={{ textAlign: 'center' }}>
<h1 style={{ backgroundColor: 'green', color: 'white', padding: '20px', borderRadius: '5px' }}>
Retail Simulation
</h1>
<LineChart data={salesData} />
<PricingControl onSelect={handlePricingSelect} />
<SalesTable data={salesData} />
</div>
);
};
export default App;
const handlePricingSelect :依據 types 的宣告型別 SaleRecord 來進行資料維護。大概就會像這樣子。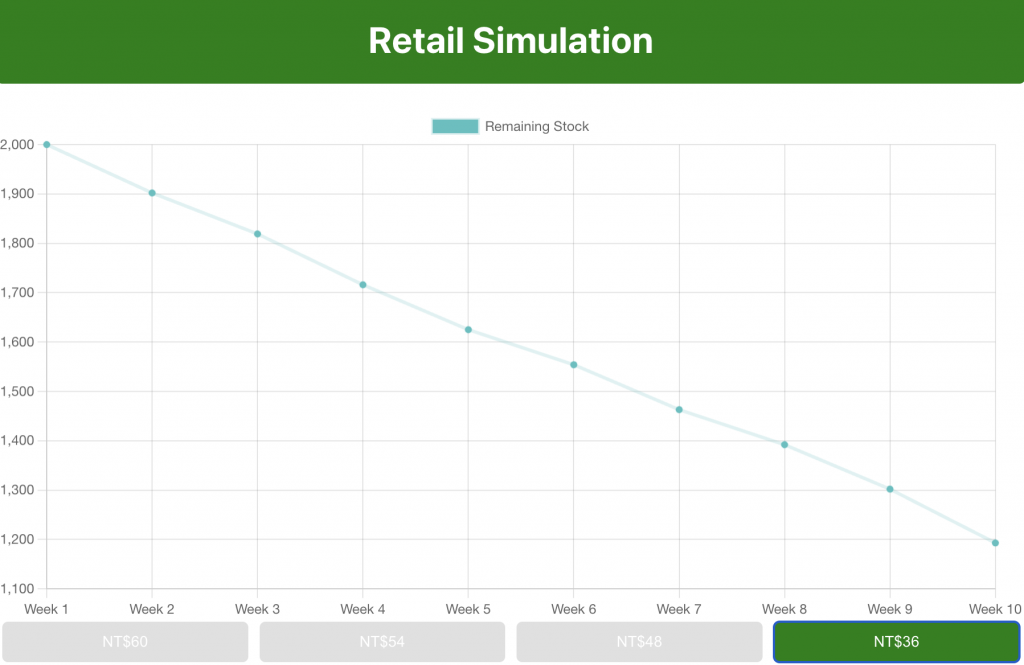


 iThome鐵人賽