終於要開始寫註冊、登入、登出功能了。
為了確認成功與否,我先定義了 ResultViewModel 用來回傳結果。
public class ResultViewModel
{
    public bool IsSuccess { get; set; }

    public List<string> Messages { get; set; } = new List<string>();

    public ResultViewModel(bool isSuccess, string messages)
    {
        IsSuccess = isSuccess;
        Messages.Add(messages);
    }

    public ResultViewModel(bool isSuccess, List<string> messages)
    {
        IsSuccess = isSuccess;
        Messages = messages;
    }

    public void AddError(string errorMessage)
    {
        Messages.Add(errorMessage);
        IsSuccess = false;
    }
}
另外我也調整了昨天 UserService 下面的 InitCreateAsync()。畢竟個人部落格,其實不用很多帳號,簡單處理即可。
public async Task<ResultViewModel> InitCreateAsync(UserViewModel viewModel)
{
    int count = GetCount();
    if (count == 0)
    {
        viewModel.Role = (int)RoleStatus.管理員;
        await CreateAsync(viewModel);
        return new ResultViewModel(true, "註冊成功");
    }

    return new ResultViewModel(false, "不開放註冊其他帳號");
}

public int GetCount()
{
    var count = _userRepository.GetAll().Count();
    return count;
}
而在 InitController 這邊,定義 CreateUser() 動作,作為我們第一次註冊來使用,如果資料庫內已經有帳號,就不能使用
public IActionResult CreateUser()
{
    return View();
}

[HttpPost]
public async Task<IActionResult> CreateUser(UserViewModel viewModel)
{
    if (ModelState.IsValid)
    {
        var result = await _userService.InitCreateAsync(viewModel);
        if (result.IsSuccess)
        {
            return RedirectToAction("Login", "Login");
        }

        ModelState.AddModelError(string.Empty, result.Messages.First());
    }

    return View(viewModel);
}
建立 View 一樣使用樣板產生器,使用 Create 模板幫我們產生,或是自己建立。使用的資料模型是UserViewModel
@model MyBlog.Models.UserViewModel

<div class="row">
    <div class="col-md-4">
        <form asp-action="CreateUser">
            <div asp-validation-summary="ModelOnly" class="text-danger"></div>
            <div class="form-group">
                <label asp-for="Email" class="control-label"></label>
                <input asp-for="Email" class="form-control" />
                <span asp-validation-for="Email" class="text-danger"></span>
            </div>
            <div class="form-group">
                <label asp-for="Password" class="control-label"></label>
                <input asp-for="Password" class="form-control" />
                <span asp-validation-for="Password" class="text-danger"></span>
            </div>
            <div class="form-group">
                <label asp-for="PasswordCheck" class="control-label"></label>
                <input asp-for="PasswordCheck" class="form-control" />
                <span asp-validation-for="PasswordCheck" class="text-danger"></span>
            </div>
            <div class="form-group">
                <label asp-for="Name" class="control-label"></label>
                <input asp-for="Name" class="form-control" />
                <span asp-validation-for="Name" class="text-danger"></span>
            </div>
            <div class="form-group">
                <label asp-for="DisplayId" class="control-label"></label>
                <input asp-for="DisplayId" class="form-control" />
                <span asp-validation-for="DisplayId" class="text-danger"></span>
            </div>
            <div class="form-group">
                <input type="submit" value="Create" class="btn btn-primary" />
            </div>
        </form>
    </div>
</div>
建立完的結果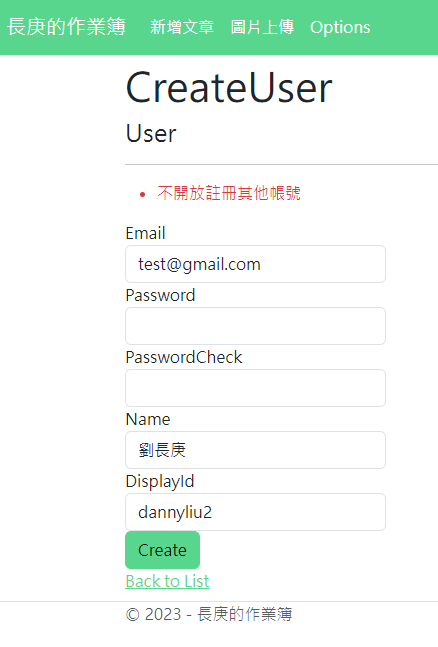
這邊我用信箱與密碼來驗證,標上驗證屬性
public class LoginViewModel
{
    [Required]
    [EmailAddress]
    public string Email { get; set; } = string.Empty;

    [Required]
    [DataType(DataType.Password)]
    public string Password { get; set; } = string.Empty;
}
在 UserService 加入 LoginAsync 方法來做登入判斷,因為我們的密碼有做雜湊,所以判斷登入的方式比較不一樣,要先找出這個帳號使用者的User物件,與密碼一起才能做比較。
public async Task<ResultViewModel> LoginAsync(LoginViewModel viewModel)
{
    var user = _userRepository.Query(x => x.Email == viewModel.Email).FirstOrDefault();

    if (user != null
        && PasswordVerificationResult.Success == VerifyHashedPassword(user, viewModel.Password))
    {
        await CreateCookieAsync(user);
        return new ResultViewModel(true, "登入成功");
    }

    return new ResultViewModel(false, "帳號或密碼錯誤");
}

private PasswordVerificationResult VerifyHashedPassword(User user, string password)
{
    return _passwordHasher.VerifyHashedPassword(user, user.Password, password);
}
確定帳號密碼正確之後,就要建立並使用 Cookie 登入 。寫入用戶資料,設定長期記憶Cookie IsPersistent = true 。
最後使用 HttpContext.SignInAsync() 來做登入。而在 Server 層,不像 Controller 層一樣有 HttpContext 可以使用,我們需要注入 IHttpContextAccessor 來提供我們 HttpContext,才可以。
Program.cs 需要註冊以下內容
builder.Services.AddTransient<IUserService, UserService>();

builder.Services.AddScoped<IPasswordHasher<User>, PasswordHasher<User>>();
builder.Services.AddHttpContextAccessor();
builder.Services.AddAuthentication(CookieAuthenticationDefaults.AuthenticationScheme)
    .AddCookie();
另外 Program.cs 下方也要啟動身分驗證與授權,上下順序固定不可調整。
app.UseAuthentication();
app.UseAuthorization();
下面這段就是建 Cookie 的程式碼。
private async Task CreateCookieAsync(User user)
{
    var claims = new List<Claim>
    {
        new Claim(nameof(User.Id),user.Id.ToString()),
        new Claim(ClaimTypes.Name, user.Name),
        new Claim(ClaimTypes.Email, user.Email),
        new Claim(ClaimTypes.Role,user.Role.ToString()),
    };

    var authProperties = new AuthenticationProperties
    {
        IsPersistent = true,
    };

    var claimsIdentity = new ClaimsIdentity(claims, CookieAuthenticationDefaults.AuthenticationScheme);
    await _accessor.HttpContext.SignInAsync(new ClaimsPrincipal(claimsIdentity), authProperties);
}
在控制器這邊要做的事就很少了,實作 Login() 與 Logout() 就可以了。
public IActionResult Login()
{
    return View();
}

[HttpPost]
public async Task<IActionResult> Login(LoginViewModel viewModel)
{
    if (ModelState.IsValid)
    {
        var result = await _userService.LoginAsync(viewModel);

        if (result.IsSuccess)
        {
            return RedirectToAction("Index", "Home");
        }

        ModelState.AddModelError("Email", result.Messages.First());
    }

    return View(viewModel);
}

public async Task<IActionResult> Logout()
{
    await HttpContext.SignOutAsync(CookieAuthenticationDefaults.AuthenticationScheme);
    return RedirectToAction("Index", "Home");
}
登出跟登入很像,只要換用HttpContext.SignOutAsync()就可以登出了。
Login View 的模型就是前面定義的 LoginViewModel 。可以使用自動產生或是自己建。
產生的樣式會如下。

實際程式碼以 GitHub 上為主。

 iThome鐵人賽