前面我們實作出了一些基本的模型,而今天我們就拿之前的多元線性回歸模型來當作範例,要把這個模型佈署至網頁上,藉由讓使用者從輸入框傳入特徵資料到模型中,讓模型能夠把輸出結果顯示在網頁上,而特徵資料會包含使用者的年資、教育程度和居住城市,模型就會依據這些資料做年薪的預測。
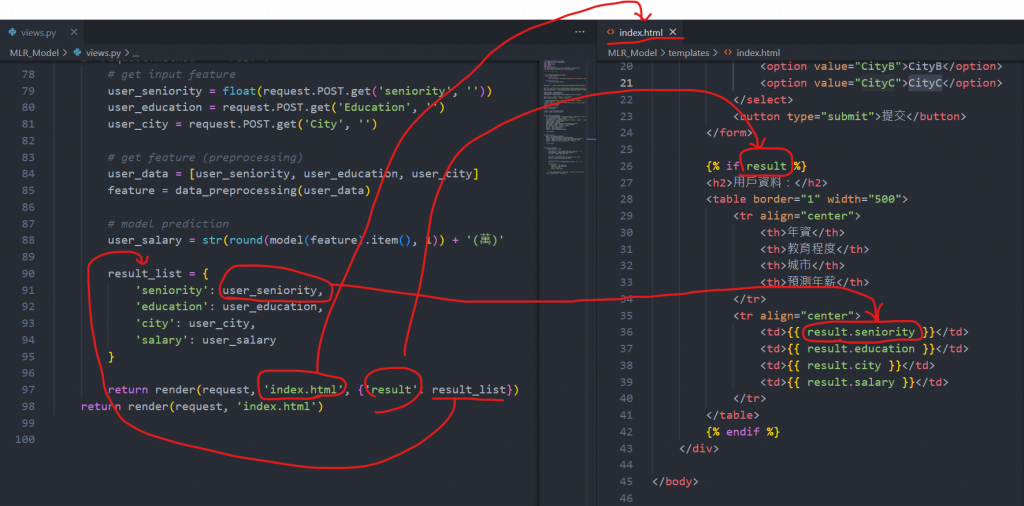
對於特徵資料的取得,我們會讓使用者用 <form> 表單的方式,用輸入框和下拉式選單去做資料傳入,所以就到 templates/index.html 中去設計我們的表單架構,注意到 標籤我們會通過指定 for 屬性的方式,讓我們能夠在 view.py 中獲取使用者輸入的資料,下面為 index.html 內容:
<html>

<body>
    <div align="center">
        <h1>Multiple Linear Regression</h1>
        <form method="post">
            {% csrf_token %}
            <input type="text" name="seniority" placeholder="輸入年資">

            <label for="Education">教育程度:</label>
            <select name="Education" id="city">
                <option value="高中以下">高中以下</option>
                <option value="大學">大學</option>
                <option value="碩士以上">碩士以上</option>
            </select>

            <label for="City">城市:</label>
            <select name="City" id="city">
                <option value="CityA">CityA</option>
                <option value="CityB">CityB</option>
                <option value="CityC">CityC</option>
            </select>
            <button type="submit">提交</button>
        </form>

        {% if result %}
        <h2>用戶資料:</h2>
        <table border="1" width="500">
            <tr align="center">
                <th>年資</th>
                <th>教育程度</th>
                <th>城市</th>
                <th>預測年薪</th>
            </tr>
            <tr align="center">
                <td>{{ result.seniority }}</td>
                <td>{{ result.education }}</td>
                <td>{{ result.city }}</td>
                <td>{{ result.salary }}</td>
            </tr>
        </table>
        {% endif %}
    </div>

</body>

</html>
若我們在 jupyter lab ( 或其他 IDE ) 上訓練出我們的多元線性回歸模型,那要怎麼把它與 Django 結合呢?下面是多元線性回歸模型的完整訓練程式碼,我們會讓 Django 的應用程式去使用這個模型:
import torch
import pandas as pd
from sklearn.preprocessing import OneHotEncoder, StandardScaler
from sklearn.model_selection import train_test_split
import numpy as np
from torch import nn
這邊用 One-Hot Encoding 與 Label Encoding 去處理包含字串資料的欄位,最後得到四個特徵欄位與一個標籤欄位,再去訓練與測試資料的切割,讓測試資料的數量占全部的 20 %,最後用 StandardScaler() 做特徵資料的標準化:
np.set_printoptions(formatter={"float": "{: .2e}".format})
data = pd.read_csv("Salary_Data2.csv")
data["EducationLevel"] = data["EducationLevel"].map({"高中以下": 0, "大學": 1, "碩士以上": 2})
oneHot_encoder = OneHotEncoder()
oneHot_encoder.fit(data[["City"]])
city_encoded = oneHot_encoder.transform(data[["City"]]).toarray()
data[["CityA", "CityB", "CityC"]] = city_encoded

data = data.drop(["City", "CityC"], axis=1)
x = data[["YearsExperience", "EducationLevel", "CityA", "CityB"]]  # Feature
y = data["Salary"]  # Label
x_train, x_test, y_train, y_test = train_test_split(x, y, test_size=0.2, random_state=87)
x_train = x_train.to_numpy()
x_test = x_test.to_numpy()
y_train = y_train.to_numpy()
y_test = y_test.to_numpy()

scaler = StandardScaler()
scaler.fit(x_train)
x_train = scaler.transform(x_train)
x_test = scaler.transform(x_test)

x_train = torch.from_numpy(x_train)
y_train = torch.from_numpy(y_train)
x_test = torch.from_numpy(x_test)
y_test = torch.from_numpy(y_test)
定義我們的多元線性回歸模型,用 nn.Linear() 增加了一個線性層,相當於神經網路中設定輸入層神經元數量 ( in_features ) 有 4 個,最後輸出層數量 ( out_features ) 為 1 個值:
class LinearRegressionModel(nn.Module):
    def __init__(self):
        super().__init__()
        self.linear_layer = nn.Linear(in_features=4, out_features=1, dtype=torch.float64)

    def forward(self, x):
        return self.linear_layer(x)
這邊宣告多元線性回歸模型物件 model,宣告後模型就會得到一組初始參數,並且用 reshape 去調整資料的形狀,以便之後訓練時能夠進行與參數之間的運算 ( 矩陣的相乘運算 ) :
torch.manual_seed(87)
model = LinearRegressionModel()

x_train = x_train.reshape(-1, 4)
y_train = y_train.reshape(-1, 1)
x_test = x_test.reshape(-1, 4)
y_test = y_test.reshape(-1, 1)
這邊設定損失函數為 MSE ( 均方誤差 ),優化器則使用 SGD ( 隨機梯度下降法 ),並設定 lr學習率為 0.001,params 參數的地方則是傳入模型的初始參數:
mseLoss = nn.MSELoss()  # mean square error
optimizer = torch.optim.SGD(params=model.parameters(), lr=0.001)
之前有跟著實作過模型的話這段一定不陌生吧,我們讓模型去訓練迭代一萬次,並把模型在每次迭代中,對於訓練資料 ( x_train , y_train ) 和驗證資料 ( x_test , y_test ) 上的表現 ( 成本損失值 ) 印出來:
train_cost_hist = []
test_cost_hist = []
for epoch in range(10000):

    model.train()  # Training Mode On
    train_pred = model(x_train)
    train_cost = mseLoss(train_pred, y_train)
    train_cost_hist.append(train_cost.detach().numpy())
    optimizer.zero_grad()
    train_cost.backward()  # 計算目前梯度並更新 model.w.grad
    optimizer.step()  # 更新參數

    model.eval()  # Evaluation Mode On
    with torch.inference_mode():  # Inference Mode On
        test_pred = model(x_test)
        test_cost = mseLoss(test_pred, y_test)
        test_cost_hist.append(test_cost.detach().numpy())
    if (epoch % 1000 == 0):
        print(
            f"epoch:{epoch: 5}, train_cost:{train_cost: .4e}, testing_cost:{test_cost: .4e}")
我們可以嘗試將模型最終訓練出來的參數印出來,結果會出現 OrderedDict 類型的物件:
model.state_dict()
輸出結果:
OrderedDict([('linear_layer.weight',
tensor([[ 4.0801, 14.1181, -1.4940, -3.7587]], dtype=torch.float64)),
('linear_layer.bias', tensor([50.9500], dtype=torch.float64))])
而要讓我們 Django 的應用程式可以使用到這個模型,這步驟就很重要,我們用下面程式碼去儲存我們訓練好的多元線性回歸模型,也就是儲存模型訓練出來的最終參數,注意到 f 參數需要指定為你想要把模型儲存的路徑位置,所以我們把模型存放在 model 目錄中,並且檔案附檔名為.pth 檔,表示可以用來儲存我們訓練好的模型,所以說這檔案就代表了模型的參數:
torch.save(obj=model.state_dict(), f="model/MLR_Model.pth")
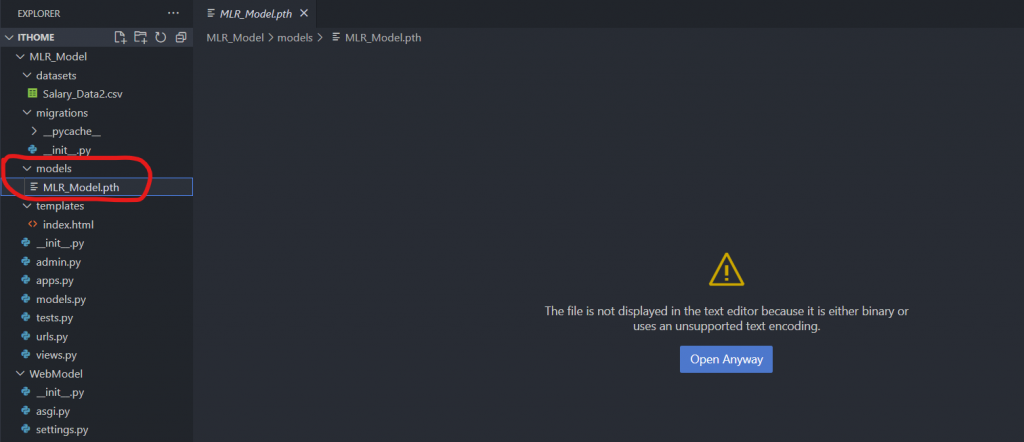
在儲存好模型之後,我們就回到 Django 應用程式的部分,在應用程式目錄中創建一個資料夾 models,並且在裡面存放剛才的模型 .pth 檔,這個就可以在應用程式中去使用這個模型了:
https://drive.google.com/file/d/1ZkqE1IpTieSTrnc9kUsRukK5uoRBi91m/view?usp=drive_link
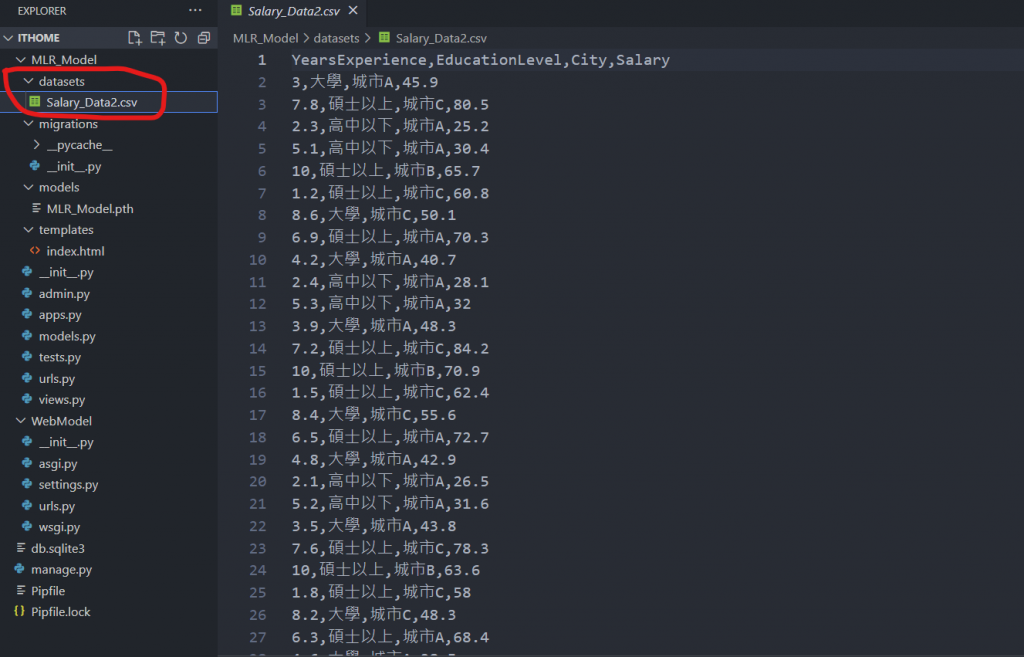
然後我們在應用程式目錄下再新增一個目錄 datasets,用來存放我們的資料集檔案 Salary_Data2.csv ( 檔案可在上方連結取得 ):
下面是 views.py 中的完整程式碼:
from django.shortcuts import render
from django.http import HttpResponse
import numpy as np
import pandas as pd
import torch
from torch import nn
from sklearn.preprocessing import OneHotEncoder, StandardScaler
from sklearn.model_selection import train_test_split

# Create your views here.

class LinearRegressionModel(nn.Module):
    def __init__(self):
        super().__init__()
        self.linear_layer = nn.Linear(in_features=4, out_features=1, dtype=torch.float64)

    def forward(self, x):
        return self.linear_layer(x)

# 模型路徑
model_path = 'C:\\Users\Thomas\Desktop\ithome\MLR_Model\models\MLR_Model.pth'

# 下面這段是為了得到 scaler 在 training data 上的參數 (mean, std), testing data 才得以沿用

data = pd.read_csv("C:\\Users\Thomas\Desktop\ithome\MLR_Model\datasets\Salary_Data2.csv")

# Label Encoding 處理
data["EducationLevel"] = data["EducationLevel"].map({"高中以下": 0, "大學": 1, "碩士以上": 2})

# One-Hot Encoding 獨熱編碼處理字串格式資料
oneHot_encoder = OneHotEncoder()
oneHot_encoder.fit(data[["City"]])
city_encoded = oneHot_encoder.transform(data[["City"]]).toarray()
data[["CityA", "CityB", "CityC"]] = city_encoded
data = data.drop(["City", "CityC"], axis=1)

# 劃分特徵與標籤資料
x = data[["YearsExperience", "EducationLevel", "CityA", "CityB"]]  # Feature
y = data["Salary"]  # Label

# 資料切割
x_train, x_test, y_train, y_test = train_test_split(x, y, test_size=0.2, random_state=87)
x_train = x_train.to_numpy()
x_test = x_test.to_numpy()

# 特徵資料標準化
scaler = StandardScaler()
scaler.fit(x_train)
x_train = scaler.transform(x_train)
x_test = scaler.transform(x_test)

# 對使用者輸入的資料做資料預處理
def data_preprocessing(data):
    df = pd.DataFrame([data], columns=["Seniority", "Education", "City"])
    flag = np.array([['CityA'], ['CityB'], ['CityC']])
    x = np.where(flag == data[2])[0][0]
    df["Education"] = df["Education"].map({"高中以下": 0, "大學": 1, "碩士以上": 2})
    oneHot_encoder = OneHotEncoder()
    oneHot_encoder.fit(flag)
    city_encoded = oneHot_encoder.transform(flag).toarray()
    df[["CityA", "CityB", "CityC"]] = city_encoded[x]
    df = df.drop(["City", "CityC"], axis=1)
    feature = [df.iloc[0].tolist()]
    feature = np.array(feature)
    feature = scaler.transform(feature)

    return feature

# 對於使用者輸入的資料去做預測
def model(feature):

		# 使用預先訓練好的模型參數
    model = LinearRegressionModel()
    model.load_state_dict(torch.load(f=model_path)) # 載入模型

		# 取得模型參數
    w_final = model.state_dict()['linear_layer.weight'][0].tolist()
    b_final = model.state_dict()['linear_layer.bias'][0].item()

		# 進行模型預測
    y_pred = (feature * w_final).sum(axis=1) + b_final

    return y_pred

def say_hello(request):
    if request.method == 'POST':
        # 取得使用者的輸入特徵資料
        user_seniority = float(request.POST.get('seniority', ''))
        user_education = request.POST.get('Education', '')
        user_city = request.POST.get('City', '')

        # 進行特徵資料處理
        user_data = [user_seniority, user_education, user_city]
        feature = data_preprocessing(user_data)

        # 模型預測
        user_salary = str(round(model(feature).item(), 1)) + '(萬)'

        result_list = {
            'seniority': user_seniority,
            'education': user_education,
            'city': user_city,
            'salary': user_salary
        }

        return render(request, 'index.html', {'result': result_list})
    return render(request, 'index.html')
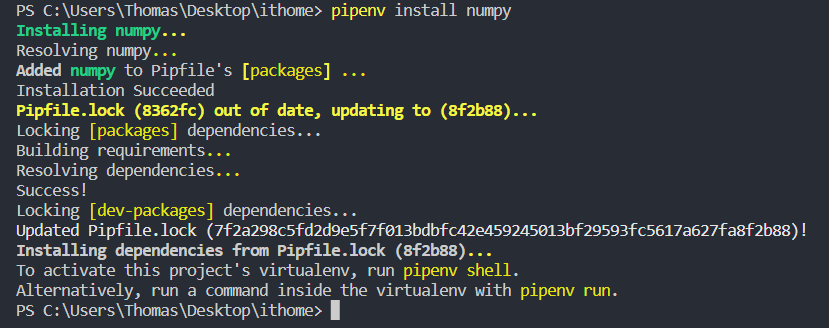
可以用 pipenv install [套件名稱] 去安裝所需的套件,像是下面我們想安裝 numpy 套件:
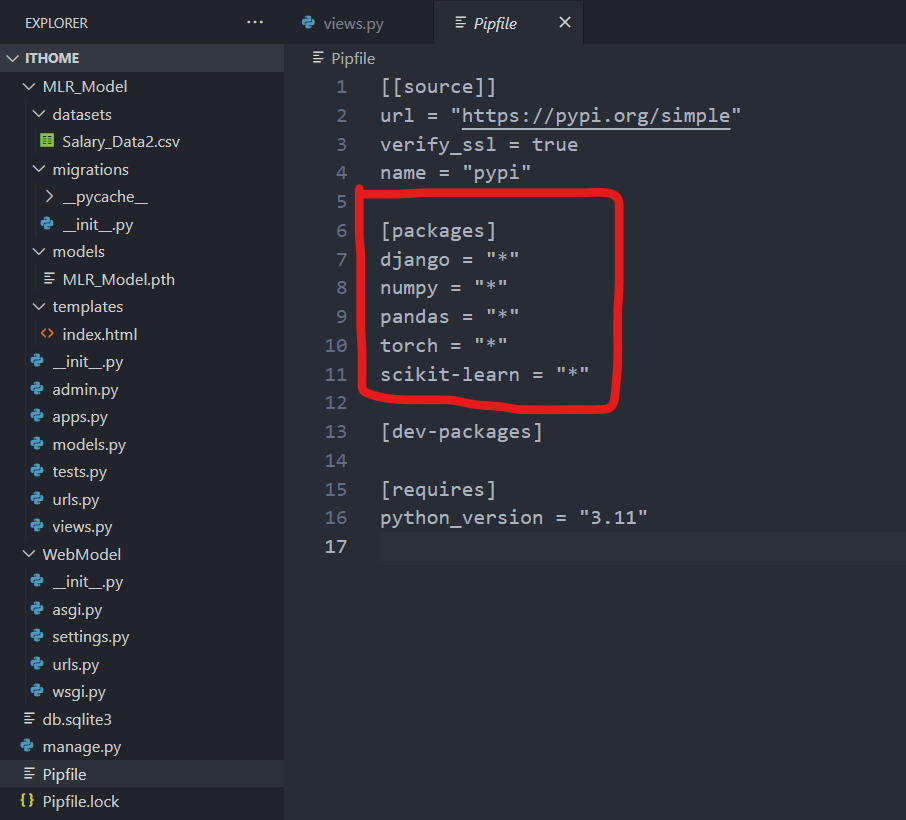
在這個虛擬環境中,可以找到 Pipfile 檔案,裡面就會顯示當前環境中的一些資訊,包括套件或是版本資訊等,像是我這邊就已經安裝好了 django、numpy、pandas、torch、scikit-learn 套件,就可以在 [packages] 下面看到我們所在這個虛擬環境安裝的套件有哪些:
這邊來說明一下 say_hello 方法的部分,request.POST.get(’seniority’, ‘’) 表示要獲取在 index.html 檔中 標籤 for 屬性為 ‘seniority’ 的內容,這方法能夠讓我們在 view.py 獲取到使用者的輸入表單資料,我們使用者輸入的資料有三個,對應到 標籤的 for 屬性分別就是 ‘seniority’、’Education’、’City’,取得這些標籤裡的內容值,再 views.py 中經過資料處理後,會把它存放在 result_list 的字典中,然後指派到 index.html 檔案中的 result 變數,再透過 table 的方式把分別把字典中的值顯示出來:
def say_hello(request):
    if request.method == 'POST':

        # 取得使用者的輸入特徵資料
        user_seniority = float(request.POST.get('seniority', ''))
        user_education = request.POST.get('Education', '')
        user_city = request.POST.get('City', '')

        # 進行特徵資料處理
        user_data = [user_seniority, user_education, user_city]
        feature = data_preprocessing(user_data)

        # 模型預測
        user_salary = str(round(model(feature).item(), 1)) + '(萬)'

        result_list = {
            'seniority': user_seniority,
            'education': user_education,
            'city': user_city,
            'salary': user_salary
        }

        return render(request, 'index.html', {'result': result_list})
    return render(request, 'index.html')
下面顯示的 index.html 檔跟 view.py 檔案之間資料的傳遞關係,{% if result %} 判斷如果使用者三個特徵資料都有輸入的話並按下提交按鈕的話,就會用 table 去顯示輸入資料與預測的結果,反之會報錯,記得最後都要加上 {% endif %} 結束判斷條件:
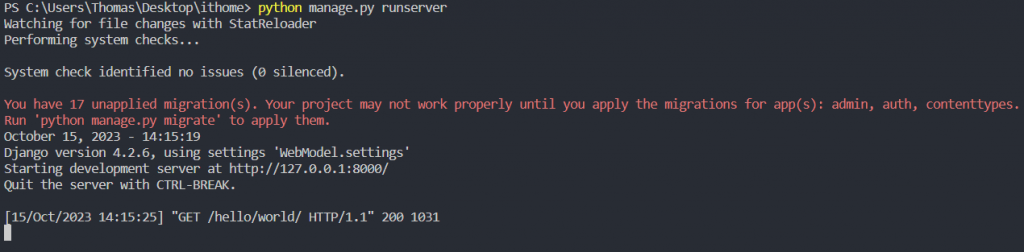
確認終端機無顯示報錯 ( 無報錯畫面如下 ):
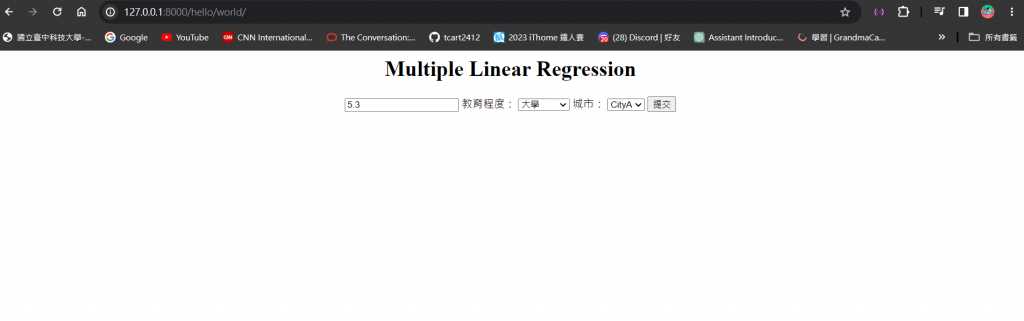
輸入 app 網址 就能夠看到下面的畫面,現在使用者都還沒輸入表單資料,所以 table 並不會顯示出來,只會顯示表單中的輸入框和下拉式選單:

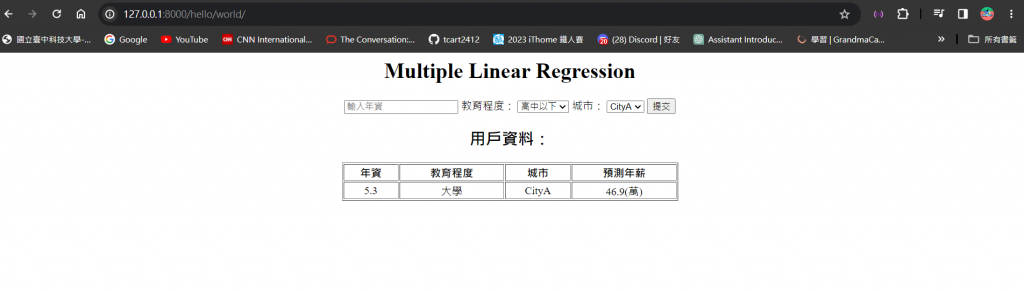
我們這邊在輸入框輸入年資,並且用下拉式選單選擇教育程度和城市:
按下了提交按鈕後,就可以看到你剛傳入的特徵資料和模型預測出來的年薪結果啦 ~
哇哇哇完賽感言終於來了,總算可以輕鬆沒壓力的寫了,很慶幸我能夠寫到完賽感言,代表我真的持續了 30 天連續不間斷發文,但這過程對我來說,絕對不只有 30 天而已。
現在五專四年級的我從這個學期開始就要準備畢業專題,隨著人工智慧的浪潮日益高漲,我選擇其中的機器學習做為我專題研究的範疇,也因此開啟我與機器學習的邂逅,很感謝室友在暑假前就告訴我有這個機會讓我參與這個比賽,並且找到夥伴們一起組隊報名 : )
機器學習對我來說是 0 基礎,從來沒有接觸過的東西,所以在暑假時,我就開始看台大李弘毅教授的機器學習公開課程,多虧他的課才讓我深層了解機器學習本身就是由數學原理所構成,讓我深刻體會到,去了解機器學習背後的數學架構對於這領域的掌握是最有幫助的,所以我很感謝這個比賽讓我在學習的當中,有個地方可以去紀錄我學習的腳步,也能夠把重要的知識點寫成文章和大家分享。
正因為這是我從未做過的事情,所以我會開始去思考文章的架構要怎麼去編排,或是這段文字要怎麼去描述才會最清楚,開始會站在閱讀者的角度去撰寫文章,起初就是看著公開課的影片邊做筆記,或是想到甚麼就寫甚麼,到最後發現整個知識點都是零散的,內容會跳來跳去沒辦法前後連貫,當時發現這個問題我的文章已經寫了 16 篇了,也很懊惱當初怎麼沒早點意識到這個問題,加上筆記的內容絕大多都是教授口中講的話,並不是用我自己的方式去描述,所以我當時毅然捨棄先前的 16 文章,重新用自己的話去寫,嘗試把文章的性質做分類,把一些廢話太多的地方做修改,這樣讀起來就順暢多了。
也是因為有這個比賽才讓我學會如何去做時間規劃,可以說這樣的生活因此多了點忙碌和充實感?晚上 10 點多上完微積分回到宿舍後看到 Notion 文章空白的無力感,還有每天都差點忘記要發文的緊張感 ( 阿不就還好有隊友提醒 ),當然還有完賽時內心的成就感,就算最後結果只有完賽獎,參加鐵人賽的這個決定我也不會後悔,準備鐵人賽的這些日子將來我也不會忘記,帶給我的更多是能力上的蛻變,30 天的機器學習之旅就到此結束啦,我們下趟旅程見 ~