
今天要來介紹的是React的測試,原本是打算使用React Testing Library和Jest的組合,但是我之前只有在create react app建構工具起的專案使用過,想說可以使用Vite起的專案來試試看,試了試實在是有點麻煩,因為Vite是使用ESM需要安裝一些套件和新增一些配置。於是果斷來放棄Jest改使用Vite + Vitest + React Testing Library的組合,Vitest和Vite整合得不錯,不用太多配置就可以使用。
Vitest和Jest是類似的工具,主要的功能就是執行測試並且決定測試有沒有通過,而且和Jest的API大致上都相容。
React Testing Library是一個用於測試在React上撰寫的元件的工具,透過撰寫測試可以讓我們對於整個應用程式能正確執行更有信心,減少bug的發生。是一個輕量化的測試工具,它以DOM Testing Library為基礎,加入了一些能操作React元件的API。
那DOM Testing Library是什麼呢?
它提供像是抓取DOM node的功能,讓我們能對於node內容加以測試。
在使用React Testing Library測試時,有個準則就是測試的內容要接近使用者操作的行為,不是元件裡的實作細節,這是因為假設我們測試的是實作的細節,那麼有天我們重構程式,這樣測試就必須要重新再撰寫,測試會變得需要一直重新去維護。如果換成是測試使用者操作的行為,即使實作細節改變了功能也不會改變,這樣我們測試也不用重新撰寫,這就是測試接近使用者操作行為的好處。
我們這邊使用vite為建構工具,在把React專案建立起來後還需要以下步驟
安裝npm install vitest --save-dev
npm install jsdom --save-dev
npm install @testing-library/react --save-dev
npm install @testing-library/jest-dom —save-dev
設定node script
要執行測試時輸入npm run test
// package.json
"scripts": {
    "dev": "vite",
    "build": "tsc && vite build",
    "lint": "eslint . --ext ts,tsx --report-unused-disable-directives --max-warnings 0",
    "preview": "vite preview",
    "test": "vitest" // 增加
  },
export default defineConfig({
  plugins: [react()],
  test: {
    globals: true,
    environment: 'jsdom',
  },
})
// .eslintrc plugins加上testing-library和jest-dom
plugins: ['react-refresh', 'testing-library', 'jest-dom'],
extends: [
    'eslint:recommended',
    'plugin:@typescript-eslint/recommended',
    'plugin:jest-dom/recommended', // 加上'plugin:jest-dom/recommended'
],
這時候會出現一個error,Vite defineConfig預設沒有test的屬性
Object literal may only specify known properties, and 'test' does not exist in type 'UserConfigExport’
import { defineConfig } from 'vite'
// 改為由vitest/config import
import { defineConfig } from 'vitest/config';
安裝相關eslint擴充
npm install eslint-plugin-testing-library --save-dev
npm install eslint-plugin-jest-dom --save-dev
在測試的檔案import '@testing-library/jest-dom/vitest'
// App.test.tsx

import '@testing-library/jest-dom/vitest';
第一個測試
describe區塊可以包含相關的多個test區塊,第一個參數都是對於測試的描述,第二個參數帶入要執行的function。
render第一個參數為要測試的元件
screen提供各種查詢的API讓我們查詢render的內容,各種查詢可參考官方文件。可以分為查詢單個、多個或非同步等的不同API。
getByRole可以查詢role的方式抓取DOM,並帶入參數做進階的匹配,name為該DOM內的文字內容。可以在Chrome的Accessibility底下查看Tag代表的Role。
expectvitest提供的方法,使用就如同字面上的意思,預期查詢的結果h1Element,toBeInTheDocument有在畫面上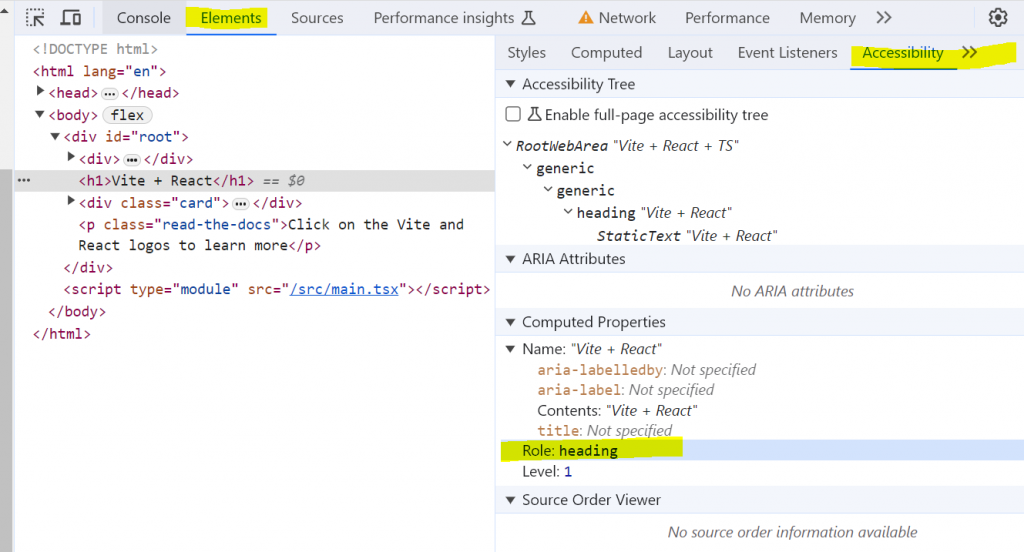
import '@testing-library/jest-dom/vitest';
import { render, screen } from '@testing-library/react';
import { describe, test, expect } from 'vitest'
import App from '../App';

describe('App', () => {
  test('檢查h1元素', () => {
    render(<App />)
    const h1Element = screen.getByRole('heading', { name: 'Vite + React' })
    expect(h1Element).toBeInTheDocument()
  });
});
與畫面互動
要測試使用者輸入或點擊等這類的互動可以使用兩種API
fireEvent
發起特定的一個事件
fireEvent.click 發起一個click事件
import { render, screen, fireEvent  } from '@testing-library/react';
import App from '../App';

test('點擊按鈕+1,使用fireEvent', () => {
    render(<App />)
    const button = screen.getByRole('button')
    fireEvent.click(button) // fireEvent後面接著要互動的事件並且帶入要被執行的element
    expect(button).toHaveTextContent(/count is 1/i)
})
userEvent
不像fireEvent發起單一的事件,userEvent更能模擬使用者的互動行為,像是在input輸入時會先後發起focuse、input和keyboard的事件。
安裝
npm install @testing-library/user-event —save-dev
使用
使用user後面接著要互動的事件並且會回傳一個promise,所以記得要使用async await去等待事件完成
import userEvent from '@testing-library/user-event'
import App from '../App';

test('點擊按鈕-1,使用userEvent', async () => {
    const user = userEvent.setup(); // 需要在render之前先呼叫setup
    render(<App />);
    const button = screen.getByRole('button')
    await user.click(button) // user接著要互動的行為
    expect(button).toHaveTextContent(/count is 1/i)
  })
帶入資料
porps
如果元件有props直接帶入在元件上即可
test('檢查h1元素', async () => {
  render(<App title="我第一個測試"/>)
  const h1Element = screen.getByRole('heading', { name: '我第一個測試' })
  expect(h1Element).toBeInTheDocument()
});
Context
可以直接將provider包在外面,但是如果有很多個context或是要測試很多個元件,在每個元件都要包一個provider會變得很麻煩
test('檢查姓名元素', async () => {
    render(<UserNameContext.Provider value='王小明'>
    <App title="我第一個測試"/>
  </UserNameContext.Provider>)
  const h1Element = screen.getByText('王小明')
  expect(h1Element).toBeInTheDocument()
});
我們可以使用renderwrapper option來做一個自帶provider的render
// react-testing-library-utils.tsx
import { RenderOptions, render } from '@testing-library/react';
import { UserNameContext } from '../UserNameCtx';

const UserNameProvider = ({children}: {children: React.ReactNode}) => {
  return (
      <UserNameContext.Provider value='王小明'>
        {children}
      </UserNameContext.Provider>
  )
}
const customRender = (
  ui: React.ReactElement,
  options?: Omit<RenderOptions, 'wrapper'>,
) => render(ui, {wrapper: UserNameProvider, ...options})
// 將其他@testing-library/react的內容export出去,方便我們之後不管screen或是render都使用
// 我們的react-testing-library-utils.tsx import
export * from '@testing-library/react';
 // 將我們的customRender命名為render export出去
export { customRender as render };
把原本從@testing-library/react import的render改為我們自己寫的,這樣測試會變得比較簡潔好維護,不像我們一開始寫的還需要包一個provider
import { render, screen } from '../test-utility/utilts';

test('檢查姓名元素', async () => {
  render(<App title="我第一個測試"/>)
  const h1Element = screen.getByText('王小明')
  expect(h1Element).toBeInTheDocument()
});
Mock API
在元件內如果有呼叫API我們可以阻斷API的呼叫,回復的資料取而代之的是我們預先設定的mock資料,這樣可以確保我們在測試的時候清楚劃分是API錯誤的問題還是我們程式的問題,並且也可以減少呼叫API導致server的資源浪費。當然也還有另一派的說法是,不mock API才能測試整個應用的樣貌。
這邊我們會使用Mock Service Worker來達成mock API的效果。
npm install msw --save-dev
建立一個handler.ts,裡面包含所有會使用到的API,與回覆的資料,handlers為一個陣列,內容為每個API的細節
// handler.ts
import { rest } from 'msw'

const handlers = [
	// API為get就是rest.get,post就是rest.post以此類推
  rest.get('https://jsonplaceholder.typicode.com/todos/1', (req, res, ctx) => {
    return res(
      ctx.status(200),
      ctx.json({
        "userId": 1,
        "id": 1,
        "title": "我的mock API",
        "completed": false
      })
    )
  }),
]
// 最後export出去,提供Server.js使用
export default handlers;
import { setupServer } from 'msw/node'
import handlers from './handlers'

// 使用setupServer來建立一個server實體,並且帶入上一個步驟建立的handlers
export const server = setupServer(...handlers)
撰寫測試
以下是一個簡易的元件,呼叫了一支API,當拿到值後使用setTitle更新狀態並且更新畫面
import { useEffect, useState } from "react";

function User() {
  const [title, setTitle] = useState('');
  useEffect(() => {
    fetch('https://jsonplaceholder.typicode.com/todos/1')
      .then(response => response.json())
      .then(json => {
        setTitle(json.title)
      })
  }, [])
  return <h1>{title}</h1>
}
export default User;
測試內容
import '@testing-library/jest-dom/vitest';
import { afterAll, afterEach, beforeAll, describe, expect, test } from 'vitest';
import { render, screen } from '@testing-library/react';
import { server } from '../mocks/Server';
import User from '../User';

// beforeAll**、**afterEach和afterAll是vitest提供的功能
// beforeAll會在所有測試開始前執行
// 呼叫server.listen會建立一個請求攔截層
beforeAll(() => server.listen())

// afterEach會在每個測試結束後執行
// server.resetHandlers會重置headers
// 假設有些post會影響到get的情形,重置headers, 讓每個測試之間不會彼此互相干擾
afterEach(() => server.resetHandlers())

// afterAll會在所有測試完成後執行
// server.close為關掉請求的攔截層
afterAll(() => server.close())

describe('mock api', () => {
  test('mock api title', async () => {
    render(<User />);
		// 呼叫API這種非同步的行為,記得要使用async await搭配findBy系列的查詢方式
    const h1El = await screen.findByRole('heading', { name: '我的mock API' })
		expect(h1El).toBeInTheDocument()
		// 也可以@testing-library/react的waitFor,這樣就可以使用原本的getByText
		// await waitFor(() => {
    //   expect(screen.getByText('我的mock API')).toBeInTheDocument();
    // });
    })
})
我們可以使用上一篇提到的AI工具來幫我們寫測試,前面的內容其實都不用看了
在要撰寫測試的元件點選Codeium: Refactor → Generate unit tests
import React from 'react';
import { render, screen, fireEvent } from '@testing-library/react';
import App from './App';

test('renders title', () => {
  render(<App title="Test App" />);
  const titleElement = screen.getByText(/Test App/i);
  expect(titleElement).toBeInTheDocument();
});

test('renders user name', () => {
  const userName = 'John Doe';
  render(
    <UserNameContext.Provider value={userName}>
      <App title="Test App" />
    </UserNameContext.Provider>
  );
  const userNameElement = screen.getByText(userName);
  expect(userNameElement).toBeInTheDocument();
});

test('increments count when button is clicked', () => {
  render(<App title="Test App" />);
  const countElement = screen.getByText(/count is 0/i);
  const buttonElement = screen.getByRole('button');
  fireEvent.click(buttonElement);
  expect(countElement.textContent).toBe('count is 1');
});

test('renders HMR test message', () => {
  render(<App title="Test App" />);
  const messageElement = screen.getByText(/Edit src\/App.tsx and save to test HMR/i);
  expect(messageElement).toBeInTheDocument();
});

test('renders learn more message', () => {
  render(<App title="Test App" />);
  const learnMoreElement = screen.getByText(/Click on the Vite and React logos to learn more/i);
  expect(learnMoreElement).toBeInTheDocument();
});
還外加以下解釋
Cases tested:
Render the title correctly
Render the user name correctly
Increment the count when the button is clicked
Render the HMR test message correctly
Render the learn more message correctly
These unit tests use the
@testing-library/reactlibrary to render theAppcomponent and assert on the expected output. The tests cover various scenarios such as rendering the title, user name, incrementing the count, rendering the HMR test message, and rendering the learn more message.
這個結果真的很驚人,在短短幾秒內就產生很不錯的結果,可能也比自己寫的測試還來的全面。
大家也可以試試用Chat GPT或Google Bard工具幫我們撰寫測試,兩個也都擁有不錯的效果。
第一次使用Vitest其實和Jest使用起來API的相容性很高,都是用相同的語法,只差別在import from的對象不同。其實也是第一次嘗試用AI去撰寫測試,結果真的很不錯,如果不是用像是TDD這類的開發方式,之後我應該會使用AI先產生測試再進行微調,可以省下不少的時間。
https://dev.to/hannahadora/jest-testing-with-vite-and-react-typescript-4bap?ssp=1&setlang=zh-TW&safesearch=moderate
https://stackoverflow.com/questions/72146352/vitest-defineconfig-test-does-not-exist-in-type-userconfigexport
https://www.robinwieruch.de/vitest-react-testing-library/
https://saucelabs.com/resources/blog/vitest-vs-jest-comparison
https://testing-library.com/docs/user-event/intro
https://mswjs.io/docs/getting-started/install

 iThome鐵人賽