耶,這篇是我想要寫很久的,終於到swagger了
另外NestJS相關系列包含這篇,應該…九篇吧!
吧! 到Day50剛好把NestJS講完的話,有種很舒服的感覺(?)
那這篇主要來談談API測試
寫好了API,肯定要自己先測過,才交給前端串接的吧?
痾,即使自己就包辦前後端的話,有時候還是自己想針對各種case去做手動測試吧?
那我們來問問ChatGPT!
當你在使用 NestJS 開發 API 時,可以使用 Postman 這個工具來方便進行前後端的 API 測試。
Postman 是一個強大的 API 測試工具,可以讓你輕鬆地發送各種類型的請求(GET、POST、PUT、DELETE 等等)並查看回傳的結果。你可以在 Postman 中建立各種不同的請求,設定請求的 header、body 參數,並且可以保存和組織你的測試集合。
以下是一些使用 Postman 進行 API 測試的步驟:
- 下載安裝 Postman:
前往 Postman 官方網站 下載並安裝 Postman。- 建立新的請求:
在 Postman 中,你可以建立一個新的請求,選擇請求的方法(GET、POST、PUT、DELETE 等),填入 API 的 URL,並設定相關的參數。- 設定請求參數:
在請求中可以設定 header、query parameters、request body 等參數,以符合你的 API 的需求。- 發送請求:
點擊 Postman 中的 "Send" 按鈕來發送請求,並查看回傳的結果。- 保存測試集合:
你可以將一系列相關的請求保存為一個集合,方便之後重複使用。透過 Postman,你可以輕鬆地測試你的 API,並確保其正確運作。希望這個方法對你有所幫助!如果你需要任何更詳細的指示或範例,請隨時告訴我。
好誒,他直接推薦Postman
postman真的很快上手,雖然(?)介面是英文的
但操作方式很直覺,也可以各種設定參數、header
就像上一篇我們測試JWT驗證的時候那樣,簡單附個上一篇的測試截圖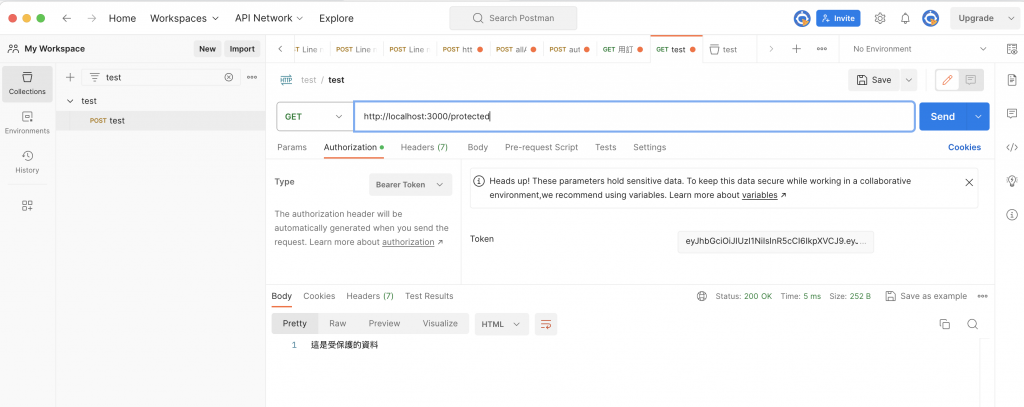
呃,但是好,我們要了解有沒有其他工具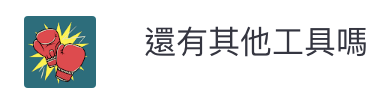
當然了,除了 Postman,還有一些其他可以方便前後端進行 API 測試的工具,以下是其中幾個:
- Insomnia:
Insomnia 是一個類似於 Postman 的 API 測試工具,它提供了直觀的使用者介面,可以讓你輕鬆地發送請求、設定參數,並查看回傳的結果。- Swagger UI:
如果你使用 NestJS,你可以使用 Swagger UI 來生成 API 的互動式文檔,這樣你可以在瀏覽器中直接測試 API,而無需額外的工具。- Postwoman:
Postwoman 是一個開源的 API 測試工具,它可以在瀏覽器中運行,並提供了簡單直觀的介面。- Thunder Client:
這是一個 Visual Studio Code 的擴充套件,可以讓你在 VS Code 中進行 API 測試。- Paw:
Paw 是一個針對 macOS 平台的強大 API 測試工具,提供了豐富的功能和直觀的使用者介面。這些工具都提供了不同程度的功能和特性,你可以根據自己的需求和喜好來選擇其中之一來進行 API 測試。如果你對其中任何一個工具有興趣,我可以提供更詳細的相關資訊。
這些工具有興趣都可以去試一次
這邊先來看看這個 Swagger UI 要怎麼使用、什麼是「API的互動式文檔」?

當然,以下是使用 Swagger UI 的完整教學:
步驟 1: 安裝 Swagger UI
首先,你需要在你的 NestJS 專案中安裝 Swagger UI。你可以使用 npm 或者 yarn 來進行安裝。
使用 npm:
npm install --save @nestjs/swagger swagger-ui-express使用 yarn:
yarn add @nestjs/swagger swagger-ui-express步驟 2: 在 NestJS 中設定 Swagger
接著,在你的 NestJS 專案中打開
main.ts檔案,然後在你的應用程式中啟用 Swagger。import { NestFactory } from '@nestjs/core'; import { AppModule } from './app.module'; import { SwaggerModule, DocumentBuilder } from '@nestjs/swagger'; async function bootstrap() { const app = await NestFactory.create(AppModule); const config = new DocumentBuilder() .setTitle('Your API') .setDescription('API description') .setVersion('1.0') .addTag('tags') // 你可以添加一個或多個 tags .build(); const document = SwaggerModule.createDocument(app, config); SwaggerModule.setup('api', app, document); await app.listen(3000); } bootstrap();步驟 3: 創建 API 文檔
現在,你可以在你的控制器類別(controller)和路由(route)上使用 Swagger 的裝飾器來添加描述,以生成 API 文檔。
例如:
import { Controller, Get } from '@nestjs/common';
import { ApiTags } from '@nestjs/swagger';

@ApiTags('cats') // 添加 tags
@Controller('cats')
export class CatsController {
  @Get()
  findAll(): string {
    return 'This action returns all cats';
  }
}
步驟 4: 啟動 NestJS 應用程式
使用以下指令來啟動你的 NestJS 應用程式:
npm run start步驟 5: 瀏覽 Swagger UI
現在你可以在瀏覽器中輸入以下網址,來查看你生成的 Swagger UI:
http://localhost:3000/api你將會看到一個互動式的 API 文檔,你可以在這裡瀏覽你的 API,甚至進行測試。
這就是使用 Swagger UI 來生成 NestJS API 文檔的基本步驟。當然,你可以根據你的具體需求進行更進一步的配置和定制。
如果你有任何進一步的問題或需要更多的幫助,請隨時告訴我!
照做打開後,果然就看到了一個頁面!
裡面有我目前有引入、有寫的所有API (包含上一篇放的prtected和login)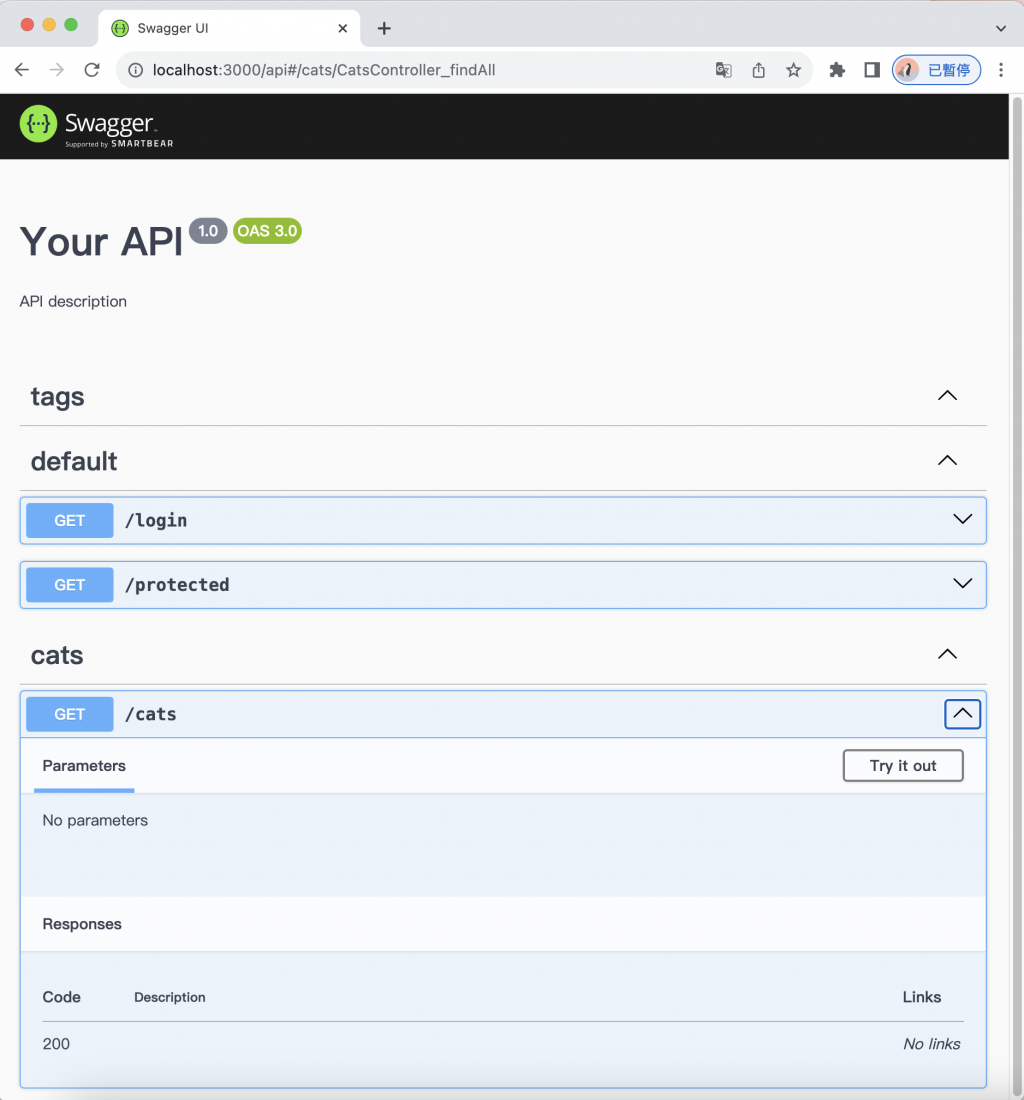
沒有特別使用 @ApiTags() 的話就會被歸類在default
但有使用的話就會有一個可以摺疊的自訂類別
在分類API的時候真的很方便
點擊Try it out,就可以來到輸入參數與發送的介面
就可以發送並執行取得結果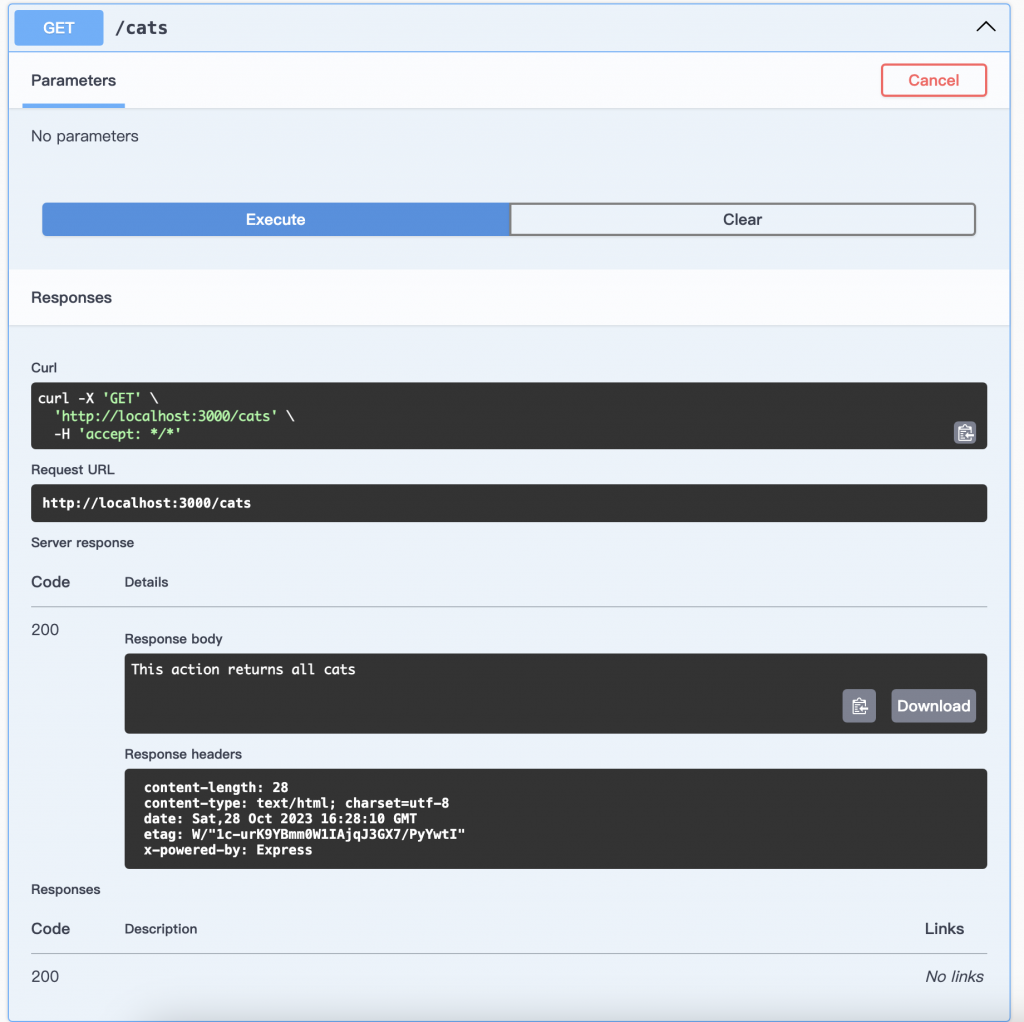
接下來針對剛剛的main.ts中的設定稍微再請ChatGPT細細講解一下
在
main.ts中設定 Swagger 是為了在 NestJS 應用程式中整合 Swagger UI,以生成互動式的 API 文檔。以下是針對在main.ts中 Swagger 設定的詳細介紹:首先,我們會使用
DocumentBuilder類別來設定 Swagger 相關的信息,然後使用SwaggerModule.createDocument方法生成 Swagger 文檔,最後使用SwaggerModule.setup方法將 Swagger UI 整合到 NestJS 應用程式中。import { NestFactory } from '@nestjs/core'; import { AppModule } from './app.module'; import { SwaggerModule, DocumentBuilder } from '@nestjs/swagger'; async function bootstrap() { const app = await NestFactory.create(AppModule); const config = new DocumentBuilder() .setTitle('Your API') // 設定 API 的標題 .setDescription('API description') // 設定 API 的描述 .setVersion('1.0') // 設定 API 的版本號 .addTag('tags') // 可以添加一個或多個 tags .build(); const document = SwaggerModule.createDocument(app, config); // 生成 Swagger 文檔 SwaggerModule.setup('api', app, document); // 整合 Swagger UI await app.listen(3000); // 啟動應用程式 } bootstrap();這裡是一些你可以在
DocumentBuilder中使用的方法:
setTitle(title: string): 設定 API 的標題。setDescription(description: string): 設定 API 的描述。setVersion(version: string): 設定 API 的版本號。addTag(name: string, description?: string): 添加 tags,可以用來對 API 进行分類。你可以根據你的需求來配置這些選項,以確保 Swagger UI 生成的 API 文檔符合你的預期。
最後,
SwaggerModule.setup的參數說明如下:
'api': 指定 Swagger UI 的路由,這裡代表 API 文檔將會在http://localhost:3000/api上可用。app: NestJS 應用程式的實例。document: 剛才生成的 Swagger 文檔。透過這些設定,你可以定制你的 API 文檔,以符合你的需求和項目的特定情況。
如果你對這方面有進一步的問題或需要更多的說明,請隨時告訴我!

當然,Swagger 在 NestJS 中使用裝飾器來描述 API 資源,這些裝飾器可以幫助生成詳細的 API 文件。以下是一些常用的 Swagger 裝飾器以及它們的用法:
@ApiTags(tags: string[]):用途:指定 API 資源的標籤,方便在 Swagger UI 中進行分類。
例子:
import { Controller, Get } from '@nestjs/common';
import { ApiTags } from '@nestjs/swagger';

@ApiTags('cats') // 添加 tags
@Controller('cats')
export class CatsController {
  // ...
}
@ApiOperation(summary: string, description?: string):用途:描述一個 API 操作。
例子:
import { Controller, Get } from '@nestjs/common';
import { ApiOperation } from '@nestjs/swagger';

@ApiOperation({ summary: 'Get all cats', description: 'Get a list of all cats' })
@Get()
findAll(): string {
  return 'This action returns all cats';
}
@ApiResponse(status: number, type: any):用途:定義 API 的回應。
例子:
import { Controller, Get } from '@nestjs/common';
import { ApiOperation, ApiResponse } from '@nestjs/swagger';

@ApiOperation({ summary: 'Get all cats' })
@ApiResponse({ status: 200, type: [Cat] }) // 返回狀態為 200,型別為 Cat[]
@Get()
findAll(): Cat[] {
  return this.catsService.findAll();
}
@ApiBearerAuth(name?: string):用途:指定 Bearer Token 的驗證。
例子:
import { Controller, Get } from '@nestjs/common';
import { ApiBearerAuth } from '@nestjs/swagger';

@ApiBearerAuth() // 使用預設的 Bearer Token 驗證
@Controller('cats')
export class CatsController {
  // ...
}
@ApiProperty(options?: ApiPropertyOptions):用途:指定屬性的描述。
例子:
import { ApiProperty } from '@nestjs/swagger';

export class CreateCatDto {
  @ApiProperty({ example: 'Whiskers' }) // 添加 example 屬性
  name: string;

  @ApiProperty({ example: 5 }) // 添加 example 屬性
  age: number;

  @ApiProperty({ example: 'grey' }) // 添加 example 屬性
  breed: string;
}
這些裝飾器可以幫助你更精細地描述你的 API 資源,使得 Swagger UI 能夠生成更具有詳細信息的 API 文檔。
如果你還有其他問題或需要進一步的說明,請隨時告訴我。
上面在標註方法的參數的時候有點微妙啊
可能還是看他示範比較準
上面給的示範都是零碎的,我們來要一個組合起來能跑的
而且最好是有request參數與response 物件的

當使用 Swagger 並定義 DTO(Data Transfer Object)來描述 API 參數和回傳時,以下是一個完整的 NestJS 範例程式碼,包括一個控制器、DTO、API 路由,以及 Swagger 裝飾器的使用。
首先,我們將建立一個 DTO 來描述我們的資料。在這個範例中,我們將建立一個
CatDto來表示貓咪的相關資料。// cat.dto.ts import { ApiProperty } from '@nestjs/swagger'; export class CatDto { @ApiProperty({ example: 'Whiskers', description: 'The name of the cat' }) name: string; @ApiProperty({ example: 5, description: 'The age of the cat' }) age: number; @ApiProperty({ example: 'Grey', description: 'The breed of the cat' }) breed: string; }接下來,我們將建立一個控制器
CatsController並在其中使用 DTO 來處理參數和回傳。// cats.controller.ts import { Controller, Get, Post, Body } from '@nestjs/common'; import { ApiTags, ApiOperation, ApiResponse } from '@nestjs/swagger'; import { CatDto } from './cat.dto'; @ApiTags('cats') @Controller('cats') export class CatsController { private cats = []; @ApiOperation({ summary: 'Get all cats' }) @ApiResponse({ status: 200, type: CatDto, isArray: true }) @Get() findAll(): CatDto[] { return this.cats; } @ApiOperation({ summary: 'Create a new cat' }) @ApiResponse({ status: 201, type: CatDto }) @Post() create(@Body() cat: CatDto): CatDto { this.cats.push(cat); return cat; } }在這個控制器中,我們使用
@Body()裝飾器將cat參數作為 POST 請求的主體來處理。同時,我們使用了ApiResponse裝飾器來描述回傳的型別。最後,我們需要在
main.ts中設定 Swagger,這個部分前面已經提供過了,請參考前述的說明。使用這個完整的程式碼,你可以創建一個簡單的 NestJS 應用程式,其中包括一個控制器處理 GET 和 POST 請求,並使用 Swagger 生成互動式的 API 文檔。你可以透過 Swagger UI 檢視 API 文檔,同時也可以透過 POST 請求來測試 API。
如果你需要進一步的協助或有其他問題,請隨時告訴我!
照做之後,來看看我們的swagger ui頁面
cats下有兩個API,先看看GET的這個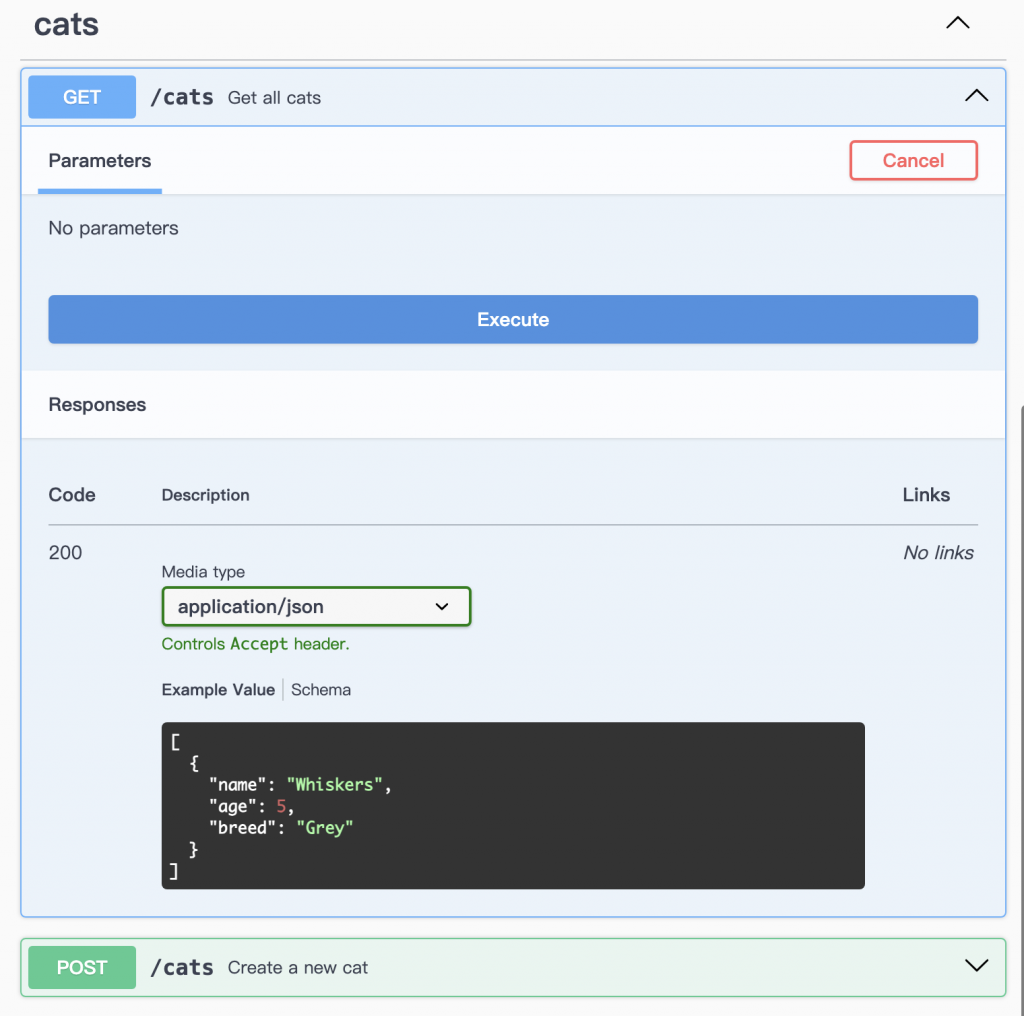
輸入不需要帶參數,但還沒回傳之前,下面就有Example Value
告訴你說,你得到的東西,可能長什麼樣字、有什麼參數、型別是什麼
像我們看到可能是一個物件陣列,那個物件中有name: string, age: number, breed: string
讓你在真實發送API之前,就知道會得到什麼樣的回傳
第一次實際發送,拿到一個預設的空陣列,正常!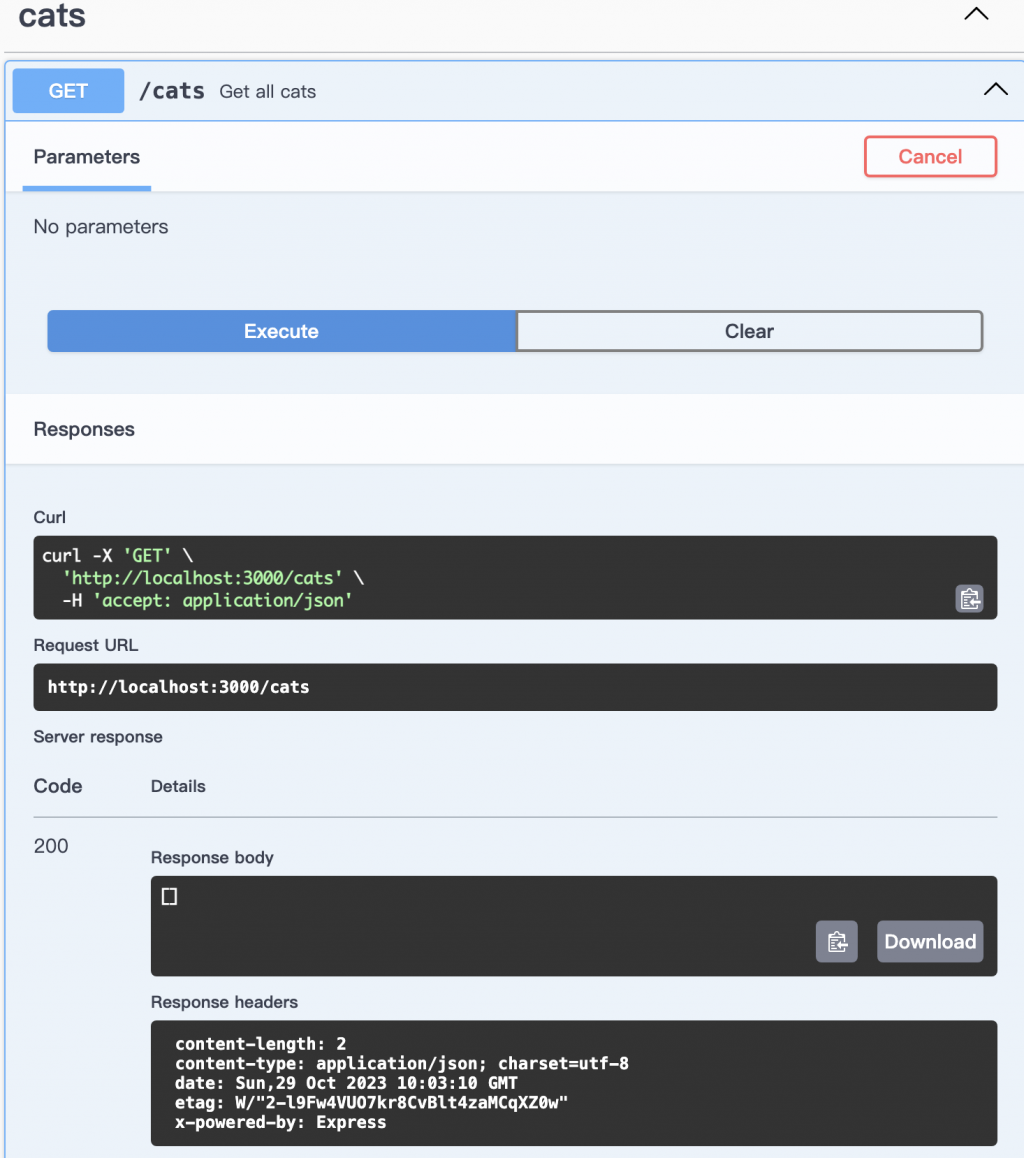
接著看那個Post 的方法,方法旁邊就有一句簡述告訴你這個API的功能
也有跟你Request body是必要的,且需要什麼參數,同時也會說回傳會是什麼內容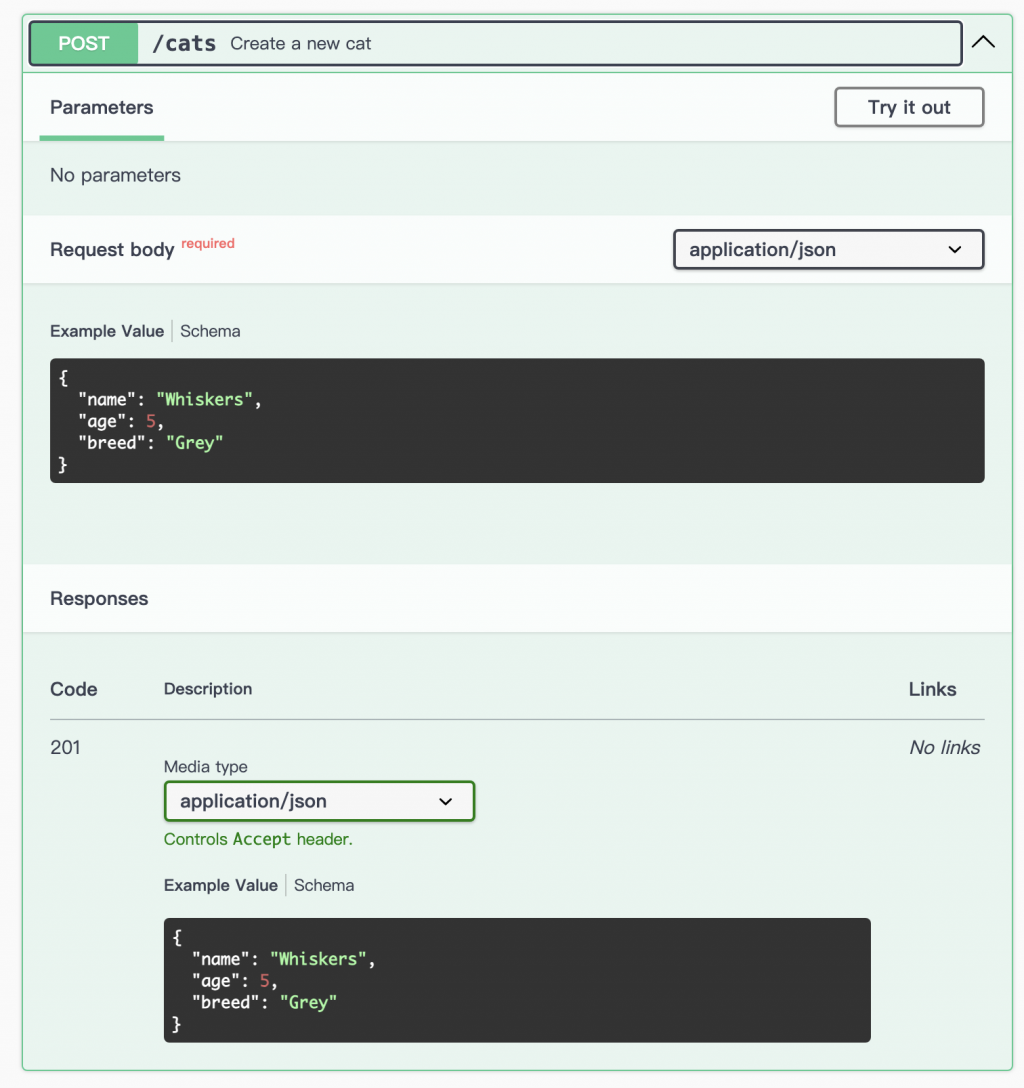
因為後端在寫DTO的時候,就有加上swagger的語法,附上example
所以點擊try out的時候就有預設的內容幫你填好
填好就可以按Execute發送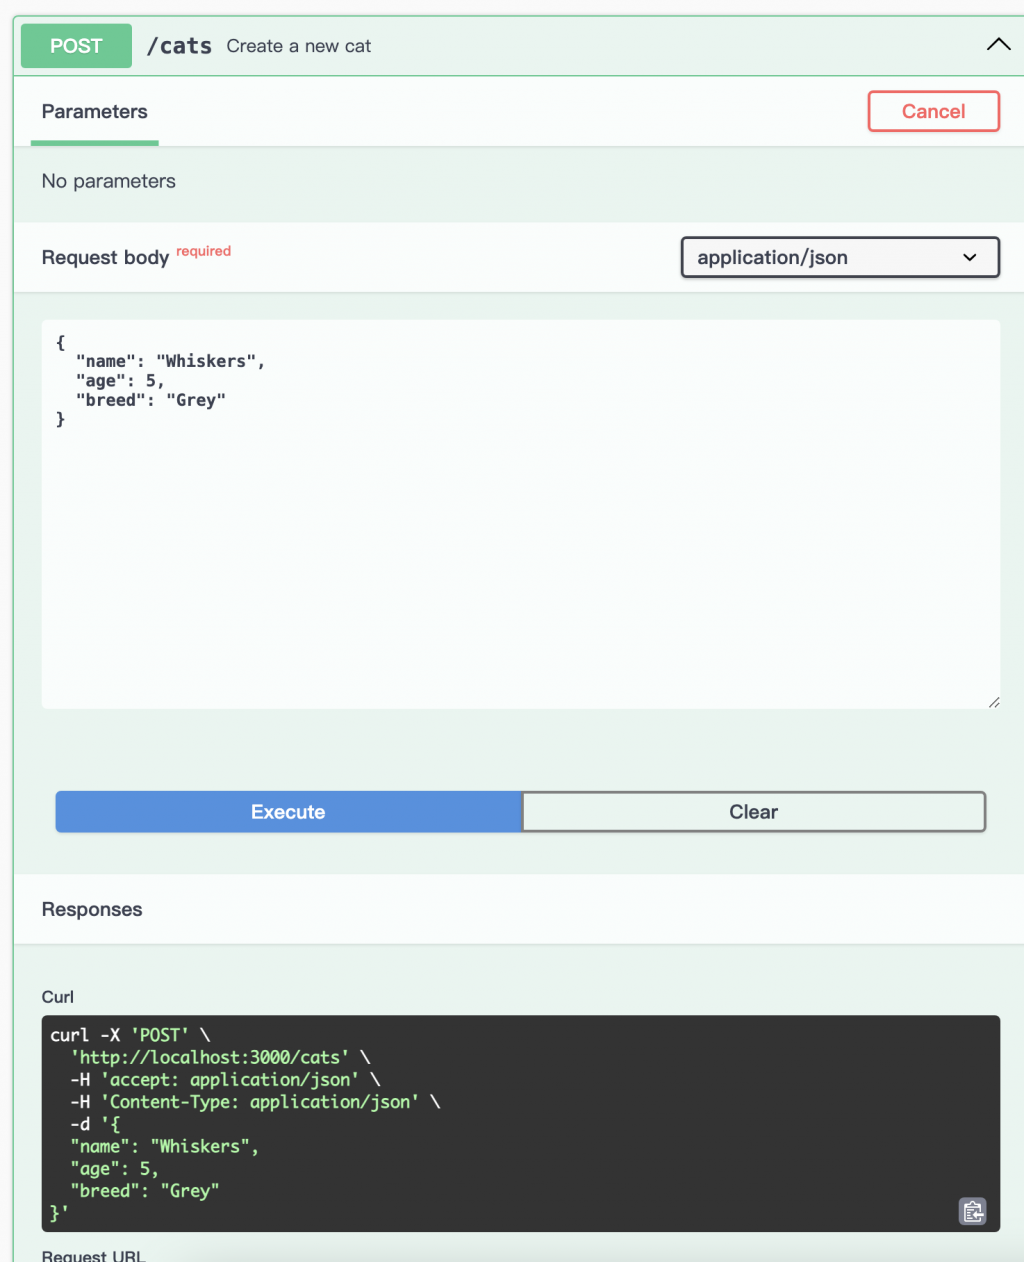
可以改成其他request body,然後Execute發送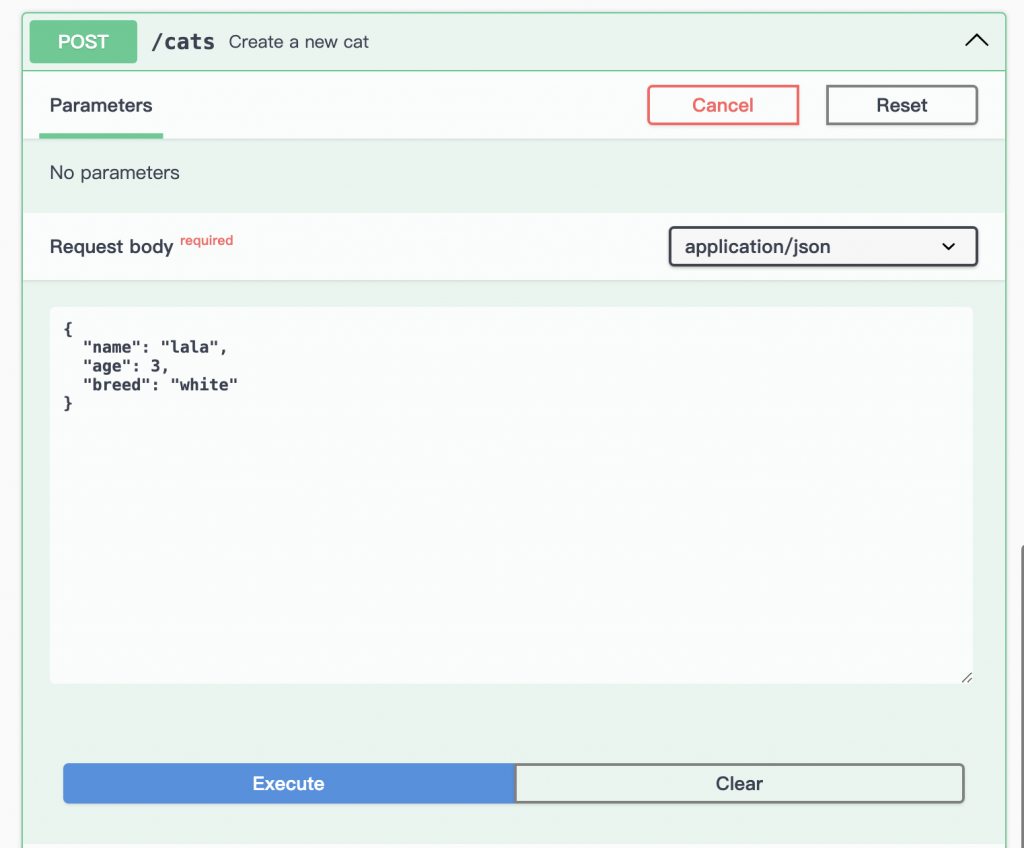
這樣我們就新增兩隻貓了,再回頭看看一開始的GET API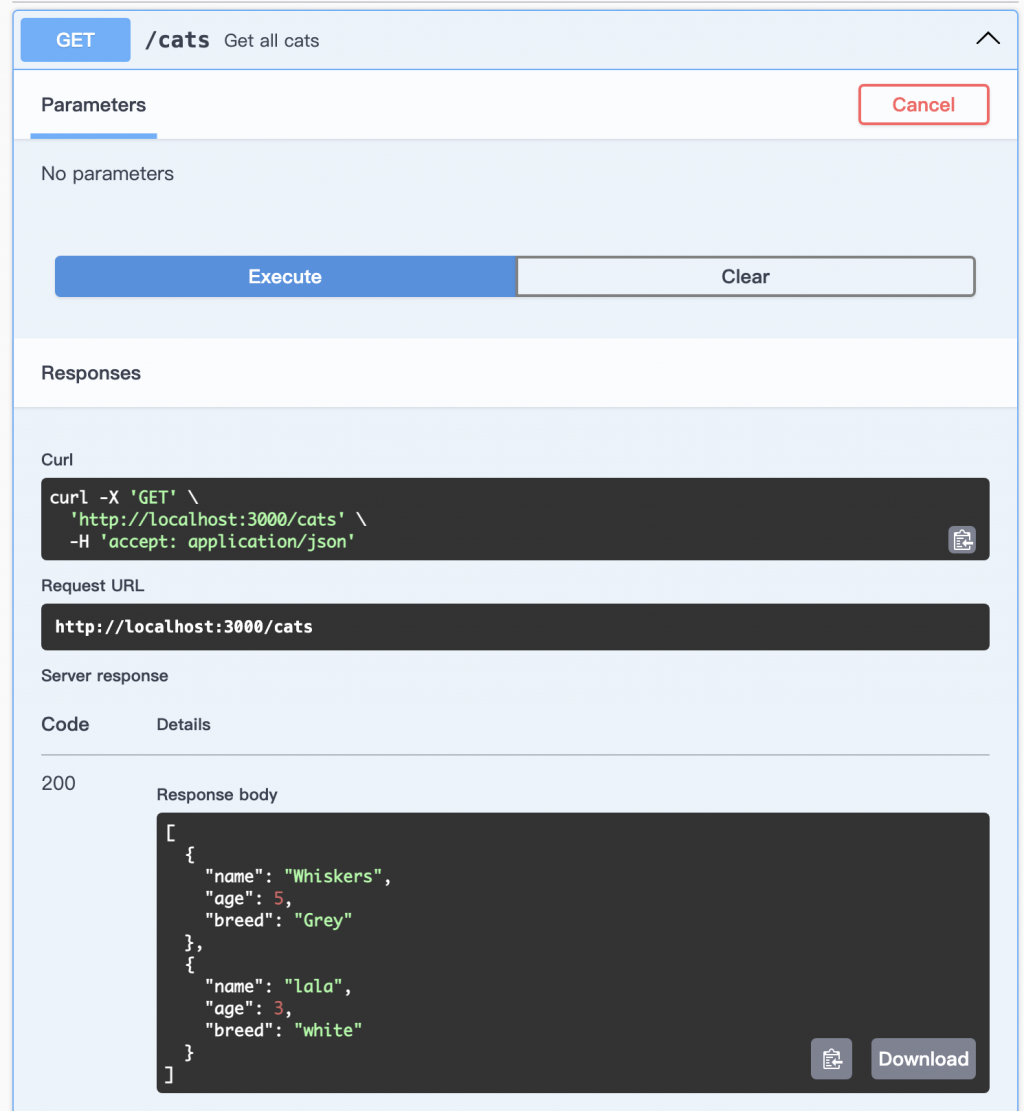
果然就拿到了剛剛新增的貓列表
功能就能這樣測試成功,而且在發送前就先告知
加了swagger的裝飾器後,不太需要另外寫文件
swagger裝飾切自動產生文件,並與程式碼互相同步,還能做發送測試
這就是API的互動式文檔
喔而且,我覺得最方便的是GET 的query參數的介面
問一下ChatGPT來生成範例看一下
當你需要在 GET 方法中處理多個 query 參數時,你可以使用 DTO(Data Transfer Object)來描述這些參數,同時使用 Swagger 裝飾器來提供相應的描述。以下是一個範例程式碼,展示如何在 NestJS 中處理帶有多個 query 參數的 GET 方法,並使用 DTO 表示它們:
首先,讓我們建立一個 DTO 來描述多個 query 參數:
// query.dto.ts

import { ApiProperty } from '@nestjs/swagger';

export class QueryDto {
  @ApiProperty({ example: 'Whiskers', description: 'The name of the cat' })
  name: string;

  @ApiProperty({ example: 5, description: 'The minimum age of the cat' })
  minAge: number;

  @ApiProperty({ example: 'Grey', description: 'The breed of the cat' })
  breed: string;
}
接下來,我們將在
CatsController中添加一個 GET 方法,該方法接受一個QueryDto作為 query 參數:// cats.controller.ts import { Controller, Get, Post, Body, Query } from '@nestjs/common'; import { ApiTags, ApiOperation, ApiResponse, ApiQuery } from '@nestjs/swagger'; import { CatDto } from './cat.dto'; import { QueryDto } from './query.dto'; @ApiTags('cats') @Controller('cats') export class CatsController { private cats: CatDto[] = [ { name: 'Whiskers', age: 5, breed: 'Grey' }, { name: 'Fluffy', age: 3, breed: 'White' }, // Add more cat data here... ]; @ApiOperation({ summary: 'Get all cats' }) @ApiResponse({ status: 200, type: CatDto, isArray: true }) @Get() findAll(@Query() query: QueryDto): CatDto[] { // Filter cats based on query parameters const filteredCats = this.cats.filter((cat) => { if (query.name && !cat.name.includes(query.name)) { return false; } if (query.minAge && cat.age < query.minAge) { return false; } if (query.breed && cat.breed !== query.breed) { return false; } return true; }); return filteredCats; } @ApiOperation({ summary: 'Create a new cat' }) @ApiResponse({ status: 201, type: CatDto }) @Post() create(@Body() cat: CatDto): CatDto { this.cats.push(cat); return cat; } }在上述程式碼中,我們使用
@Query()裝飾器將query參數作為 GET 請求的 query 字串參數,同時使用@ApiQuery裝飾器來描述 query 參數。這樣,你可以在 GET 方法中使用
query參數,同時透過 Swagger UI 來檢視並測試帶有多個 query 參數的 API。如果你需要進一步的協助或有其他問題,請隨時告訴我!
GET方法需要參數的時候,輸入的parameters變成這樣!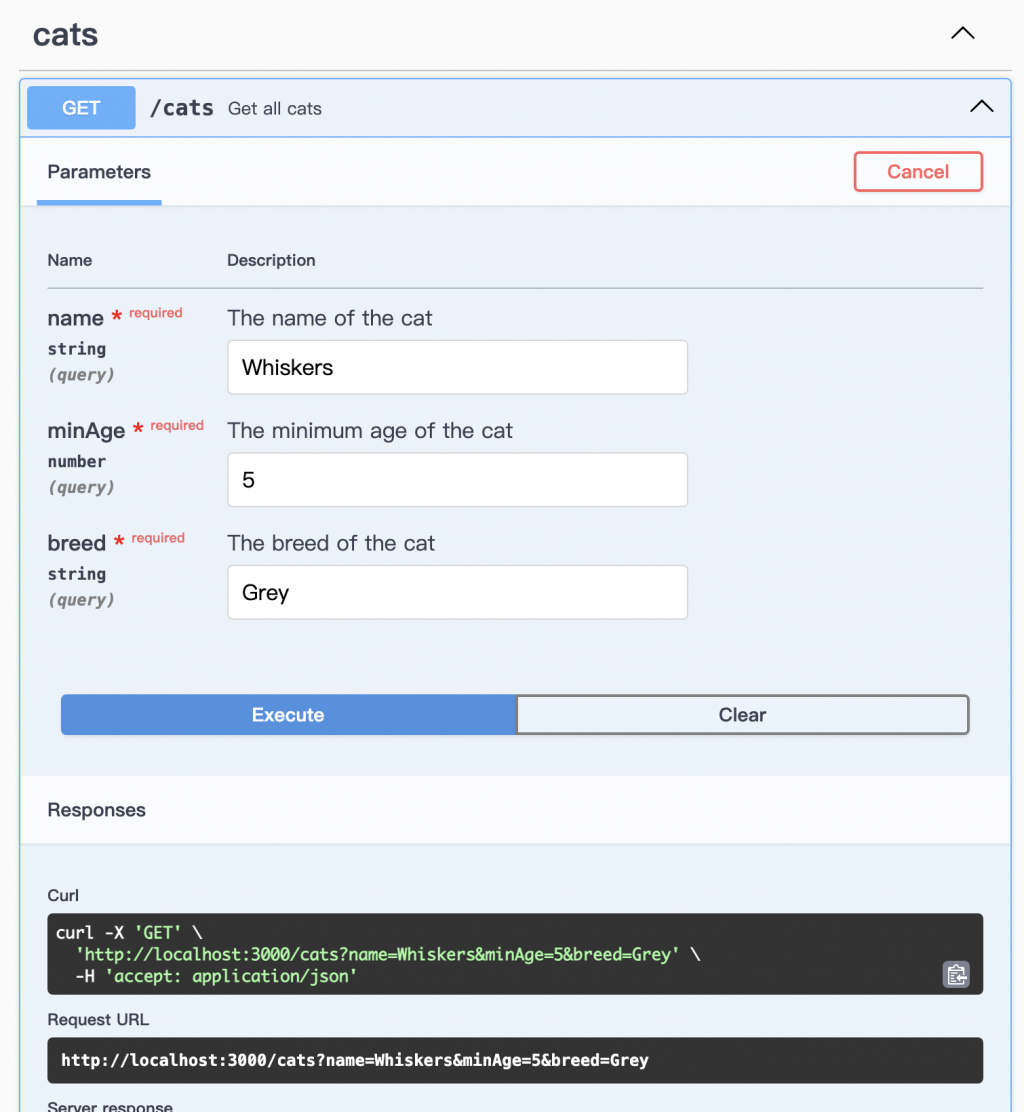
舒舒服服啊。
@ApiBearerAuth :JWT認證ChatGPT上面提供的方式中,還有提到一個@ApiBearerAuth
和我們上一篇的【Day46】ChatGPT請教教我:NestJS!(五)- JWT 身份驗證!Guards! 內容相關
針對有設下JWT驗證的API,必須有位置可以設定JWT token
上一篇我們的範例內容,綜合一下這一篇的話是這樣的
// jwt.service.ts
import { Injectable } from '@nestjs/common';
import * as jwt from 'jsonwebtoken';

@Injectable()
export class JwtService {
  private readonly secretKey = 'mySecretKey'; // 這裡放置你的私鑰

  generateToken(payload: any): string {
    return jwt.sign(payload, this.secretKey, { expiresIn: '1h' });
  }

  verifyToken(token: string): any {
    try {
      return jwt.verify(token, this.secretKey);
    } catch (error) {
      throw new Error('Token 驗證失敗');
    }
  }
}
// jwt.guard.ts
import { Injectable, CanActivate, ExecutionContext } from '@nestjs/common';
import { Observable } from 'rxjs';
import { JwtService } from './jwt.service';

@Injectable()
export class JwtAuthGuard implements CanActivate {
  constructor(private readonly jwtService: JwtService) {}

  canActivate(
    context: ExecutionContext,
  ): boolean | Promise<boolean> | Observable<boolean> {
    const request = context.switchToHttp().getRequest();
    const token = request.headers.authorization?.split(' ')[1];

    if (token) {
      try {
        const decoded = this.jwtService.verifyToken(token);
        request.user = decoded;
        return true;
      } catch (error) {
        return false;
      }
    }

    return false;
  }
}
// app.controller.ts
import { Controller, Get, UseGuards } from '@nestjs/common';
import { JwtAuthGuard } from './jwt.guard';
import { JwtService } from './jwt.service';

@Controller()
export class AppController {
  constructor(private readonly jwtService: JwtService) {}

  @Get('login')
  login(): { access_token: string } {
    const token = this.jwtService.generateToken({ userId: '123456' });
    return { access_token: token };
  }

  @Get('protected')
  @UseGuards(JwtAuthGuard)
  getProtectedData(): string {
    return '這是受保護的資料';
  }
}
// app.module.ts
import { Module } from '@nestjs/common';
import { AppController } from './app.controller';
import { JwtAuthGuard } from './jwt.guard';
import { JwtService } from './jwt.service';
import { CatsModule } from './cats/cats.module';

@Module({
  imports: [CatsModule],
  controllers: [AppController],
  providers: [JwtAuthGuard, JwtService],
})
export class AppModule {}
如果光是這樣放,沒有在controller中加上任何swagger裝飾器的情況下,會像是這樣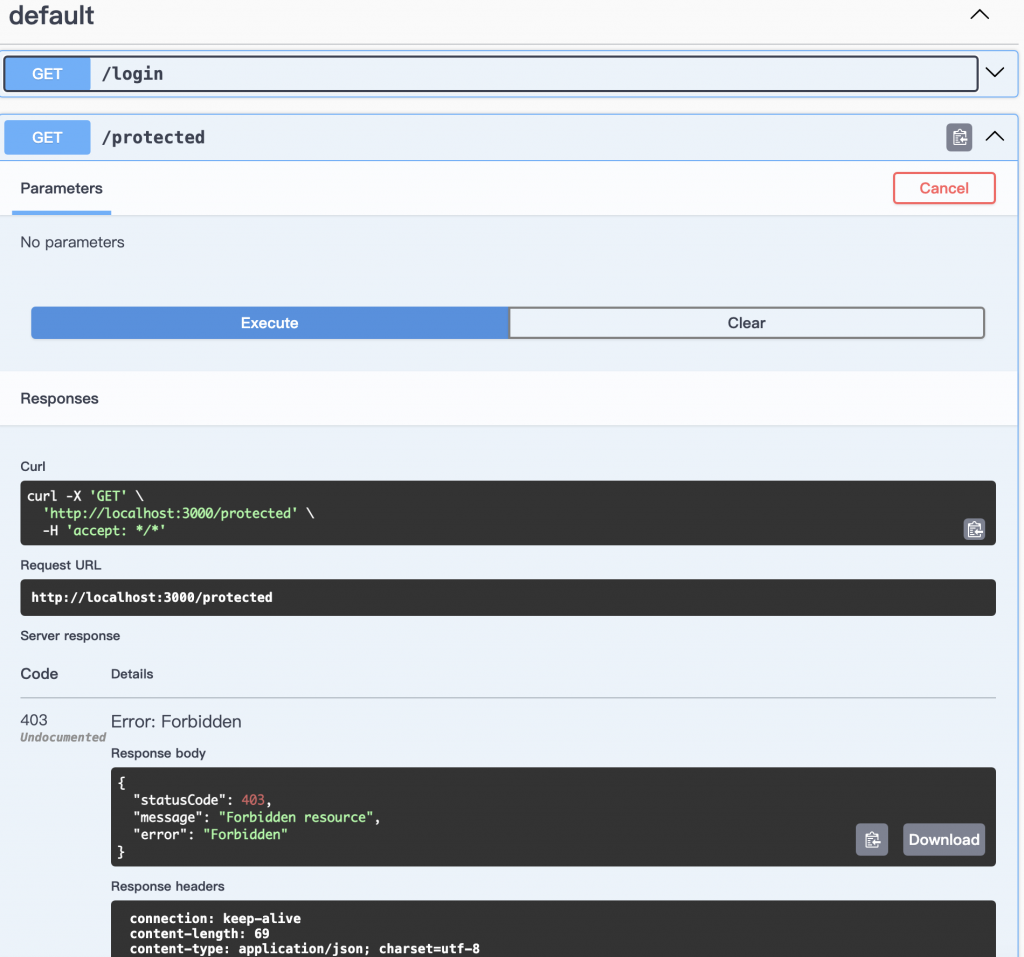
API放在default tag中,按下執行只會得到403
也沒有找到可以指定JWT token的地方
OK! 來請教這個要怎麼加上Swagger
要在 Swagger UI 中設定 JWT token 在 header 中,你可以使用 Swagger 的 securityDefinitions 來描述你的 JWT token。以下是你的程式碼搭配 Swagger 裝飾器以及 securityDefinitions 的改寫:
首先,在
app.controller.ts中加入 Swagger 相關的裝飾器:import { Controller, Get, UseGuards } from '@nestjs/common'; import { ApiBearerAuth, ApiTags, ApiOperation, ApiResponse } from '@nestjs/swagger'; // 引入相關的 Swagger 裝飾器 import { JwtAuthGuard } from './jwt.guard'; import { JwtService } from './jwt.service'; @ApiTags('authentication') // 添加 tags,這只是一個示例,你可以自行修改 @Controller() export class AppController { constructor(private readonly jwtService: JwtService) {} @ApiOperation({ summary: 'Login' }) // 描述操作 @ApiResponse({ status: 200, type: () => ({ access_token: String }) }) // 描述回傳型別 @Get('login') login(): { access_token: string } { const token = this.jwtService.generateToken({ userId: '123456' }); return { access_token: token }; } @ApiOperation({ summary: 'Get protected data' }) // 描述操作 @ApiBearerAuth() // 使用 Bearer Token 驗證 @ApiResponse({ status: 200, type: String }) // 描述回傳型別 @UseGuards(JwtAuthGuard) @Get('protected') getProtectedData(): string { return '這是受保護的資料'; } }接下來,在你的
main.ts中設定 Swagger:import { NestFactory } from '@nestjs/core'; import { AppModule } from './app.module'; import { SwaggerModule, DocumentBuilder } from '@nestjs/swagger'; async function bootstrap() { const app = await NestFactory.create(AppModule); const options = new DocumentBuilder() .setTitle('Your API') // 設定 API 標題 .setDescription('API description') // 設定 API 描述 .setVersion('1.0') // 設定 API 版本號 .addBearerAuth() // 添加 Bearer Token 驗證 .build(); const document = SwaggerModule.createDocument(app, options); SwaggerModule.setup('api', app, document); await app.listen(3000); } bootstrap();現在你的 Swagger UI 應該會顯示一個 "Authorize" 按鈕,你可以點擊它來設置 JWT token 在 header 中。
這樣你就可以在 Swagger UI 中進行受保護路由的測試,並在 header 中設置 JWT token。
如果你需要進一步的協助或有其他問題,請隨時告訴我!
做了改動之後,swagger ui的介面中出現「Authorize」的 按鈕了!
最右上角的綠色「Authorize」按鈕按下去之後,就可以把login API拿到的token丟進去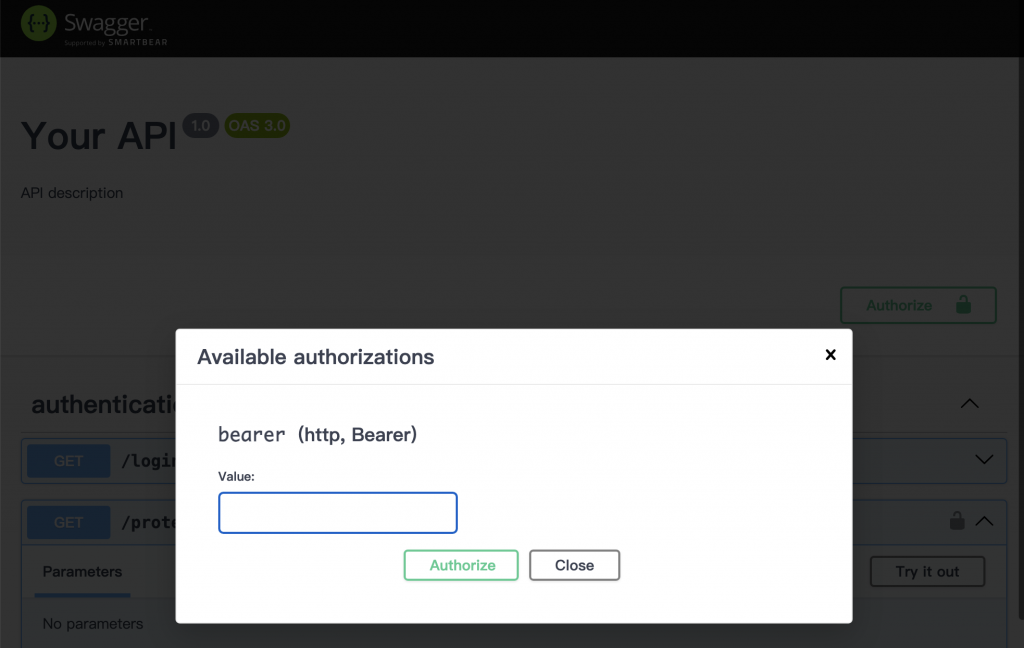
接著按下Authorize,然後關閉視窗
再嘗試看看protected這個API,就有順利執行了!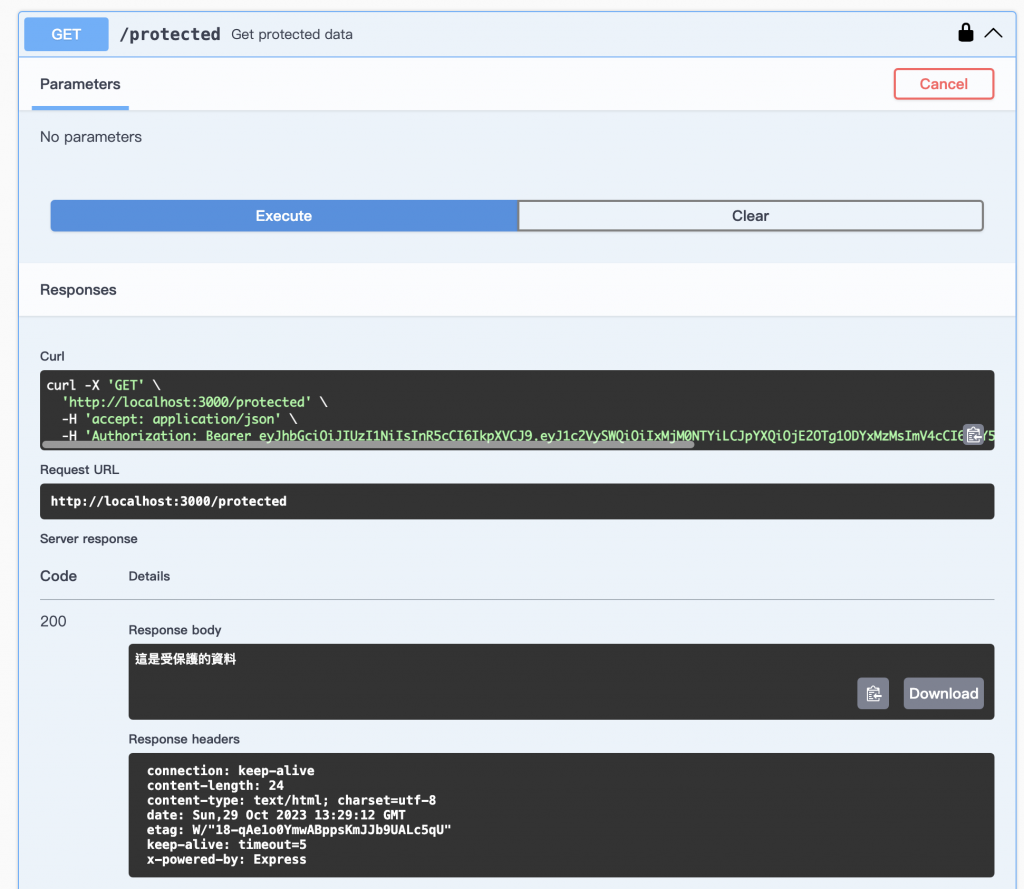
另外在有指定 @ApiBearerAuth() 的API名稱最右側,也會有一個鎖頭的按鈕
那邊也可以按下後設定token

當然,Swagger 是一個功能強大的工具,除了基本的使用,還有一些進階的功能和技巧可以讓你更好地利用它來撰寫、測試和維護 API 文檔。以下是一些進階的 Swagger 使用和技巧:
- 模型定義與引用:
- 使用
definitions或components/schemas來定義和引用模型,以便在多個地方重複使用。- 使用
$ref來引用定義的模型,使得 API 文件更清晰。- 路由分組:
- 使用 Swagger 的
tags裝飾器來對 API 路由進行分組,以便在 Swagger UI 中更好地組織和瀏覽。- 路由參數:
- 使用
@ApiParam裝飾器來描述路由中的參數,使得 API 文檔更詳盡。- 控制器層次結構:
- 在 NestJS 中,你可以使用模組和子模組來組織控制器,Swagger 也會根據模組的層次結構來生成文檔。
- 操作鉤子與中介軟體:
- 在 Swagger 中,你可以使用
before和after鉤子來執行一些前置或後置處理,以便動態修改 API 資訊。- 加密與認證:
- 如果你的 API 需要進行加密或認證,可以使用
securityDefinitions來定義相應的安全方案。- 自訂化 UI:
- Swagger UI 允許你通過添加自定義 CSS 或 JavaScript 來修改 UI 的外觀和行為。
- 多語言支援:
- Swagger 支援多種語言,你可以在
info對象中添加x-translator屬性,以指定翻譯的語言。- API 版本管理:
- 如果你的應用程式有多個版本,可以使用
basePath來區分不同版本的 API。- 測試功能:
- Swagger UI 提供了一個方便的介面來進行 API 測試,你可以直接在 UI 中發送請求。
這些是一些進階的 Swagger 使用和技巧,它們可以幫助你更靈活地撰寫和管理 API 文檔。當然,根據你的具體項目需求,還可以進一步探索 Swagger 的其他功能和配置。
如果你對其中任何一個主題有特別的興趣,或者需要更詳細的說明,請隨時告訴我!
上面又提到了一些額外的功能,就是簡單做個導覽與列表
這一篇就沒有要繼續細講下去,有需求可以再問問ChatGPT!
差不多該來收尾了

結合以上內容,以下是 Swagger 在 NestJS 中使用的重點:
- 安裝與設定:
- 使用
@nestjs/swagger套件安裝 Swagger。- 在
main.ts中設定 Swagger,並使用DocumentBuilder定義基本資訊。- 裝飾器的使用:
- 使用
@ApiTags來分組 API 資源。- 使用
@ApiOperation描述操作,並使用@ApiResponse定義回傳型別。- 使用
@ApiProperty來描述屬性。- DTO 的應用:
- 使用 DTO 來描述 API 參數和回傳,使得 API 文件更清晰。
- 受保護的路由:
- 使用
@UseGuards來保護特定的路由,例如 JWT 驗證。- 多個 query 參數的處理:
- 使用 DTO 來處理多個 query 參數,並在 Swagger UI 中進行測試。
- JWT Token 在 Header 中的設定:
- 使用
@ApiBearerAuth來指定 Bearer Token 驗證,並在main.ts中配置相應的 securityDefinitions。進一步,你可以探索以下進階功能:
- 模型定義與引用
- 路由分組
- 路由參數描述
- 控制器層次結構
- 操作鉤子與中介軟體
- 加密與認證
- 自訂化 UI
- 多語言支援
- API 版本管理
- 測試功能
總的來說,Swagger 是一個強大的工具,可以幫助你更輕鬆地創建、測試和維護 API 文檔,同時提供了許多進階功能來滿足不同項目的需求。
希望這份整合的內容對你有所幫助!如果你有任何進一步的問題或需要協助,請隨時告訴我。
本篇的對話紀錄連結在這邊:
https://chat.openai.com/share/52f68656-7a7c-4a9f-acd7-3c53013a22d6
swagger對於API的文件化與測試,都提供了相當方便與優秀的做法
在認識swagger之前,我曾經試著用Notion來寫API的規格書
在初期規劃或整理、整理開發文件的時候Notion確實很好用
但等到專案開始運行,會有大大小小的改動修正之後
Notion的那份文件就開始和真實的API開始脫離,
變成原本就有的內部文件記錄(更新紀錄或需求紀錄)之外
還要花額外的心力去同步API文件,實在太花精力了
其次就是使用postman測試的時候,也是要有一份文件,一邊看著輸入輸出要是什麼內容
一邊手動填寫request body的屬性名稱與內容
說不上很方便
但swagger就大大的改善了我上述兩個困擾
文件就跟著開發走,開發上多參數、少參數都可以直接反應出來
那些swagger裝飾器中的API或參數描述,也達成了程式碼的註解效果
真的要測試的時候,直接提供了方便的測試介面
有什麼API或是需要什麼參數,一目了然,非常利於團隊溝通與測試
大概就是這樣!
另外,因為這幾篇都著重在controller,幾乎沒有呼叫service
功能都是controller 直接回傳這樣其實不太好啊??
說好的架構分工呢?
下一篇!再來談一下NestJS 的service & 例外處理 & HTTP請求!
我是成為swagger信徒的前端工程師一宵三筵,我們明天見!


 iThome鐵人賽