在開發 i2c 的時候我們可以使用一些工具來加速我們的開發。首先我們先在 yocto / build / local.conf 當中加入 i2c-tools 這個工具,後續在測試時會方便很多。
i2cdetect i2cdump i2cget i2cset # 可使用的 cmd
# 查看有幾個 Bus
 i2cdetect -l
# 查看該Bus 上的 Device , 最後面的是 Bus 編號
 sudo si2cdetect -y 1
# 獲得 I2C-1 上的 0x50 所有 register 資訊
 i2cdump -y 1 0x50
# 修改 I2C-1 上的 0x50 地址的 0x12 的 reg 位置上的數值 ,改成5
 i2cset -f -y 1 0x50 0x12 5
# 直截讀取 I2C-1 上的 0x50 地址的 0x12 暫存器位置的資料
 i2cget  -y 1 0x50 0x12
# 讀取 I2C-1 上的 0x50 設備地址的四個 byte資料
 i2ctransfer -f -y <i2cbus number> r<number of bytes>@<peripheral address>
 i2ctransfer -f -y 1 r4@0x50
# 寫入 byte 的資料
 i2ctransfer -f -y <i2cbus number> w<number of bytes>@<peripheral address> <byte value 1> <byte value 2> ... <byte value n>
 i2ctransfer -f -y 1 w2@0x50 0x10 0x20
# 寫入後讀取
 **i2ctransfer -f -y <i2cbus number> w<number of bytes to write>@<peripheral address> <byte value 1> <byte value 2> ... <byte value n> r<number of bytes to read>
 i2ctransfer -f -y 1 w2@0x50 0x10 0x20 r4**
CONFIG_I2C=y
CONFIG_I2C_CHARDEV=y
CONFIG_I2C_STM32F7=y
bitbake linux-stm32mp
bitbake core-image-minimal
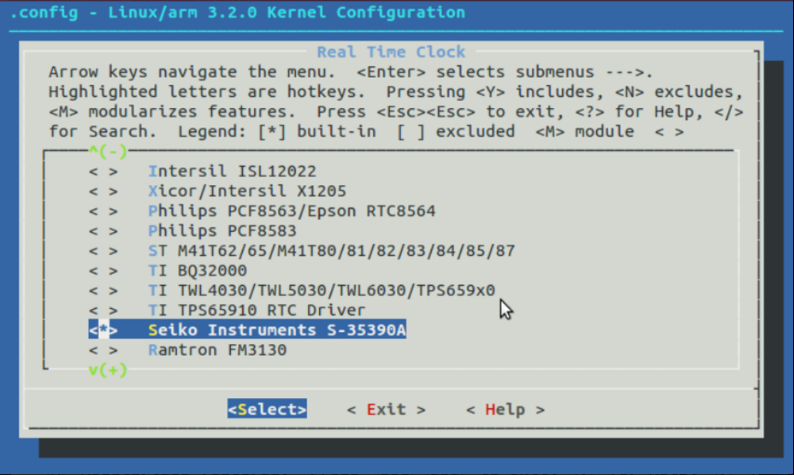
configname: CONFIG_RTC_DRV_S35390A
Linux Kernel Configuration
└─>Device Drivers
└─>Real Time Clock

    └─>Seiko Instruments S-35390A

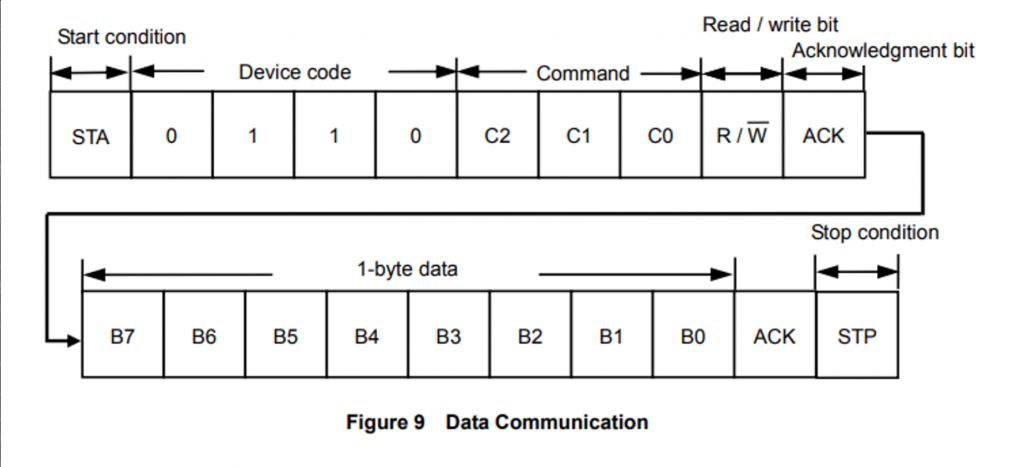
下方是 S35390 的地址與指令的圖,可以看到比較不一樣的是他只採用了 4bits 當作地址,而後續 3bits 為指令。所以這邊我們可以得知地址掃出來會是 0x30~0x37。
&i2c8 {
	pinctrl-names = "default", "sleep";
	pinctrl-0 = <&i2c8_pins_a>;
	pinctrl-1 = <&i2c8_sleep_pins_a>;
	status = "okay";

	/* USER CODE BEGIN i2c8 */

	i2c-scl-rising-time-ns = <185>;
	i2c-scl-falling-time-ns = <20>;
	clock-frequency = <100000>;
	status = "okay";
	#address-cells = <1>;
	#size-cells = <0>;

	S35390A: rtc@30{
		compatible = "sii,s35390a";
		reg = <0x30>;
		status = "okay";
	};
};
確認當前kernel 當中是否含有驅動
grep -r -n "s35390a" ./ #要在kernel 當中的 driver 資料夾中搜尋
上電確認 /dev 底下是否有 /rtc0 /rtc1 ,如果MP1 內部 RTC 沒關的換就會有兩個
root@stm32mp1:~# ls /dev/rtc*
/dev/rtc  /dev/rtc0  /dev/rtc1
如果沒有的話可以確認一下啟動過程中是否有出現相關錯誤
dmesg | grep "rtc"
# 先設定系統時間
date -s "2024-08-20 11:23:45"
# 將 rtc 當前的時間顯示出來
hwclock --show --rtc=/dev/rtc1
# 將系統時間設定給 RTC
hwclock --systohc --rtc=/dev/rtc1
# 最後再將RTC時間顯示出來確認
hwclock --show --rtc=/dev/rtc1

# 斷電後重新上電 確認RTC正確使用電容儲存的電維持工作
當 rtc 正常後 ,使用 i2cdetect 指令會看到下方 (UU 表示目前已被其餘process 使用)
root@stm32mp1:~# i2cdetect -y 1
     0  1  2  3  4  5  6  7  8  9  a  b  c  d  e  f
00:                         -- -- -- -- -- -- -- --
10: -- -- -- -- -- -- -- -- -- -- -- -- -- -- -- --
20: -- -- -- -- -- -- -- -- -- -- -- -- -- -- -- --
30: UU UU UU UU UU UU UU UU -- -- -- -- -- -- -- --
40: -- -- -- -- -- -- -- -- -- -- -- -- -- -- -- --
50: -- -- -- -- -- -- -- -- -- -- -- -- -- -- -- --
60: -- -- -- -- -- -- -- -- -- -- -- -- -- -- -- --
70: -- -- -- -- -- -- -- --
root@stm32mp1:~#
