今天又要來實作啦!我想要介紹的主題是 Hugging Face 以及如何使用它的功能來完成一些簡單的 NLP 任務。
Hugging Face 是一個和人工智慧相關的開源平台,也有人把它叫做「AI 界的 Github」,因為它提供了大量的 AI 模型和資料集,並且擁有各式各樣的工具和函式庫。這些資源全部都是開源的,像我這種剛開始學習 NLP 的新手就可以在上面找一些模型來實作。
除了 NLP 領域,我在 Hugging Face 上還有看到像電腦視覺 ( Computer Vision ) 和語音 ( Audio ) 等主題的 AI 模型,不過今天就專注在 NLP 好了。
我用 Huggingface 提供的教程來介紹一下如何利用 Transformer 的函式庫吧,這裡的實作一樣是在 Colab 上進行。
首先是把 transformers 函式庫載下來:
!pip install -q transformers
以文本生成 ( Text Generation ) 為例,我們可以直接使用 pipeline 把我們要做的任務填進去,它就像是一個接口,能夠快速連接到 Hugging Face 提供的各種模型。
from transformers import pipeline

generator = pipeline("text-generation")
results = generator("The chocolate cake was delicious and", max_length = 20)
print(results)
我們把任務設定成 text-generation,然後讓最大輸出長度 max_length 等於 20:
[{'generated_text': 'The chocolate cake was delicious and I would be making a sequel if I lived in Canada.\n\n'}]
可以看到在模型接續下去的內容中,文法和單詞大致用對了,沒有出現順序錯亂或看不懂的情況,接下來換成情緒分析任務試試看。
from transformers import pipeline

classifier = pipeline("sentiment-analysis")
data = ["I love you", "I hate you"]
classifier(data)
[{'label': 'POSITIVE', 'score': 0.9998656511306763},
{'label': 'NEGATIVE', 'score': 0.9991129040718079}]
像這樣簡單的小任務,模型都可以回答的很正確,當然,我們也可以試試看用 HuggingFace 上其他的分類模型,看效果如何。
我們可以在 HuggingFace 網站上找到 Model 的頁面,按照我們想要執行的任務選擇其中一個模型,假設我選了這一個:

然後點擊右上角 Use this model 的按鈕,它會說明如何使用這個模型:

照著執行看看:
classifier = pipeline(model = "finiteautomata/bertweet-base-sentiment-analysis")
classifier(data)
[{'label': 'POS', 'score': 0.9916695356369019},
{'label': 'NEG', 'score': 0.9806600213050842}]
對於同樣的 data 這個模型可以做出正確的情緒分類,我們就可以按照這個方式去使用各種模型。
接下來要更進一步了,我們可以用昨天講到的微調 ( Fine-Tuning ) 概念用在模型上,為了讓大家比較了解完整的流程,我讓 ChatGPT 生成了一筆情緒分類的資料集,然後從頭開始做。
我把訓練資料集和測試資料集放在這個連結,大家有興趣可以把它載下來玩玩看。
首先,我們要開啟 Colab 然後連上 Google Drive,利用 Hugging Face 提供的工具把資料集載下來:
!pip install datasets
from google.colab import drive
from datasets import load_dataset

drive.mount('/content/drive', force_remount = True)

# 請自行修改檔案路徑
data_files = {"train": "train_data.json", "test": "test_data.json"}
dataset = load_dataset("json", data_files = data_files)
print(dataset)
DatasetDict({
    train: Dataset({
        features: ['text', 'label'],
        num_rows: 16
    })
    test: Dataset({
        features: ['text', 'label'],
        num_rows: 4
    })
})
通過輸出結果可以看到,資料格式中包含了文章 text 和對應的情緒分類 label,而訓練資料集有 16 筆,測試資料集有 4 筆。
此外,這裡有一個細節的部份是我在練習的時候才發現的,載入資料集的時候不能用一般的 open 而是 load_dataset,因為它會把資料集變成 DatasetDict 的格式,才能進行下面這一連串的任務。
接著開始進行模型的初始化和設置,這一段程式碼比較長,我用列點的方式補充好了:
from transformers import BertTokenizer, BertForSequenceClassification
import torch

device = torch.device("cuda" if torch.cuda.is_available() else "cpu")
tokenizer = BertTokenizer.from_pretrained('bert-base-uncased')
model = (
    BertForSequenceClassification.from_pretrained(
        'bert-base-uncased',
        num_labels = 2,
        id2label = {0: "negative", 1: "positive"},
        label2id = {"negative": 0, "positive": 1}
    ).to(device)
)
model_name = "sentiment_model"
cuda,最後面要加上 .to(device)
bert-base-uncased,model 的部分也要設置成一樣的模型sentiment_model
下一步是設置資料的預處理流程以及評估 accuracy 的方式:
from transformers import DataCollatorWithPadding
from sklearn.metrics import accuracy_score

def preprocess_function(example):
  return tokenizer(example['text'], truncation = True, padding = True)

train_dataset = dataset["train"].map(preprocess_function, batched = True)
test_dataset = dataset["test"].map(preprocess_function, batched = True)

data_collator = DataCollatorWithPadding(tokenizer = tokenizer)

def compute_metrics(pred):
  labels = pred.label_ids
  predictions = pred.predictions.argmax(-1)
  accuracy = accuracy_score(labels, predictions)
  return {"accuracy": accuracy}
最後要設置訓練參數:
from transformers import Trainer, TrainingArguments

training_args = TrainingArguments(
  output_dir = model_name,
  evaluation_strategy = "epoch",
  learning_rate = 2e-5,
  per_device_train_batch_size = 4,
  per_device_eval_batch_size = 4,
  num_train_epochs = 3,
  weight_decay = 0.01,
)

trainer = Trainer(
  model = model,
  args = training_args,
  train_dataset = train_dataset,
  eval_dataset = test_dataset,
  tokenizer = tokenizer,
  data_collator = data_collator,
  compute_metrics = compute_metrics,
)

trainer.train()
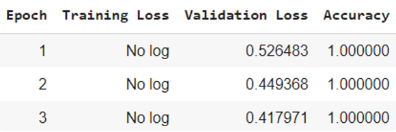
訓練過程中會出現像這樣子的紀錄:

我們也可以執行這段程式碼來看 training 和 testing 的結果:
train_results = trainer.evaluate(eval_dataset = train_dataset)
train_accuracy = train_results.get('eval_accuracy')
print(f"Training Accuracy: {train_accuracy}")

test_results = trainer.evaluate(eval_dataset = test_dataset)
test_accuracy = test_results.get('eval_accuracy')
print(f"Testing Accuracy: {test_accuracy}")
Training Accuracy: 0.9375
Testing Accuracy: 1.0
不過因為資料量還蠻少的,沒有辦法展示出真正的微調效果如何。此外,因為剛剛在設定中把模型存在指定位置了,我們還可以找到它的路徑然後用 pipeline 讓模型預測新的資料:
from transformers import pipeline

classifier = pipeline(task = 'sentiment-analysis', model = "/content/sentiment_model/checkpoint-12")
classifier(["The new café in town has amazing coffee and a cozy atmosphere.",
			      "The service at the restaurant was slow and the food was disappointing."])
[{'label': 'positive', 'score': 0.7120353579521179},
 {'label': 'negative', 'score': 0.6172909736633301}]
這兩個句子都被模型正確的分類到了對應的 label,不過資料集大一點的話效果應該會更好。以上就是我們利用 Hugging Face 這個平台和 Transformer 函式庫的一些實作,明天要來介紹另一個超讚的平台 Langchain 啦!
推薦文章
