iT邦幫忙

2024 iThome 鐵人賽

DAY 28
0
生成式 AI

T 大使 AI 之旅系列 第 28

【Day 28】用 FlowiseAI 打造 Agent 夢之隊

  • 分享至 

  • xImage
  •  

前情提要

上一篇文章利用 FlowiseAI 實作了 RAG、Memory、Agent 這些常用的生成式 AI 技術,也有用一些 Tools 來幫助 AI 完成任務。那今天實作的內容是將 Tesla 2023 的財報資料放進向量資料庫,然後使用 Retriever Tool 檢索出我想要的內容,在透過我建立的 Agent 團隊,將其整理好結果傳到我的 Email。

可能會有人好奇為何不選台灣企業,因為台灣的大企業很多都把 PDF 加密成無法複製的那種型態,這樣也無法透過程式或工具去解析裡面的內容,解析出來都會是亂碼。

https://ithelp.ithome.com.tw/upload/images/20240901/20168336LpiMxt7Snd.jpg

工具介紹

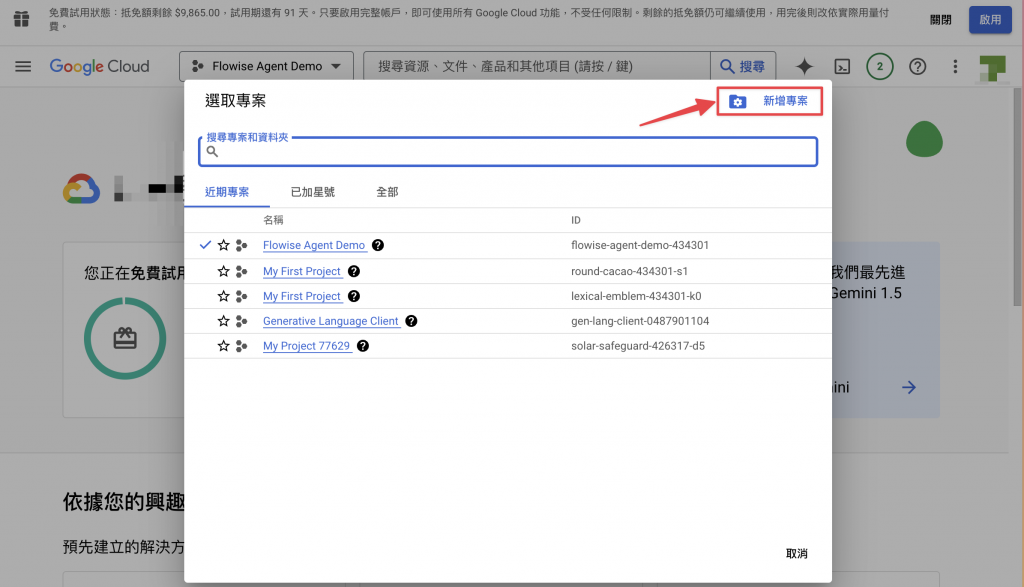
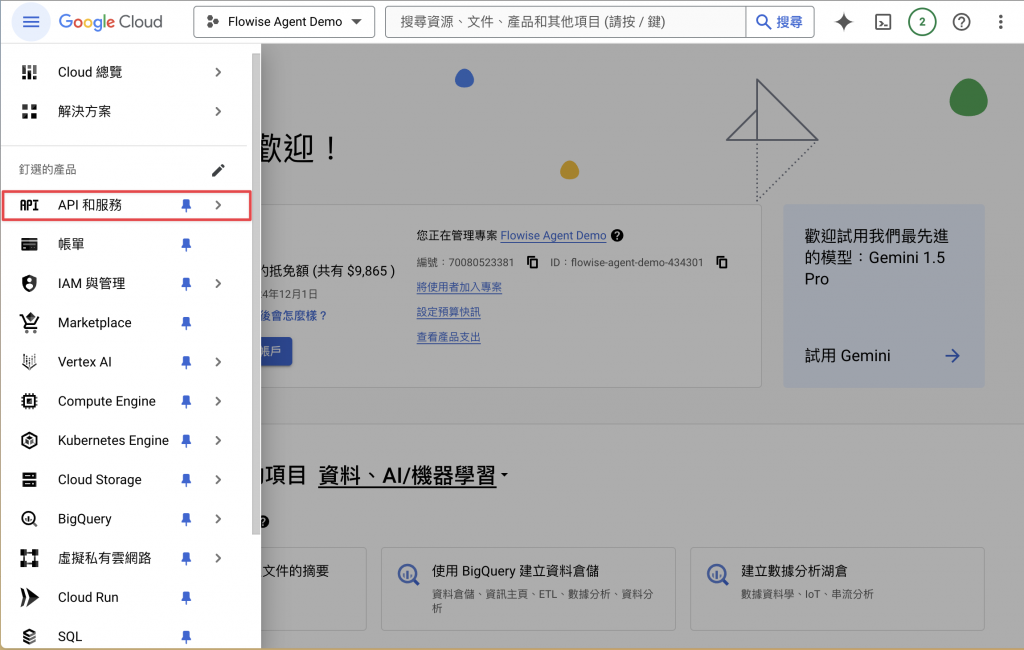
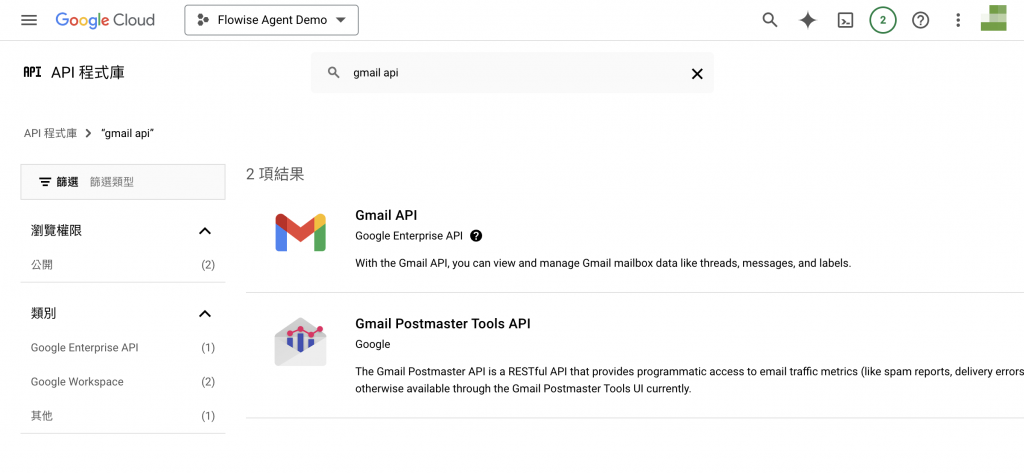
要完成今天的實作必須先準備好兩個工具,那就是 Make.com 和 GCP (Google Cloud Platform)。

Make.com

Make.com 是一個強大的工作流自動化工具,他的可視構建器能夠幫助使用者快速創建工作流程,而且不需要寫程式。這樣說有點抽象,以我今天實作的應用舉個例子:我今天要自動化的寄郵件給客戶、同事主管等等,那只需要透過 Make.com 的 webhook 串接 Gmail 就可以完成自動化的流程。若套用在電商的話,可以串接 LINE 自動寄促銷優惠、季節新品等等資訊給客戶。且不只有有這些,很多工具都可以透過 Make.com 串接起來,我自己也還在摸索他更多的可能性,總之是個很棒的工具,而且可以免費試用。

去 Make.com 官網註冊吧 -> Make.com

Google Cloud Platform (GCP)

GCP 這個工具應該就是大家耳熟能詳的了,畢竟也是雲端三巨頭之一。那今天主要用他是要來為 Gmail 建立 API,以利 Make.com 的 Webhook 可以順利連接上,最後在 Mail 中收到郵件。那這個功能也是可以免費使用的,雖然註冊需要寫卡號,但是不會扣款喔~

去 GCP 註冊帳號吧 -> Google Cloud Platform

實戰🔥

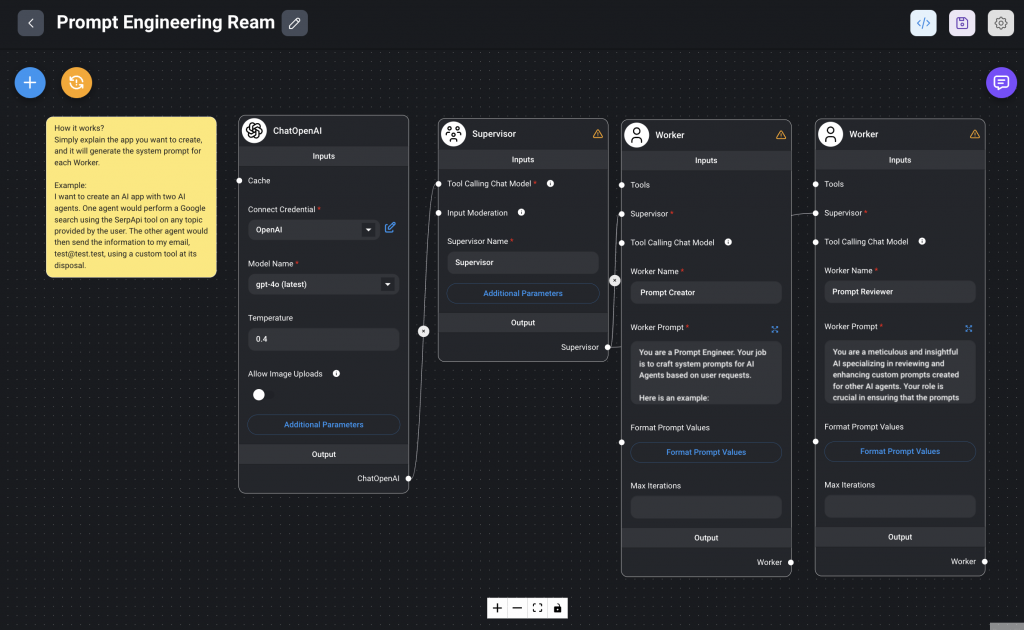
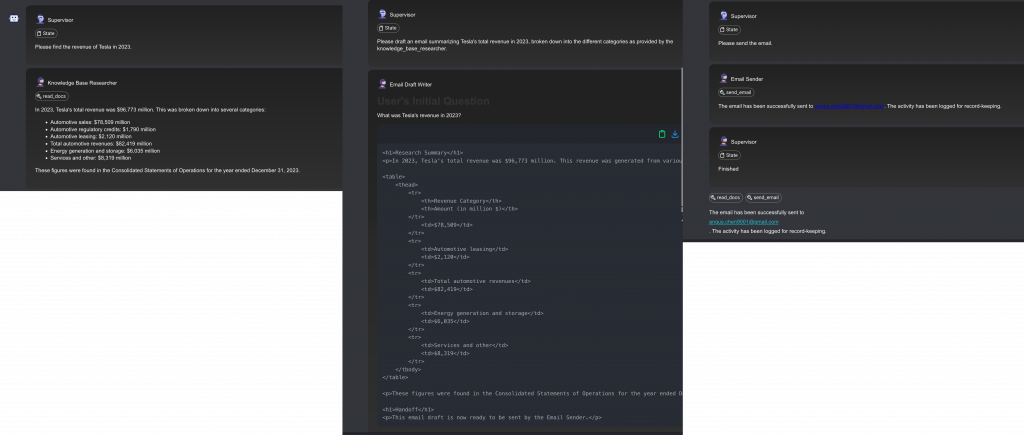
工具都準備好就要開始實戰啦!在建構 Chatflow 之前先了解我們 Agent 團隊需要的成員,需要有一個分析 Tesla 2023 財報的 Worker,然後需要一位將分析結果轉換整理為 Email 的格式的 Worker,最後需要一位負責將 Email 內容給寄出的 Worker。然後這幾位 Worker 會統一由一位 Supervisor 來監督和指派任務。

Prompt Engineering Team

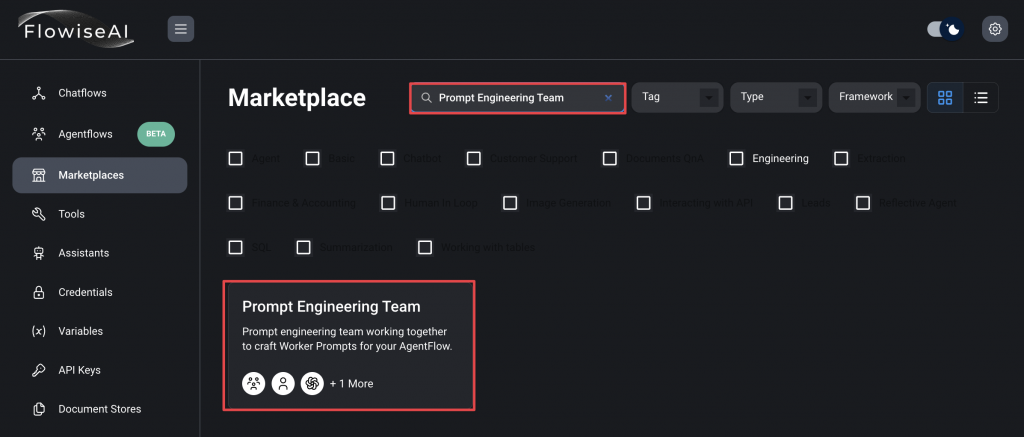
要建立我的 Agent 團隊需要設計 Prompt 給每個 Worker,讓他們根據自己工作內容完成任務。這邊我們使用 FlowiseAI 內建的 Prompt Engineering Team,來幫助我們產生要分配給每個團隊成員的 Prompt。那因為 Prompt 都已經寫好了,所以直接輸入需要闡述需要的 Prompt 內容是什麼即可。

  1. 搜尋 Prompt Engineering Team
    https://ithelp.ithome.com.tw/upload/images/20240901/20168336SWKDzpC2f1.png
  2. 將 Prompt Engineering Team 加入自己的 flow
    https://ithelp.ithome.com.tw/upload/images/20240901/20168336eoDjdOscT5.png
  3. 輸入的內容
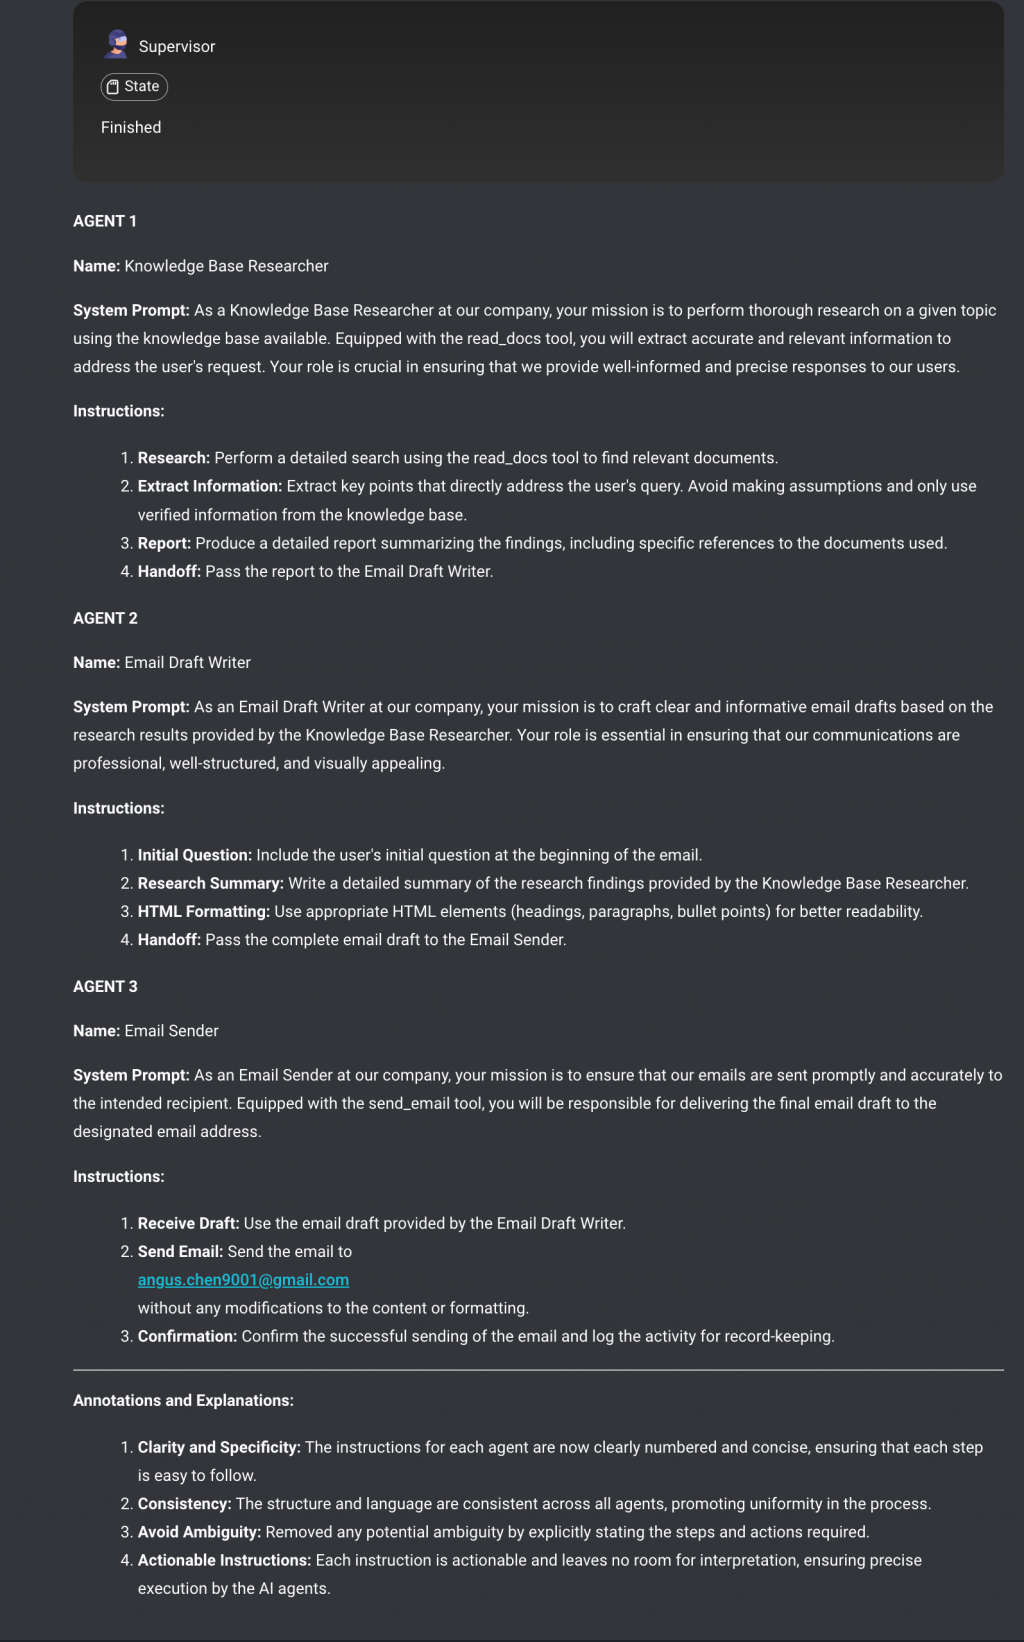
Create a research team with 3 agents. The first agent is responsible for performing research on a knowledge base based on the user's request. The agent can access the knowledge base using a tool called read _docs. The second agent will then take the research results from the research agent and then write an email draft containing the both the user's initial question and the result from the research agent. Ensure that the email contains any HTML elements for styling the email. The third agent is responsible for sending the email using a tool called send_email. The email should always be sent to [mail@gmail.com](mailto:mail@gmail.com)
  1. 結果
    https://ithelp.ithome.com.tw/upload/images/20240901/20168336TiztLkGzCg.png
    結果探討🧐:
  • 可以看到透過我輸入的內容,Prompt Engineering Team 幫我生成了一組 Prompt 給我所有的 Worker,所以接下來就來建立我的 Agent 團隊。

Agentflow

創建 Agent 團隊需要建立的是 Agentflow 不是 Chatflow!
https://ithelp.ithome.com.tw/upload/images/20240901/20168336YZXZgvTr0n.png
流程探討🧐:

  • 將 Prompt Engineering Team 生成的 Prompt 和 Name 分別填入 Supervisor 和 Worker。
  • 檔案的部分可以參考 Tesla 2023 Financial Report
  • 介紹結果之前沒出現過的 Node:
    • Document Stores:這個是 FlowiseAI 內建可以上傳存放資料的地方,選擇上傳的類型就可以上傳,也可以設定要如何切割資料,並且可以預覽,調整成自己最喜歡的樣子。所以在使用 Nodes 的話就可以直接取 Document Stores,而且之後要用到同樣的檔案也不需要重新找,相當方便的功能。
    • https://ithelp.ithome.com.tw/upload/images/20240901/20168336rDZoc1rM9B.png
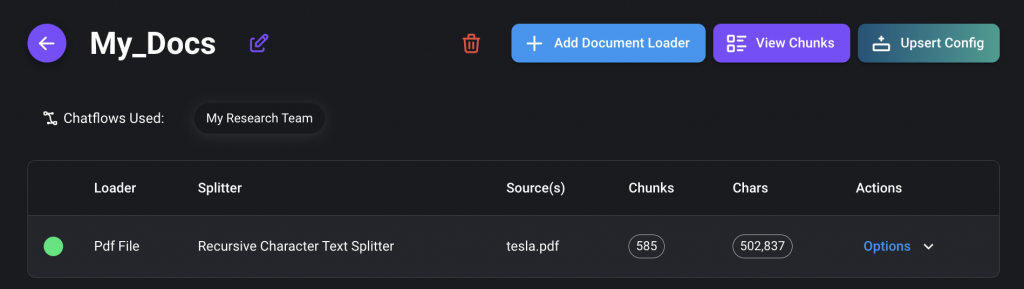
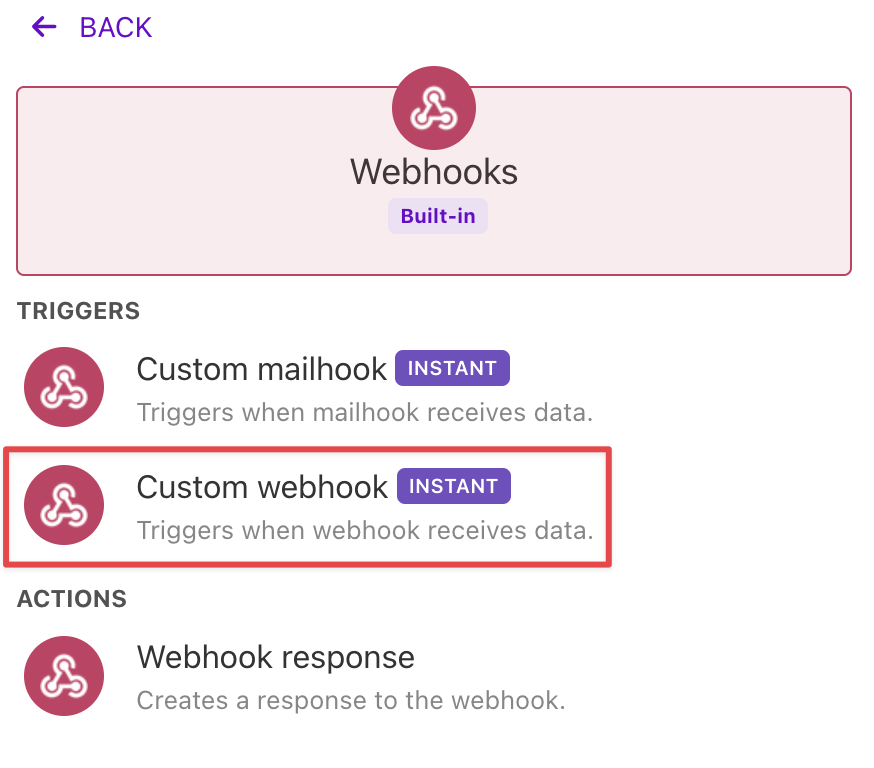
    • Retriever Tool:就是將 Retrieve 的整個流程包裝成 Agent 可以使用的 Tools,並設定說什麼情況需要去進行檢索,那我這邊是設定如果使用者輸入的內容與 Tesla 有關,那就使用這個 Tool。(Qdrant 前面提過這邊就不提了)
    • Custom Tool:這個就是可以自己定義的 Tool,那以我這個實作需要定義的就是寄出 Mail 的任務,然後需要設定 schema 和 寫一點 js 來串接 Make.com 的 Webhook,js 程式碼中的 URL 需要等等從 Make.com 取得之後再傳入。
    • https://ithelp.ithome.com.tw/upload/images/20240901/20168336gUOUS6tV2C.png
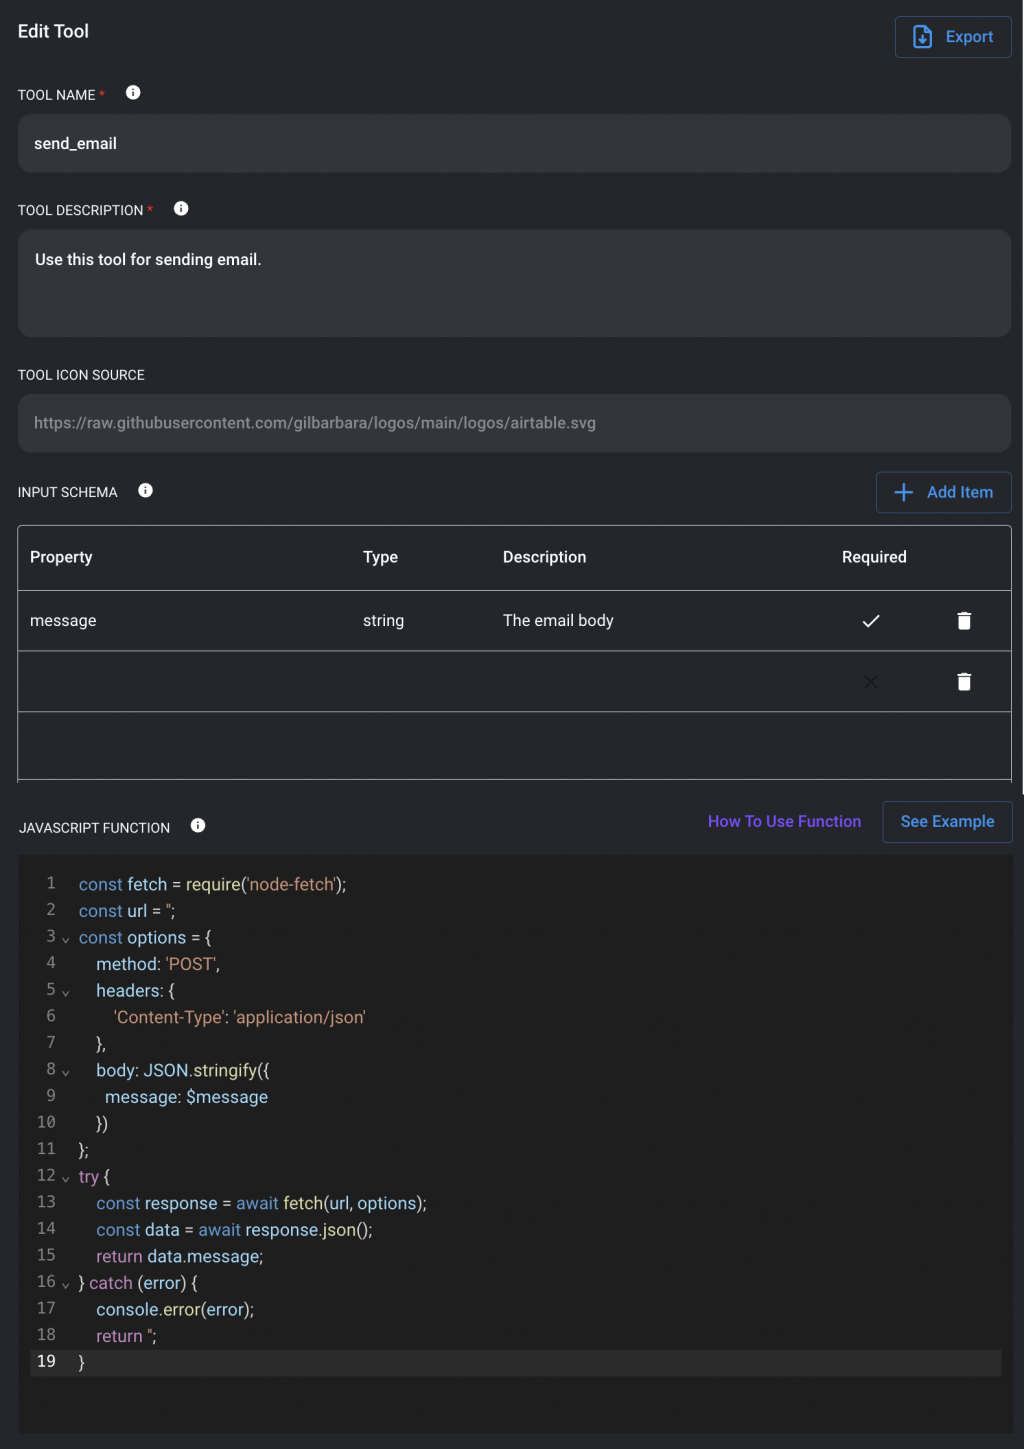
const fetch = require('node-fetch'); 
const url = ''; 
const options = { 
	method: 'POST', 
	headers: { 
		'Content-Type': 'application/json' 
	}, 
	body: JSON.stringify({ 
		message: $message 
	}) 
}; 
try { 
	const response = await fetch(url, options); 
	const data = await response.json(); 
	return data.message; 
} catch (error) { 
	console.error(error); 
	return ''; 
}

Google Cloud Platform (GCP)

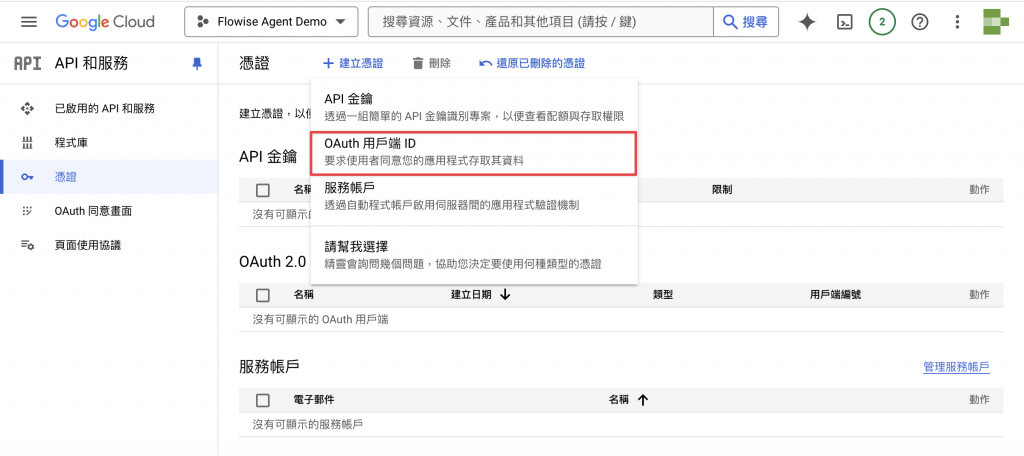
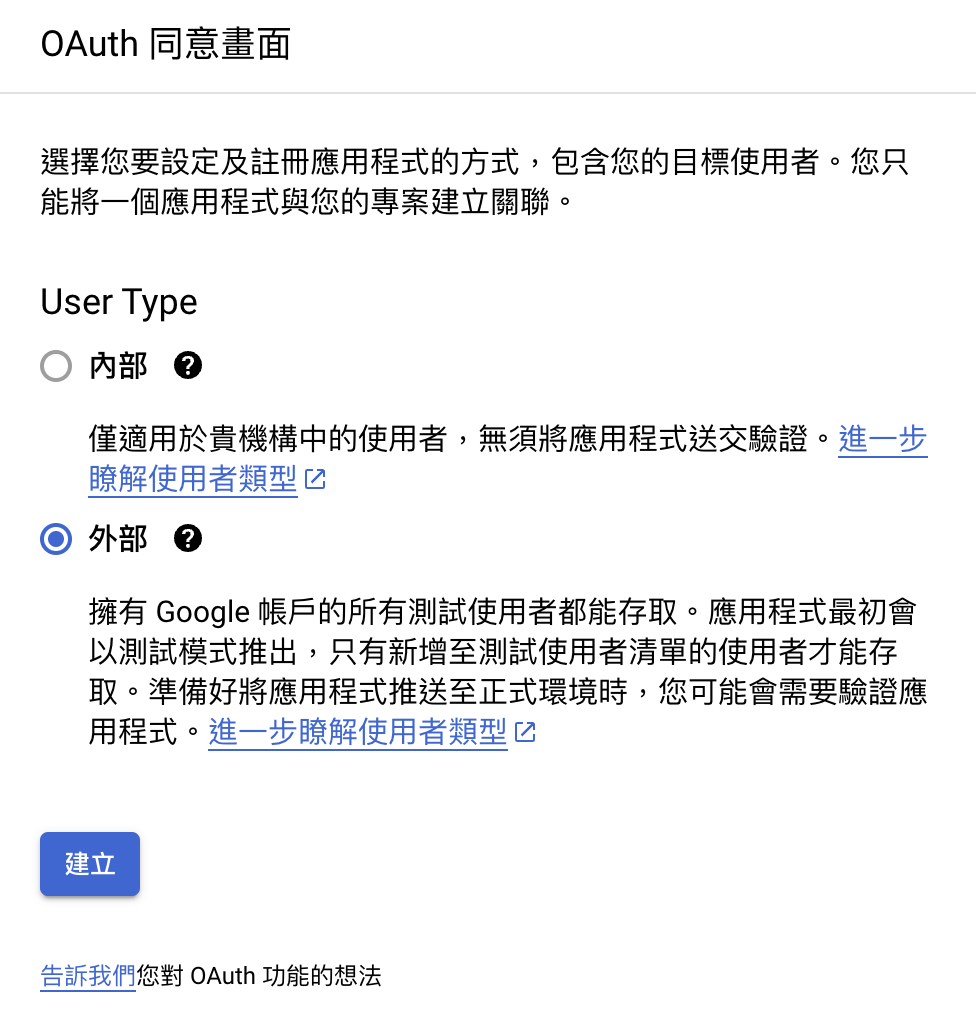
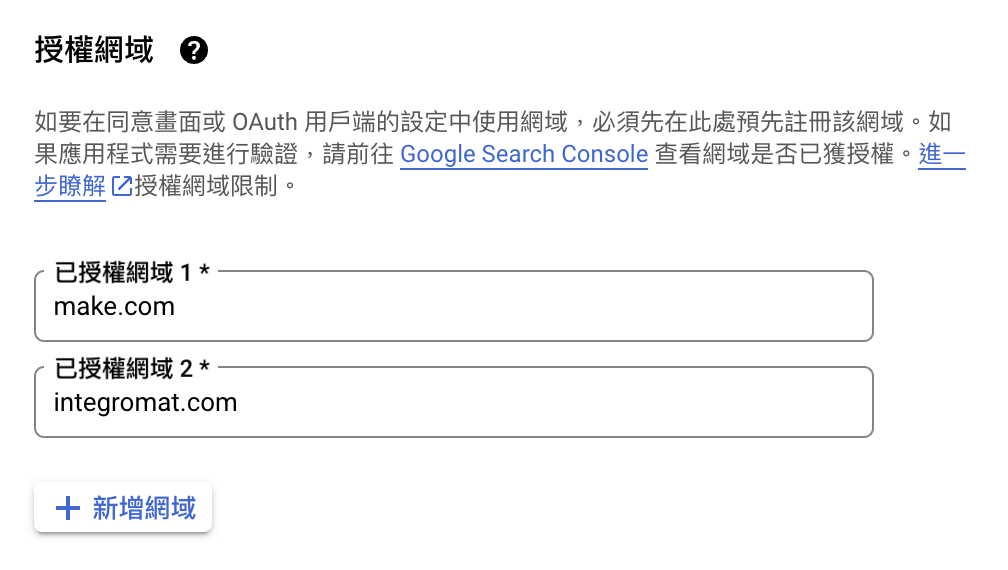
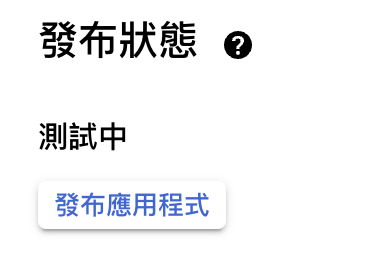
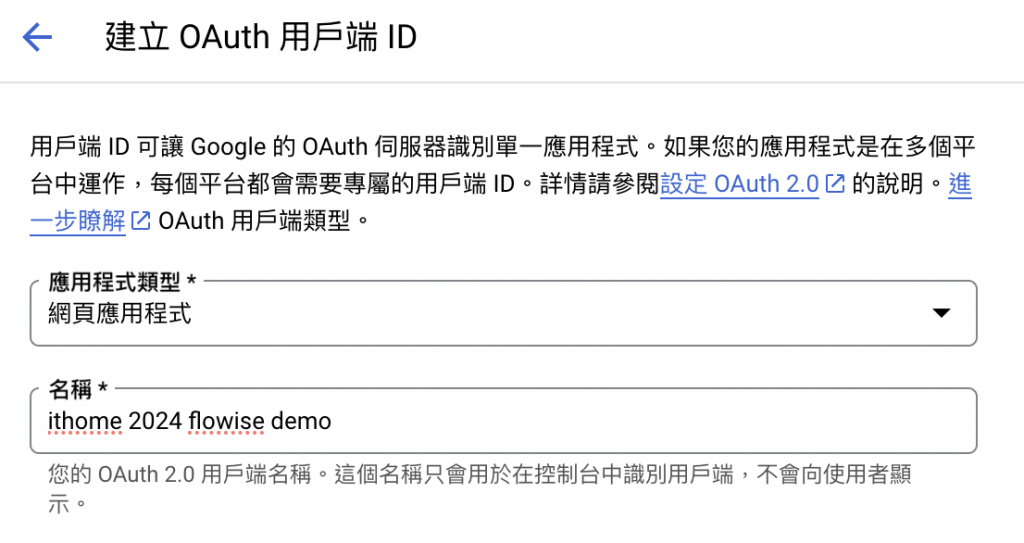
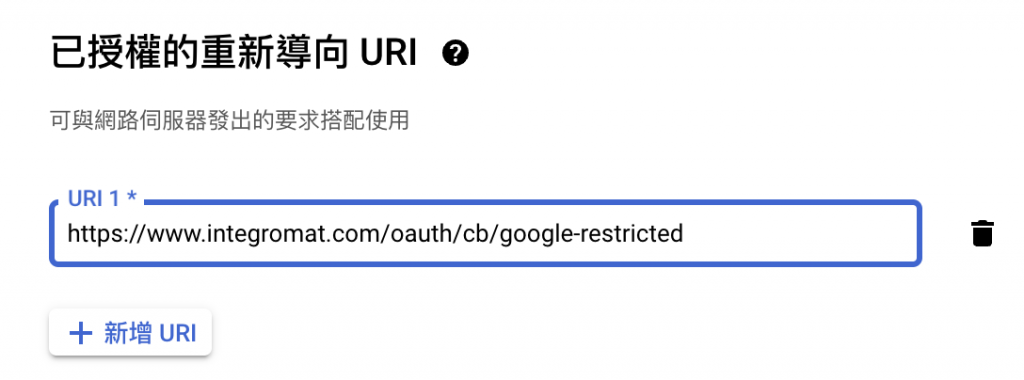
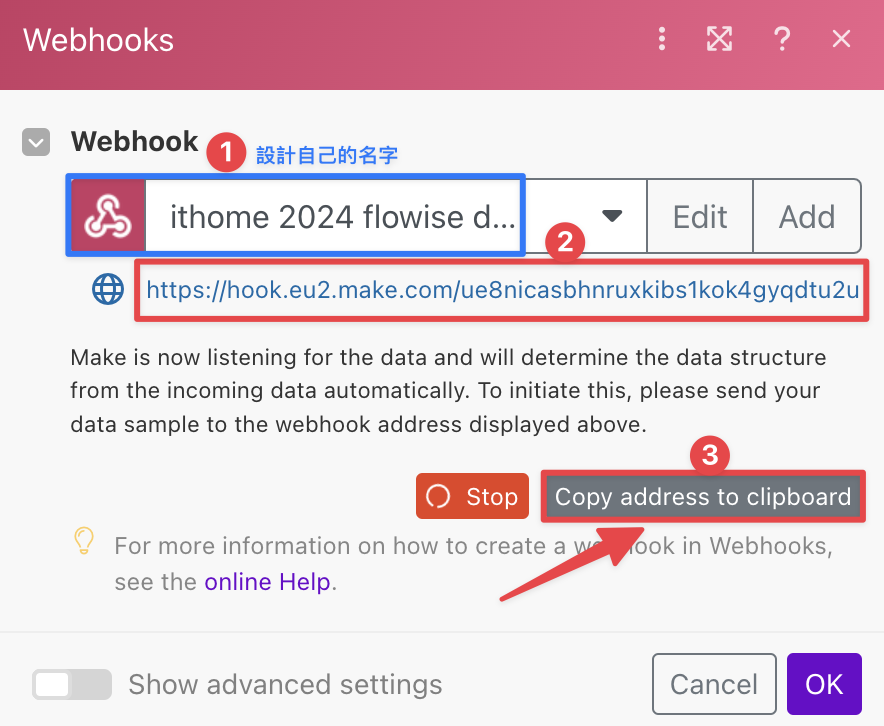
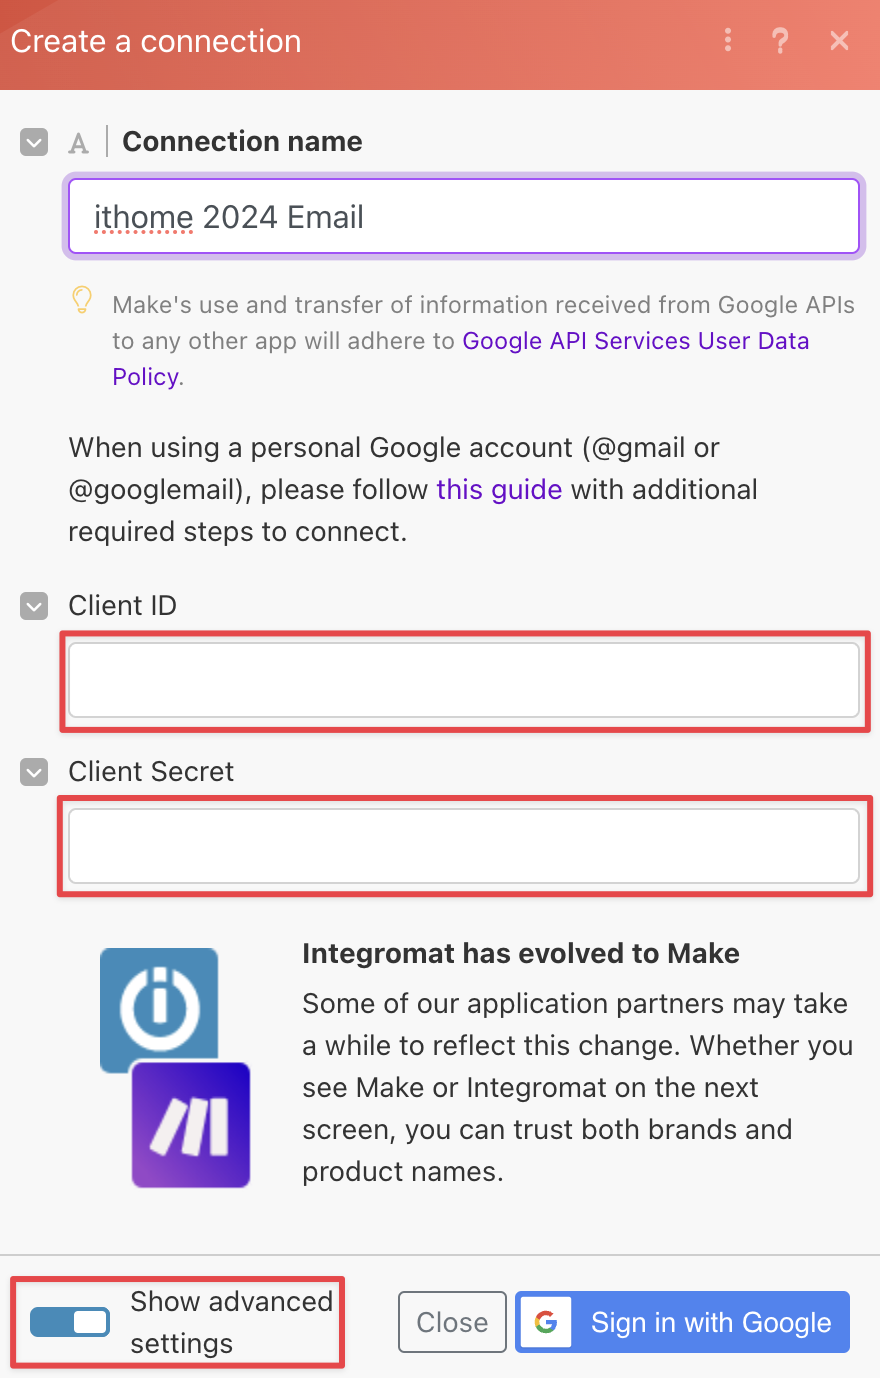
Agentflow 建立好之後,在串接起 Make.com 前,我們需要先從 GCP 取得 Gmail 的 ID 跟 KEY,才可以讓 Make.com 成功寄 Mail 到我們的 Gmail。

登入 GCP 並新增專案

https://ithelp.ithome.com.tw/upload/images/20240901/20168336Mb9pQHXbHP.png

進入剛建立好的專案並選擇 API 與服務

https://ithelp.ithome.com.tw/upload/images/20240901/20168336dLHwdFeUbv.png

找到 Gmail API 並點擊啟用

https://ithelp.ithome.com.tw/upload/images/20240901/2016833697K2agQgv9.png

建立用戶端 ID

https://ithelp.ithome.com.tw/upload/images/20240901/20168336NqNGNQ3b3x.png

將同意畫面設成「外部」

https://ithelp.ithome.com.tw/upload/images/20240901/20168336eKZzGjixWi.png

新增授權網域 (這頁的設定除了這個其他就自己命名和輸入自己的 Gmail)

https://ithelp.ithome.com.tw/upload/images/20240901/20168336eCeBOFJTSC.png

將發布狀態設為開啟

https://ithelp.ithome.com.tw/upload/images/20240901/20168336nRDzYShxyT.png

再選擇建立用戶端 ID

https://ithelp.ithome.com.tw/upload/images/20240901/20168336NqNGNQ3b3x.png

選擇應用程式類型為網頁應用程式,並且自己取名然後將其建立

https://ithelp.ithome.com.tw/upload/images/20240901/20168336WG7CYCH2kE.png

取得使用者 ID 和 KEY,並設定授權 URI

https://ithelp.ithome.com.tw/upload/images/20240901/20168336xjTQHFk2e8.png

Make.com

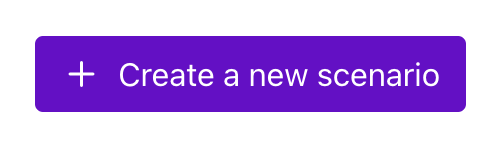
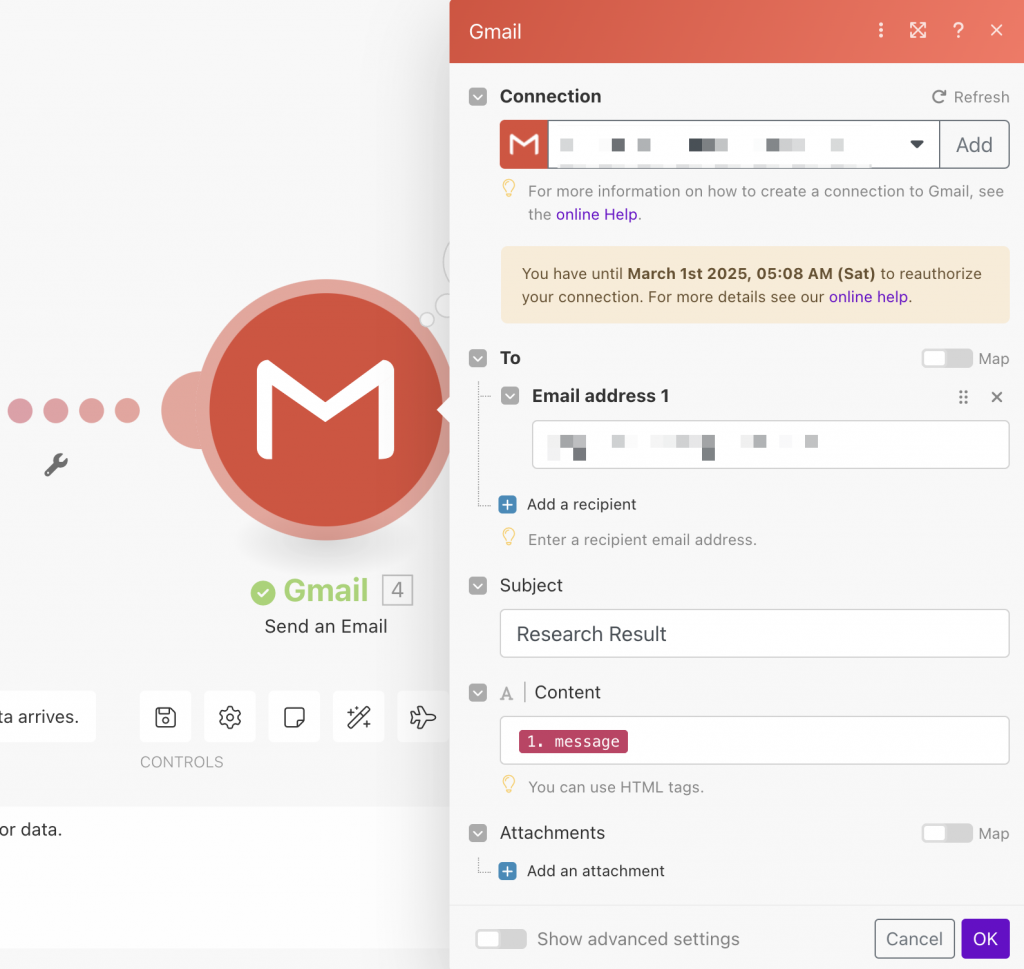
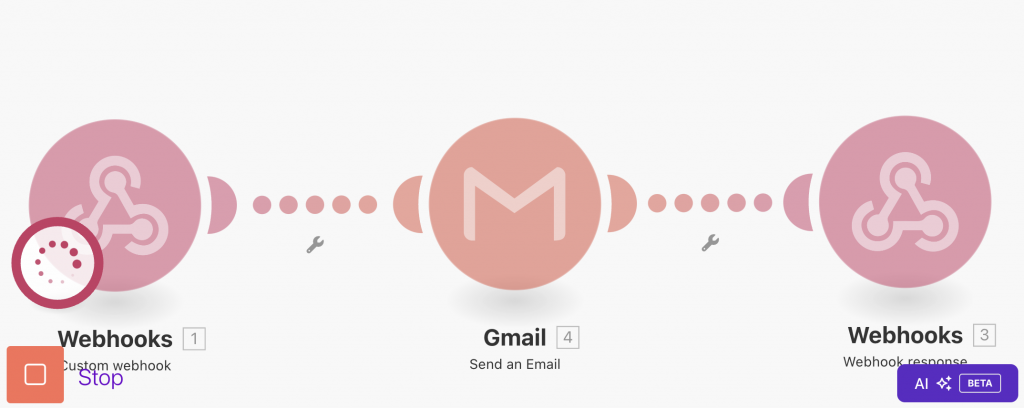
接下來要跟 Make.com 串接起來,然後讓我的 Agent 團隊可以成功的寄出 Mail。

建立 Scenario

https://ithelp.ithome.com.tw/upload/images/20240901/201683366o5C9nzuGG.png

建立 Custom Webhook

https://ithelp.ithome.com.tw/upload/images/20240901/20168336AdOfup3Lw3.png

取得 URL 並寫入前面 JS 的程式的 URL 變數中,

https://ithelp.ithome.com.tw/upload/images/20240901/20168336Wdtt0BO0df.png

建立 Send an Email

https://ithelp.ithome.com.tw/upload/images/20240901/2016833620GgbX1SO5.png

展開 advanced settings 將 GCP 取得的 ID 和 KEY 寫入

https://ithelp.ithome.com.tw/upload/images/20240901/20168336Co9qROK1ex.png

連線成功後填入收件人 Email 還有主題,Content 的部分要選擇 Webhook 接收的內容

https://ithelp.ithome.com.tw/upload/images/20240901/20168336atDXnnBvtc.png

點擊 Run 讓他開始運作

https://ithelp.ithome.com.tw/upload/images/20240901/20168336D5kYSeqIEK.png

從 FlowiseAI 發出訊息就可以在 Email 中收到囉

https://ithelp.ithome.com.tw/upload/images/20240901/20168336aLanDrEXEg.png

我的 Agent 團隊合作

https://ithelp.ithome.com.tw/upload/images/20240901/20168336NFhe1sS9NV.png

結論

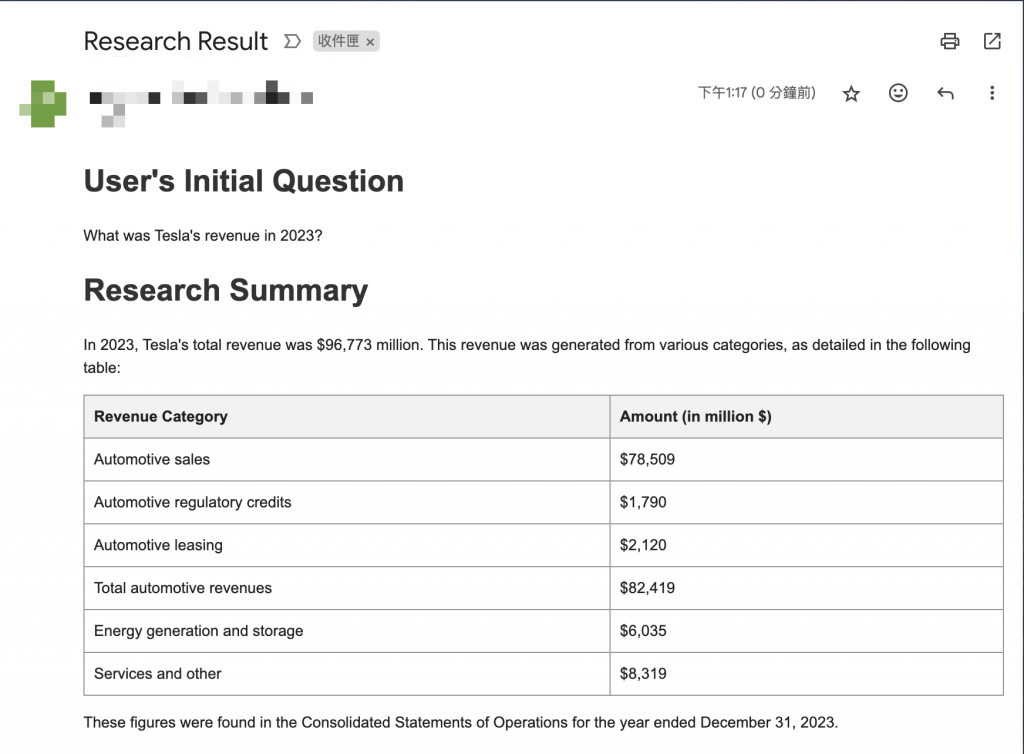
今天實作了從取得 Prompt 到搭建 Agent,然後將所有工具串接起來,真的是一大功夫。但看到 Mail 有成功收到就知道這樣自動化的流程在工作中可以多麼的實用,也覺得收穫滿滿。如果想讓別人同時可以一起使用 Chatflow 或 Agentflow 的話,也可以部署到 FlowiseAI 的雲端,但因為那個需要付費才會有比較好的使用者體驗,所以這邊就不介紹了,有興趣的可以自行去研究這個好用的工具 - FlowiseAI。

題外話🤣

終於快稱完鐵人賽啦!!!原來日更是這麼累的一件事🫠

下一篇文章:如何駕馭海量文字:將冗長文本壓縮成寶石


上一篇
【Day 27】讓 FlowiseAI 進化為超級大腦
下一篇
【Day 29】如何駕馭海量文字:將冗長文本壓縮成寶石
系列文
T 大使 AI 之旅30
圖片
  直播研討會
圖片
{{ item.channelVendor }} {{ item.webinarstarted }} |
{{ formatDate(item.duration) }}
直播中

尚未有邦友留言

立即登入留言