一般在建立一個網路時,基本都會完成三大設定:設定IP、路由規則、DNS
Kubernets 中存在一個虛擬網路,讓 Pod 彼此能互相溝通。
而虛擬網路同樣也要搞定上面三大設定,今天我們就來探討一下 k8s 是如何處理這些設定的。
CNI 的全名是「Container Network Interface」,目的是搞定 cluster 中的網路基本需求。
所謂的「基本需求」k8s有明確的定義:
讓整個 cluser 中的所有 Pod 能不靠 NAT 即可互相溝通。
部署在每個 Node 上的 agent(例如:daemonset、kubelet)能與該 Node 上的 Pod 溝通
要滿足上述需求並搭建出虛擬網路,cluster 中的 Pod 就必須有「最基本的」網路配置,例如:
每個 Pod 要有自己獨立的 IP
虛擬網路介面(veth-pair)
其實就像是在現實中處理多台電腦的網路連線一樣,我們會幫電腦配置網路卡、規劃網段,並手動設定IP。
只不過,cluster 中的「電腦」不是普通的多,一個 cluster 所擁有的 Pod 可能就有上百、上千個,而且又隨時會刪除或重啟,直接人工處理這些配置實在是強人所難。透過 CNI,我們就可以將這些繁雜的工作通通交給它來處理。
雖然傳統的容器網路也能做到分配虛擬介面與IP、讓容器可以互相通訊,但這種通訊範圍僅限於單一主機上。
K8s 通常由多節點組成,僅依賴傳統容器技術的網路模型,我們需額外處理跨節點的容器通訊,這是 CNI 出現的主要原因。
綜合上述,CNI 會在 clsuter 內部搭建一個虛擬網路,把 k8s 中的 Pod 串起來,讓彼此能夠通訊。
不過,k8s 並沒有提供預設的 CNI,而是定義出 CNI「該做甚麼、該如何做」,只要滿足這些規範,人人都可以按照這些規範來開發 CNI,並且以「插件(Plugins)」的形式讓使用者彈性的挑選,最終部署在 cluster 中。
常見的 CNI 例如:
Calico
Flannel
Weave
Cilium
CNI 是 CNCF 的一個開源專案,可以在他們的 Github 或是 k8s 官方文件上找到更多關於 CNI 的資訊。
有關更底層的網路運作原理,可以參考這篇文章:Kubernetes Networking Fundamentals
CNI 相關的設定檔通常會放在以下兩個重要目錄:
ls /opt/cni/bin/
andwidth  calico       dhcp   firewall  host-device  install  loopback  portmap  sbr     tap     vlan
bridge     calico-ipam  dummy  flannel   host-local   ipvlan   macvlan   ptp      static  tuning  vrf
ls /etc/cni/net.d/
10-canal.conflist calico-kubeconfig
來看一下 10-canal.conflist 設定檔:
{
  "name": "k8s-pod-network",
  "cniVersion": "0.3.1",
  "plugins": [
    {
      "type": "calico", # 使用 calico 作為 cni
      "log_level": "info",
      "log_file_path": "/var/log/calico/cni/cni.log", # log檔位置
      "datastore_type": "kubernetes",
      "nodename": "controlplane",
      "mtu": 0,
      "ipam": { # Pod的ip範圍,等一下會解釋
          "type": "host-local",
          "subnet": "usePodCidr"
      },
      "policy": {
          "type": "k8s"
      },
      "kubernetes": {
          "kubeconfig": "/etc/cni/net.d/calico-kubeconfig"
      }
    },
    {
      "type": "portmap",
      "snat": true,
      "capabilities": {"portMappings": true}
    },
    {
      "type": "bandwidth",
......
為了更有效率的管理每個 Node 上的網路工作,以及 Node 之間的封包傳遞,每個 Node 都會有一個 CNI 的 agent,通常以 daemonset 的方式部署:
kubectl get daemonset -n kube-system
NAME         DESIRED   CURRENT   READY   UP-TO-DATE   AVAILABLE   NODE SELECTOR            AGE
canal        2         2         2       2            2           kubernetes.io/os=linux   18d
kube-proxy   2         2         2       2            2           kubernetes.io/os=linux   18d
有了網路基礎後,當然就是互相連線嘛。但 Pod 的生命週期短而導致 IP 經常變動,因此用了 Service 來統一代理 Pod 的流量。當有流量到達 Service 時,需要有「路由規則」來轉發流量到正確的 Pod,而這個路由規則會由 kube-proxy 來維護。
綜合以上,我們來看一下目前為止提到的三種網路元件:
CNI:cluster 中的網路基礎,注重的是「如何配置 Pod 的基本網路」,例如設定 Pod 的 IP、虛擬網路卡設定。
Service:提供了穩定的統一介面讓外界來訪問 Pod,例如 NodePort、ClusterIP、LoadBalancer。
kube-proxy:負責維護 cluster 中的路由規則,時時監控 Servicve 與 Pod 的狀態與對應關係。注重的是「如何轉發流量」,例如iptables、ipvs。
當一個 Pod 被建立,然後再為其產生一個 Service 後,會發生:
CNI:分配一個 IP 給 Pod,並完成虛擬網路介面等基礎設定。
Service:k8s 並不會自動的建立 service。如果使用者依需求自行幫 Pod 建立 service 後,kube-apiserver 會為這個 service 分配一個 IP,其流量的轉發目標為一個 Pod,這個 Pod 則稱為「endpoint」。
kube-proxy:隨時的觀察 Service 與 endpoints 的狀態,當新的 service 被建立後,kube-proxy 會配置相對應的路由規則,讓整個 cluster 都能夠存取這個 service。當 service 被刪除後,kube-proxy 也會刪除相對應的路由規則。
有了以上三者的配合後,「IP分配」、「路由規則」基本上就搞定了。(還有 DNS 的部分,我們後面會提到)
至於建立 service 的介紹這裡就不再贅述,可以參考之前的Day06
Tips:kube-proxy 的種類
kube-proxy 有兩種 proxy mode 可選:
iptables:kube-proxy 負責維護 iptables 規則,封包轉送由 Kernel 處理。(還記得 Day 03 開啟的 Kernel 模組 netfilter 嗎?)
ipvs:類似 iptables,但是封包轉送由 ipvs 處理,效率較高。
兩者的詳細比較可以參考這篇文章
可以透過以下指令查看現在使用的 proxy mode,預設是 iptables:
logs -n kube-system daemonsets/kube-proxy | head -n 1
I0325 09:25:49.947640 1 server_others.go:72] "Using iptables proxy"
了解網路元件之間的關係與作用後,我們來看看 CNI 為 Pod 或 Servie 分配的 IP,究竟是從哪個「網段」中取得的?
kubectl cluster-info dump | grep -i cluster-cidr
"--cluster-cidr=192.168.0.0/16",
kubectl get node node01 -o yaml | grep -i podcidr
    podCIDR: 192.168.1.0/24
    podCIDRs:
node01 的 Pod IP 範圍是 192.168.1.1 ~ 192.168.1.254
至於 service 的 IP 範圍則是由 kube-apiserver 決定:
cat /etc/kubernetes/manifests/kube-apiserver.yaml | grep -i range
- --service-cluster-ip-range=10.96.0.0/12
所以 service 的 IP 範圍是 10.96.0.1 ~ 10.111.255.254
底下提供了一個簡單的範例,來測試測試上述的 IP 範圍:
範例
kubectl run nginx --image nginx --port 80
kubectl expose pod nginx --port 80 --type NodePort --name nginx-svc
kubectl get po,svc
NAME        READY   STATUS    RESTARTS   AGE   IP            NODE     NOMINATED NODE   READINESS GATES
pod/nginx   1/1     Running   0          22s   192.168.1.4   node01   <none>           <none>

NAME                 TYPE        CLUSTER-IP      EXTERNAL-IP   PORT(S)        AGE   SELECTOR
service/kubernetes   ClusterIP   10.96.0.1       <none>        443/TCP        21d   <none>
service/nginx-svc    NodePort    10.99.165.171   <none>        80:32455/TCP   8s    run=nginx
kubectl logs -n kube-system daemonsets/kube-proxy | head -n 1
I0907 06:01:08.374323 1 server_linux.go:69] "Using iptables proxy"
因此,我們可以整理出以下資訊:
因為 kube-proxy 的處理,我們可以從 iptables 看到關於 nginx-svc 的規則:
iptables -L -t nat | grep nginx
KUBE-MARK-MASQ  all  --  anywhere             anywhere             /* masquerade traffic for default/nginx-svc external destinations */

KUBE-EXT-HL5LMXD5JFHQZ6LN  tcp  --  anywhere             anywhere             /* default/nginx-svc */ tcp dpt:32455

KUBE-MARK-MASQ  all  --  192.168.1.4          anywhere             /* default/nginx-svc */

DNAT       tcp  --  anywhere             anywhere             /* default/nginx-svc */ tcp to:192.168.1.4:80
講完 k8s 如何實現「IP分配」、「路由規則」,接下來我們來談談「DNS」。
那究竟什麼是 DNS?
如果想要使用 fackbook 的網頁,我們不需要知道 fackbook server 的 IP,而是輸入「www.facebook.com」 就可以了,這是因為 DNS server 幫我們將這個網址轉換成 IP。
以下提供一些有關 DNS 的指令:
host www.google.com
www.google.com has address 142.250.185.132
www.google.com has IPv6 address 2a00:1450:4001:810::2004
nslookup www.google.com
Server:         8.8.8.8
Address:        8.8.8.8#53

Non-authoritative answer:
Name:   www.google.com
Address: 142.250.70.100
Name:   www.google.com
Address: 2404:6800:4009:830::2004
通常系統預設的 DNS server 與相關設定會寫在 /etc/resolv.conf 中:
cat /etc/resolv.conf
nameserver 8.8.8.8
nameserver 1.1.1.1
簡而言之,「DNS」的任務就是「完成 domain name 與 IP 的對應」
在 k8s 中,也有 DNS server 來完成相同的任務。我們不需要知道 service 的 IP,只要知道 service 的「domain name」即可存取,而 k8s 預設的 DNS server 是 CoreDNS,會在 53 port 上監聽需求。
CoreDNS是一個用 Go 語言寫的 DNS server,高度的靈活性使它能在多種環境中部署,其中一種就是 k8s cluster。
CoreDNS 以 Deployment 的方式部署在 cluster 中,會不斷的與 Master Node 溝通來取得 service 的資訊,並依照這些資訊建立 DNS 對應,然後 Pod 就可以透過存取「CoreDNS 的 Service」來取得 DNS 對應。
底下來探索一下 cluster 中的 CoreDNS:
kubectl get deployments.apps -n kube-system coredns
NAME      READY   UP-TO-DATE   AVAILABLE   AGE
coredns   2/2     2            2           23d
kubectl get svc -n kube-system
NAME       TYPE        CLUSTER-IP   EXTERNAL-IP   PORT(S)                  AGE
kube-dns   ClusterIP   10.96.0.10   <none>        53/UDP,53/TCP,9153/TCP   23d
kubectl describe deploy -n kube-system coredns
    Args:
      -conf
      /etc/coredns/Corefile # 設定檔位置
......
    Mounts:
      /etc/coredns from config-volume (ro)
  Volumes: # 透過configMap導入設定檔
   config-volume:
    Type:               ConfigMap (a volume populated by a ConfigMap)
    Name:               coredns
    Optional:           false
前面提到,CoreDNS 的任務是將 service 的 domain name 轉換成IP,那在 k8s 中,service 的 domain name 格式為:
<service-name>.<namespace>.svc.cluster.local
而 Pod 的 domain name 格式為:
<pod-ipv4-address>.<namespace>.pod
底下我們用實際例子來測試一下:
我們會建立出三個 Pod 與兩個 service,分別是:
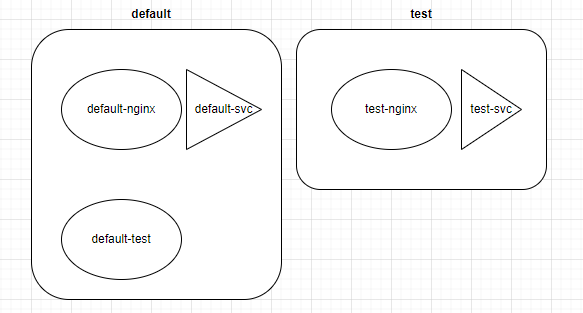
實作目的:用 default-test 這個 Pod 來存取不同的 service,看看 DNS 的解析成果。
# day20-lab.yaml
# Namespace: test
apiVersion: v1
kind: Namespace
metadata:
  name: test

---
# Pod: default-nginx in default namespace
apiVersion: v1
kind: Pod
metadata:
  name: default-nginx
  namespace: default
spec:
  containers:
  - name: nginx
    image: nginx
    ports:
    - containerPort: 80

---
# Service: default-svc in default namespace
apiVersion: v1
kind: Service
metadata:
  name: default-svc
  namespace: default
spec:
  selector:
    app: default-nginx
  ports:
    - protocol: TCP
      port: 80
      targetPort: 80

---
# Pod: default-test in default namespace (without service)
apiVersion: v1
kind: Pod
metadata:
  name: default-test
  namespace: default
spec:
  containers:
  - name: busybox
    image: busybox:1.28
    command: ['sleep', '1d']

---
# Pod: test-nginx in test namespace
apiVersion: v1
kind: Pod
metadata:
  name: test-nginx
  namespace: test
spec:
  containers:
  - name: nginx
    image: nginx
    ports:
    - containerPort: 80

---
# Service: test-svc in test namespace
apiVersion: v1
kind: Service
metadata:
  name: test-svc
  namespace: test
spec:
  selector:
    app: test-nginx
  ports:
    - protocol: TCP
      port: 80
      targetPort: 80
kubectl apply -f day20-lab.yaml
等所有 Pod 跑起來後,先測試 default-test 能不能 ping 到另外兩個 Pod 的 Cluster-IP :
kubectl exec default-test -- ping -c 4 $(kubectl get po -n default default-nginx -o jsonpath='{.status.podIP}')
64 bytes from 192.168.1.4: seq=0 ttl=63 time=0.096 ms
64 bytes from 192.168.1.4: seq=1 ttl=63 time=0.070 ms
64 bytes from 192.168.1.4: seq=2 ttl=63 time=0.122 ms
64 bytes from 192.168.1.4: seq=3 ttl=63 time=0.092 ms
kubectl exec default-test -- ping -c 4 $(kubectl get po -n test test-nginx -o jsonpath='{.status.podIP}')
64 bytes from 192.168.1.6: seq=0 ttl=63 time=0.096 ms
64 bytes from 192.168.1.6: seq=1 ttl=63 time=0.089 ms
64 bytes from 192.168.1.6: seq=2 ttl=63 time=0.084 ms
64 bytes from 192.168.1.6: seq=3 ttl=63 time=0.084 ms
然後,我們來測試一下 DNS 的解析:
為了驗證 DNS 的解析結果,我們先將兩個 Service 的 Cluster-IP 記錄在變數中:
default_svc_ip=$(kubectl get svc -n default default-svc -o jsonpath='{.spec.clusterIP}')
test_svc_ip=$(kubectl get svc -n test test-svc -o jsonpath='{.spec.clusterIP}')
coredns_svc_ip=$(kubectl get svc -n kube-system kube-dns -o jsonpath='{.spec.clusterIP}')
接下來,我們來測試一下這些 service 的 domain name:
kubectl exec default-test -- nslookup default-svc.default.svc.cluster.local
Server:    10.96.0.10
Address 1: 10.96.0.10 kube-dns.kube-system.svc.cluster.local

Name:      default-svc.default.svc.cluster.local
Address 1: 10.96.71.181 default-svc.default.svc.cluster.local
echo $default_svc_ip
# 沒錯!
10.96.71.181
echo $coredns_svc_ip
# 沒錯!
10.96.0.10
再來,我們用 default-test 存取不同 namespace 的 service:
kubectl exec default-test -- nslookup test-svc.test.svc.cluster.local
Server:    10.96.0.10
Address 1: 10.96.0.10 kube-dns.kube-system.svc.cluster.local

Name:      test-svc.test.svc.cluster.local
Address 1: 10.111.38.112 test-svc.test.svc.cluster.local
echo $test_svc_ip
# 沒錯!
10.111.38.112
不過整個 domain name 似乎有點長,我們換成比較簡短的寫法 ---「只寫 service-name」來測試看看:
kubectl exec default-test -- nslookup default-svc
Server:    10.96.0.10
Address 1: 10.96.0.10 kube-dns.kube-system.svc.cluster.local

Name:      default-svc
Address 1: 10.96.71.181 default-svc.default.svc.cluster.local
kubectl exec default-test -- nslookup test-svc
nslookup: can't resolve 'test-svc'
Server:    10.96.0.10
Address 1: 10.96.0.10 kube-dns.kube-system.svc.cluster.local

command terminated with exit code 1
可以發現無法跨 namespace 解析較短的 domain name。
原因是,跨 namespace 就不能只寫「service-name」,至少要寫到「<service-name>.<namespace>」:
kubectl exec default-test -- nslookup test-svc.test
Server:    10.96.0.10
Address 1: 10.96.0.10 kube-dns.kube-system.svc.cluster.local

Name:      test-svc.test
Address 1: 10.111.38.112 test-svc.test.svc.cluster.local
其實從輸出結果來看,就算使用簡寫,DNS 仍然會還原出全名來查找,這可以在 default-test 中的 /etc/resolv.conf 中看到:
kubectl exec default-test -- cat /etc/resolv.conf
search default.svc.cluster.local svc.cluster.local cluster.local
nameserver 10.96.0.10
options ndots:5
search 用來告訴 DNS server,如果找不到 domain name,就自動加上這些後綴來查找。
至於 Pod 的 domain name,我們得先知道 Pod 的 IP,然後再查找:
kubectl get po -n test test-nginx -o jsonpath='{.status.podIP}'
192.168.1.6
kubectl exec default-test -- nslookup 192-168-1-6.test.pod
Server:    10.96.0.10
Address 1: 10.96.0.10 kube-dns.kube-system.svc.cluster.local

Name:      192-168-1-6.test.pod
Address 1: 192.168.1.6 192-168-1-6.test-svc.test.svc.cluster.local
今天介紹了 k8s 中的網路架構,以及如何透過 CNI、Service、kube-proxy、CoreDNS 來滿足建立網路的三大需求:IP、路由、DNS。
另外,也透過實作了解到如果一個 Pod 如果要跨 namespace 存取 service,就必須至少寫到「<service-name>.<namespace>」才能成功解析。
參考資料
[Kubernetes / K8s] Service之間互相溝通?namespace和介紹kube-dns


 iThome鐵人賽