共用的主題 config 設定完之後,部落格終於有了基礎的雛形啦~
但是,使用的樣式都是 VitePress 預設的,今天就來改樣式吧~~~
部落格最重要的當然就是文字字型啦,看看這個滿滿的文字量, 好的字型帶你上天堂!
建議選擇免費的開源字型比較不會有疑慮。
在 docs/.vitepress/theme 目錄下建立 fonts 資料夾,
接下來挑選自己要的字型 weight 檔,並宣告進 font.css 然後把目錄結構整理成下面的模樣,最後在 .docs/.vitepress/theme/index.ts 引用,由於 VitePress 預設使用 Inter 字型,而且會把他 build 出來,不要因為用不到的字體把自己變肥,我們需要在 index.ts 中調整引用的預設主題,從 vitepress/theme 變成 vitepress/theme-without-fonts:
.docs/.vitepress/theme
├─ fonts
│  ├─ Fira_Code
│  │  ├─ FiraCode-Bold.ttf
│  │  ├─ FiraCode-Light.ttf
│  │  ├─ FiraCode-Medium.ttf
│  │  └─ FiraCode-Refular.ttf
│  ├─ Noto_Sans_TC
│  │  ├─ NotoSansTC-Bold.ttf
│  │  ├─ NotoSansTC-Light.ttf
│  │  ├─ NotoSansTC-Medium.ttf
│  │  └─ NotoSansTC-Refular.ttf
│  ├─ Roboto
│  │  ├─ Roboto-Bold.ttf
│  │  ├─ Roboto-Light.ttf
│  │  ├─ Roboto-Medium.ttf
│  │  └─ Roboto-Refular.ttf
│  └─ markdown-examples.md
└─ index.ts
@font-face {
    font-family: NotoSansTC;
    src: url('./Noto_Sans_TC/NotoSansTC-Light.ttf');
    font-weight: 300;
    font-style: normal;
}
@font-face {
    font-family: NotoSansTC;
    src: url('./Noto_Sans_TC/NotoSansTC-Bold.ttf');
    font-weight: 700;
    font-style: normal;
}
@font-face {
    font-family: NotoSansTC;
    src: url('./Noto_Sans_TC/NotoSansTC-Medium.ttf');
    font-weight: 500;
    font-style: normal;
}
@font-face {
    font-family: NotoSansTC;
    src: url('./Noto_Sans_TC/NotoSansTC-Regular.ttf');
    font-weight: 400;
    font-style: normal;
}
@font-face {
    font-family: Roboto;
    src: url('./Roboto/Roboto-Light.ttf');
    font-weight: 300;
    font-style: normal;
}
@font-face {
    font-family: Roboto;
    src: url('./Roboto/Roboto-Bold.ttf');
    font-weight: 700;
    font-style: normal;
}
@font-face {
    font-family: Roboto;
    src: url('./Roboto/Roboto-Medium.ttf');
    font-weight: 500;
    font-style: normal;
}
@font-face {
    font-family: Roboto;
    src: url('./Roboto/Roboto-Regular.ttf');
    font-weight: 400;
    font-style: normal;
}
@font-face {
    font-family: FiraCode;
    src: url('./Fira_Code/FiraCode-Light.ttf');
    font-weight: 300;
    font-style: normal;
}
@font-face {
    font-family: FiraCode;
    src: url('./Fira_Code/FiraCode-Bold.ttf');
    font-weight: 700;
    font-style: normal;
}
@font-face {
    font-family: FiraCode;
    src: url('./Fira_Code/FiraCode-Medium.ttf');
    font-weight: 500;
    font-style: normal;
}
@font-face {
    font-family: FiraCode;
    src: url('./Fira_Code/FiraCode-Regular.ttf');
    font-weight: 400;
    font-style: normal;
}
在 index.ts 使用字型
import { h } from 'vue'
import type { Theme } from 'VitePress'
import DefaultTheme from 'vitepress/theme' // [!code --]
import DefaultTheme from 'vitepress/theme-without-fonts'; // [!code ++]
import './style.css'

// [-]字體引用 // [!code ++]
import './fonts/font.css'; // [!code ++]

export default {
  extends: DefaultTheme,
  Layout: () => {
    return h(DefaultTheme.Layout, null, {
      // https://VitePress.dev/guide/extending-default-theme#layout-slots
    })
  },
  enhanceApp({ app, router, siteData }) {
    // ...
  }
} satisfies Theme
以為做完上面這些事就可以使用自訂主題了嗎?
抱歉並不行,我們需要覆蓋主題預設字體的 CSS 變數,既然都要動 CSS 了,為了以後的方便,順便加入 SCSS 的相關功能吧~
VitePress 預設支援 CSS預處理器,不用特別安裝 vite 的專用插件,但是還是要安裝相應的解析器喔:
yarn add scss -D
接下來幹掉 docs/.vitepress/theme 裡面的 style.css ,建立 scss 資料夾,裡面建立 style.scss 、 mixin.scss 和 _variable.scss 三個檔案‧
// CSS 變數
@import 'variable';
@mixin setSize($w:0, $h:0){
    width: $w;
    height: $h;
}
@mixin setFlex($justify: center, $align: center, $gap: 0, $direction: '') {
    display: flex;
    @if $direction != '' {
        flex-direction: $direction;
    }
    align-items: $align;
    justify-content: $justify;
    @if $gap != 0 {
        gap: $gap;
    }
}
@mixin setRWD($size) {
    @media(max-width: $size){
        @content;
    }
}
_variable.scss 裡的變數,都是 VitePress 預設的,只是我們對他進行覆蓋,:root {
// 品牌色、tip色
--vp-c-brand-1: #dc8419;
--vp-c-brand-2: #cd8f42;
--vp-c-brand-3: #c7975d;
--vp-c-brand-soft: rgba(234, 182, 119, 14%);
// 把tip 改為品牌色 (Component: Custom Block)
--vp-custom-block-tip-border: transparent;
--vp-custom-block-tip-text: var(--vp-c-text-1);
--vp-custom-block-tip-bg: var(--vp-c-brand-soft);
--vp-custom-block-tip-code-bg: var(--vp-c-brand-soft);
// 字型設定
--vp-font-family-base: 'Roboto', 'NotoSansTC', '微軟正黑體', 'Arial', sans-serif;
--vp-font-family-mono: 'FiraCode', 'Roboto', sans-serif;
}
.dark {
--vp-c-brand-1: #f5b81f;
--vp-c-brand-2: #d8a72b;
--vp-c-brand-3: #b99436;
--vp-c-brand-soft: rgba(185, 148, 54, 16%);
}
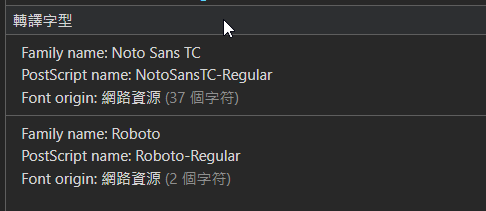
然後就可以重新啟動,在 F12 的計算屬性的最下面,看看字型有沒有成功被應用啦~
今天添加了字型,並開始使用 SCSS 調整主題,
距離部落格成為我們心中的樣子,又跨了一步囉~