今天要跟大家分享的是一個功能強大且好用的 Leaflet Routing Machine 套件,他能在 Leaflet 地圖中增加路線規劃的功能,我們可以在地圖上顯示起點到終點的路線,也能與不同的路線服務整合,提供即時路況與導航。
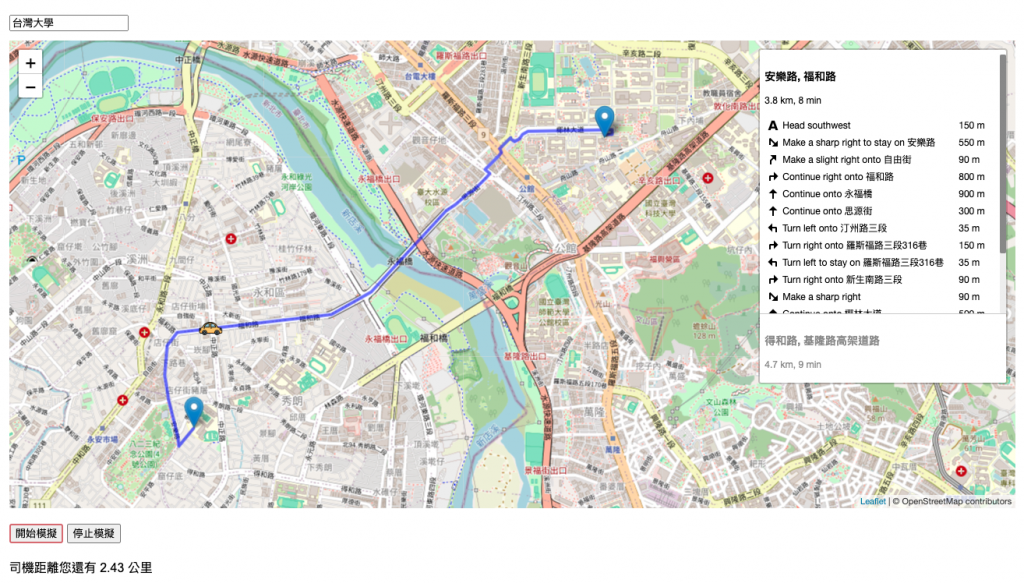
我們要做的是一個簡單的叫車服務:輸入上車地址後,會自動計算司機從當前位置到目的地的路線,地圖上會顯示預計的距離與時間。開始模擬後,司機會沿著規劃的路線移動,在移動過程中,也會顯示距離目的地的實時距離。
這邊使用 Leaflet Routing Machine 做一個簡單版的導航追蹤,實作畫面如下:
先載入 Leaflet 和 Lefalet Routing Machine 的 JS 與 CSS 檔案
  <link rel="stylesheet" href="<https://cdnjs.cloudflare.com/ajax/libs/leaflet/1.7.1/leaflet.css>" />
  <link rel="stylesheet" href="<https://unpkg.com/leaflet-routing-machine@latest/dist/leaflet-routing-machine.css>" />
  <script src="<https://cdnjs.cloudflare.com/ajax/libs/leaflet/1.7.1/leaflet.js>"></script>
  <script src="<https://cdnjs.cloudflare.com/ajax/libs/leaflet-routing-machine/3.2.12/leaflet-routing-machine.min.js>"></script>
let map, userMarker, driverMarker, routeControl;
let simulationInterval;
let routePoints = [];
let currentPointIndex = 0;
因為沒有真的司機 XD,所以預設司機的所在地是台北市中心。
也能在此設定司機的 Marker icon,我用了黃色的車子表示,圖片來源請點我
function initMap() {
  map = L.map('map').setView([25.0330, 121.5654], 13);  // 台北市中心
  L.tileLayer('https://{s}.tile.openstreetmap.org/{z}/{x}/{y}.png', {
    attribution: '© OpenStreetMap contributors'
  }).addTo(map);

  userMarker = L.marker([25.0330, 121.5654]).addTo(map);
  driverMarker = L.marker([25.0330, 121.5654], {
    icon: L.icon({
      // <a href="<https://www.flaticon.com/free-icons/car>" title="car icons">Car icons created by Konkapp - Flaticon</a>
      iconUrl: 'car.png',
      iconSize: [30, 30],
      iconAnchor: [15, 15]
    })
  }).addTo(map);
}
使用 OpenStreetMap API 來搜尋地址,可以使用 encodeURIComponent 來處理地址中的特殊字元,讓他能正常轉換解析(ex. 空白,逗號,引號 … 等)
取得經緯度後,要做三件事情:
userMarker.setLatLng([lat, lon])
map.setView([lat, lon], 13)
calculateRoute(lat, lon)
async function searchAddress() {
  const address = document.getElementById('addressInput').value;
  const response = await fetch(`https://nominatim.openstreetmap.org/search?format=json&q=${encodeURIComponent(address)}`);
  const data = await response.json();
  if (data.length > 0) {
    const { lat, lon } = data[0];
    // 設定使用者的所在地
    userMarker.setLatLng([lat, lon]);
    // 重設地圖的中心點
    map.setView([lat, lon], 13);
    // 計算司機與上車地點的路徑
    calculateRoute(lat, lon);
  } else {
    document.getElementById('status').textContent = "找不到地址";
  }
}
calculateRoute():計算司機與上車地點的路徑計算路徑時,我們用到的就是 Leaflet Routing Machine 套件的功能,有興趣的朋友可以參考他的官方文件:https://www.liedman.net/leaflet-routing-machine/
主要功能如下:
driverMarker.getLatLng(),取得司機當前的經緯度;我們在模擬移動的時候,會不斷取得司機當前的經緯度以重新渲染畫面,這部分的程式碼後面會提到。L.Routing.control 可以幫我們建立新的路線,並渲染到地圖上,參數介紹我會直接寫在程式碼的註解裡。routesfound 事件,我們透過他取得路徑的距離和時間,並顯示到畫面上。function calculateRoute(destLat, destLon) {
if (routeControl) {
map.removeControl(routeControl);
}
const driverStart = driverMarker.getLatLng();
routeControl = L.Routing.control({
waypoints: [
L.latLng(driverStart.lat, driverStart.lng),
L.latLng(destLat, destLon)
],
routeWhileDragging: false, // 禁止在拖動時重新計算路徑
addWaypoints: false, // 禁止添加新的路徑點
draggableWaypoints: false, // 禁止拖動路徑點
fitSelectedRoutes: true, // 自動調整地圖視角以適應選中的路徑
show: true, // 顯示路線指示面板
lineOptions: {
styles: [{ color: 'blue', opacity: 0.6, weight: 4 }] // 設定路線的樣式
}
}).addTo(map);
// 當找到路徑時,觸發事件
routeControl.on('routesfound', function (e) {
routePoints = e.routes[0].coordinates;
const distance = e.routes[0].summary.totalDistance / 1000; // 獲取總距離並轉換為公里
const duration = Math.round(e.routes[0].summary.totalTime / 60); // 獲取總時間並轉換為分鐘
document.getElementById('status').textContent = `預計距離: ${distance.toFixed(2)} 公里, 時間: ${duration} 分鐘`;
});
}
輸入地址後,我們準備了兩個按鈕,分別是「開始模擬」與「停止模擬」
<button onclick="startSimulation()">開始模擬</button>
<button onclick="stopSimulation()">停止模擬</button>
點選「開始模擬」按鈕,會模擬司機沿著路線移動的過程。
startSimulation() 主要功能:
currentPointIndex 初始化當前路線的索引點,我們會利用他與路線終點做比對,以判斷是否到達目的地。moveDriver(),前面提到的「我們在模擬移動的時候,會不斷取得司機當前的經緯度以重新渲染畫面」,就是 moveDriver() 做的事情之一。moveDriver() 主要功能:
currentPointIndex 與路線長度做比對,以判斷是否到達目的地routePoints[currentPointIndex] 取得當前路線點,並更新司機標記的位置 (driverMarker.setLatLng())。currentPointIndex) 增加 1,以便下一次移動到下一個點。function startSimulation() {
if (routePoints.length === 0) {
document.getElementById('status').textContent = "請先搜索地址並計算路線";
return;
}
currentPointIndex = 0;
simulationInterval = setInterval(moveDriver, 1000);
}
function moveDriver() {
if (currentPointIndex >= routePoints.length) {
stopSimulation();
document.getElementById('status').textContent = "模擬完成,司機已到達目的地";
return;
}
const point = routePoints[currentPointIndex];
driverMarker.setLatLng([point.lat, point.lng]);
currentPointIndex++;
const userPos = userMarker.getLatLng();
const driverPos = driverMarker.getLatLng();
const distance = userPos.distanceTo(driverPos) / 1000;
document.getElementById('status').textContent = `司機距離您還有 ${distance.toFixed(2)} 公里`;
}
「停止模擬」的功能相較之下簡單許多,停止 simulationInterval 計時器,並將之設為 null,防止再次誤用
function stopSimulation() {
  clearInterval(simulationInterval);
  simulationInterval = null;
}
以上就是這個功能完整的程式碼,想要直接複製試用看看的朋友們,可以依序複製程式碼後,在 HTML 放上相關的 DOM 就能執行了。
這是 HTML 的 Snippet 片段:
<div>
  <input type="text" id="addressInput" placeholder="輸入您的地址">
  <button onclick="searchAddress()">搜尋地址</button>
</div>
<div id="map"></div>
<div>
  <button onclick="startSimulation()">開始模擬</button>
  <button onclick="stopSimulation()">停止模擬</button>
</div>
<div id="status"></div>
線上範例網址:https://mukiwu.github.io/web-api-demo/geo-track.html
Geolocation API 搭配地圖可以做的運用非常多,尤其再加上行動裝置等載具,可以實時地做出導航、追蹤、遊戲等有趣的應用。透過這些技術,我們不僅可以提高生活的便捷性,還能創造出更多創新和互動的體驗。例如,導航應用可以幫助我們在陌生的城市中找到最佳路線,追蹤應用可以用來保護個人安全或監控物流,遊戲則可以利用地理位置提供現實增強的遊戲體驗。
希望這兩篇的分享,可以讓大家對 Geolocation API 有更進一步的了解與認識,並激發大家在自己專案中運用這些技術的靈感。如果有任何問題或想法,都歡迎留言詢問或分享討論唷。