了解 k8s 中的授權機制
了解 API group 與 verbs
實作 RBAC
測試權限
kubectl auth can-i 指令kubectl 指令並加上 --as 選項Verbs 的區別:get、list、watch
看完如何升級、備份 cluster 後,我們來談談 cluster 中的權限管理,今天的重點是 cluster 中的「授權」機制。
在 Day 22 介紹的 cert、 key 和 kubeconfig,規定了「誰可以進到 cluster」,例如我們幫 Bob 簽署了一張憑證,讓他可以進入到 cluster。這就是所謂的 Authentication(認證)。
不過,為了不讓 Bob 亂來,我們也在 Day 22 的範例中透過 RBAC 讓 Bob 只能操作 default namespace 的 Pod ,而 RBAC 就是 k8s中的一種 Authorization ( 授權 )機制。
在 k8s 中, Authorization 的常見模式有以下幾種:
Node:對 kubelet 能進行的 API 操作進行控制。
ABAC: Attribute-based access control ( ABAC )。在一份 policy 檔中,針對不同使用者(或群組)「個別」設定權限。
RBAC:Role-based access control ( RBAC )。先設定好「role 物件」的權限,再將使用者(或群組)與這個 role 物件「綁定」。
Webhook:使用第三方的授權機制,透過 HTTP POST 的方式來進行授權。
關於其他授權模式,可以參考官方文件。
要查看目前 cluster 啟用的授權模式,可以使用以下指令:
kubectl -n kube-system describe po kube-apiserver-controlplane | grep auth
      --authorization-mode=Node,RBAC
      --enable-bootstrap-token-auth=true
於 /etc/kubernetes/manifests/kube-apiserver.yaml 中的 --authorization-mode 進行設定
與 ABAC 相比,RBAC 更加的方便與靈活,舉例來說:
有三個使用者,都只能對 Pod 進行操作:
如果後續須變更規則時,RBAC 這種「規則數量」上的優勢就會更加明顯。例如要讓這三人改成只能操作 Deployment,ABAC 需更改三條規則,而 RBAC 只需更改一個 role 物件即可。
今天我們會實際動手來實作 RBAC,不過在此之前,得先了解一下 k8s 中的「API group」。
其實這個概念在我們建立 Pod 與 Deployment 時就已經接觸過了。
如果看 yaml 檔的話,會發現 Pod 的 apiVersion 是 v1,而 Deployment 的 apiVersion 是 apps/v1。
在 k8s 中,所有物件都有屬於自己的 API group,而這樣的分類讓 k8s 的 API更加容易管理或擴充。
這裡介紹兩種常見的 API group:
API group 的總列表,可以參考官方文件
以下是兩者的比較關係:
| API group | RESTful API路徑 | yaml 的 apiVersion |
|---|---|---|
| core group(/api) | /api/v1 | v1 |
| named group(/apis) | /apis/$GROUP_NAME/$VERSION | $GROUP_NAME/$VERSION |
例如:
Pod 屬於 core group,所以 RESTful API 路徑是「/api/v1」,而 yaml 檔中的 apiVersion 是「v1」。
Deployment 屬於 named group 中的「apps群組」,所以 RESTful API 路徑是「/apis/apps/v1」,而 yaml 檔中的 apiVersion 是「apps/v1」。
這裡是 k8s 的 API group 架構圖: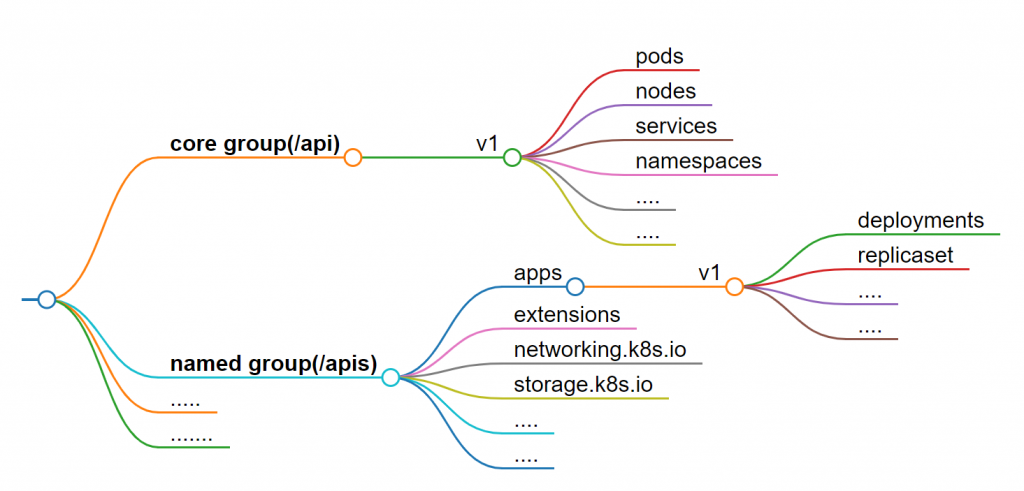
但如果真的不知道某個物件屬於哪個 API group,可以使用 kubectl api-resources 指令:
kubectl api-resources
# 在輸出結果的 APIVERSION 欄位
kubectl api-resources | grep <object-name>
例如:
kubectl api-resources | grep deployments
deployments deploy apps/v1 true Deployment
apiVersion 是「apps/v1」,所以 Deployment 屬於 apps 群組。
OK,現在我們知道每個物件都有自己的 API group,而使用者能對這些物件「做什麼」,則取決於該物件的 verbs。
常見的 verbs 有以下幾種:
get、list 是不是看起來很像?但其實是有差異的,後面會有測試來說明。
不過,每個物件對應的 verbs 或多或少會有些差異,可以透過以下方法查看特定物件的 verbs:
kubectl api-resources -o wide | grep <object-name>
了解了 API group 與 verbs 之後,我們就可以來設定 RBAC 了。
針對某個 namespace 的 RBAC 設定其實很簡單,只需要兩個步驟:
建立 Role 物件:賦予這個 Role 在「某個 namespace 」中的權限,例如能對 default namespace 的 Pods 進行 get、watch、list 的操作。
建立 Rolebinding 物件:將使用者(或群組)綁定到剛剛建立的「Role」上,這樣這個使用者就擁有了這個「Role」的權限。
底下我們直接來實作一個 RBAC 的範例:
這是一個 role 的yaml範例:
這個 role 的名稱是「pod-reader」,只能對 default namespace 的 Pods 進行 get、watch、list 的操作。
# pod-reader.yaml
apiVersion: rbac.authorization.k8s.io/v1
kind: Role
metadata:
  namespace: default # role 權限的生效範圍
  name: pod-reader
rules:
- apiGroups: [""] # 空值,代表是core group
  resources: ["pods"]
  verbs: ["get", "watch", "list"]
Tips:用
kubectl create建立 role
我們可以用指令建立一個一模一樣的 role:
kubectl create role pod-reader --verb=get,watch,list --resource=pods
不過使用 kubectl create 就只能設定一個 rule,如果設定多個 rule 可以先使用「--dry-run=client -o yaml」將 yaml 輸出,再進行編輯。
設定好 role 的權限後,建立之後來查看一下:
kubectl apply -f pod-reader.yaml
kubectl describe role pod-reader
Name:         pod-reader
Labels:       <none>
Annotations:  <none>
PolicyRule:
  Resources  Non-Resource URLs  Resource Names  Verbs
  ---------  -----------------  --------------  -----
  pods       []                 []              [get watch list]
使用 describe 來查看 role 的權限其實就一目瞭然了。底下再來看看其他 rules 的設定方式:
rules:
- apiGroups: [""]
  resources: ["pods", "configmaps"]
  verbs: ["get", "watch", "list"]
# 可以對 core gruop 中的所有 resource 進行 get、watch、list 的操作。
rules:
- apiGroups: [""]
  resources: ["*"]
  verbs: ["get", "watch", "list"]
resource/subresource」的方式來指定特定的資源的子資源,例如:# 只能對 Pod 與 Pod 中的 log 進行 get、list 的操作。
rules:
- apiGroups: [""]
resources: ["pods", "pods/log"]
verbs: ["get", "list"]
# 只能對「nginx」這個 Pod 進行 get、watch、list 的操作,而非該 namespace 中的所有 Pod
rules:
- apiGroups: [""]
  resources: ["pods"]
  resourceNames: ["nginx"]
  verbs: ["get", "watch", "list"]
Tips:apiGroups 的寫法
如果使用 kubectl api-resources 查看 Deployment 的 apiGroup:
kubectl api-resources | grep deployments
deployments                       deploy       apps/v1                           true         Deployment
會發現是 apps/v1,這時你可能會在 role 的 yaml 中這樣定義關於 Deployment 的 rule:
rules:
- apiGroups: ["apps/v1"]
  resources: ["deployments"]
  verbs: ["get", "watch", "list"]
這樣是錯誤的,因為 apps/v1 是「apiVersion」的寫法,其格式為「$GROUP_NAME/$VERSION」。
所以在寫 role 的 yaml 時。apiGroups 欄位,只需填入 $GROUP_NAME 即可:
rules:
- apiGroups: ["apps"]
  resources: ["deployments"]
  verbs: ["get", "watch", "list"]
建立好 role 之後,就可以把「使用者(或群組)」綁定到這個 role 上,這個動作稱為「Role Binding」。
例如我們剛剛創建了一個 role 物件叫 pod-reader,現在我們想要將使用者「bob」綁定到這個 role:
# rolebinding.yaml
apiVersion: rbac.authorization.k8s.io/v1
kind: RoleBinding
metadata:
  name: read-pods
  namespace: default
subjects:
- kind: User
  name: bob # user的名稱
  apiGroup: rbac.authorization.k8s.io
roleRef:
  kind: Role
  name: pod-reader # 剛剛創建的role物件
  apiGroup: rbac.authorization.k8s.io
kubectl apply -f rolebinding.yaml
這樣一來,Bob 就能在 default namespace 中對 Pod 進行 get、watch、list 的操作。
如果要一次綁定多個使用者,可以在 subjects 底下加入多個「kind: User」:
subjects:
- kind: User
  name: bob
  apiGroup: rbac.authorization.k8s.io
- kind: User
  name: alice
  apiGroup: rbac.authorization.k8s.io
Tips:用
kubectl create建立 rolebinding
我們同樣能用指令來建立 rolebinding:
kubectl create rolebinding read-pods --role=pod-reader --user=bob
用指令綁定多個使用者:
kubectl create rolebinding read-pods --role=pod-reader --user=bob --user=james
在上面建立的 role 與 rolebinding 都需要指定 namespace,代表這些設定只存在於特定的 namespace。例如上面的例子中,bob 只能在 default namespace 中對 Pod 進行 get、watch、list 的操作。
假如今天我要讓 bob 在整個 cluster 都能對 Pod 進行相同的操作,難到需要在每個 namespace 中都建立一次 role 與 rolebinding?另外,有些物件不能用 namespace 來區分,例如 namespace 本身、Node、storageclass 等等,這些物件的 role 與 rolebinding 又該如何設定?
這時候就可以用 ClusterRole 與 ClusterRoleBinding 來設定。兩者的概念與 role 與 rolebinding 是一樣的,只是權限的作用範圍涵蓋了整個 cluster。
Tips:如何查看能被 namespace 區分的物件?
哪些物件能不能被 namespace 區分,可以用以下指令查看:
kubectl api-resources --namespaced=true
kubectl api-resources --namespaced=false
我們直接拿上面的 pod-reader.yaml 來修改一下:
apiVersion: rbac.authorization.k8s.io/v1
kind: ClusterRole # role --> ClusterRole
metadata: # 把 namespace 拿掉
  name: pod-reader
rules:
- apiGroups: [""]
  resources: ["pods"]
  verbs: ["get", "watch", "list"]
kubectl apply -f pod-reader.yaml
建立之後一樣與使用者綁定:
apiVersion: rbac.authorization.k8s.io/v1
kind: ClusterRoleBinding # rolebinding --> ClusterRoleBinding
metadata: # 同樣沒有namespace
  name: read-pods-cluster
subjects:
- kind: User
  name: bob # user的名稱
  apiGroup: rbac.authorization.k8s.io
roleRef:
  kind: ClusterRole # role --> ClusterRole
  name: pod-reader
  apiGroup: rbac.authorization.k8s.io
kubectl apply -f rolebinding.yaml
這樣一來,Alice 就能在整個 cluster 中對 Pod 進行 get、watch、list 的操作。
Tips:用
kubectl create建立 clusterrole & clusterrolebinding
同樣也可以用指令來建立 clusterrole 與 clusterrolebinding:
kubectl create clusterrole pod-reader --verb=get,watch,list --resource=pods
kubectl create clusterrolebinding read-pods-cluster --clusterrole=pod-reader --user=bob
ClusterRole 其實也能與 RoleBinding 組合使用,這種組合的好處在於不用重複建立多個相同的 role 物件。舉例來說:
假設 deploy-reader 只是一個存在於 default namespace 的 role 物件,那麼只能在 default namespace 中建立 rolebinding。如果我們想讓 bob 在 default、kube-system、kube-public 這三個 namespace 中擁有 deploy-reader 的權限,就得重複的在這三個 namespace 都建立一個 deploy-reader 再分別綁定 bob。
所以,如果我們知道某個 role 會在多個 namespace 中頻繁使用,可以直接建立一個 ClusterRole,再用 RoleBinding 來綁定到不同的 namespace。來實際操作一下:
kubectl create clusterrole deploy-reader --verb=get,watch,list --resource=deployments
kubectl create rolebinding read-deploy --clusterrole=deploy-reader --user=Alice -n default
kubectl create rolebinding read-deploy --clusterrole=deploy-reader --user=Alice -n kube-system
kubectl create rolebinding read-deploy --clusterrole=deploy-reader --user=Alice -n kube-public
這樣一來,bob 就能在 default、kube-system、kube-public 這三個 namespace 中對 Pod 進行 get、watch、list 的操作。雖然綁定的是 clusterrole,但是透過 rolebinding 的綁定,這個權限只會在特定的 namespace 生效。
看完上面的測試後,你可能會有點懷疑權限真的照我們預期的生效了嗎?而且隨著規則增加,我們不可能記得每個使用者的權限設定,這時可以這樣檢查:
kubectl auth can-i <verb> <resource>
例如:
kubectl auth can-i get pods
yes
kubectl auth can-i <verb> <resource> --as <user>
或是:
kubectl <command> --as <user>
底下我們來測試幾個例子:
如果現在都有按照上面的範例執行的話,我們預期的權限如下:
測試權限的方法有上面提到的兩種:
kubectl auth can-i 指令kubectl 指令,並加上 --as 選項使用「方法一」測試 bob 的權限
kubectl auth can-i get pods --as bob --all-namespaces
輸出:yes
kubectl auth can-i delete pods --as bob
輸出:no
kubectl auth can-i get deployments --as bob -n kube-system
輸出:no
使用「方法二」測試 Alice 的權限
kubectl get deploy --as Alice --all-namespaces
Error from server (Forbidden): deployments.apps is forbidden: User "Alice" cannot list resource "deployments" in API group "apps" at the cluster scope
kubectl get deploy --as Alice -n default
kubectl get deploy --as Alice -n kube-system
kubectl get deploy --as Alice -n kube-public
輸出:default、kube-system、kube-public 這三個 namespace 的 Deployment 清單
kubectl get po --as Alice -n kube-public
Error from server (Forbidden): pods is forbidden: User "Alice" cannot list resource "pods" in API group "" in the namespace "kube-public"
這三個 verbs 「字面上」看起來很像,但其實是有差異的:
get:只能取得特定物件的「個別資訊」,例如 kubectl get po nginx、kubectl describe po nginx
list:只能列出特定物件的「清單」,例如 kubectl get po
watch:可以及時的監控物件的變化,例如在有「get」的權限下,可以 kubectl get po nginx -w
三個權限是彼此獨立的,例如當你擁有 list 權限不代表你一定有 get 或 watch 的權限,因為 list 只是列出清單。
這樣說或許很模糊,我們來實際測試看看:
kubectl create role get-pods --verb=get --resource=pods
kubectl create role list-pods --verb=list --resource=pods
kubectl create role watch-pods --verb=watch --resource=pods
kubectl create rolebinding get-pods-binding --role=get-pods --user=getter
kubectl create rolebinding list-pods-binding --role=list-pods --user=lister
kubectl create rolebinding watch-pods-binding --role=watch-pods --user=watcher
kubectl run nginx --image=nginx
kubectl run busybox --image=busybox --command -- sleep 1d
測試 getter 可以做什麼
kubectl get po --as getter
Error from server (Forbidden): pods is forbidden: User "getter" cannot list resource "pods" in API group "" in the namespace "default"
kubectl get po nginx --as getter
NAME    READY   STATUS    RESTARTS   AGE
nginx   1/1     Running   0          103s
kubectl describe po nginx --as getter
ame:             nginx
Namespace:        default
Priority:         0
Service Account:  default
Node:             node01/172.30.2.2
......
kubectl get po nginx -w --as getter
NAME    READY   STATUS    RESTARTS   AGE
nginx   1/1     Running   0          5m26s
Error from server (Forbidden): unknown (get pods)
測試 lister 可以做什麼
kubectl get po --as lister
NAME      READY   STATUS    RESTARTS   AGE
busybox   1/1     Running   0          6m9s
nginx     1/1     Running   0          6m10s
kubectl get po nginx --as lister
Error from server (Forbidden): pods "nginx" is forbidden: User "lister" cannot get resource "pods" in API group "" in the namespace "default"
kubectl describe po nginx --as lister
Error from server (Forbidden): pods "nginx" is forbidden: User "lister" cannot get resource "pods" in API group "" in the namespace "default"
kubectl get po -w --as lister
NAME      READY   STATUS    RESTARTS   AGE
busybox   1/1     Running   0          7m31s
nginx     1/1     Running   0          7m32s
Error from server (Forbidden): unknown (get pods)
測試 watcher 可以做什麼
kubectl get po -w --as watcher
Error from server (Forbidden): pods is forbidden: User "watcher" cannot list resource "pods" in API group "" in the namespace "default"
所以修改一下 watcher 的 role,讓他至少有 get 的權限:
kubectl edit role watch-pods
......
rules:
- apiGroups:
  - ""
  resources:
  - pods
  verbs:
  - watch
  - get # 加入 get
kubectl get po nginx --as watcher
NAME    READY   STATUS    RESTARTS   AGE
nginx   1/1     Running   0          10m
kubectl get po nginx -w --as watcher
NAME    READY   STATUS    RESTARTS   AGE
nginx   1/1     Running   0          10m
沒錯,這時 -w 選項就生效了,按「ctrl + c」來結束觀察。
為了不影響後續章節的操作,記得清理環境喔
kubectl delete po,role,rolebinding --all -n default
kubectl delete clusterrole pod-reader
kubectl delete clusterrolebinding read-pods-cluster
今天示範如何設定 RBAC,在設定時必須清楚的知道「設定的目的」,例如要讓某個使用者在整個 cluster 中有哪些權限,或是只能在特定的 namespace 中有哪些權限,而這些特定的 namespace 數量是多是少?需不需要直接建立一個 clusterrole 再分別綁定?
如果設定 RBAC 後想要測試權限是否生效,可以使用 kubectl auth can-i 指令,或是直接使用 kubectl 指令並加上 --as 選項。
以下為考試時可能用到的查詢關鍵字整理:
參考資料