我們先前要測哪個檔案、要用哪個瀏覽器都是用cli-cmd去指定
但每跑一次就要貼一次非常的麻煩,如果有設定檔可以傳送會更好
https://playwright.dev/docs/test-configuration
import { defineConfig, devices } from '@playwright/test';

export default defineConfig({
// Look for test files in the "tests" directory, relative to this configuration file.
testDir: 'tests',

// Run all tests in parallel.
fullyParallel: true,

// Fail the build on CI if you accidentally left test.only in the source code.
forbidOnly: !!process.env.CI,

// Retry on CI only.
retries: process.env.CI ? 2 : 0,

// Opt out of parallel tests on CI.
workers: process.env.CI ? 1 : undefined,

// Reporter to use
reporter: 'html',

use: {
// Base URL to use in actions like `await page.goto('/')`.
baseURL: 'http://127.0.0.1:3000',

// Collect trace when retrying the failed test.
trace: 'on-first-retry',
},
// Configure projects for major browsers.
projects: [
{
name: 'chromium',
use: { ...devices['Desktop Chrome'] },
},
],
// Run your local dev server before starting the tests.
webServer: {
command: 'npm run start',
url: 'http://127.0.0.1:3000',
reuseExistingServer: !process.env.CI,
},
});
新增playwright config檔playwright.config.js
const { defineConfig, devices } = require('@playwright/test');

const config = {
	retries: 1,
	timeout: 60000,
	use: {
		headless: false,
		viewport: {width: 1280, height:720},
		video: "off",
		screenshot: "off"
	},
	projects: [
		{
			name: "Chrome",
			use: {browserName: "chromium"}
		},
		{
			name: "Firefox",
			use: {browserName: "firefox"}
		},
		{
			name: "Webkit",
			use: {browserName: "webkit"}
		},
	]
}

module.exports = config
npx playwright test --config=playwright.config.js --project=Chrome
自動化程式執行過程的錄影檔
const { PlaywrightTestConfig } = require('@playwright/test');

const config = {
	retries: 1,
	timeout: 60000,
	use: {
		headless: false,
		viewport: {width: 1280, height:720},
		video: "on",
		screenshot: "off"
	},
	projects: [
		{
			name: "Chrome",
			use: {browserName: "chromium"}
		},
		{
			name: "Firefox",
			use: {browserName: "firefox"}
		},
		{
			name: "Webkit",
			use: {browserName: "webkit"}
		},
	]
}

module.exports = config
test.only('pause check', async ({ page }) => {
  await page.goto('https://playwright.dev/');
  // Method 1
  await page.screenshot({path: "screenshot.png", fullPage: true})

  // Method 2
  const locator = page.locator("test=Add/Remove Elements");
  await locator.screenshot({path: "screenshot.png"})
});
config file: screenshot = on
const { PlaywrightTestConfig } = require('@playwright/test');

const config = {
	retries: 1,
	timeout: 60000,
	use: {
		headless: false,
		viewport: {width: 1280, height:720},
		video: "off",
		screenshot: "on"
	},
	projects: [
		{
			name: "Chrome",
			use: {browserName: "chromium"}
		},
		{
			name: "Firefox",
			use: {browserName: "firefox"}
		},
		{
			name: "Webkit",
			use: {browserName: "webkit"}
		},
	]
}

module.exports = config
為了要讓測試script可以用在不同的環境下、並且整合CI/CD
可以在config檔裡面設定 baseURL
const { PlaywrightTestConfig } = require('@playwright/test');

const config = {
	retries: 1,
	timeout: 60000,
	use: {
        baseURL: "https://the-internet.herokuapp.com/",
		headless: false,
		viewport: {width: 1280, height:720},
		video: "on",
		screenshot: "off"
	},
	projects: [
		{
			name: "Chrome",
			use: {browserName: "chromium"}
		},
		{
			name: "Firefox",
			use: {browserName: "firefox"}
		},
		{
			name: "Webkit",
			use: {browserName: "webkit"}
		},
	]
}

module.exports = config
test script的部分則可以寫成
await page.goto("/");
完整test
const { test, expect } = require('@playwright/test');

test.describe("Smoke Tests", () => {
	test('pause check', async ({ page }) => {
	  await page.goto("/");
	  await page.goto("/abtest");
	  await page.pause()
	});
})
// @ts-check
const { test, expect } = require('@playwright/test');

test.describe("Smoke Tests", () => {

    test.beforeEach(async ({ page }) => {
        await page.goto("/");
    })

    test.afterEach(async ({ page }) => {
	    await page.screenshot({ path: "screenshot.png", fullPage: true })
        console.log("This test finished")
    })

    test('pause check', async ({ page }) => {
        await page.pause()
    });
})
一般我們寫nodeJS最常用的執行指令是
npm run build
npm run debug
npm run start
我們也可以利用這個機制客製化跑測試
package.json
{
  "name": "playwright",
  "version": "1.0.0",
  "main": "index.js",
  "scripts": {
    "test": "npx playwright test --headed",
    "test:chrome": "npx playwright test --config=playwright.config.js --project=chromium",
    "test:firefox": "npx playwright test --config=playwright.config.js --project=firefox"
  },
  "keywords": [],
  "author": "",
  "license": "ISC",
  "description": "",
  "devDependencies": {
    "@playwright/test": "^1.47.0",
    "@types/node": "^22.5.4"
  }
}
可直接執行
npm run test
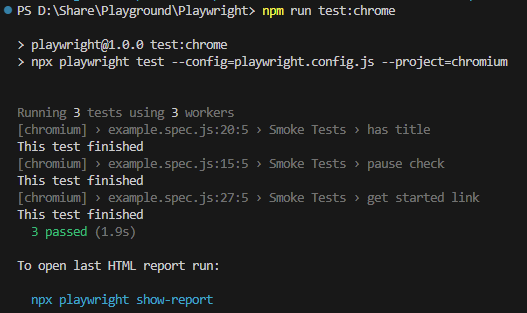
npm run test:chrome
npm run test:firefox
將test.describe改成 test.describe.parallel
如果你有很多測試要執行,使用平行測試會讓你省非常多時間。甚至可以平行跑在不同的瀏覽器上。
// @ts-check
const { test, expect } = require('@playwright/test');


test.describe.parallel("Smoke Tests", () => {

    test.beforeEach(async ({ page }) => {
        await page.goto("/");
    })

    test.afterEach(async ({ page }) => {
        console.log("This test finished")
    })

	// ...
})
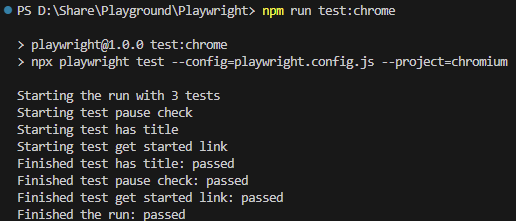
新增一個reporter.js
class MyReporter {
    onBegin(config, suite) {
        console.log(`Starting the run with ${suite.allTests().length} tests`);
    }

    onTestBegin(test) {
        console.log(`Starting test ${test.title}`);
    }

    onTestEnd(test, result) {
        console.log(`Finished test ${test.title}: ${result.status}`);
    }

    onEnd(result) {
        console.log(`Finished the run: ${result.status}`);
    }
}

module.exports = MyReporter
在config新增一個參數 reporter
const { PlaywrightTestConfig } = require('@playwright/test');

const config = {
	retries: 1,
	timeout: 60000,
	reporter: './reporter.js',
	use: {
        // ...
	},
	projects: [
		// ...
	]
}

module.exports = config
list -> 預設的reporter
npm run test --reporter=list
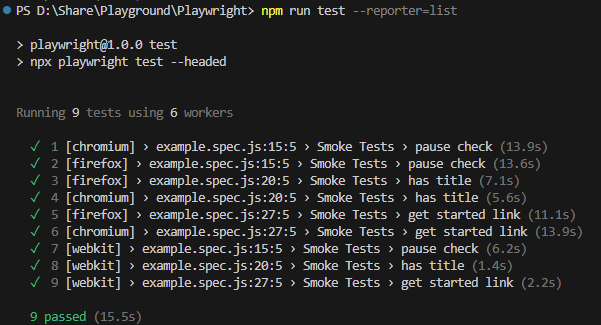
可以是 list, line, dot, html 等
本文章同步發布於個人blogger。