在昨天的文章中,我們探索了如何使用 Angular Material 來簡化基礎元件的開發,並且了解到善用現成工具能大大提升效率。今天,我們將深入探討更多的元件和表單驗證,這些功能是開發更複雜的應用方式。在實際專案中,表單驗證和更多的 UI 元件是不可或缺的,尤其當我們需要處理與大量使用者互動時。
文章大綱:
當學習元件和表單驗證時,很多初學者可能會感到複雜和困惑。尤其像是 Dialog 和 Card 的設定過程中,涉及到比較複雜的設定,會困難許多。同時,表單驗證也包含多層次的邏輯處理,會讓新手感到這部分學習又更複雜。
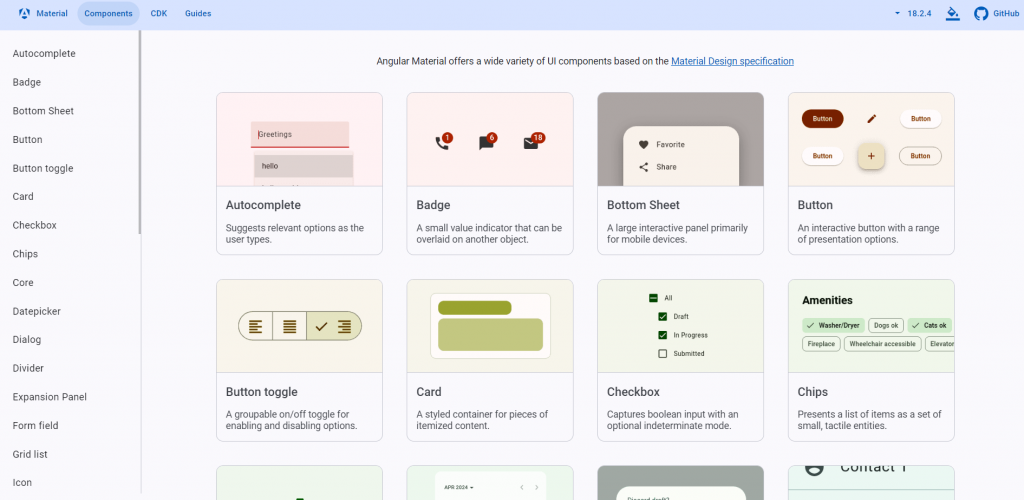
Angular Material 中的進階元件提供了強大的功能,能夠提升使用者體驗。這些元件包括 Dialog、 Card 、List 等。這些元件可以呈現更多的畫面。
首先,我們來建立一個簡單的 Sidenav 和 Toolbar。
在 app.module.ts 中,確保導入 MatSidenavModule 和 MatToolbarModule:
import { NgModule } from '@angular/core';
import { BrowserModule } from '@angular/platform-browser';

import { AppRoutingModule } from './app-routing.module';
import { AppComponent } from './app.component';
import { FormsModule } from '@angular/forms';
import { provideAnimationsAsync } from '@angular/platform-browser/animations/async';
import { MatSidenavModule } from '@angular/material/sidenav';
import { MatToolbarModule } from '@angular/material/toolbar';
import { MatIconModule } from '@angular/material/icon';
import { MatListModule } from '@angular/material/list';

@NgModule({
  declarations: [AppComponent, LoginComponent],
  imports: [
    BrowserModule,
    AppRoutingModule,
    FormsModule,
    MatSidenavModule,
    MatToolbarModule,
    MatIconModule,
    MatListModule,
  ],
  providers: [provideAnimationsAsync()],
  bootstrap: [AppComponent],
})
export class AppModule {}
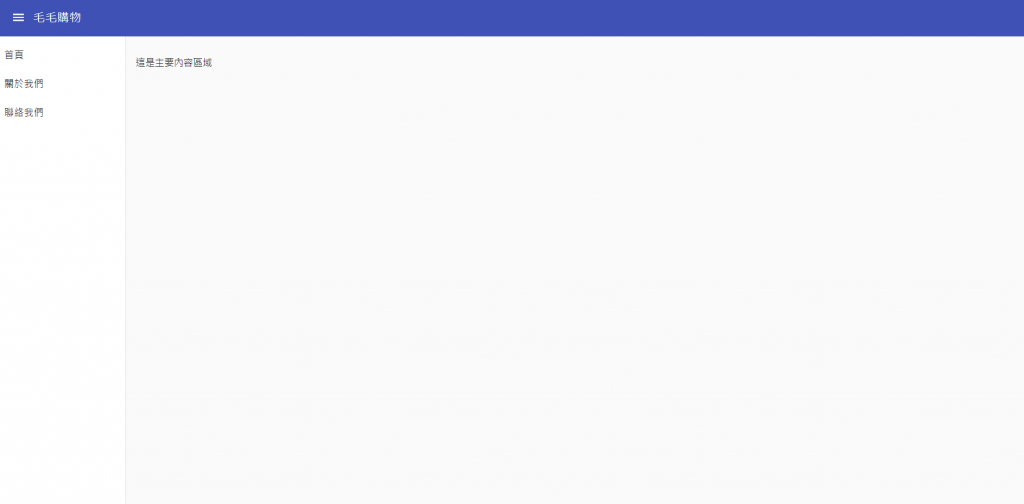
接著,編輯 app.component.html,加入導 Sidenav 和 Toolbar :
<mat-toolbar color="primary">
  <button mat-icon-button (click)="sidenav.toggle()">
    <mat-icon>menu</mat-icon>
  </button>
  <span>毛毛購物</span>
</mat-toolbar>

<mat-sidenav-container class="example-container">
  <mat-sidenav #sidenav mode="side" opened>
    <mat-nav-list>
      <a mat-list-item href="#">首頁</a>
      <a mat-list-item href="#">關於我們</a>
      <a mat-list-item href="#">聯絡我們</a>
    </mat-nav-list>
  </mat-sidenav>

  <mat-sidenav-content>
    <p>這是主要內容區域</p>
  </mat-sidenav-content>
</mat-sidenav-container>
編輯 app.component.css
/* 讓 Sidenav 和 Toolbar 高度自動調整 */
.example-container {
  height: 100vh;
}

/* 設定 Sidenav 的寬度 */
mat-sidenav {
  width: 220px;
}

/* 給內容加一點內距,讓看起來更整潔 */
mat-sidenav-content {
  padding: 16px;
}
表單驗證是不可或缺的一部分,特別是在使用者資料輸入的情境中。我們將學習如何使用 Angular Material 提供的表單元件,並結合 同步 和 非同步驗證器 來實現資料驗證。
首先,我們來使用 Angular Material 的表單元件,如 輸入框(Input) 和 選擇器(Select),並設定簡單的表單。
在 app.module.ts 中導入 ReactiveFormsModule:
import { ReactiveFormsModule } from '@angular/forms';

@NgModule({
  imports: [
    ReactiveFormsModule,
  ],
})
接著,我們來建立一個表單:
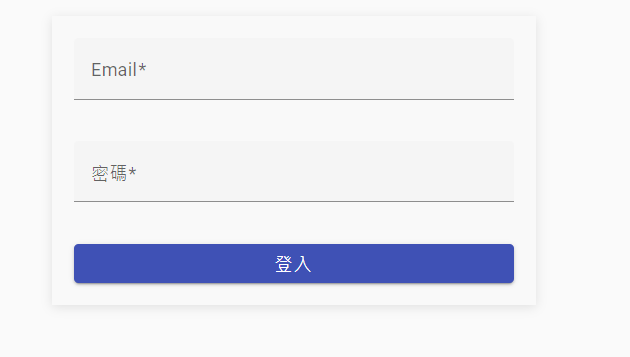
<!-- login.component.html -->
<form [formGroup]="loginForm" (ngSubmit)="onSubmit()">
  <mat-form-field appearance="fill">
    <mat-label>Email</mat-label>
    <input matInput formControlName="email" placeholder="輸入你的 Email">
    <mat-error *ngIf="loginForm.controls['email'].hasError('required')">
      Email 是必填的
    </mat-error>
    <mat-error *ngIf="loginForm.controls['email'].hasError('email')">
      Email 格式不正確
    </mat-error>
  </mat-form-field>

  <mat-form-field appearance="fill">
    <mat-label>密碼</mat-label>
    <input matInput type="password" formControlName="password" placeholder="輸入你的密碼">
    <mat-error *ngIf="loginForm.controls['password'].hasError('required')">
      密碼是必填的
    </mat-error>
  </mat-form-field>

  <button mat-raised-button color="primary" type="submit" [disabled]="!loginForm.valid">
    登入
  </button>
</form>
我們將使用 Angular 的表單驗證功能:
// login.component.ts
import { Component } from '@angular/core';
import { FormBuilder, FormGroup, Validators } from '@angular/forms';

@Component({
  selector: 'app-login',
  templateUrl: './login.component.html',
  styleUrls: ['./login.component.css']
})
export class LoginComponent {
  loginForm: FormGroup;

  constructor(private fb: FormBuilder) {
    this.loginForm = this.fb.group({
      email: ['', [Validators.required, Validators.email]],
      password: ['', Validators.required]
    });
  }

  onSubmit() {
    if (this.loginForm.valid) {
      console.log('表單提交', this.loginForm.value);
    }
  }
}
這段程式碼中,我們對 Email 和 密碼 進行了基本的驗證。
現在,我們可以把所學應用到一個小項目中。讓我們建立一個包含更多元件和表單驗證的登入頁面。
在專案根目錄下,執行以下命令來安裝 Angular Material:
ng add @angular/material
app.module.ts 中匯入必要的模組確保在 app.module.ts 中匯入了所有需要的模組,例如 MatInputModule、MatFormFieldModule、MatButtonModule、ReactiveFormsModule 等。這些模組用來支援表單元件、按鈕及其他 Angular Material 組件。
// app.module.ts
import { NgModule } from '@angular/core';
import { BrowserModule } from '@angular/platform-browser';
import { BrowserAnimationsModule } from '@angular/platform-browser/animations';
import { ReactiveFormsModule } from '@angular/forms';
import { MatFormFieldModule } from '@angular/material/form-field';
import { MatInputModule } from '@angular/material/input';
import { MatButtonModule } from '@angular/material/button';
import { MatIconModule } from '@angular/material/icon';
import { MatSidenavModule } from '@angular/material/sidenav';
import { MatToolbarModule } from '@angular/material/toolbar';
import { MatListModule } from '@angular/material/list';

import { AppComponent } from './app.component';
import { LoginComponent } from './login/login.component';

@NgModule({
  declarations: [AppComponent, LoginComponent],
  imports: [
    BrowserModule,
    BrowserAnimationsModule,
    ReactiveFormsModule,
    MatFormFieldModule,
    MatInputModule,
    MatButtonModule,
    MatIconModule,
    MatSidenavModule,
    MatToolbarModule,
    MatListModule
  ],
  providers: [],
  bootstrap: [AppComponent]
})
export class AppModule {}
執行以下命令來生成一個新的登入元件:
ng generate component login
在 login.component.html 中,設定表單和表單欄位,並使用 Angular Material 的元件。
<!-- login.component.html -->
<form [formGroup]="loginForm" (ngSubmit)="onSubmit()">
  <mat-form-field appearance="fill">
    <mat-label>Email</mat-label>
    <input matInput formControlName="email" placeholder="輸入你的 Email">
    <mat-error *ngIf="loginForm.controls['email'].hasError('required')">
      Email 是必填的
    </mat-error>
    <mat-error *ngIf="loginForm.controls['email'].hasError('email')">
      Email 格式不正確
    </mat-error>
  </mat-form-field>

  <mat-form-field appearance="fill">
    <mat-label>密碼</mat-label>
    <input matInput type="password" formControlName="password" placeholder="輸入你的密碼">
    <mat-error *ngIf="loginForm.controls['password'].hasError('required')">
      密碼是必填的
    </mat-error>
  </mat-form-field>

  <button mat-raised-button color="primary" type="submit" [disabled]="!loginForm.valid">
    登入
  </button>
</form>
在 login.component.ts 中,使用 FormBuilder 和 Validators 來設定表單驗證邏輯。
// login.component.ts
import { Component } from '@angular/core';
import { FormBuilder, FormGroup, Validators } from '@angular/forms';

@Component({
  selector: 'app-login',
  templateUrl: './login.component.html',
  styleUrls: ['./login.component.css']
})
export class LoginComponent {
  loginForm: FormGroup;

  constructor(private fb: FormBuilder) {
    this.loginForm = this.fb.group({
      email: ['', [Validators.required, Validators.email]],
      password: ['', Validators.required]
    });
  }

  onSubmit() {
    if (this.loginForm.valid) {
      console.log('表單提交', this.loginForm.value);
    }
  }
}
為了讓畫面保持簡潔,我們只需要一些基本的 CSS 設定來確保元件不會擠在一起。
/* login.component.css */

/* 將表單容器置中 */
form {
  max-width: 400px;
  margin: 0 auto;
  padding: 20px;
  background-color: #f9f9f9;
  box-shadow: 0 2px 10px rgba(0, 0, 0, 0.1);
}

/* 控制表單欄位的寬度 */
mat-form-field {
  width: 100%;
  margin-bottom: 16px;
}

/* 調整按鈕樣式,使其看起來更好 */
button {
  width: 100%;
  padding: 10px;
  font-size: 16px;
  border-radius: 4px;
}
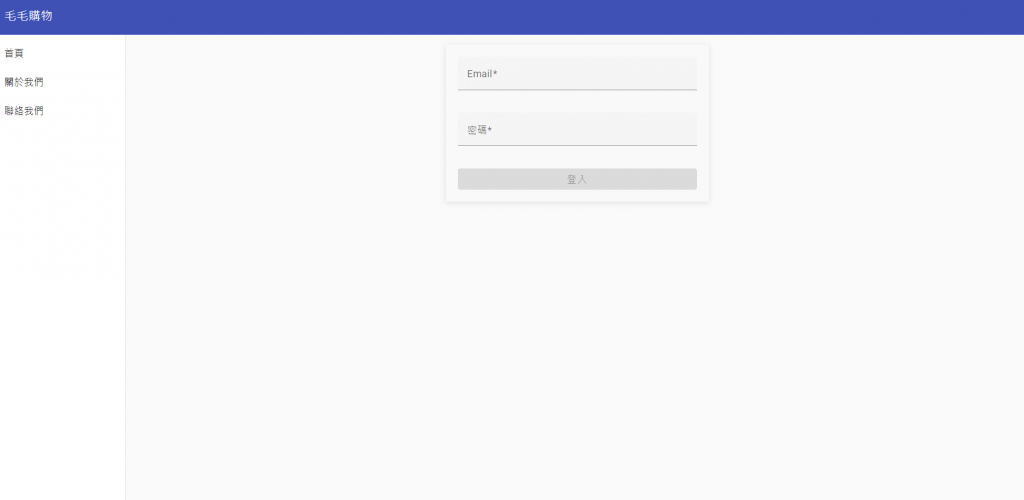
app.component.html 中加入 LoginComponent最後,在 app.component.html 中顯示登入元件。
<!-- app.component.html -->
<mat-toolbar color="primary">
  <span>我的應用</span>
</mat-toolbar>

<mat-sidenav-container class="example-container">
  <mat-sidenav mode="side" opened>
    <mat-nav-list>
      <a mat-list-item href="#">首頁</a>
      <a mat-list-item href="#">關於我們</a>
      <a mat-list-item href="#">聯絡我們</a>
    </mat-nav-list>
  </mat-sidenav>

  <mat-sidenav-content>
    <app-login></app-login>
  </mat-sidenav-content>
</mat-sidenav-container>
當你完成了這些步驟後,執行 ng serve 來啟動。可以到 http://localhost:4200/ 查看執行成果。
ng serve
掌握更多元件與表單驗證的過程可能會讓你感覺一開始有點困難。工程師的成長來自於不斷地挑戰自己,並一步步地解決問題。重要的是,從小處開始,不要急著把所有事情一口氣完成。
專注於實踐中學習,我們也是從小地方開始,慢慢的增加,現在也有一個登入畫面囉!