接下來的幾天我們會運用我們所學,繼續完成我的聊天 APP - Whisper
這是今天的參考程式碼:https://github.com/ksw2000/ironman-2024/tree/4c17966bf8615ebb609ae07d36a77cd489233a6d/whisper
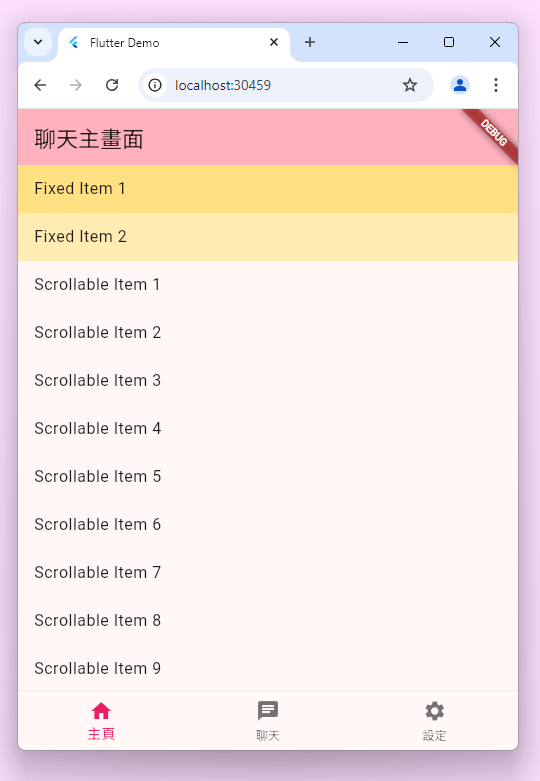
接著我們處理主頁的部分,這部分的頂部會先顯示自己的資訊,接著顯示一個「好友」的提示,為了達成這個效果我們可以使用 CustomScrollView
以下是一個最簡單的示範:
class _HomePageState extends State<HomePage> {
  @override
  Widget build(BuildContext context) {
    return CustomScrollView(
      slivers: <Widget>[
        // 固定加在 list 的前兩個項目
        SliverToBoxAdapter(
          child: Column(
            children: [
              ListTile(
                title: Text("Fixed Item 1"),
                tileColor: Colors.amber[200],
              ),
              ListTile(
                title: Text("Fixed Item 2"),
                tileColor: Colors.amber[100],
              ),
            ],
          ),
        ),
        // 其他項目
        SliverList(
          delegate: SliverChildBuilderDelegate(
            (context, index) => ListTile(
              title: Text('Scrollable Item ${index + 1}'),
            ),
            childCount: 30,
          ),
        ),
      ],
    );
  }
}
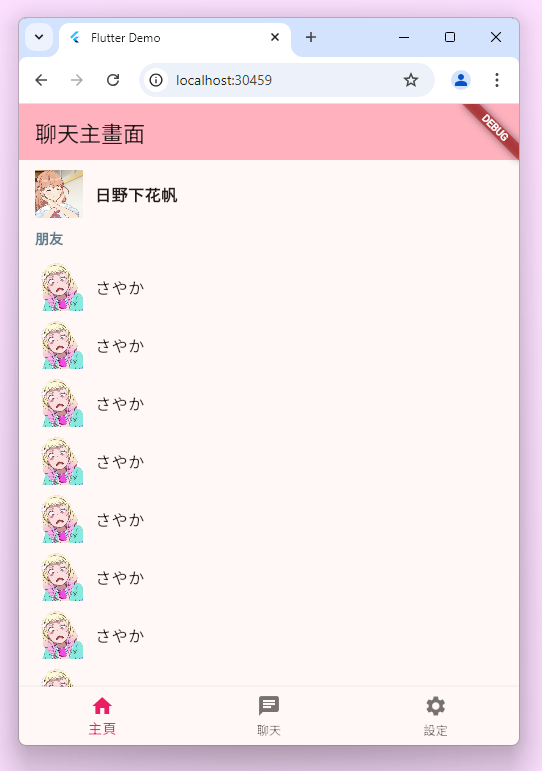
接著我們搭配昨天所學一次將其完成,首先先建立一個 Friend Class,我們這裡都把 profile 設成可為 null 的變數,這是因為,用戶可能不設頭貼!
class Friend {
  Friend(
      {required this.profile,
      required this.userName,
      required this.userID,
      required this.channelID});
  String? profile;
  String userName;
  int userID;
  int channelID;
}
接著我們把 FrinedCard 的元件也做出來,當用戶沒有設頭貼時我們使用預設頭貼,暫時以鬼塚夏美代替。
class FriendCard extends StatelessWidget {
  const FriendCard({super.key, required this.friend});
  final Friend friend;

  @override
  Widget build(BuildContext context) {
    return ListTile(
      contentPadding: const EdgeInsets.symmetric(horizontal: 16, vertical: 5),
      leading: friend.profile == null
          ? Image.asset("assets/default_profile.png")
          : Image.network(friend.profile!),
      title: Text(friend.userName),
      onTap: () {
        // TODO
        print("go to ${friend.channelID}");
      },
    );
  }
}
接著我們重新更改 CustomScrollView 使其符合以下畫面
class _HomePageState extends State<HomePage> {
  final _scrollCtrl = ScrollController();

  @override
  void dispose() {
    _scrollCtrl.dispose();
    super.dispose();
  }

  @override
  Widget build(BuildContext context) {
    Me me = MeDataLayer.of(context).user!;

    return Scrollbar(
      controller: _scrollCtrl,
      child: CustomScrollView(
        controller: _scrollCtrl,
        slivers: <Widget>[
          SliverToBoxAdapter(
            child: Column(
              crossAxisAlignment: CrossAxisAlignment.start,
              children: [
                const SizedBox(height: 10),
                ListTile(
                  leading: me.profile == null
                      ? Image.asset("assets/default_profile.png")
                      : Image.network(me.profile!),
                  title: Text(
                    me.name,
                    style: const TextStyle(fontWeight: FontWeight.bold),
                  ),
                ),
                const Padding(
                  padding: EdgeInsets.symmetric(horizontal: 16.0, vertical: 10),
                  child: Text("朋友",
                      style: TextStyle(
                          fontWeight: FontWeight.bold, color: Colors.blueGrey)),
                )
              ],
            ),
          ),
          SliverList(
            delegate: SliverChildBuilderDelegate(
              (context, index) => FriendCard(
                friend: Friend(
                    profile: null, userName: "さやか", userID: 0, channelID: 0),
              ),
              childCount: 20,
            ),
          ),
        ],
      ),
    );
  }
}
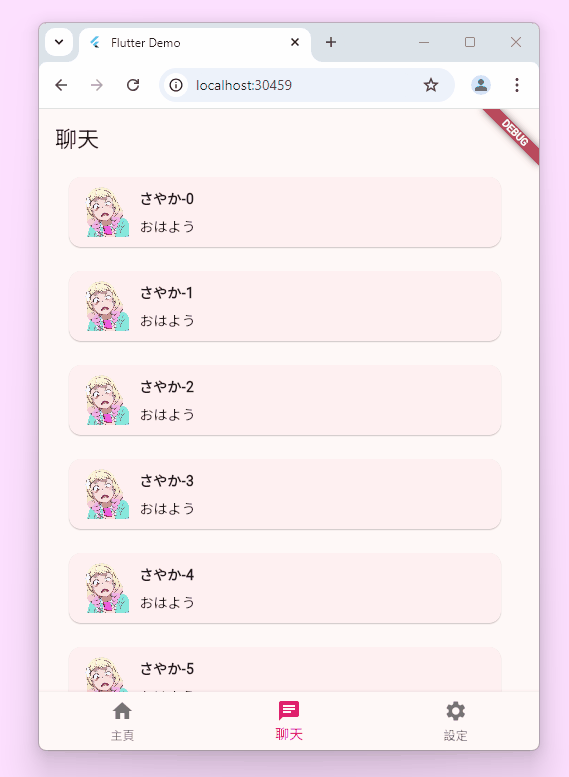
接著,如同上一篇文所提及,由於載入好友會需要經過伺服器的處理,因此我們也加入一個異步處理及滑至底部載入更多的效果。由於只有底下朋友列表的部分要額外載入,因此我們將這個邏輯分開到另一個 class FriendCardList 來處理
class _HomePageState extends State<HomePage> {
  // ...
  @override
  Widget build(BuildContext context) {
    Me me = MeDataLayer.of(context).user!;
    return Scrollbar(
      controller: _scrollCtrl,
      child: CustomScrollView(
        controller: _scrollCtrl,
        slivers: <Widget>[
          SliverToBoxAdapter(
            // ...
          ),
          const FriendCardList()
        ],
      ),
    );
  }
}
class _FriendCardListState extends State<FriendCardList> {
  final Future<List<Friend>> _loadChatList =
      Future.delayed(const Duration(seconds: 1), () {
    return List<Friend>.generate(
        20,
        (index) => Friend(
            profile: "https://i.imgur.com/91bOTO6.png",
            userName: "さやか-$index",
            userID: 1,
            channelID: 0));
  });

  @override
  Widget build(BuildContext context) {
    return FutureBuilder(
        future: _loadChatList,
        builder: (context, snapshot) {
          if (snapshot.hasError) {
            return SliverToBoxAdapter(
                child:
                    Center(child: Text("Unexpected error ${snapshot.error}")));
          } else if (snapshot.hasData) {
            return SliverList(
              delegate: SliverChildBuilderDelegate(
                (context, index) => FriendCard(
                  friend: snapshot.data![index],
                ),
                childCount: snapshot.data!.length,
              ),
            );
          }
          return const SliverToBoxAdapter(
              child: Center(child: CircularProgressIndicator()));
        });
  }
}
接著我們想要在當滑到底部時,再多載入一些 data,但是這次實作時發現,能決定控制到底的 _scrollCtrl 是在 FutureBuilder 之上層 widget 的,那麼當上層 widget 觸發事件後,下層的 widget 要怎麼更新呢?為了更簡單的解決這個問題,我們可以選擇不使用 FutureBuidler 而是自行管理狀態,直接將下滑載入的模組也用於初始化。
class _HomePageState extends State<HomePage> {
  final _scrollCtrl = ScrollController();
  final List<Friend> _friendList = [];
  bool _isLoadingMore = false;

  @override
  void initState() {
    _loadMoreItems();
    _scrollCtrl.addListener(() {
      if (_scrollCtrl.position.pixels == _scrollCtrl.position.maxScrollExtent) {
        _loadMoreItems();
      }
    });
    super.initState();
  }

  Future<void> _loadMoreItems() async {
    if (!_isLoadingMore) {
      setState(() {
        _isLoadingMore = true;
      });

      await Future.delayed(const Duration(seconds: 1));

      setState(() {
        _friendList.addAll(List<Friend>.generate(
            20,
            (index) => Friend(
                profile: "https://i.imgur.com/91bOTO6.png",
                userName: "さやか-${index + _friendList.length}",
                userID: 1,
                channelID: 0)));
        _isLoadingMore = false;
      });
    }
  }

  @override
  void dispose() {
    _scrollCtrl.dispose();
    super.dispose();
  }

  @override
  Widget build(BuildContext context) {
    Me me = MeDataLayer.of(context).user!;

    return Scrollbar(
      controller: _scrollCtrl,
      child: CustomScrollView(
        controller: _scrollCtrl,
        slivers: <Widget>[
          SliverToBoxAdapter(
            child: Column(
              crossAxisAlignment: CrossAxisAlignment.start,
              children: [
                const SizedBox(height: 10),
                ListTile(
                  leading: me.profile == null
                      ? Image.asset("assets/default_profile.png")
                      : Image.network(me.profile!),
                  title: Text(
                    me.name,
                    style: const TextStyle(fontWeight: FontWeight.bold),
                  ),
                ),
                const Padding(
                  padding: EdgeInsets.symmetric(horizontal: 16.0, vertical: 10),
                  child: Text("朋友",
                      style: TextStyle(
                          fontWeight: FontWeight.bold, color: Colors.blueGrey)),
                )
              ],
            ),
          ),
          SliverList(
            delegate: SliverChildBuilderDelegate(
              (context, index) => FriendCard(
                friend: _friendList[index],
              ),
              childCount: _friendList.length,
            ),
          ),
          SliverToBoxAdapter(
              child: Center(
            child: _isLoadingMore
                ? const CircularProgressIndicator()
                : const SizedBox(),
          ))
        ],
      ),
    );
  }
}
我們可以發現當我們在切換畫面時,上面的 AppBar 的內容根本就沒有跟著一起動,一直顯示聊天主畫面,感覺有點冗餘,我們可以設定使其隨著 BottomNavigationBar 的切換而切換,另外,也不將其上色,更符合審美。
class _MePageState extends State<MePage> {
  int _selectedIndex = 0;
  static const List<Widget> _widgets = [
    HomePage(),
    ChatPage(),
    SettingsPage(),
  ];
  static const List<String> _widgetTitle = [
    '主頁',
    '聊天',
    '設定',
  ];

  void _onItemTapped(int index) {
    setState(() {
      _selectedIndex = index;
    });
  }

  @override
  Widget build(BuildContext context) {
    return Scaffold(
      appBar: AppBar(
        // 移除 backgroundColor
        // backgroundColor: Theme.of(context).colorScheme.inversePrimary,
        title: Text(_widgetTitle[_selectedIndex]),
      ),
      body: _widgets[_selectedIndex],
      bottomNavigationBar: BottomNavigationBar(
        items: const <BottomNavigationBarItem>[
          // ...
        ],
        currentIndex: _selectedIndex,
        selectedItemColor: Colors.pink,
        onTap: _onItemTapped,
      ),
    );
  }
}
發現上次的錯誤畫面沒有處理好,重新處理了一下,並且包成另一個 Widget:
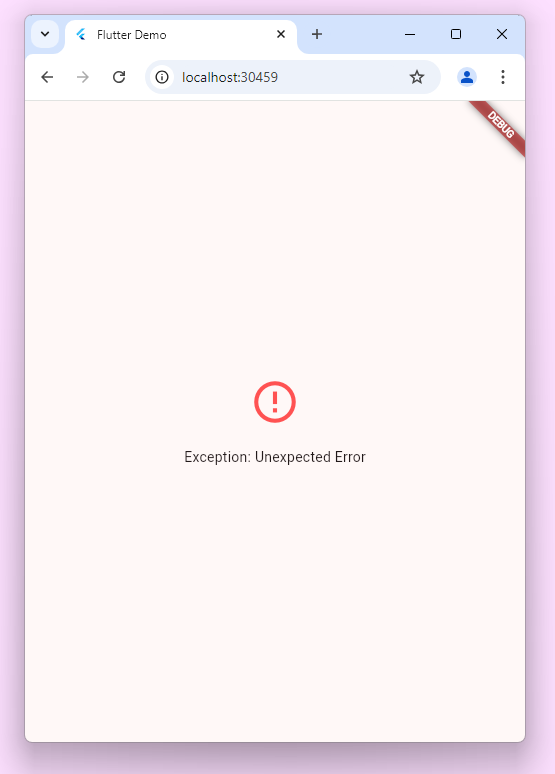
class MyErrorWidget extends StatelessWidget {
  const MyErrorWidget(this.err, {super.key});
  final String err;

  @override
  Widget build(BuildContext context) {
    return Center(
        child: Column(
      mainAxisAlignment: MainAxisAlignment.center,
      children: [
        const Icon(
          Icons.error_outline,
          color: Colors.redAccent,
          size: 50,
        ),
        const SizedBox(
          height: 20,
        ),
        Text(err)
      ],
    ));
  }
}
另外有些地方太醜了所以也稍微改了一下,都是一些細節調整:
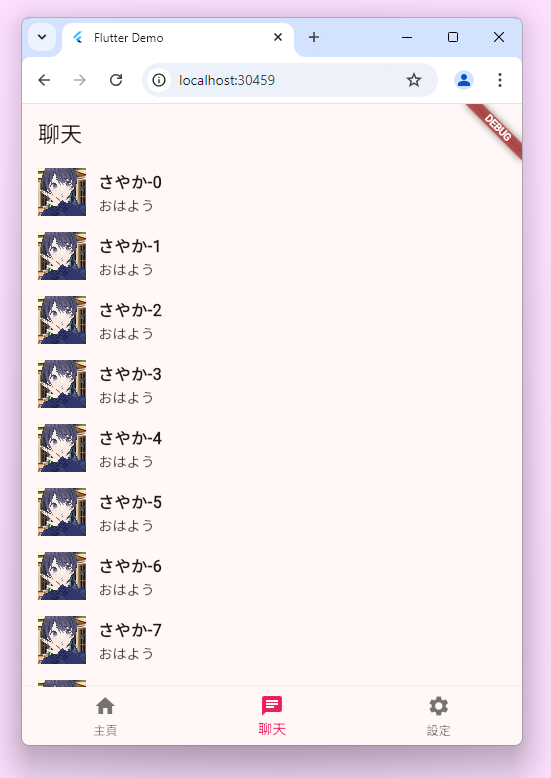
比如聊天頁面直接改以 ListTile 來做,感覺是 Card 漂亮許多
設定頁面的登出則有再做調整,變成可以實際登出的按鈕了
class _SettingsPageState extends State<SettingsPage> {
  bool _isLoggingOut = false;

  @override
  Widget build(BuildContext context) {
    return ListView(
      children: [
        // ...
        ListTile(
          leading: const Icon(Icons.exit_to_app),
          title: Text(!_isLoggingOut ? '登出' : '登出中...'),
          onTap: !_isLoggingOut
              ? () async {
                  setState(() {
                    _isLoggingOut = true;
                  });
                  await Me.logout();
                  if (context.mounted) {
                    MeDataLayer.of(context).setUser(null);
                    Navigator.pushReplacement(context,
                        MaterialPageRoute(builder: (context) {
                      return const LoginPage();
                    }));
                  }
                  setState(() {
                    _isLoggingOut = false;
                  });
                }
              : null,
        )
      ],
    );
  }
}

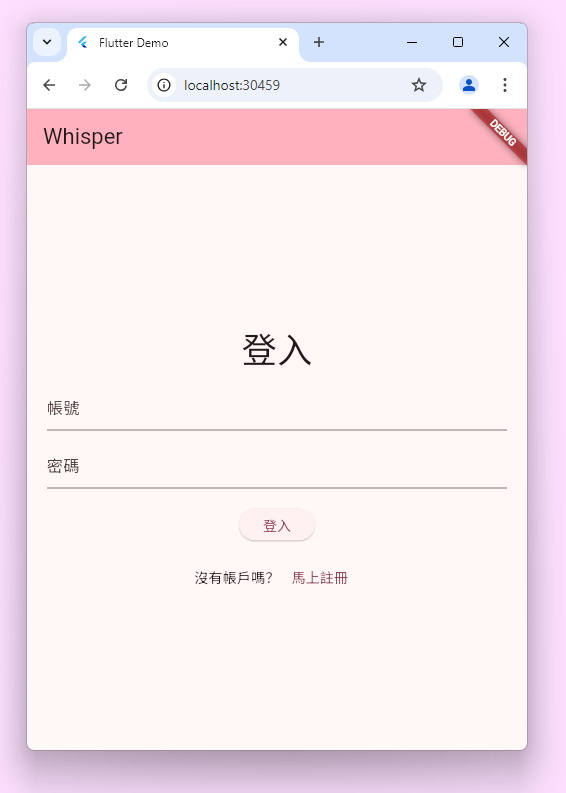
登入頁面也稍微更改了一下
感覺 HomePage 還是有點醜醜的,不知道怎麼調😂