今天來介紹第三個種觸發條件:時間。想要做到這件事,就會使用到第二個擴充套件:Task。
今天的主題同時參與了觸發條件與擴充套件兩個部分,所以只好一起塗上綠色XD
在前面的文章中,已經介紹了 Discord BOT 可以透過監聽事件來觸發功能,也可以由應用指令來觸發,而今天要介紹的是第三種觸發條件:時間。
所謂用「時間」來觸發,其實就是指定時任務。定時任務是一個常見需求,無論是每天早上的鬧鐘,或是上下班的打卡,抑或是登入遊戲領取每天的登入獎勵,都算是一種定時任務。
在軟體開發中,也有許多工具可以幫助設定定時任務。然而,在實際開發中,設定定時任務可能會遇到各種問題,例如:如何處理 asyncio.CancelledError?
幸運的是,透過 discord.py 的 Task 擴充套件,我們可以輕鬆應對這些挑戰,並有效地管理和執行定時任務。
先從一個簡單的定時任務開始吧!
import discord
from discord.ext import commands, tasks

intents = discord.Intents.default()
intents.message_content = True
bot = commands.Bot(command_prefix='', intents=intents)

@bot.command()
async def ping(ctx):
    slow_count.start()
    await ctx.send('pong')

@tasks.loop(seconds=1.0, count=5)
async def slow_count():
    print(slow_count.current_loop)

bot.run('token')
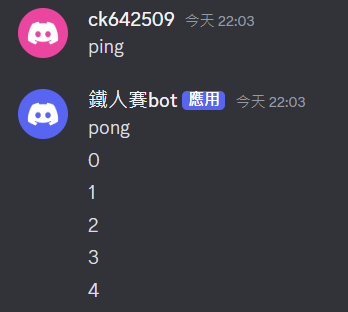
啟動後,透過使用 ping 來觸發 slow_count,之後每隔一秒,就會在 terminal 依序印出 0 ~ 4 的數字。

上面這段程式大部分都跟昨天的其中一個範例一樣,只有幾個地方做了變動:
  import discord
+ from discord.ext import commands, tasks

  intents = discord.Intents.default()
  intents.message_content = True
  bot = commands.Bot(command_prefix='', intents=intents)

  @bot.command()
  async def ping(ctx):
+     slow_count.start()
      await ctx.send('pong')

+ @tasks.loop(seconds=1.0, count=5)
+ async def slow_count():
+     print(slow_count.current_loop)

  bot.run('token')
這樣看應該就很容易理解了,當輸入 ping 之後,就會觸發 slow_count.start() 開始執行 slow_count。由於有設定間隔秒數 (seconds) 為 1,次數 (count) 為 5 次,所以才會依序在 terminal 印出 0 ~ 4 的數字。
@tasks.loop通常會使用到的參數包含以下這些:
seconds:間隔秒數minutes:間隔分鐘數hours:間隔小時數注意,型別都是
float
time:觸發時間count:執行總次數其他完整的可以參考文件。
可以。
讓我們把上面的範例調整一下:
  import discord
  from discord.ext import commands, tasks

  intents = discord.Intents.default()
  intents.message_content = True
  bot = commands.Bot(command_prefix='', intents=intents)

  @bot.command()
  async def ping(ctx):
+     slow_count.start(ctx)
      await ctx.send('pong')

  @tasks.loop(seconds=1.0, count=5)
+ async def slow_count(ctx: commands.Context):
+     await ctx.send(slow_count.current_loop)

  bot.run('token')
啟動後,就會從在 terminal 印出數字,變成回傳數字。
Task 也提供了設定任務開始前後的功能:before_loop 與 after_loop。
import discord
from discord.ext import commands, tasks

intents = discord.Intents.default()
intents.message_content = True
bot = commands.Bot(command_prefix='', intents=intents)

@bot.command()
async def ping(ctx):
    slow_count.start(ctx)
    await ctx.send('pong')

@tasks.loop(seconds=1.0, count=5)
async def slow_count(ctx: commands.Context):
    await ctx.send(slow_count.current_loop)

@slow_count.before_loop
async def before_slow_count():
    print('start!')

@slow_count.after_loop
async def after_slow_count():
    print('done!')

bot.run('token')
不過,這兩個 decorator 所修飾的函數都不能帶參數 (文件中有說明),因此就無法用回傳訊息的方式了。
不過,如果可以事先知道頻道 ID,就一樣也可以發送訊息。
或許使用
Cog有機會繞過這個限制,但這部分就等之後介紹到 Cog 再說~
今天介紹了如何使用擴充套件 Task 來設定定時任務,同時,也終於把觸發條件都介紹完了。
明天會開始介紹 Discord BOT 的回傳訊息設定。