今天來介紹回傳的訊息可以有什麼不同的變化。
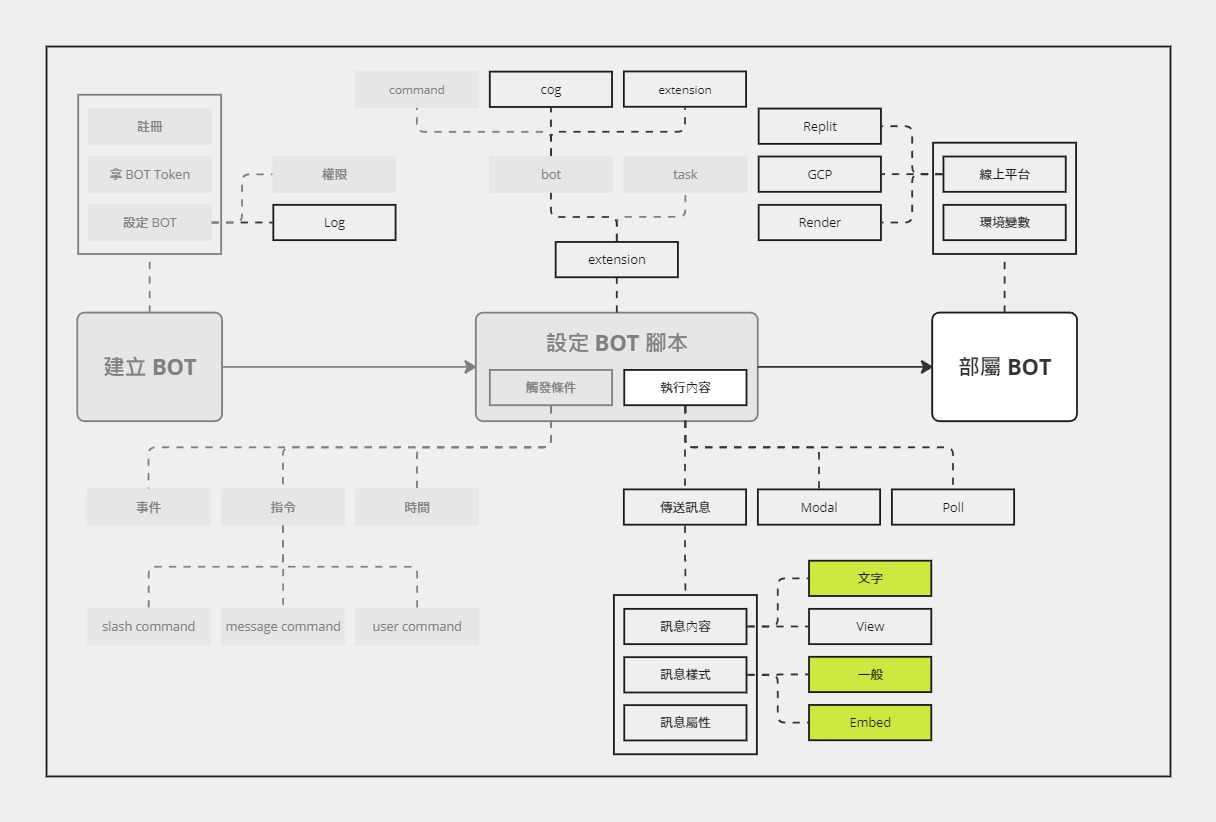
終於進入到執行內容的部分了!在前幾天,我們都只是讓 Discord BOT 回傳簡單的文字訊息。不過,光是文字訊息,就有一些值得介紹的內容。
除了平常的純文字之外,Discord 還有支援大部分的 markdown 語法 (不支援表格),讓使用者輸入文字的時候可以做一點變化。此外,Discord 有幾個格式是 Markdown 本身沒有的,例如:防雷標籤。
雖然我知道會看這邊文章的人應該都已經會 markdown 了,但還是讓我介紹一下XD
這部分就直接來看範例吧!
為了方便表示,左側是效果,右側是使用的寫法
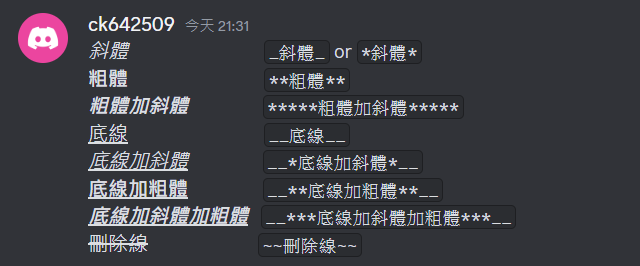
單行:
甚至也可以多行 (改用```夾起來):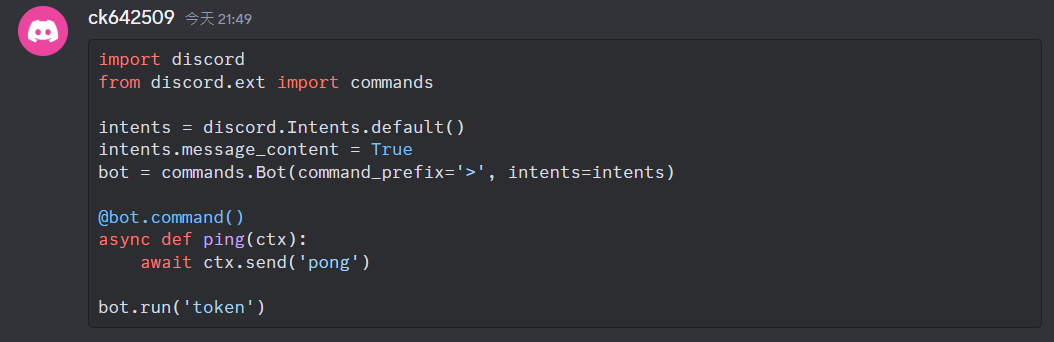

也可以用
*代替-

只有支援到第三層級
這是一個比較特別的語法,可以把內容遮起來,想看的人再點開。


依照慣例,這個翻譯也是參考自 Discord 的 Developer Help Center 內的文章
到目前為止,Markdown 基本上還是一個很接近文字的樣式。而接下來要介紹的是 Discord 的另一個訊息格式:嵌入式內容 (Embed)。
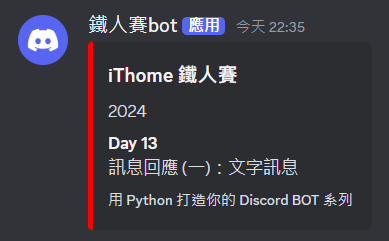
它大概長這樣:
在找資料時,意外看到這個工具,它可以讓大家輕鬆預覽自己設定的嵌入式內容的效果,非常方便。
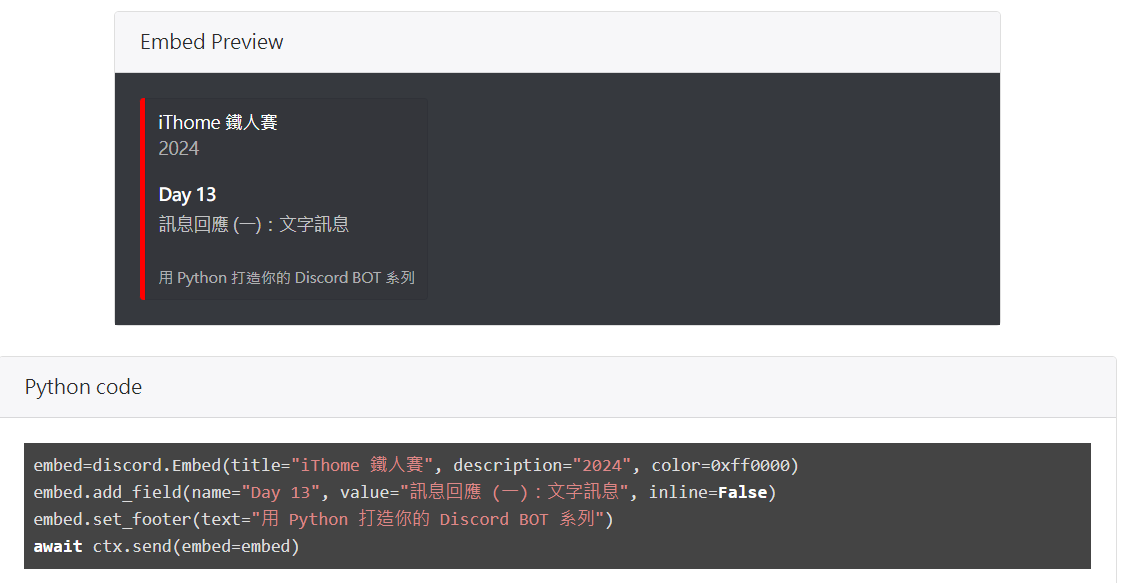
最上面的範例是用下面這段程式碼執行出來的:
import discord
from discord.ext import commands

intents = discord.Intents.default()
intents.message_content = True
bot = commands.Bot(command_prefix='>', intents=intents)

@bot.command()
async def ping(ctx: commands.Context):
    embed=discord.Embed(title="iThome 鐵人賽", description="2024", color=0xff0000)
    embed.add_field(name="Day 13", value="訊息回應 (一):文字訊息", inline=False)
    embed.set_footer(text="用 Python 打造你的 Discord BOT 系列")
    await ctx.send(embed=embed)

bot.run('token')
基本上重點都在這一部分:
  import discord
  from discord.ext import commands

  intents = discord.Intents.default()
  intents.message_content = True
  bot = commands.Bot(command_prefix='>', intents=intents)

  @bot.command()
  async def ping(: commands.Context):
+     embed=discord.Embed(title="iThome 鐵人賽", description="2024", color=0xff0000)
+     embed.add_field(name="Day 13", value="訊息回應 (一):文字訊息", inline=False)
+     embed.set_footer(text="用 Python 打造你的 Discord BOT 系列")
+     await .send(embed=embed)

  bot.run('token')
在設定嵌入式內容前,需要先建立一個 Embed 物件,常用的參數有以下這幾個:
title:標題description:描述url:讓標題變成超連結colour:嵌入式內容左側線條的顏色 (也可以用 color)timestamp:時間戳詳細說明可以參考文件
接下來,就使用 add_field 與 set_footer 去添加中間的內容與結尾。最後再用 .send(embed=embed) 送出。
這邊直接用這個範例來幫助大家理解:
@bot.command()
async def ping(ctx: commands.Context):
    embed = discord.Embed(title="title", description="description", color=0xFF0000, timestamp=.message.created_at)
    embed.set_author(name="author name", url="https://ithelp.ithome.com.tw/users/20162280/profile", icon_url="https://member.ithome.com.tw/avatars/187275?s=ithelp")
    embed.set_image(url="https://d1dwq032kyr03c.cloudfront.net/images/ironman_sticker/15/software-dev.png?sticker")
    embed.add_field(name="field name 1", value="field value 1", inline=True)
    embed.add_field(name="field name 2", value="field value 2", inline=True)
    embed.set_footer(text="footer text")
    await ctx.send(embed=embed)
效果如下:
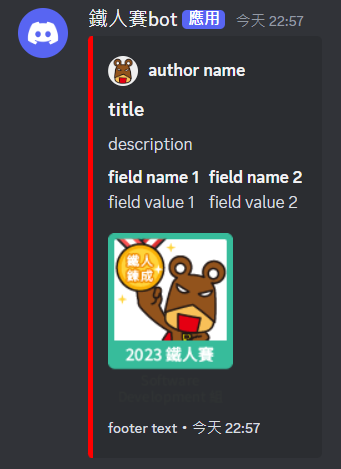
有上到下,可以分成
set_auther 設定Embed 時設定add_field 設定 (可以做到類似表格的效果)set_image 設定set_footer 設定Embed 時設定上面的所有的圖片 url 都需要使用 https 的連結,如果想要使用本地的檔案,就需要先上傳到 Discord。
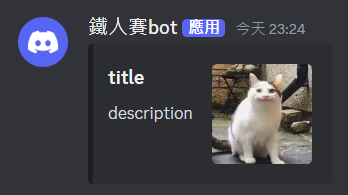
@bot.command()
async def ping(ctx: commands.Context):
    cat = discord.File("cat.jpg", filename="cat.jpg")
    embed = discord.Embed(title="title", description="description")
    embed.set_image(url="attachment://cat.jpg")
    await ctx.send(file=cat, embed=embed)
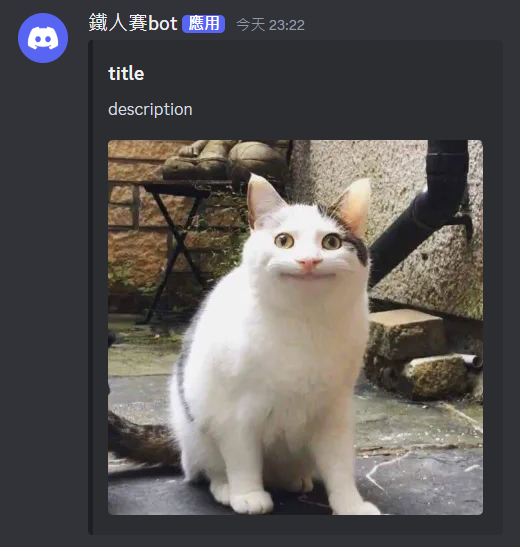
補充一下,如果覺得圖片太大,想要用縮圖的話,可以改用
set_thumbnail
今天介紹了如何設定回傳的文字訊息格式,包含了相對基本的 Markdown,以及進階的嵌入式內容 (Embed)。