RecyclerView有許多功能並不是只能拿來顯示資料而已
而這篇我會教到RecyclerView的點擊事件與下滑更新的方法
但因為要改的地方不是很多,所以我這邊會直接沿用上一次的程式碼來修改
點擊事件可以用來實現點擊資料中的項目時能夠個別顯示不同的資料
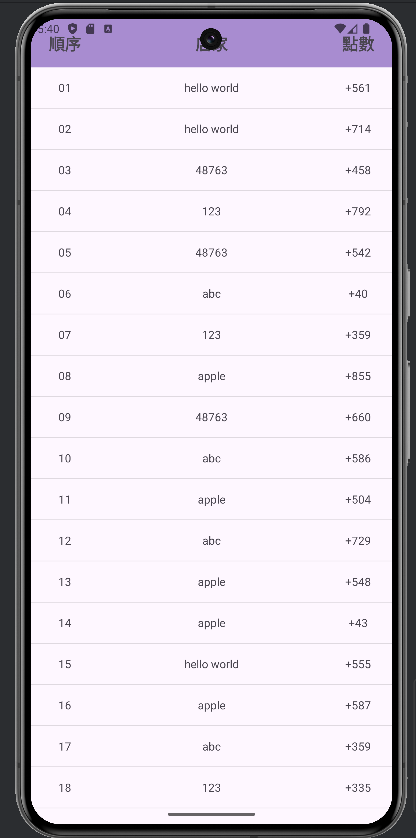
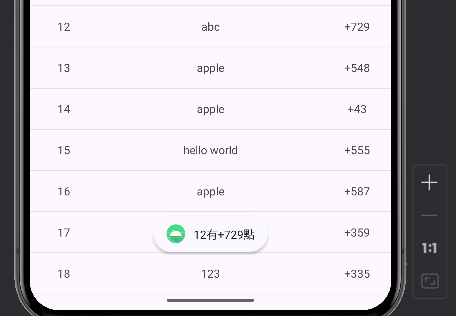
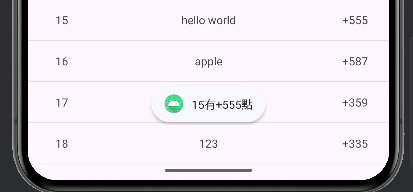
點擊事件需要修改的地方比較少
基本上只需要修改ListAdapter就好了
private View mView;
設定一個資料型態是View的變數
mView = itemView;
mView與ViewHolder裡的View相綁
holder.mView.setOnClickListener(new View.OnClickListener() {
    @Override
    public void onClick(View view) {
        Toast.makeText(getBaseContext(),holder.numberTv.getText() +"有"+ holder.pointTv.getText() + "點", Toast.LENGTH_SHORT).show();
    }
});
這裡是在添加監聽器及點擊時應該觸發的動作
(這邊是點擊時會顯示被點擊項目的number有point點,number和point為自行設定的變數)
這樣就可以了正常執行了
下滑更新可以用來實現下滑時出現一個刷新的樣子並能夠將資料更新
這邊會用到SwipeRefreshLayout來執行我們要的動作
利用SwipeRefreshLayout將RecyclerView包在其中
接著再去細調
<androidx.swiperefreshlayout.widget.SwipeRefreshLayout
    android:id="@+id/refreshLayout_srl"
    android:layout_width="0dp"
    android:layout_height="0dp"
    app:layout_constraintBottom_toBottomOf="parent"
    app:layout_constraintEnd_toEndOf="parent"
    app:layout_constraintStart_toStartOf="parent"
    app:layout_constraintTop_toBottomOf="@+id/linearLayout">

    <androidx.recyclerview.widget.RecyclerView
        android:id="@+id/main_recyclerview_rv"
        android:layout_width="0dp"
        android:layout_height="0dp"
        app:layout_constraintBottom_toBottomOf="parent"
        app:layout_constraintEnd_toEndOf="parent"
        app:layout_constraintStart_toStartOf="parent"
        app:layout_constraintTop_toBottomOf="@+id/linearLayout" />
</androidx.swiperefreshlayout.widget.SwipeRefreshLayout>
但若是直接貼上這段程式碼的話會呈現紅字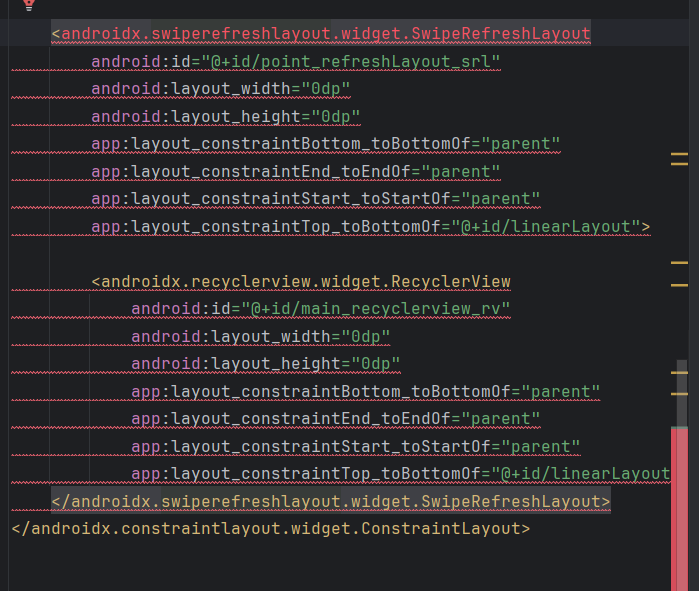
就像這樣
出現這個問題時,只需要使用Alt+Enter的快捷鍵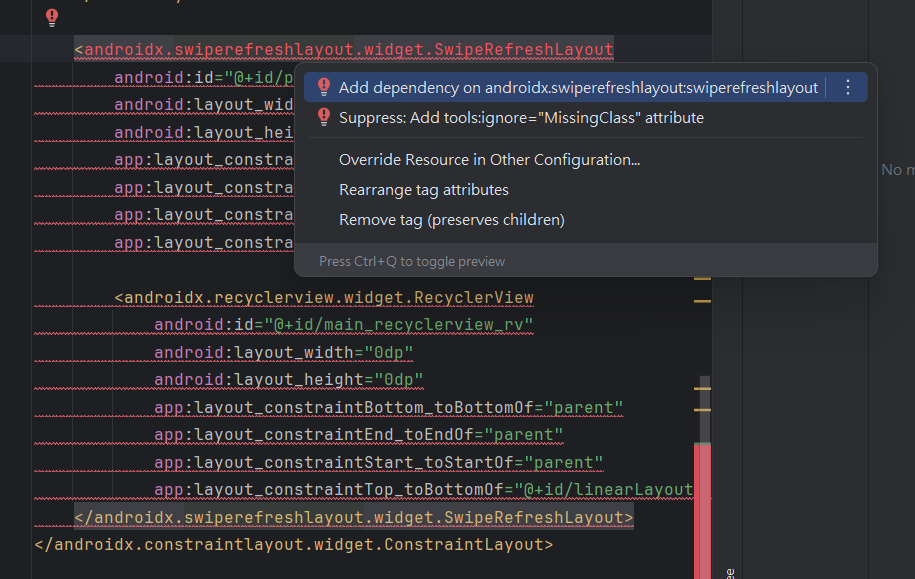
選擇第一個就好了
到build.gradle裡看就會看到新增的那行了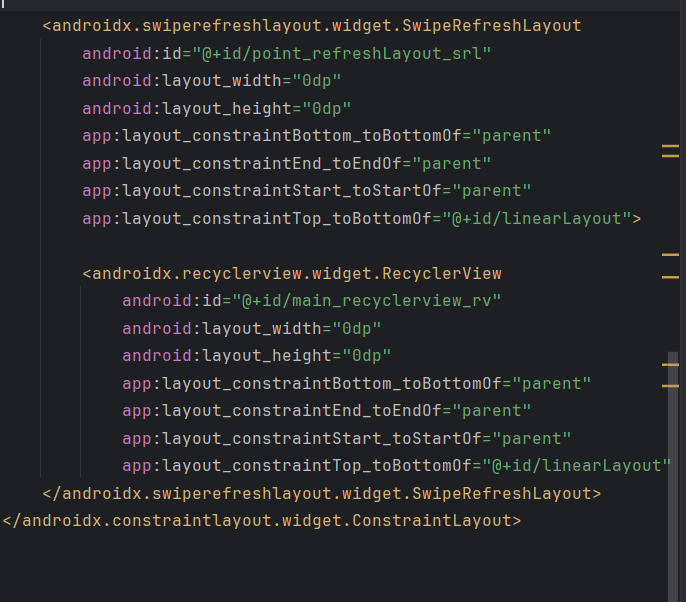
這樣就可以正常使用了
private SwipeRefreshLayout refreshLayoutSRL;
設定變數
refreshLayoutSRL = findViewById(R.id.refreshLayout_srl);//綁定
refreshLayoutSRL.setColorSchemeColors(getResources().getColor(R.color.blue));//設置刷新的圈圈的顏色
refreshLayoutSRL.setOnRefreshListener(()->{   //設置刷新監聽器
    arrayList.clear();//清空數據列表
    makeData();//重新生成數據
    listAdapter.notifyDataSetChanged();//通知適配器數據已改變
    refreshLayoutSRL.setRefreshing(false);//停止刷新動畫
});
color的部分需要已經有在res/values/colors.xml裡設定過才有辦法使用喔
(這邊是在colors.xml裡面新增了<color name="blue">#4181FF</color>這行)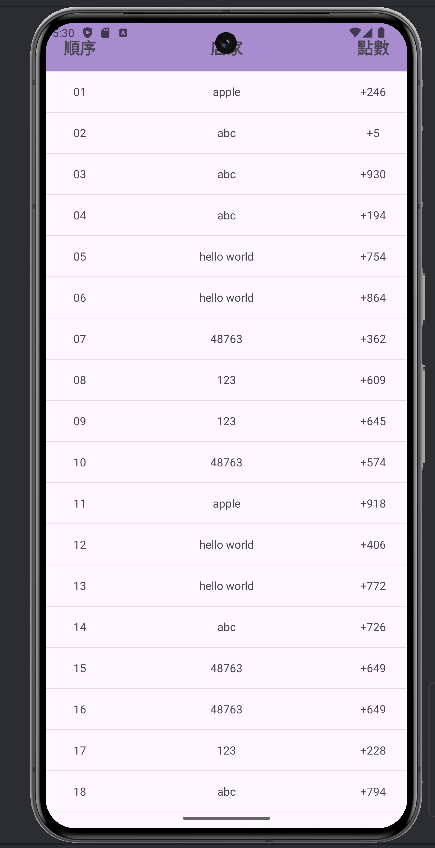
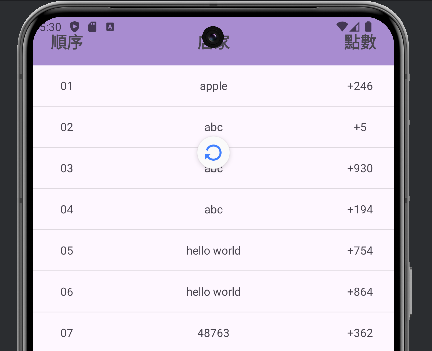
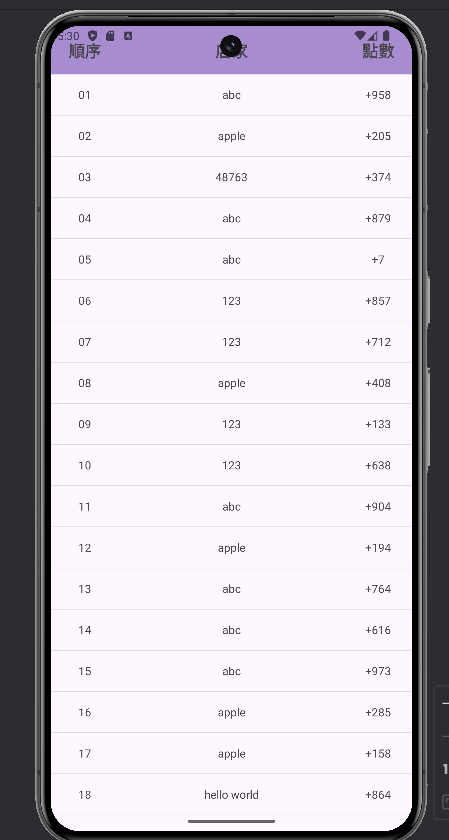
makeData()是我自行定義的函數,此函數會負責生成20筆隨機資料,並將其添加到arrayList中
<?xml version="1.0" encoding="utf-8"?>
<androidx.constraintlayout.widget.ConstraintLayout xmlns:android="http://schemas.android.com/apk/res/android"
    xmlns:app="http://schemas.android.com/apk/res-auto"
    xmlns:tools="http://schemas.android.com/tools"
    android:id="@+id/main"
    android:layout_width="match_parent"
    android:layout_height="match_parent"
    tools:context=".MainActivity">

    <LinearLayout
        android:id="@+id/linearLayout"
        android:layout_width="match_parent"
        android:layout_height="60dp"
        android:orientation="horizontal"
        android:background="#A88CD0"
        app:layout_constraintEnd_toEndOf="parent"
        app:layout_constraintStart_toStartOf="parent"
        app:layout_constraintTop_toTopOf="parent">

        <TextView
            android:id="@+id/textView"
            android:layout_width="0dp"
            android:layout_height="match_parent"
            android:layout_weight="0.3"
            android:gravity="center"
            android:text="順序"
            android:textSize="20dp"
            android:textStyle="bold" />

        <TextView
            android:id="@+id/textView4"
            android:layout_width="0dp"
            android:layout_height="match_parent"
            android:layout_weight="1"
            android:gravity="center"
            android:textSize="20dp"
            android:textStyle="bold"
            android:text="店家" />

        <TextView
            android:id="@+id/textView5"
            android:layout_width="0dp"
            android:layout_height="match_parent"
            android:layout_weight="0.3"
            android:gravity="center"
            android:textSize="20dp"
            android:textStyle="bold"
            android:text="點數" />
    </LinearLayout>

    <androidx.swiperefreshlayout.widget.SwipeRefreshLayout
        android:id="@+id/refreshLayout_srl"
        android:layout_width="0dp"
        android:layout_height="0dp"
        app:layout_constraintBottom_toBottomOf="parent"
        app:layout_constraintEnd_toEndOf="parent"
        app:layout_constraintStart_toStartOf="parent"
        app:layout_constraintTop_toBottomOf="@+id/linearLayout">

        <androidx.recyclerview.widget.RecyclerView
            android:id="@+id/main_recyclerview_rv"
            android:layout_width="0dp"
            android:layout_height="0dp"
            app:layout_constraintBottom_toBottomOf="parent"
            app:layout_constraintEnd_toEndOf="parent"
            app:layout_constraintStart_toStartOf="parent"
            app:layout_constraintTop_toBottomOf="@+id/linearLayout" />
    </androidx.swiperefreshlayout.widget.SwipeRefreshLayout>
</androidx.constraintlayout.widget.ConstraintLayout>
<?xml version="1.0" encoding="utf-8"?>
<androidx.constraintlayout.widget.ConstraintLayout xmlns:android="http://schemas.android.com/apk/res/android"
    xmlns:tools="http://schemas.android.com/tools"
    android:layout_width="match_parent"
    android:layout_height="50dp">

    <LinearLayout
        android:layout_width="match_parent"
        android:layout_height="match_parent"
        android:orientation="horizontal">

        <TextView
            android:id="@+id/recycleview_number_tv"
            android:layout_width="0dp"
            android:layout_height="match_parent"
            android:gravity="center"
            android:layout_weight="0.3"
            android:text="TextView" />

        <TextView
            android:id="@+id/recycleview_store_tv"
            android:layout_width="0dp"
            android:layout_height="match_parent"
            android:layout_weight="1"
            android:gravity="center"
            android:text="TextView" />

        <TextView
            android:id="@+id/recycleview_point_tv"
            android:layout_width="0dp"
            android:layout_height="match_parent"
            android:gravity="center"
            android:layout_weight="0.3"
            android:text="TextView" />
    </LinearLayout>
</androidx.constraintlayout.widget.ConstraintLayout>
package com.example.test_2;

import android.os.Bundle;
import android.view.LayoutInflater;
import android.view.View;
import android.view.ViewGroup;
import android.widget.TextView;
import android.widget.Toast;

import androidx.activity.EdgeToEdge;
import androidx.appcompat.app.AppCompatActivity;
import androidx.recyclerview.widget.DividerItemDecoration;
import androidx.recyclerview.widget.LinearLayoutManager;
import androidx.recyclerview.widget.RecyclerView;
import androidx.swiperefreshlayout.widget.SwipeRefreshLayout;

import java.util.ArrayList;
import java.util.HashMap;
import java.util.Random;

public class MainActivity extends AppCompatActivity {
    private RecyclerView showRecyclerView;
    private ListAdapter listAdapter;
    private SwipeRefreshLayout refreshLayoutSRL;
    final static String[] store = {"abc", "123", "48763", "hello world", "apple"};
    ArrayList<HashMap<String, String>> arrayList = new ArrayList<>();

    @Override
    protected void onCreate(Bundle savedInstanceState) {
        super.onCreate(savedInstanceState);
        EdgeToEdge.enable(this);
        setContentView(R.layout.activity_main);


        showRecyclerView = findViewById(R.id.main_recyclerview_rv); //綁定元件

        showRecyclerView.setLayoutManager(new LinearLayoutManager(this));
        showRecyclerView.addItemDecoration(new DividerItemDecoration(this, DividerItemDecoration.VERTICAL));
        listAdapter = new ListAdapter();
        showRecyclerView.setAdapter(listAdapter);

        makeData();//生成數據
        refreshLayoutSRL = findViewById(R.id.refreshLayout_srl);
        refreshLayoutSRL.setColorSchemeColors(getResources().getColor(R.color.blue));//設置刷新的圈圈的顏色
        refreshLayoutSRL.setOnRefreshListener(()->{   //設置刷新監聽器
            arrayList.clear();//清空數據列表
            makeData();//重新生成數據
            listAdapter.notifyDataSetChanged();//通知適配器數據已改變
            refreshLayoutSRL.setRefreshing(false);//停止刷新動畫
        });
    }
    public void makeData(){
        for (int i = 0; i < 20; i++) {
            HashMap<String, String> hashMap = new HashMap<>();
            hashMap.put("number",String.format("%02d", i + 1));
            hashMap.put("store",String.valueOf(store[new Random().nextInt(5)]));
            hashMap.put("point", "+" + new Random().nextInt(1000));

            arrayList.add(hashMap);
        }//利用迴圈呼叫20次將20筆不同資料放入HashMap中
    }

    private class ListAdapter extends RecyclerView.Adapter<ListAdapter.ViewHolder> {

        class ViewHolder extends RecyclerView.ViewHolder {
            private TextView numberTv, storeTv, pointTv;
            private View mView;
            public ViewHolder(View itemView) {
                super(itemView);
                numberTv = itemView.findViewById(R.id.recycleview_number_tv);
                storeTv = itemView.findViewById(R.id.recycleview_store_tv);
                pointTv = itemView.findViewById(R.id.recycleview_point_tv);
                mView  = itemView;
            }
        }
        @Override
        public ViewHolder onCreateViewHolder(ViewGroup parent, int viewType) {
            View view = LayoutInflater.from(parent.getContext())
                    .inflate(R.layout.recyclerview_item, parent, false);
            return new ViewHolder(view);
        }
        @Override
        public void onBindViewHolder(ViewHolder holder, int position) {
            holder.numberTv.setText(arrayList.get(position).get("number"));
            holder.storeTv.setText(arrayList.get(position).get("store"));
            holder.pointTv.setText(arrayList.get(position).get("point"));
            //為點擊的項目執行相關動作
            holder.mView.setOnClickListener(new View.OnClickListener() {
                @Override
                public void onClick(View view) {
                    Toast.makeText(getBaseContext(),holder.numberTv.getText() +"有"+ holder.pointTv.getText() + "點", Toast.LENGTH_SHORT).show();
                }
            });
        }
        @Override
        public int getItemCount() {
            return arrayList.size();
        }
    }
}
這樣就完成RecyclerView的點擊事件與下滑更新了
下篇會簡單介紹Fragment
