MVP架構是一個很重要的東西
它的存在幫助可以增加程式的可讀性也能方便之後的維修,是個很方便的架構
V(View)
負責顯示UI和處理使用者互動
如顯示數據或處理點擊事件之類的
但View本身並不處理邏輯,這些邏輯會在交給Presenter去處理
P(Presenter)
放邏輯判斷的地方
像是在達成什麼條件時會執行什麼動作,那個判斷有沒有達成條件就是Presenter
它在接收到View的用戶操作指令後,會從Model裡獲取數據並將結果返回給View執行下一個步驟
M(Model)
是一個類似資料庫的東西
當需要拿取它負責管理的數據時,可以透過Model拿取
像是拿取登入者基本訊息之類的或帳密之類的
除了這三個以外還有一個特殊的東西叫做Contract
Contract
是用來讓View、Presenter、Modle互相溝通的一個Interface
將我們會在當前Activity用到的方法在這先新增
等等在其他Activity要用到這些方法時才不會錯誤
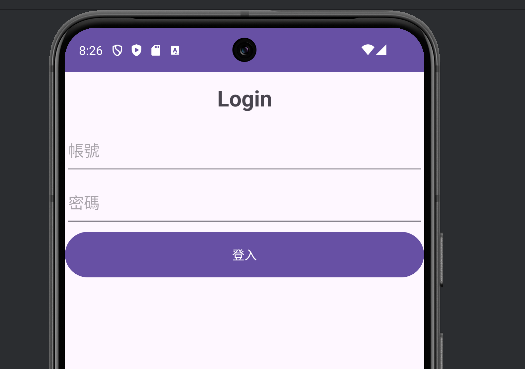
這邊我設計了簡單的登入程式
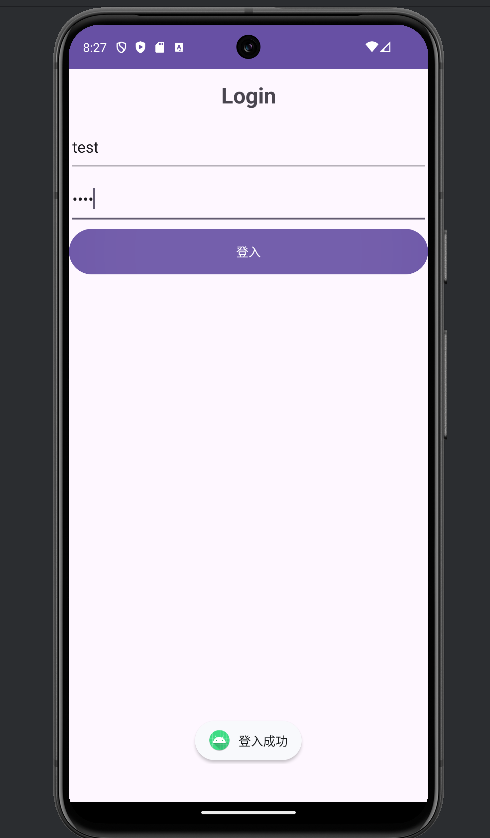
首先在View先登入並將輸入的資料傳送資料給Presenter
然後在Presenter做帳密判斷前先到Model裡拿取唯一正確的帳密
如帳密錯誤就叫View顯示Toast
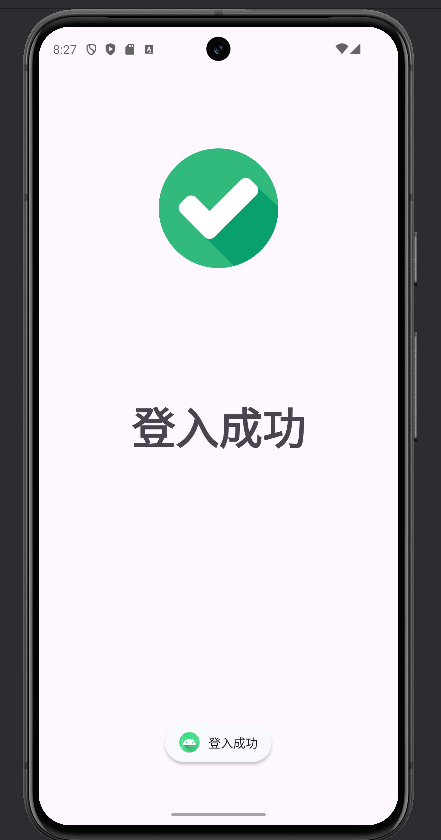
若是正確就叫View顯示Toast並跳轉到登入成功的畫面
(Model裡帳密設定成test和1234)
在剛開始時,我們會開啟三個Activity再加上一個Interface
所以總共會有四個Activity
但因為我還有用了一個跳轉頁面的功能,所以這邊多開了一個Activty和xml

不過那個頁面就只有xml有放ImageView和TextView而已,Activity並沒有動作所以這邊就不另外放上來和解釋程式碼了


下面是程式碼和程式註解
public class MainActivity extends AppCompatActivity implements MainContract.view {
    private EditText accountEt, passwordEt;
    private Button loginBtn;
    private MainPresenter presenter;
    //設定變數
    @Override
    protected void onCreate(Bundle savedInstanceState) {
        super.onCreate(savedInstanceState);
        setContentView(R.layout.activity_main);
        accountEt = findViewById(R.id.main_account_et);
        passwordEt = findViewById(R.id.main_password_et);
        loginBtn = findViewById(R.id.main_login_btn);
        //綁定變數並初始化
        presenter = new MainPresenter(this);
        //New出Presenter,並把自己丟入。

        loginBtn.setOnClickListener(new View.OnClickListener() {
            @Override
            public void onClick(View v) {
                String account = accountEt.getText().toString();
                String password = passwordEt.getText().toString();
                //將accountEt和passwordEt裡的內容轉成字串並丟給設定的變數

                presenter.Login(account, password);
                //再將兩個變數丟給presenter去處理
            }
        });
    }
    @Override
    public void LoginSuccess() {
        Toast.makeText(this, "登入成功", Toast.LENGTH_SHORT).show();
        //Toast顯示登入成功
        Intent intent = new Intent(this, LoginSuccess.class);
        startActivity(intent);
        //跳轉到LoginSuccess
    }
    @Override
    public void LoginError() {
        Toast.makeText(this, "登入失敗,請檢查帳號或密碼", Toast.LENGTH_SHORT).show();
        //Toast顯示登入失敗,請檢查帳號或密碼
    }
}
跟使用者看到的畫面有關
如元件的綁定、元件的點擊事件、登入成功或失敗使用者能看到的動作
public class MainPresenter implements MainContract.presenter {
    private MainContract.view view;
    private MainModel model;
    public MainPresenter(MainContract.view view) {
        this.view = view;
        //接收view
        model = new MainModel(this);
        //初始化Modle並把自己丟入
    }

    public void Login(String username, String password) {
        boolean isSuccess = model.LoginData(username, password);
        //判斷傳送過來的帳密與MainModel裡設定的帳密是否相同
        if (isSuccess) {
            view.LoginSuccess();
            //通知view顯示登入成功並執行登入成功後的操作
        } else {
            view.LoginError();
            //通知view顯示登入失敗並執行登入失敗後的操作
        }
    }
}
判斷輸入的帳密與Model裡設定的帳密一樣不一樣
一樣就執行View裡的LoginSuccess
不一樣就執行View裡的LoginError
public class MainModel implements MainContract.model {
    private MainContract.presenter presenter;
    public MainModel(MainContract.presenter presenter) {
        this.presenter = presenter;
        //接收presenter
    }

    public boolean LoginData(String username, String password) {
        return username.equals("test") && password.equals("1234");
        //回傳正確的帳號是test且正確的密碼為1234
    }
}
將預設的帳號丟給Presenter去做判斷
回傳正確的帳號和密碼為test和1234
public interface MainContract {
    interface view{
        void LoginSuccess();
        void LoginError();
    }
    interface presenter{
        void Login(String username, String password);
    }
    interface model{
        boolean LoginData(String username, String password);
    }
}
連接三個Activity的橋樑
將在其他Activity以外會使用到的方法都寫在這裡即可正常使用
這樣就可以簡單的完成一個登入的MVP了
<?xml version="1.0" encoding="utf-8"?>
<LinearLayout xmlns:android="http://schemas.android.com/apk/res/android"
    android:layout_width="match_parent"
    android:layout_height="match_parent"
    android:orientation="vertical">

    <LinearLayout
        android:layout_width="match_parent"
        android:layout_height="0dp"
        android:orientation="vertical"
        android:layout_weight="1">

        <TextView
            android:id="@+id/main_title_tv"
            android:layout_width="match_parent"
            android:layout_height="0dp"
            android:layout_weight="0.1"
            android:gravity="center"
            android:text="Login"
            android:textSize="25dp"
            android:textStyle="bold" />

        <EditText
            android:id="@+id/main_account_et"
            android:layout_width="match_parent"
            android:layout_height="0dp"
            android:layout_weight="0.1"
            android:hint="帳號"
            android:inputType="text"/>

        <EditText
            android:id="@+id/main_password_et"
            android:layout_width="match_parent"
            android:layout_height="0dp"
            android:hint="密碼"
            android:layout_weight="0.1"
            android:inputType="textPassword" />

        <Button
            android:id="@+id/main_login_btn"
            android:layout_width="match_parent"
            android:layout_height="0dp"
            android:layout_weight="0.1"
            android:text="登入" />

        <View
            android:layout_width="match_parent"
            android:layout_height="0dp"
            android:layout_weight="1" />
    </LinearLayout>
</LinearLayout>
<?xml version="1.0" encoding="utf-8"?>
<androidx.constraintlayout.widget.ConstraintLayout xmlns:android="http://schemas.android.com/apk/res/android"
    xmlns:app="http://schemas.android.com/apk/res-auto"
    xmlns:tools="http://schemas.android.com/tools"
    android:id="@+id/main"
    android:layout_width="match_parent"
    android:layout_height="match_parent"
    tools:context=".LoginSuccess">

    <LinearLayout
        android:layout_width="match_parent"
        android:layout_height="match_parent"
        android:orientation="vertical"
        tools:layout_editor_absoluteX="1dp"
        tools:layout_editor_absoluteY="1dp">

        <LinearLayout
            android:layout_width="match_parent"
            android:layout_height="0dp"
            android:layout_weight="1"
            android:orientation="horizontal">

            <View
                android:layout_width="0dp"
                android:layout_height="match_parent"
                android:layout_weight="1" />

            <ImageView
                android:id="@+id/imageView"
                android:layout_width="0dp"
                android:layout_height="match_parent"
                android:layout_weight="1"
                app:srcCompat="@drawable/checked" />

            <View
                android:layout_width="0dp"
                android:layout_height="match_parent"
                android:layout_weight="1" />
        </LinearLayout>

        <TextView
            android:id="@+id/textView"
            android:layout_width="match_parent"
            android:layout_height="0dp"
            android:layout_weight="0.2"
            android:gravity="center"
            android:textSize="50dp"
            android:textStyle="bold"
            android:text="登入成功" />

        <View
            android:layout_width="match_parent"
            android:layout_height="0dp"
            android:layout_weight="1" />

    </LinearLayout>
</androidx.constraintlayout.widget.ConstraintLayout>
下篇會介紹SharedPrefences
