Fragment是一個有趣的物件
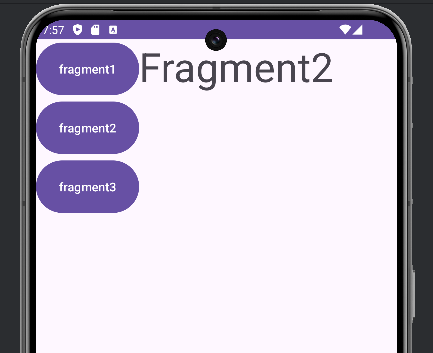
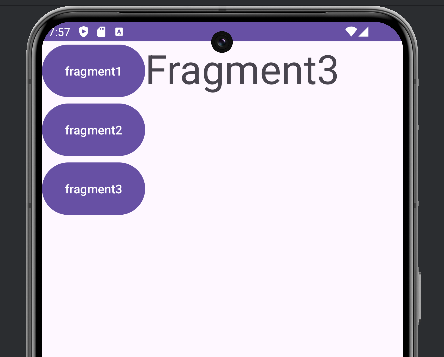
它可以有多個按鈕,對單一按鈕進行點擊且在點擊後呈現出不同的頁面
畫面切換的同時上排的按鈕不變動
這樣說可能有點難懂
直接用範例來看吧
介面我選擇拉成這樣(拉成橫的直的都可以)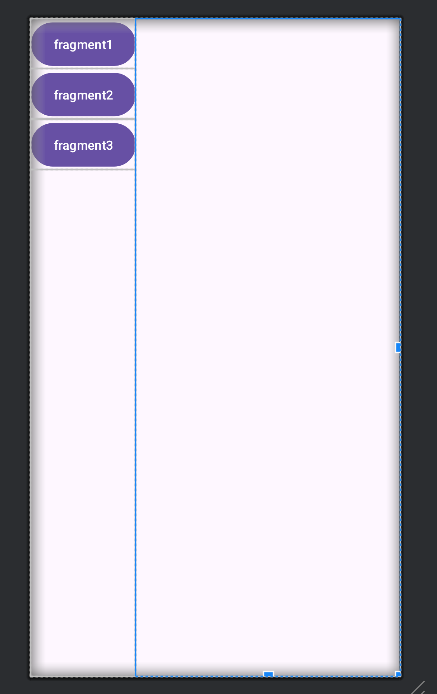
點擊新增fragment的頁面
需要幾個新增幾個
也就是自己拉了幾個按鈕就需要新增幾個fragment的activity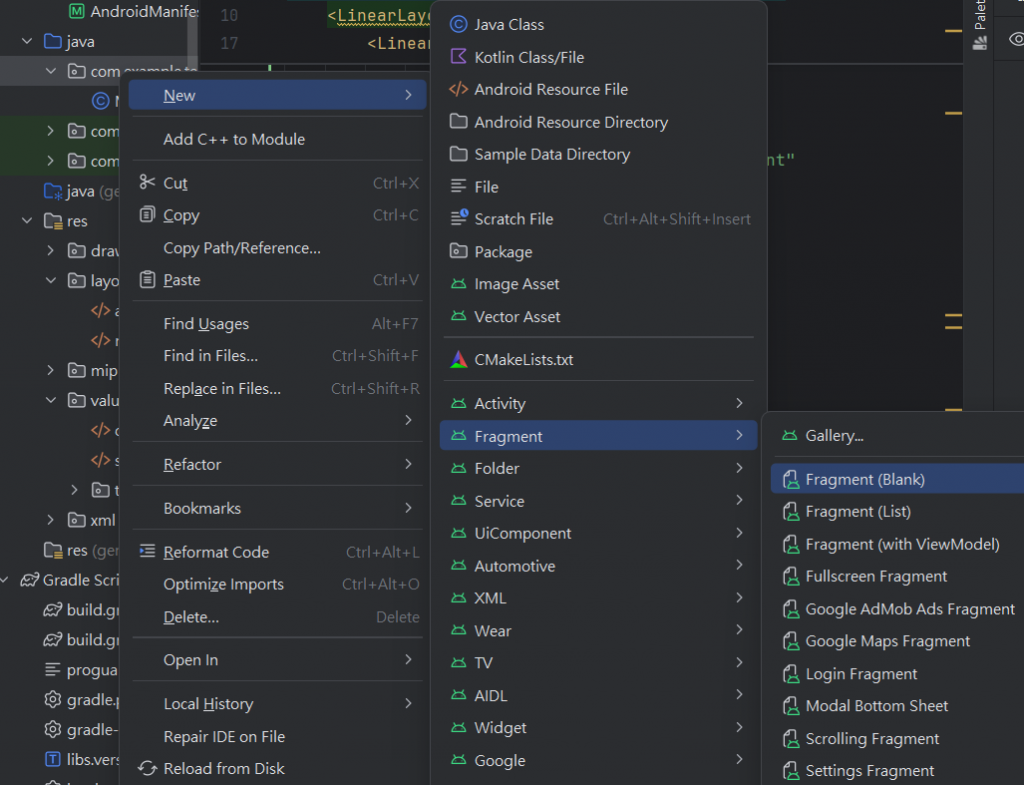
剛建立起來的fragment裡會有很多預設已經幫你打好的方法,這些方法在這次實作中大部分都不會用到,因此這邊我只會把用得到的部分留下來
而需要留下的只有onCreate、onCreateView和需要額外新增的onViewCreated而已onCreate用來處理Fragment的初始化邏輯onCreateView負責加載Fragment的UI佈局onViewCreated是在View創建後進行的操作,如設定按鈕點擊或顯示資料等
這邊的功能只有簡單的在點擊按鈕時能夠切換對應的fragment而已
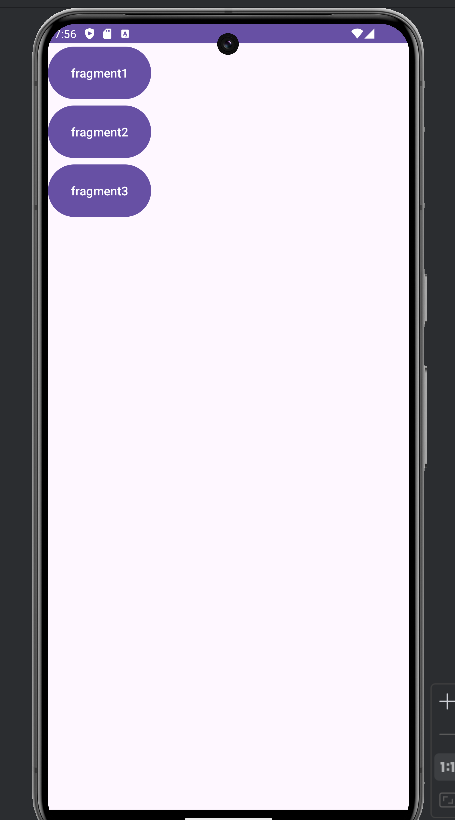
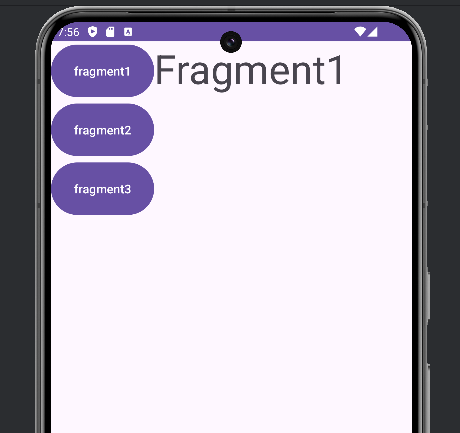
這是完成的樣子
fragment1Tv.setText("Fragment1");
在每一個fragment中的onViewCreated裡的這行是為了讓他在切換到對應的fragment時能夠將textview的文字也設定上去的
<?xml version="1.0" encoding="utf-8"?>
<androidx.constraintlayout.widget.ConstraintLayout xmlns:android="http://schemas.android.com/apk/res/android"
    xmlns:app="http://schemas.android.com/apk/res-auto"
    xmlns:tools="http://schemas.android.com/tools"
    android:id="@+id/main"
    android:layout_width="match_parent"
    android:layout_height="match_parent"
    tools:context=".MainActivity">

    <LinearLayout
        android:layout_width="match_parent"
        android:layout_height="match_parent"
        android:orientation="horizontal"
        tools:layout_editor_absoluteX="1dp"
        tools:layout_editor_absoluteY="1dp">

        <LinearLayout
            android:layout_width="0dp"
            android:layout_height="match_parent"
            android:layout_weight="0.4"
            android:orientation="vertical">

            <Button
                android:id="@+id/main_fragment1_btn"
                android:layout_width="match_parent"
                android:layout_height="0dp"
                android:layout_weight="0.1"
                android:textSize="15dp"
                android:text="fragment1" />

            <Button
                android:id="@+id/main_fragment2_btn"
                android:layout_width="match_parent"
                android:layout_height="0dp"
                android:textSize="15dp"
                android:layout_weight="0.1"
                android:text="fragment2" />

            <Button
                android:id="@+id/main_fragment3_btn"
                android:layout_width="match_parent"
                android:layout_height="0dp"
                android:layout_weight="0.1"
                android:textSize="15dp"
                android:text="fragment3" />

            <View
                android:layout_width="match_parent"
                android:layout_weight="1"
                android:layout_height="0dp"/>
        </LinearLayout>

        <LinearLayout
            android:layout_width="0dp"
            android:layout_height="match_parent"
            android:layout_weight="1"
            android:orientation="vertical">

            <FrameLayout
                android:id="@+id/main_fragmentlayout_fl"
                android:layout_width="match_parent"
                android:layout_height="match_parent">
            </FrameLayout>
        </LinearLayout>
    </LinearLayout>
</androidx.constraintlayout.widget.ConstraintLayout>
<?xml version="1.0" encoding="utf-8"?>
<FrameLayout xmlns:android="http://schemas.android.com/apk/res/android"
    xmlns:tools="http://schemas.android.com/tools"
    android:layout_width="match_parent"
    android:layout_height="match_parent"
    tools:context=".Fragment1">

    <!-- TODO: Update blank fragment layout -->
    <TextView
        android:id="@+id/fragment1_show_tv"
        android:layout_width="match_parent"
        android:layout_height="match_parent"
        android:textSize="50dp"
        android:text="@string/hello_blank_fragment" />

</FrameLayout>
<?xml version="1.0" encoding="utf-8"?>
<FrameLayout xmlns:android="http://schemas.android.com/apk/res/android"
    xmlns:tools="http://schemas.android.com/tools"
    android:layout_width="match_parent"
    android:layout_height="match_parent"
    tools:context=".Fragment2">

    <!-- TODO: Update blank fragment layout -->
    <TextView
        android:id="@+id/fragment2_show_tv"
        android:layout_width="match_parent"
        android:layout_height="match_parent"
        android:textSize="50dp"
        android:text="@string/hello_blank_fragment" />

</FrameLayout>
<?xml version="1.0" encoding="utf-8"?>
<FrameLayout xmlns:android="http://schemas.android.com/apk/res/android"
    xmlns:tools="http://schemas.android.com/tools"
    android:layout_width="match_parent"
    android:layout_height="match_parent"
    tools:context=".Fragment3">

    <!-- TODO: Update blank fragment layout -->
    <TextView
        android:id="@+id/fragment3_show_tv"
        android:layout_width="match_parent"
        android:layout_height="match_parent"
        android:textSize="50dp"
        android:text="@string/hello_blank_fragment" />

</FrameLayout>
package com.example.test_2;

import android.os.Bundle;
import android.widget.Button;

import androidx.appcompat.app.AppCompatActivity;
import androidx.fragment.app.Fragment;
import androidx.fragment.app.FragmentManager;

public class MainActivity extends AppCompatActivity {
    private Button fragment1, fragment2, fragment3;
    @Override
    protected void onCreate(Bundle savedInstanceState) {
        super.onCreate(savedInstanceState);
        setContentView(R.layout.activity_main);

        fragment1 = findViewById(R.id.main_fragment1_btn);
        fragment2 = findViewById(R.id.main_fragment2_btn);
        fragment3 = findViewById(R.id.main_fragment3_btn);

        Fragment1 fragment1 = new Fragment1();
        Fragment2 fragment2 = new Fragment2();
        Fragment3 fragment3 = new Fragment3();

        this.fragment1.setOnClickListener(view -> setFragment(fragment1));
        this.fragment2.setOnClickListener(view -> setFragment(fragment2));
        this.fragment3.setOnClickListener(view -> setFragment(fragment3));
    }
    void setFragment(Fragment fragment){
        FragmentManager fragmentManager = getSupportFragmentManager();
        fragmentManager.beginTransaction().replace(R.id.main_fragmentlayout_fl,fragment).commit();
    }
}
package com.example.test_2;

import android.os.Bundle;

import androidx.annotation.NonNull;
import androidx.annotation.Nullable;
import androidx.fragment.app.Fragment;

import android.view.LayoutInflater;
import android.view.View;
import android.view.ViewGroup;
import android.widget.TextView;

public class Fragment1 extends Fragment {
    private TextView fragment1Tv;
    @Override
    public void onCreate(Bundle savedInstanceState) {
        super.onCreate(savedInstanceState);

    }

    @Override
    public View onCreateView(LayoutInflater inflater, ViewGroup container,
                             Bundle savedInstanceState) {
        // Inflate the layout for this fragment
        return inflater.inflate(R.layout.fragment_1, container, false);
    }

    @Override
    public void onViewCreated(@NonNull View view, @Nullable Bundle savedInstanceState) {
        super.onViewCreated(view, savedInstanceState);
        fragment1Tv = view.findViewById(R.id.fragment1_show_tv);
        fragment1Tv.setText("Fragment1");

    }
}
package com.example.test_2;

import android.os.Bundle;

import androidx.annotation.NonNull;
import androidx.annotation.Nullable;
import androidx.fragment.app.Fragment;

import android.view.LayoutInflater;
import android.view.View;
import android.view.ViewGroup;
import android.widget.TextView;

public class Fragment2 extends Fragment {
    private TextView fragment2Tv;
    @Override
    public void onCreate(Bundle savedInstanceState) {
        super.onCreate(savedInstanceState);
    }

    @Override
    public View onCreateView(LayoutInflater inflater, ViewGroup container,
                             Bundle savedInstanceState) {
        // Inflate the layout for this fragment
        return inflater.inflate(R.layout.fragment_2, container, false);
    }

    @Override
    public void onViewCreated(@NonNull View view, @Nullable Bundle savedInstanceState) {
        super.onViewCreated(view, savedInstanceState);
        fragment2Tv = view.findViewById(R.id.fragment2_show_tv);
        fragment2Tv.setText("Fragment2");

    }
}
package com.example.test_2;

import android.os.Bundle;

import androidx.annotation.NonNull;
import androidx.annotation.Nullable;
import androidx.fragment.app.Fragment;

import android.view.LayoutInflater;
import android.view.View;
import android.view.ViewGroup;
import android.widget.TextView;

public class Fragment3 extends Fragment {
    private TextView fragment3Tv;
    @Override
    public void onCreate(Bundle savedInstanceState) {
        super.onCreate(savedInstanceState);
    }

    @Override
    public View onCreateView(LayoutInflater inflater, ViewGroup container,
                             Bundle savedInstanceState) {
        // Inflate the layout for this fragment
        return inflater.inflate(R.layout.fragment_3, container, false);
    }

    @Override
    public void onViewCreated(@NonNull View view, @Nullable Bundle savedInstanceState) {
        super.onViewCreated(view, savedInstanceState);
        fragment3Tv = view.findViewById(R.id.fragment3_show_tv);
        fragment3Tv.setText("Fragment3");

    }
}
下篇會介紹簡單介紹TabLayout
