SharedPreferences是個適合儲存一些小型又簡單的數據的方式
它不適合儲存大量或複雜的資料,且即使是在程式重啟後資料仍然會存在
SharedPreferences有幾種模式
已廢棄的模式
接下來
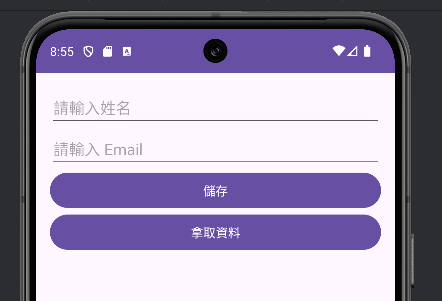
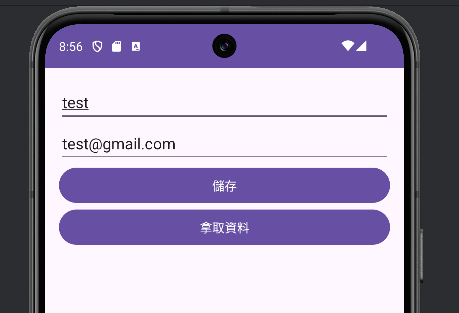
我這邊用了一個可以存取姓名和email的程式


首先是MainActivity
private SharedPrefences Shpf;
Shpf = new SharedPrefences(this);
首先,先初始化SharedPrefences
saveBtn.setOnClickListener(new View.OnClickListener() {
    @Override
    public void onClick(View v) {
        Shpf.saveData(nameEt.getText().toString(), emailEt.getText().toString());
        Toast.makeText(MainActivity.this, "資料已儲存", Toast.LENGTH_SHORT).show();
        nameEt.setText("");
        emailEt.setText("");
    }
});
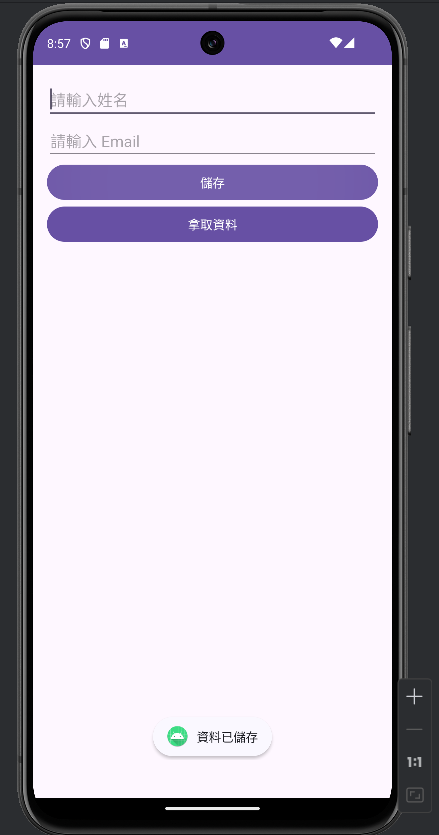
在點擊儲存按鈕後會把資料儲存起來、顯示Toast並清空兩個EditText
setBtn.setOnClickListener(new View.OnClickListener() {
    @Override
    public void onClick(View v) {
        showTv.setText("姓名: " + Shpf.getName() + "\n電子郵件: " + Shpf.getEmail());
        Toast.makeText(MainActivity.this, "資料已拿取", Toast.LENGTH_SHORT).show();
    }
});
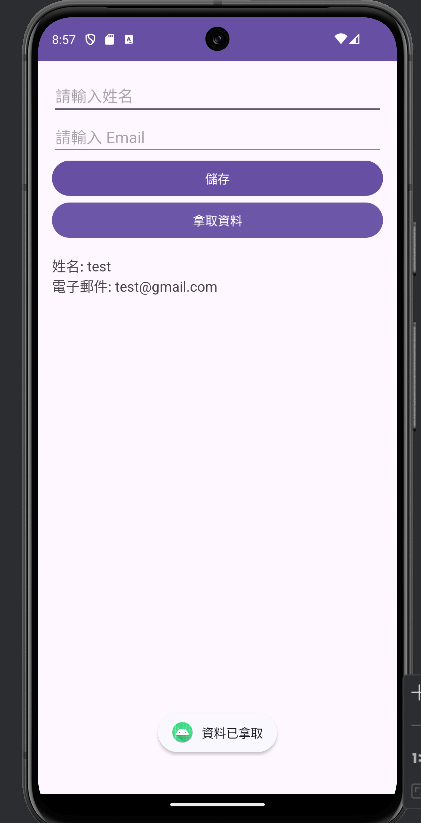
在點擊拿取資料按鈕後會把資料拿出來顯示Toast並顯示在下方的TextView上
進到SharedPreferences的Activity
private static final String Name = "name";
private static final String Email = "email";
用來儲存電子郵件和姓名的key
private SharedPreferences shpf;
public SharedPrefences(Context context) {
    this.context = context;
    shpf = this.context.getSharedPreferences(context.getResources().getString(R.string.app_name), Context.MODE_PRIVATE);
}
初始化SharedPreferences並將模式設為只有這個APP可以存取
(getSharedPreferences這個方法可以指定或產生一個要用來存放的設定檔的xml)
public void saveData(String name, String email) {
    shpf.edit().putString(Name, name).apply();
    shpf.edit().putString(Email, email).apply();
}
儲存名稱和電子郵件
public String getName() {
    return shpf.getString(Name, "");
}
取得儲存的名稱
public String getEmail() {
    return shpf.getString(Email, "");
}
取得儲存的電子郵件
後面的兩個方法是在回傳回傳名稱和電子郵件的,他們在()中都有個"",這個""是當在SharedPreferences中找不到對應的Name或Email時所回傳的預設值,可自行設定
到這裡就可以正常執行程式了
<?xml version="1.0" encoding="utf-8"?>
<LinearLayout xmlns:android="http://schemas.android.com/apk/res/android"
    android:layout_width="match_parent"
    android:layout_height="match_parent"
    android:orientation="vertical"
    android:padding="16dp">

    <EditText
        android:id="@+id/main_name_et"
        android:layout_width="match_parent"
        android:layout_height="wrap_content"
        android:hint="請輸入姓名" />

    <EditText
        android:id="@+id/main_email_et"
        android:layout_width="match_parent"
        android:layout_height="wrap_content"
        android:hint="請輸入 Email" />

    <Button
        android:id="@+id/main_save_btn"
        android:layout_width="match_parent"
        android:layout_height="wrap_content"
        android:text="儲存" />

    <Button
        android:id="@+id/main_set_btn"
        android:layout_width="match_parent"
        android:layout_height="wrap_content"
        android:text="拿取資料" />

    <TextView
        android:id="@+id/main_show_tv"
        android:layout_width="match_parent"
        android:layout_height="wrap_content"
        android:paddingTop="16dp"
        android:textSize="16sp" />
</LinearLayout>
package com.example.test3;

import android.os.Bundle;
import android.view.View;
import android.widget.Button;
import android.widget.EditText;
import android.widget.TextView;
import android.widget.Toast;
import androidx.appcompat.app.AppCompatActivity;

public class MainActivity extends AppCompatActivity {
    private EditText nameEt;
    private EditText emailEt;
    private Button saveBtn;
    private Button setBtn;
    private TextView showTv;
    private SharedPrefences Shpf;
    @Override
    protected void onCreate(Bundle savedInstanceState) {
        super.onCreate(savedInstanceState);
        setContentView(R.layout.activity_main);

        nameEt = findViewById(R.id.main_name_et);
        emailEt = findViewById(R.id.main_email_et);
        saveBtn = findViewById(R.id.main_save_btn);
        setBtn = findViewById(R.id.main_set_btn);
        showTv = findViewById(R.id.main_show_tv);

        Shpf = new SharedPrefences(this);
        //初始化SharedPrefences

        saveBtn.setOnClickListener(new View.OnClickListener() {
            @Override
            public void onClick(View v) {
                Shpf.saveData(nameEt.getText().toString(), emailEt.getText().toString());
                Toast.makeText(MainActivity.this, "資料已儲存", Toast.LENGTH_SHORT).show();
                nameEt.setText("");
                emailEt.setText("");
            }
        });
        setBtn.setOnClickListener(new View.OnClickListener() {
            @Override
            public void onClick(View v) {
                showTv.setText("姓名: " + Shpf.getName() + "\n電子郵件: " + Shpf.getEmail());
                Toast.makeText(MainActivity.this, "資料已拿取", Toast.LENGTH_SHORT).show();
            }
        });
    }
}
package com.example.test3;

import android.content.Context;
import android.content.SharedPreferences;

public class SharedPrefences {
    private Context context;
    private static final String Name = "name";
    private static final String Email = "email";
    private SharedPreferences shpf;
    public SharedPrefences(Context context) {
        this.context = context;
        shpf = this.context.getSharedPreferences(context.getResources().getString(R.string.app_name), Context.MODE_PRIVATE);
    }
    public void saveData(String name, String email) {
        shpf.edit().putString(Name,name).apply();
        shpf.edit().putString(Email, email).apply();
    }
    public String getName() {
        return shpf.getString(Name, "");

    }
    public String getEmail() {
        return shpf.getString(Email, "");
    }
}
下篇會開始介紹我們IT鐵人賽最後會完成的專案
