本篇要來介紹 interface,講解如何「宣告介面」和「使用介面」
並藉由 interface 來重構物件型別註釋的範例,來比較兩個不同寫法的差異
介面(interface) 是 TypeScript 獨有的型別,也是一個「用來定義物件」的型別
在不使用 Interfaces 之前,我們都必須用「型別註釋」來定義物件,如果物件的內容一多,程式碼將變得冗長、不易閱讀
但 Interfaces 可以有效解決這個問題,讓資料更有條理的去做管理
有關原始物件型別註釋的寫法可以參考之前的文章 👉 Day05 - Object 物件
那我們先來看看範例吧!
下面這個這範例使用了物件的型別註釋寫法
重點擺在 printBook 裡的 book 參數就好
let book = {
  isbn: "23213121436547",
  title: "X 調查",
  author: 'will',
  year: 2024,
};

function printBook(book: { isbn: string, title: string, author: string, year: number }) {
  console.log(book.title); // X 調查
}
printBook(book);
不知道看完後你有什麼感覺?
是不是覺得很冗長?
如果屬性一多,要傳的資料一複雜,這樣好維護嗎?
相信你的答案應該是覺得這樣並不好閱讀、也不好維護
那我們何不把函式中 book 參數的所有屬性和型別都集合成一個 interface 呢?
直接定義一個 interface 去替代 book,這樣更簡潔有力👍🏻
好,那我們來重構上面那段範例
interface 關鍵字來宣告,但請注意,interface 的名稱開頭要「大寫」,類似於類(Class)的概念// 宣告介面
interface Book { // Book 介面型別
isbn: string;
title: string;
author: string;
year: number;
};
let book = {
  isbn: "23213121436547",
  title: "X 調查",
  author: 'will',
  year: 2024,
};

// 使用介面
function printBook(book: Book) {
  console.log('use interface', book.title); // X 調查
}
printBook(book);
重構完後,實在是清晰許多!!這就是基本宣告介面的方式
那接著來看更進階的用法
?)介面中的屬性並非全部都是必須的,可以透過在屬性名稱後加上 ? 來標記為可選
interface Book {
  isbn: string;
  title: string;
  author?: string;
  year?: number;
};
let book2: Book = {
  isbn: "23213121423147",
  title: "被討厭的勇氣",
};
readonly)可以使用 readonly 關鍵字來指定一個屬性「只能在物件創建時被賦值」,之後都是不能修改的(immutable)
修改就會報錯,請看下方範例
interface Book {
  readonly isbn: string;
  title: string;
  author: string;
  year: number;
};
let book3: Book = {
  isbn: "23213331423147", // ✅ Pass,創建時第一次被賦值
  title: "高敏感是種天賦",
  author: "伊爾斯·山德",
  year: 2010,
};

book3.isbn = 'b12345'; // ❌ Cannot assign to 'isbn' because it is a read-only property.
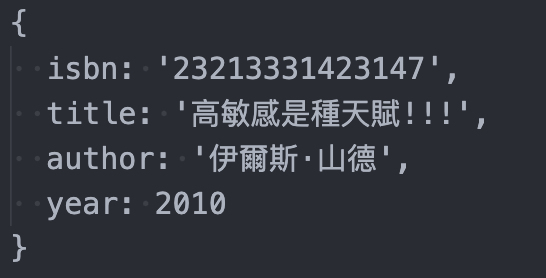
book3.title = "高敏感是種天賦!!!"  // ✅ Pass

console.log(book3) // 印出結果請看下方截圖
console 截圖
interface 可以透過 extends 關鍵字來繼承一個或多個介面,「子介面」會繼承「父介面」的所有屬性和方法,也可以增加新的屬性和方法,十分有彈性,但要避免不斷循環依賴和出現重複的屬性
PS. 請留意 extends 有 s
// 宣告 Person 介面
interface Person {
  name: string;
  age: number;
}

// 定義另一個介面 Employee,它繼承 Person 並新增更多屬性
interface Employee extends Person {
  employeeId: number;
  department: string;
}

// 使用擴展後的介面來定義一個物件
let employee: Employee = {
  name: "Hannah",
  age: 18,
  employeeId: 123456,
  department: "Tech."
};

// 定義一個介面,同時繼承多個介面
interface Manager extends Employee {
    hasTeam: boolean;
}

// 使用多重繼承的介面再定義一個物件
let manager: Manager = {
    name: "Bob",
    age: 34,
    employeeId: 654321,
    department: "Tech.",
    hasTeam: true
};
extends 常被拿來和 implements 比較
前者是 interface 之間的繼承所使用的關鍵字,後者是 Class 去執行(Implement) interface 內容所使用的關鍵字
interface Greetable {
  greet(): void;
}

class Human implements Greetable {
  constructor(public name: string) {}
  greet() {
    console.log(this.name);
  }
}

const human = new Human("Alice");
human.greet(); // ✅ 會印出 Alice
implements 可以說是 interface 的專屬功能, Type Alias(型別別名)則做不到
interface 允許我們重複定義相同的名稱,當定義多個相同名稱時,TypeScript 編譯器會自動將它們合併,這對於擴展和元件開發很方便。每個同名的 interface 中的屬性、方法會被合併在一起。相反的 type 則不行(type 明天會講到~)
// ✅
interface Image {
   height: number;
   width: number;
}
// ✅
interface Image {
   type: string;
   title: string;
   resize(): void;
}

// 自動合併後的 Image 介面
// interface Image {
//   height: number;
//   width: number;
//   type: string;
//   title: string;
//   resize(): void;
// }

// ❌ Duplicate identifier 'Image'.
type Image = {
  height: number;
  width: number;
};

type Image = {
  type: string;
  title: string;
  resize(): void;
};
物件」的型別extends 是可以讓介面繼承一個或多個介面的屬性、方法的關鍵字; implements 則是 Class 想去執行介面內容所使用的關鍵字interface 的名稱可以重複宣告並支援自動合併; 相反地 type 則不支援自動合併,無法定義多個相同名稱的型別別名每天的內容有推到 github 上喔
