
在前面的章節中,我們已經深入了解了 Grafana Scene 的基本使用方法和非常實用的進階功能,下一步就是藉由基本功能的概念與進階功能結合實現一個完全客製化的 Scene。本章將聚焦於如何客製化 Scenes、variable 和 control,為下一章的 data 和 Panel 呈現做準備。
在實際開發中,大部分的情況使用基本的 Scene 元件就可以滿足需求,但是還是會遇到需要客製化 Scenes 的情況。這些情況通常出現在我們需要更細緻的控制或是特定的功能,而這些功能在標準的 Scene 元件中無法直接實現。客製化 Scenes 可以讓我們根據特定的業務邏輯或用戶需求,創造出更加自由和適合的視覺化界面。以下是一些可能需要客製化 Scenes 的例子:
接下來我們會以一個天氣監測系統為範例來說明如何客製化 Scene、variable 和 control。但在這之前 Scenes 提供了一個非常方便的工具叫做 sceneGraph 可以讓我們更方便的客製化 Scenes。因此以下會先介紹 sceneGraph 的概念,再於客製化的實例中使用。
sceneGraph 是 Grafana Scenes 中的一個核心工具,用於在 Scene Object Tree 中進行導航和查詢。它提供了非常多的實用 API,幫助開發者更容易地操作和取得 Scene 上下文中的各個元件。而在客製化 Scenes 時,會需要知道或取得其他 SceneObject 的狀態進行操作,這時候就可以使用 sceneGraph 提供的 API 來實現。以下是 Scene Graph 所提供的 API 列表:
變數操作:
getVariables(sceneObject: SceneObject): 取得指定 SceneObject 的最相近節點的變數。
lookupVariable(sceneObject: SceneObject, variableName: string): 需指定 SceneObject 和變數名稱來查找特定變數。
const variable = sceneGraph.lookupVariable(sceneObject, "room");
hasVariableDependencyInLoadingState(sceneObject: SceneObject): 不僅檢查指定變數的加載狀態,還會檢查其所有依賴變數的狀態。例如,如果變數 C 依賴於變數 B,變數 B 又依賴於變數 A,當變數 A 正在加載時,對變數 C 和 B 調用此方法都會返回 true。
interpolate(sceneObject: SceneObject, value: string, interpolations?: VariableInterpolation[]): 使用當前 SceneObject 以及需要進行 Interpolate 的 value 作為上下文來進行 Interpolate。在 Dashboard 或 Panel 設置中替換變數或動態生成 query string。
數據資料:
時間範圍:
佈局:
SceneObject 查找:
層級操作:
getAncestor(sceneObject: SceneObject, ancestorType): 取得指定類型的最近祖先物件。如果找不到指定類型的祖先,則拋出錯誤。
const ancestor = sceneGraph.getAncestor(sceneObject, SceneFlexLayout);
其他:
在客製化 Scenes 時,我們可以繼承 SceneObjectBase 來建立我們自己的 SceneObject,並在 Component 中使用我們自定義的 render 方式來顯示。在以下的範例中,所有的自定義都是基於 SceneObjectBase 來實現的。
在先前的文章有提過 Scenes 提供的 Variable 實例基本上都會 render 一個樣式固定的 selector 或操作元件,因此當這個元件無法滿足我們的需求時,就需要自定義 Variable 了。此處的自定義 Variable 會建立一個全新的 SceneObject 實例,主要呈現由 control 所控制的 Room 列表及當前選擇的 Room,而 Component 會由下一個自定義 control 來實現。
定義一個新的 State 型別,並繼承 SceneObjectBase 來建立 Variable 實例。
interface RoomVariableState extends Partial<SceneVariableState> {
  name: string;
  label: string;
  value: VariableValue;
  text: VariableValue;
  type: VariableType;
  options: VariableValueOption[];
}
State 中需要包含所有可能的變數值,例如:name、label、value、text、type 和 options。
在 constructor 中,我們將這些屬性初始化,並將其他屬性從傳入的 state 中複製過來。
最後,我們將 Component 設置為我們自定義的 renderer。
export class RoomVariable extends SceneObjectBase<RoomVariableState> {
public constructor(state?: Partial<RoomVariableState>) {
super({
name: "room_variable",
label: "Room Variable",
value: "cellar",
text: "Cellar",
type: "custom",
options: [
{ label: "Cellar", value: "cellar" },
{ label: "Kitchen", value: "kitchen" },
{ label: "Living Room", value: "living_room" },
{ label: "Bedroom", value: "bedroom" },
{ label: "Bathroom", value: "bathroom" },
{ label: "Porch", value: "porch" },
{ label: "Playroom", value: "playroom" },
],
...state,
});
this.getValue = this.getValue.bind(this);
this.getValueText = this.getValueText.bind(this);
}
public static Component = ({ model }: SceneComponentProps<RoomVariable>) => {
return <RoomControlSelector model={model} />;
};
public getValue(): VariableValue {
return this.state.value;
}
public getValueText(): string {
return String(this.state.text);
}
}
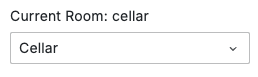
export function RoomControlSelector({ model }: SceneComponentProps<RoomVariable>) {
const { value, options } = model.useState();
const changeRoom = (newRoom: string | number | true | CustomVariableValue) => {
model.setState({ value: newRoom });
};
return (
<div style={{ display: "flex", flexDirection: "column", gap: "5px" }}>
<div>Current Room: {String(value)}</div>
<Select options={options} value={value} onChange={(v) => changeRoom(v.value || "")} placeholder="Select room" />
</div>
);
}
在定義好了 RoomVariable 之後,接下來我們創建一個自定義的控制元件,使用 @grafana/ui 提供的 Select 元件,用於切換房間來顯示不同房間的溫度曲線。而由於自定義的 Control 與 Variable 是一個組合,因此我們需要使用 sceneGraph.findObject 來找到對應的 Variable 實例,並在 Component 中使用。
export class ControlSelector extends SceneObjectBase<SceneObjectState> {
  constructor(props: SceneObjectState) {
    super(props);
  }

  public static Component = ({ model }: SceneComponentProps<ControlSelector>) => {
    const variable = sceneGraph.findObject(model, (obj) => obj instanceof RoomVariable) as RoomVariable;

    return <variable.Component model={variable} />;
  };
}
現在,我們來創建一個自定義的 Scene,將我們的自定義 variable 和 control 整合進去:
SceneObjectBase 來建立 Scene 實例。export class TemperatureScene extends SceneObjectBase<TemperatureSceneProps> {
constructor(state: Partial<TemperatureSceneProps>) {
super({
$timeRange: state.$timeRange ?? new SceneTimeRange({}),
$variables: new SceneVariableSet({
variables: [new RoomVariable({ name: "room" })],
}),
controls: state.controls ?? [new ControlSelector({}), new SceneTimePicker({})],
body: new TemperatureByRoomScene({}),
...state,
});
}
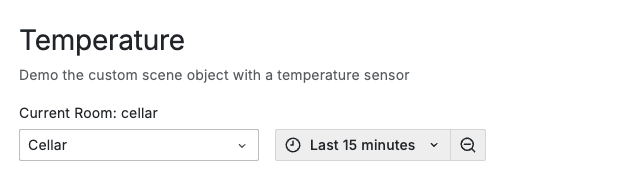
static Component = ({ model }: SceneComponentProps<TemperatureScene>) => {
const { body, controls } = model.useState();
const styles = useStyles2(getStyles);
return (
<div className={styles.bodyContainer}>
<div className={styles.container}>
{controls && (
<div className={styles.controlsContainer}>
<div className={styles.filters}>
<div style={{ width: "240px" }}>
{controls.map((control) =>
control instanceof ControlSelector ? (
<control.Component key={control.state.key} model={control} />
) : null
)}
</div>
<div style={{ width: "240px" }}>
{controls.map((control) =>
control instanceof SceneTimePicker ? (
<control.Component key={control.state.key} model={control} />
) : null
)}
</div>
</div>
</div>
)}
</div>
{body && <body.Component model={body} />}
</div>
);
};
}
最後,在 EmbeddedScene 中使用我們自定義的 Scene,並呈現整個 Scene 應用程式:
export function getTemperature(defaults: SceneAppPageState) {
  return new SceneAppPage({
    ...defaults,
    subTitle: "Demo the custom scene object with a temperature sensor",
    getScene: () =>
      new EmbeddedScene({
        body: new TemperatureScene({}),
      }),
  });
}
筆者語錄:
在上述的範例中我們已經將大致自定義的 Scene 應用程式架構完成了,可以發現我們能夠不依靠 Grafana Scenes 提供的現成元件實現頁面的構成,因此不管是元件的挑選或是佈局設定都能夠完全由我們自己客製化,這也是 Grafana Scenes 的方便之處,在下一章中,我們將基於這個基礎,添加TemperatureByRoomScene來展示如何使用sceneDataNode獲取數據並在 Panel 中呈現。


 iThome鐵人賽