前一天的課程把前端與後端的重要功能按照順序開發完成,接下來我們來利用這個觀念,進行一些變化,算是更加進階一點的技術,而且整個開發的過程要從後端開始,一路開發到前端。
我相信對大家來說這個應該會是一個挑戰,但It鐵人賽就是來挑戰自我的地方,所以就讓我們來挑戰一下吧!
今天的功能,是開發根據類別篩選清單的功能,我們今天的目標是要開發完後端Spring boot的程式碼,就讓我們開始吧
依照前幾天的教學,在Spring boot的後端開發的順序是先從Repository->Serivce->ServiceImpl->Controller這個順序,而因為我們使用了JPA來當作Repository,JPA已經幫我們開發好很多的東西,我們就可以從Service開始
所以我們來到Service這個頁面中新增以下的功能
List<String> getAllCategories();
再來到ServiceImpl層,我們這裡的功能是取得所有的類別,邏輯上是先讀取所有的資料,然後把資料做篩選,取得Category的資料回傳到前端,所以我們事先使用finall這個功能,然後用stream的方式把所有資料一筆筆取出來,用map的方式取得所有category,然後分區之後再用collect的方式取得資料。
	@Override

	public List<String> getAllCategories() {

	       List<Account> accounts = accountRepository.findAll();

	        return accounts.stream()

	                .map(Account::getCategory)

	                .distinct()

	                .collect(Collectors.toList());

	}
完成之後我們回到Controller,新增取得category的功能
    @GetMapping("/categories")

    public List<String> getAllCategories() {

        return accountsService.getAllCategories();

    }
再來就是來測試,只要回傳了你先前設置的清單即可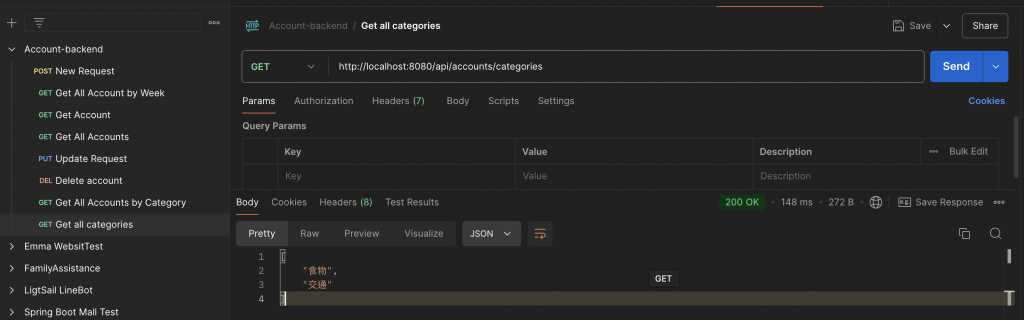
接下來,我們就要到前端繼續開發了
我們要再React Service中心層新增這個功能,我們這個頁面會先從後端中取得所有的類別,給使用者選取,再來根據選取到的資料丟回給Spring boot,從Spring boot中取得所有這個類別的資料,所以我們要新增getAllCategories跟getAccountsByCategory這兩個功能
export const getAllCategories = ()=>axios.get(BASE_REST_API_URL+'/categories')
export const getAccountsByCategory = (category)=>axios.get(BASE_REST_API_URL+'/category/'+category)
再來,我們就要新增篩選的頁面,我們要按照先前的邏輯,要引用useState, useEffect這些控制網頁參數與變動的功能,以及使用到我們開發的getAllCategories, getAccountsByCategory 兩個功能。
我們在這裡要使用到的參數有categories、selectedCategory跟最後從Spring取得的filteredAccounts
在網頁讀取的時候,我們就要先取得所有的類別,再把這些類別顯示到網頁中。
完整的程式碼如下
import React from 'react'
import { useState, useEffect } from 'react';
import { getAllCategories, getAccountsByCategory } from '../Service/AccountService';
const SortAccountComponent = () => {
    const [categories, setCategories] = useState([]);
    const [selectedCategory, setSelectedCategory] = useState('');
    const [filteredAccounts, setFilteredAccounts] = useState([]);
    // 取得所有的 Category
    useEffect(() => {
        getAllCategories().then((response) => {
            setCategories(response.data);
        }).catch((error) => {
            console.error(error);
        });
    }, []);
    // 當選擇的 Category 改變時,取得對應的帳戶清單
    useEffect(() => {
        if (selectedCategory) {
            getAccountsByCategory(selectedCategory).then((response) => {
                setFilteredAccounts(response.data);
            }).catch((error) => {
                console.error(error);
            });
        }
    }, [selectedCategory]);
  return (
    <div className='container'>
    <br></br>
    <div className='card col-md-6 offest-md-3 offset-md-3'>
        <br></br>
        <h2 className='text-center'>Sort Accounts by Category</h2>
        <div className='card-body'>
            <div className='form-group mb-2 text-center'>
                <label className='form-label'>Select Category:</label>
                <select
                    className='form-control'
                    value={selectedCategory}
                    onChange={(e) => setSelectedCategory(e.target.value)}
                >
                    <option value=''>Select a Category</option>
                    {categories.map((category, index) => (
                        <option key={index} value={category}>
                            {category}
                        </option>
                    ))}
                </select>
            </div>
            <br></br>
            {selectedCategory && (
                <div>
                    <h3 className='text-center'>Accounts in {selectedCategory}</h3>
                    <ul className='list-group'>
                        {filteredAccounts.map((account) => (
                            <li key={account.id} className='list-group-item'>
                                <strong>{account.name}</strong> - ${account.amount} ({account.expensed ? 'Expense' : 'Income'})
                            </li>
                        ))}
                    </ul>
                </div>
            )}
        </div>
    </div>
</div>
  )
}
export default SortAccountComponent
因為前後端整合是一件比較艱深的內容,所以我會預期大家先有html、CSS、JS的基礎,但這邊也還是多補充解釋一些前端網頁的呈現內容
                <select
                    className='form-control'
                    value={selectedCategory}
                    onChange={(e) => setSelectedCategory(e.target.value)}
                >
                    <option value=''>Select a Category</option>
                    {categories.map((category, index) => (
                        <option key={index} value={category}>
                            {category}
                        </option>
                    ))}
                </select>
這一段程式碼是顯示選擇的欄位,將讀取到的categories用category跟id的形式呈現,對外顯示類別
再來就是當我們選擇之後,就會出現一個selectCategory,那就會顯示以下的內容
 {selectedCategory && (
                <div>
                    <h3 className='text-center'>Accounts in {selectedCategory}</h3>
                    <ul className='list-group'>
                        {filteredAccounts.map((account) => (
                            <li key={account.id} className='list-group-item'>
                                <strong>{account.name}</strong> - ${account.amount} ({account.expensed ? 'Expense' : 'Income'})
這樣一來就能夠完成我們的目的,再來,我們要去App.jsx去設地這個頁面對應的網址
          {/* http://localhost:8080/sort-account/ */}
          <Route path='/sort-account' element={<SortAccountComponent />}></Route>
完整的程式碼如下
  return (
    <>
    <BrowserRouter>
        <HeaderComponent />
        <Routes>
        {/* http://localhost:8080/ */}
        <Route path='/' element={<ListAccountComponent />}></Route>
          {/* http://localhost:8080/weekly-account' */}
          <Route path='/week-account' element={<WeeklyAccountComponent />}></Route>
          {/* http://localhost:8080/list-account */}
          <Route path='/lsit-account' element={<ListAccountComponent />}></Route>
          {/* http://localhost:8080/add-account */}
          <Route path='/add-account' element={<AccountComponent />}></Route>
          {/* http://localhost:8080/update-account/1 */}
          <Route path='/update-account/:id' element={<AccountComponent />}></Route>
          {/* http://localhost:8080/sort-account/ */}
          <Route path='/sort-account' element={<SortAccountComponent />}></Route>
        </Routes>
        <FooterComponent />
    </BrowserRouter>
    </>
  )
結果如下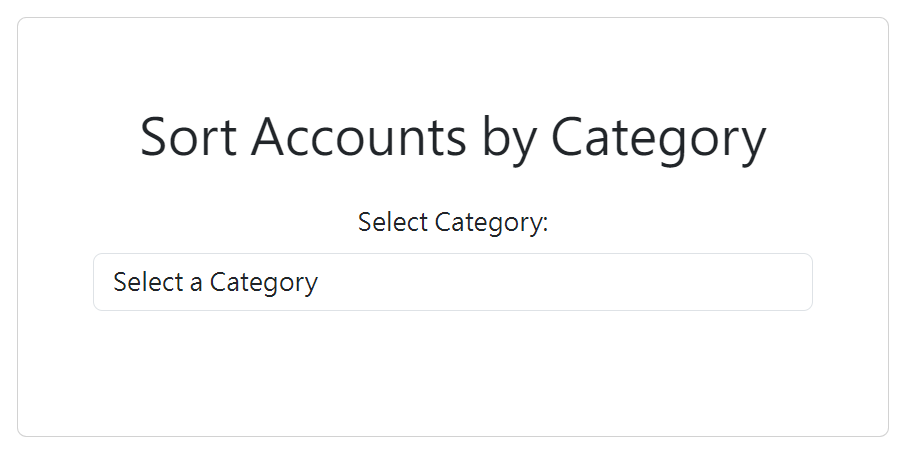
點選類別,然後隨便選擇一個類別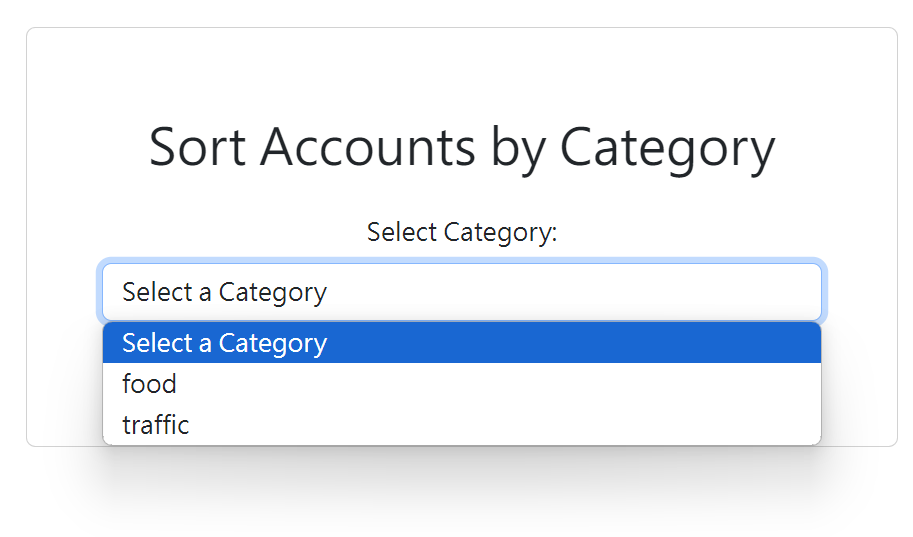
選擇好之後就會出現所有的清單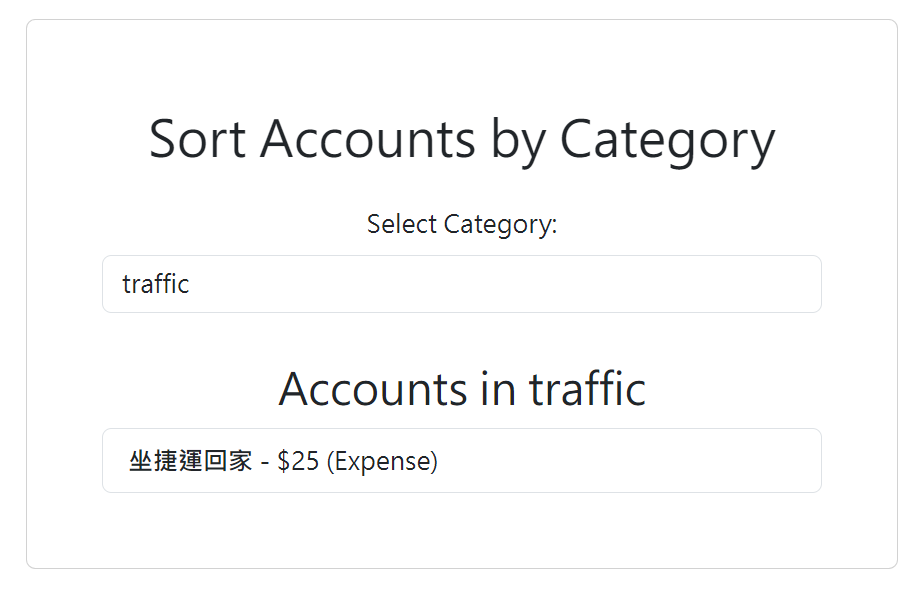
到這邊,恭喜你完成了這段進階的功能!

