接下來要讓 Nextjs 專案串接 Typsense 的搜尋功能,主要會是利用 Algolia 出品的 Instasearch 元件來串。
Typsense 另外製作了一個轉接器串接 Instasearch ,蠻方便的。
首先安裝套件。
pnpm i algoliasearch react-instantsearch typesense-instantsearch-adapter
再來另外開個新頁面來測試。
// src/app/books/page.tsx
"use client";
import { type LiteClient } from "algoliasearch/lite";
import { Hits, InstantSearch, SearchBox } from "react-instantsearch";
import TypesenseInstantSearchAdapter from "typesense-instantsearch-adapter";

const typesenseInstantsearchAdapter = new TypesenseInstantSearchAdapter({
  server: {
    apiKey: "xyz", // Be sure to use the search-only-api-key
    nodes: [
      {
        host: "localhost",
        port: 8108,
        protocol: "http",
      },
    ],
  },
  // The following parameters are directly passed to Typesense's search API endpoint.
  //  So you can pass any parameters supported by the search endpoint below.
  //  query_by is required.
  additionalSearchParameters: {
    query_by: "title,authors",
  },
});

const searchClient = typesenseInstantsearchAdapter.searchClient as LiteClient;

function Hit({
  hit,
}: {
  hit: {
    title: string;
    authors: string;
  };
}) {
  return (
    <article>
      <h1>{hit.title}</h1>
    </article>
  );
}

const Page = () => {
  return (
    <>
      <h1>{"Books"}</h1>
      <InstantSearch searchClient={searchClient} indexName="books">
        <SearchBox />
        <Hits hitComponent={Hit} />
      </InstantSearch>
    </>
  );
};

export default Page;
這邊的 Typesense api key 如果繼續用建置服務時的無限制 api key 的話蠻危險的,得另外發一隻有限權限的才行。
typesense-dashboard 也有提供 api key 的管理畫面,可以在這裡輕鬆的建立一支新的金鑰。
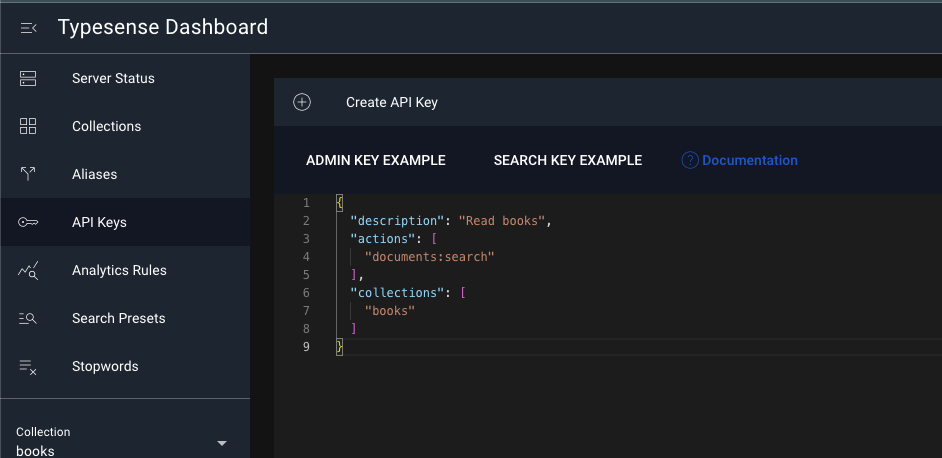
用 JSON 表示金鑰的名稱跟權限,這邊只允許 books 的搜尋功能。
{
  "description": "Read books",
  "actions": [
    "documents:search"
  ],
  "collections": [
    "books"
  ]
}
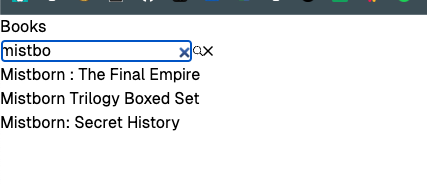
新增好後記下金鑰貼回 Nextjs 這邊,就能看到搜尋輸入跟搜尋結果了。
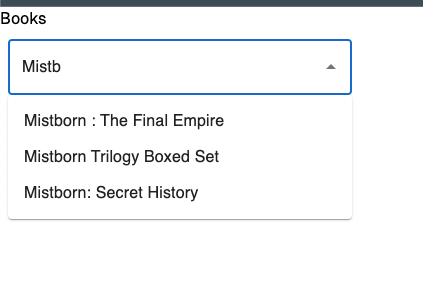
為了方便客製化 Instasearch 沒有預設任何的樣式,而是另外提供 Algolia 跟 Satellite 的樣式主題方便引入後套用,但是這邊不打算用那個,而是套用 MUI。
要替換整個元件的話就要利用個元件的 hook,例如 useSearchBox 。
最後整合的結果範例如下:
"use client";
import { type LiteClient } from "algoliasearch/lite";
import {
  InstantSearch,
  type SearchBoxProps,
  useHits,
  type UseHitsProps,
  useSearchBox,
} from "react-instantsearch";
import TypesenseInstantSearchAdapter from "typesense-instantsearch-adapter";
import Autocomplete from "@mui/material/Autocomplete";
import TextField from "@mui/material/TextField";
import Box from "@mui/material/Box";

const typesenseInstantsearchAdapter = new TypesenseInstantSearchAdapter({
  server: {
    apiKey: "xyz", // Be sure to use the search-only-api-key
    nodes: [
      {
        host: "localhost",
        port: 8108,
        protocol: "http",
      },
    ],
  },
  // The following parameters are directly passed to Typesense's search API endpoint.
  //  So you can pass any parameters supported by the search endpoint below.
  //  query_by is required.
  additionalSearchParameters: {
    query_by: "title,authors",
  },
});

const searchClient = typesenseInstantsearchAdapter.searchClient as LiteClient;

type Book = {
  title: string;
  authors: string[];
};

const CustomSearchBox = ({
  hitsProps,
  ...props
}: SearchBoxProps & {
  hitsProps?: UseHitsProps<Book>;
}) => {
  const { query, refine, clear } = useSearchBox(props);
  const { items, results, banner, sendEvent } = useHits<Book>(hitsProps);

  return (
    <Box width={360} p={1}>
      <Autocomplete
        options={items}
        getOptionLabel={(option) => option.title}
        onInputChange={(event, newInputValue) => {
          refine(newInputValue);
        }}
        renderInput={(params) => <TextField {...params} />}
      />
    </Box>
  );
};

const Page = () => {
  return (
    <>
      <h1>{"Books"}</h1>
      <InstantSearch searchClient={searchClient} indexName="books">
        <CustomSearchBox />
      </InstantSearch>
    </>
  );
};

export default Page;
這樣就能有一個方便統一樣式的搜尋功能了。
在多加一個標註匹配字串的功能,利用 Instasearch 的 Highlight 元件。
hit 都會內涵 highlight 資訊,可以用 Highlight 元件將 hit 換成用 <mark> 標記好匹配字的字串,所以可以針對 <mark> 做樣式改變。
import {
  Highlight,
  useSearchBox,
  type SearchBoxProps,
  useHits,
  type UseHitsProps,
} from "react-instantsearch";

const CustomSearchBox = ({
  hitsProps,
  ...props
}: SearchBoxProps & {
  hitsProps?: UseHitsProps<Book>;
}) => {
  const { query, refine, clear } = useSearchBox(props);
  const { items, results, banner, sendEvent } = useHits<Book>(hitsProps);

  return (
    <Box width={360} p={1}>
      <Autocomplete
        options={items}
        getOptionLabel={(option) => option.title}
        onInputChange={(event, newInputValue) => {
          refine(newInputValue);
        }}
        renderInput={(params) => <TextField {...params} />}
        renderOption={(props, option) => (
          <Box
            component="li"
            {...props}
            sx={{
              "& mark": {
                backgroundColor: "unset",
                color: "red",
              },
            }}
          >
            <Highlight attribute="title" hit={option} />
          </Box>
        )}
      />
    </Box>
  );
};
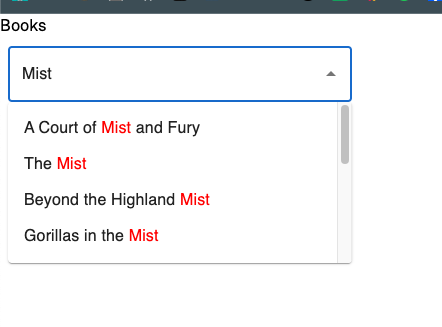
自己做這種搜尋輸入框還挺頭痛的,有這些方便的元件真是太好了。


 iThome鐵人賽