OpenTelemetry 有提供 Node.js 的 Client SDK,讓 Node.js 開發者可以透過其產生、匯出 Telemetry,那麼 NestJS 該如何與該 SDK 搭配使用呢?有官方套件可以使用嗎?很遺憾的是,NestJS 官方並 沒有 提供 NestJS 專用的套件,但 OpenTelemetry 有替 NestJS 製作了專屬的套件來收集 NestJS 獨有的資訊。
OpenTelemetry 將各個不同職責的功能拆分成多個函式庫,可以根據自身需求決定要使用哪些功能。透過下方指令安裝 OpenTelemetry SDK 核心套件:
$ npm install @opentelemetry/sdk-node
上一篇我們透過 Grafana Tempo 的範例快速啟動了 OpenTelemetry Collector,該 Collector 有設定 gRPC OTLP 的 Receiver,所以我們可以透過下方指令安裝 gRPC OTLP 的 Exporter,以便將 Trace 資料匯出至 Collector:
$ npm install @opentelemetry/exporter-trace-otlp-grpc
OpenTelemetry 所產生的 Span 可以帶有 資源(Resource) Attributes,用來標示此 Span 產生時的實體資源,比如:服務名稱、Kubernetes Pod 名稱等,這在觀察特定實體資源的行為會很有幫助。透過下方指令安裝產生 Resource 的函式庫,以便將實體資源相關資訊帶入 Span 中:
$ npm install @opentelemetry/resources
在產生 Resource Attributes 的時候,可以參考 OpenTelemetry 定義的Resource Semantic Conventions,裡面詳細描述了 Resource 的標準 Attribute 用法與名稱定義,當然,OpenTelemetry 有為此另外準備了函式庫給開發者使用:
$ npm install @opentelemetry/semantic-conventions
補充:事實上,
@opentelemetry/resources本身的依賴項目就包含了@opentelemetry/semantic-conventions。
在開發階段可能會需要偵錯的手段,這裡可以透過下方函式庫提供的功能將 OpenTelemetry SDK 所產生的 Log 印出:
$ npm install @opentelemetry/api
有了基礎建設所需的項目後,就需要透過 OpenTelemetry SDK 相關機制來收集資訊,而這套機制就叫 檢測器(Instrumentation)。在收集資訊方面,可以根據不同面向來使用不同的 Instrumentation,舉例來說,我們想要知道一個請求從 NestJS Controller 進入後到整個請求結束時各個 function 執行的狀況,就可以透過下方指令安裝 NestJS 專用函式庫:
$ npm install @opentelemetry/instrumentation-nestjs-core
如果要知道一個 HTTP 請求的相關資訊並讓 OpenTelemetry 自動為 HTTP 相關操作執行 Context Propagation,可以安裝下方套件:
$ npm install @opentelemetry/instrumentation-http
由於 OpenTelemetry SDK 會盡可能地捕捉所需的資訊,會需要 在載入任何其他模組之前將 SDK 初始化,否則有可能會得到非預期的結果。以 NestJS 應用程式來說,會需要在執行 main.ts 的最前面初始化 SDK,這裡我們可以新增一個名為 tracer.ts 的檔案,並執行一系列初始化 SDK 的工作。下方為範例程式碼,裡面有針對部分程式碼撰寫註解:
import { NodeSDK } from '@opentelemetry/sdk-node';
import { OTLPTraceExporter } from '@opentelemetry/exporter-trace-otlp-grpc';
import { NestInstrumentation } from '@opentelemetry/instrumentation-nestjs-core';
import { HttpInstrumentation } from '@opentelemetry/instrumentation-http';
import { Resource } from '@opentelemetry/resources';
import { ATTR_SERVICE_NAME } from '@opentelemetry/semantic-conventions';
import { diag, DiagConsoleLogger, DiagLogLevel } from '@opentelemetry/api';

/**
 * 產生 OpenTelemetry SDK 實例
 */
function generateTracer() {
  const traceExporter = new OTLPTraceExporter({
    url: 'http://localhost:4317',  // OpenTelemetry Collector OTLP gRPC Receiver 的 Endpoint
  });

  return new NodeSDK({
    // 建立 Resource Attribute,運用 Semantic Conventions 提供的常數當作 Attribute Name
    resource: new Resource({
      [ATTR_SERVICE_NAME]: process.env['SERVICE_NAME'],
    }),
    // 設定 Trace 功能的 Exporter
    traceExporter: traceExporter,
    // 設定 NestJS Instrumentation 來產生 NestJS 相關資訊,同時設定 Http Instrumentation 自動為 HTTP 操作建立相關資訊以及實現 Context Propagation
    instrumentations: [
      new NestInstrumentation(),
      new HttpInstrumentation(),
    ],
  });
}

/**
 * 啟動 SDK
 */
function bootstrapTracer(sdk: NodeSDK) {
  // 註冊 Logger,並指定輸出 Debug 以上的 Log
  diag.setLogger(new DiagConsoleLogger(), DiagLogLevel.DEBUG);
  sdk.start();
}

/**
 * 主程序
 */
function main() {
  const sdk = generateTracer();
  bootstrapTracer(sdk);

  // 在程式關閉之前 Graceful Shutdown SDK
  process.on('SIGTERM', () => {
    sdk
      .shutdown()
      .then(() => console.log('SDK shutdown successfully.'))
      .catch((error) => console.log('Error shutdown SDK.', error))
      .finally(() => process.exit(0));
  });
}

main();
最後,到 main.ts 的 第一行 匯入該檔案:
import './tracer';
// ...
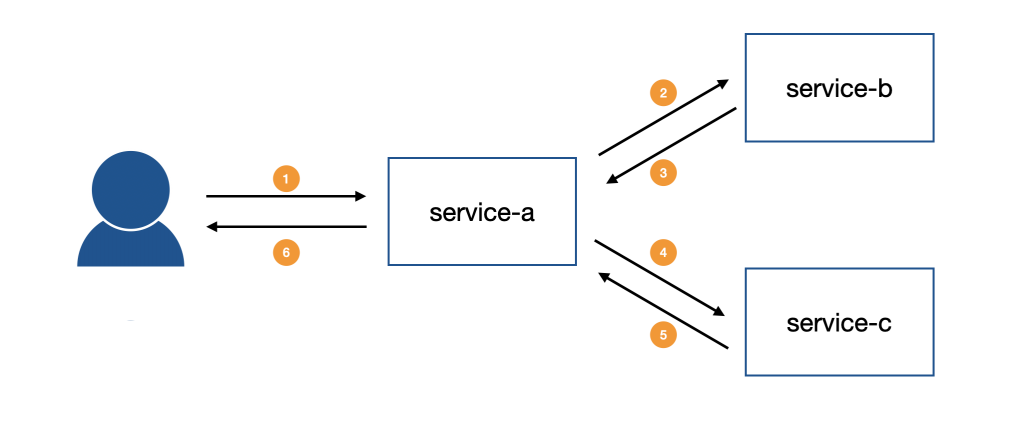
先規劃一下這次整合會使用到的服務,預計會產生 service-a、service-b 與 service-c,由 service-a 擔任請求進入點,它會向 service-b 請求訂單資訊,收到訂單資訊後會將訂單資訊中的商品 ID 帶給 service-c 取得商品資訊,最終再將兩個資訊合併起來回傳給使用者。架構如下圖所示:
注意:接下來實作
service-a、service-b與service-c請在main.ts匯入tracer.ts,假如是建立三個 NestJS Application,那就將tracer.ts複製到這三個 Application 的 codebase 中。
針對 service-a 的部分進行調整,由於該服務會需要透過 HTTP 存取 service-b 與 service-c,所以需要使用到 HttpModule。下方是範例程式碼,在 AppModule 匯入 HttpModule:
import { HttpModule } from '@nestjs/axios';
import { Module } from '@nestjs/common';
// ...

@Module({
  imports: [HttpModule],
  // ...
})
export class AppModule {}
接著,調整 AppController 的內容,設計使用 GET 方法存取 /views/orders/:orderId 的 API,會使用 orderId 傳給 service-b,等收到回應後再將 productId 傳給 service-c,最後再將資訊整合起來回傳給客戶端:
import { Controller, Get, Param } from '@nestjs/common';
import { HttpService } from '@nestjs/axios';
import { concatMap, map, of } from 'rxjs';

type Order =
  | {
      id: string;
      state: string;
      productId: string;
    }
  | Record<string, never>;

type Product =
  | {
      id: string;
      name: string;
    }
  | Record<string, never>;

@Controller()
export class AppController {
  constructor(private readonly httpService: HttpService) {}

  @Get('views/orders/:orderId')
  getOrderView(@Param('orderId') orderId: string) {
    const orderInfo$ = this.httpService
      .get<Order>(`http://localhost:3334/orders/${orderId}`)
      .pipe(map((res) => res.data));
    return orderInfo$.pipe(
      concatMap((order) => {
        if (!order.id) {
          return of({});
        }
        return this.httpService
          .get<Product>(`http://localhost:3335/products/${order.productId}`)
          .pipe(
            map((res) => res.data),
            map((product) => ({ id: order.id, state: order.state, product }))
          );
      })
    );
  }
}
注意:啟動時,請記得指定環境變數
PORT為3333,同時將SERVICE_NAME設定為nestjs-service-a,避免與其他兩個服務衝突。
修改 AppController 的內容,設計使用 GET 方法存取 /orders/:orderId 的 API:
import { Controller, Get, Param } from '@nestjs/common';

@Controller()
export class AppController {
  private readonly orders = [
    {
      id: '1',
      state: 'pending',
      productId: 'a',
    },
  ];

  @Get('orders/:orderId')
  getOrderById(@Param('orderId') orderId: string) {
    return this.orders.find((order) => order.id === orderId) ?? {};
  }
}
注意:啟動時,請記得指定環境變數
PORT為3334,同時將SERVICE_NAME設定為nestjs-service-b,避免與其他兩個服務衝突。
修改 AppController 的內容,設計使用 GET 方法存取 /products/:productId 的 API:
import { Controller, Get, Param } from '@nestjs/common';

@Controller()
export class AppController {
  private readonly products = [
    {
      id: 'a',
      name: 'Book',
    },
  ];

  @Get('products/:productId')
  getProductById(@Param('productId') productId: string) {
    return this.products.find((product) => product.id === productId) ?? {};
  }
}
注意:啟動時,請記得指定環境變數
PORT為3335,同時將SERVICE_NAME設定為nestjs-service-c,避免與其他兩個服務衝突。
根據前一篇的內容將 OpenTelemetry Collector、Grafana Tempo 與 Grafana 架設起來:
$ docker-compose up -d
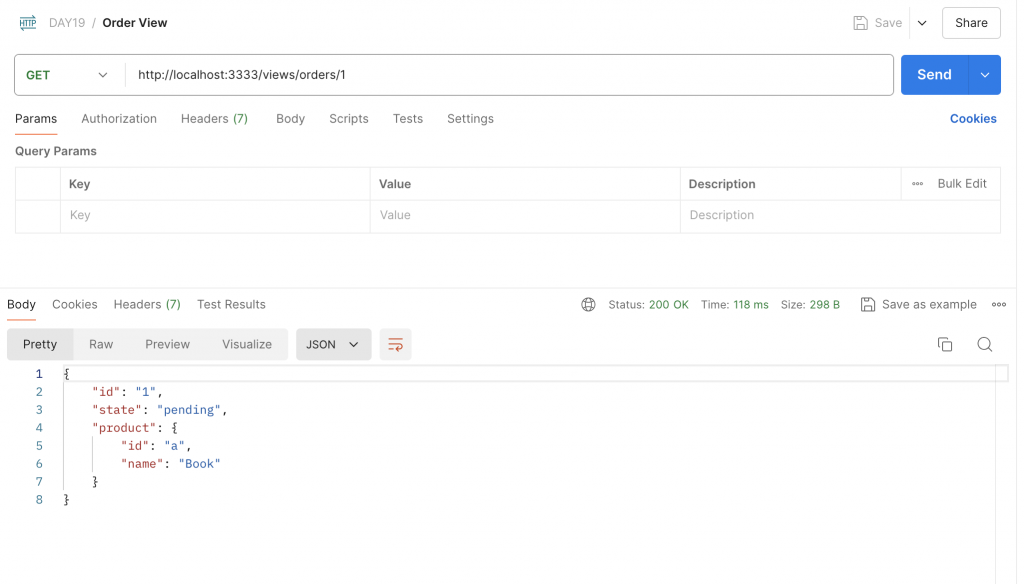
使用 Postman 透過 GET 方法存取 http://localhost:3333/views/orders/1,會順利收到組合後的結果:
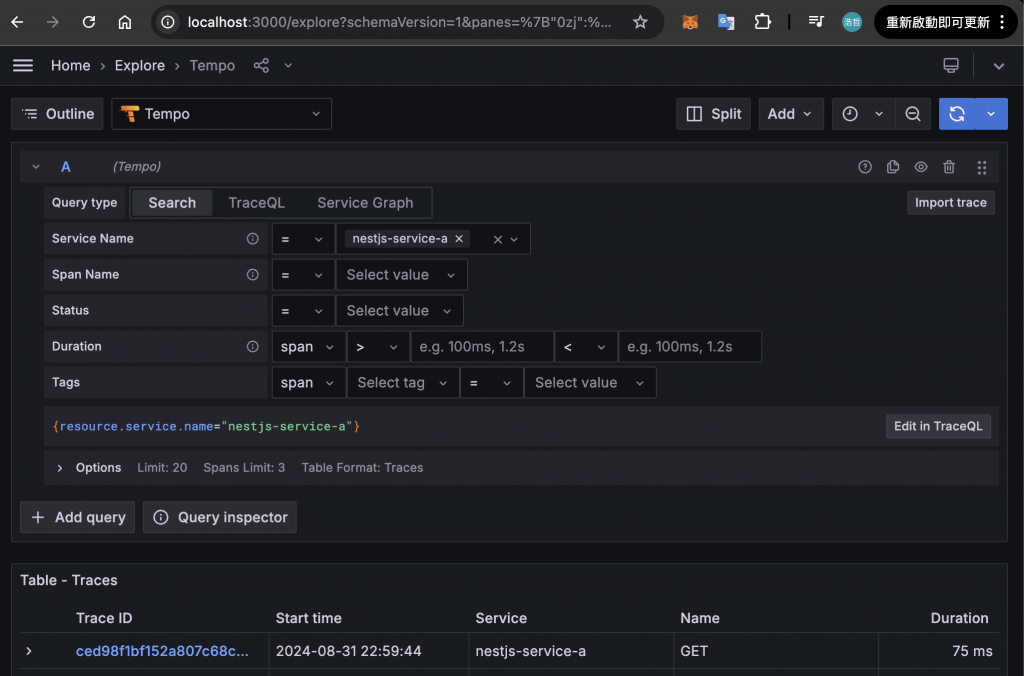
透過瀏覽器存取 http://localhost:3000 開啟 Grafana,並進入「Explore」頁面,在「Search」狀態下查詢「Service Name」為「nestjs-service-a」可以看到剛才存取 API 時產生的 Trace:
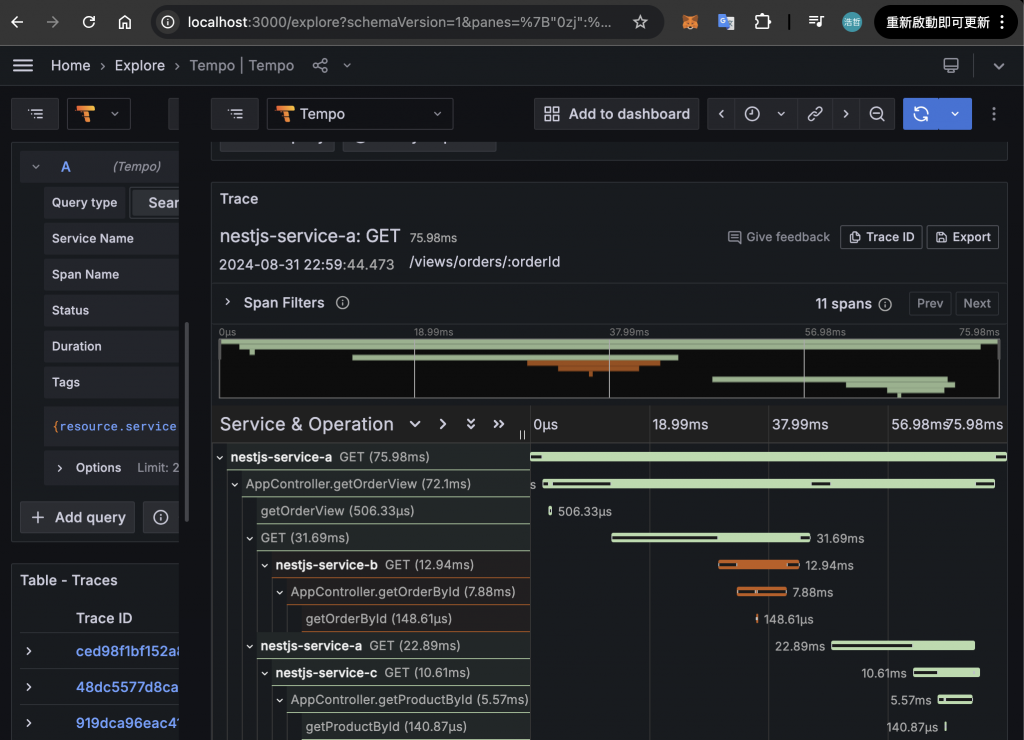
點開來可以看到詳細的 Trace 過程:
在本篇文章中,介紹了如何在 NestJS 應用程式中整合 OpenTelemetry,首先,說明了多個 OpenTelemetry 函式庫的作用,包含: @opentelemetry/sdk-node、@opentelemetry/exporter-trace-otlp-grpc、@opentelemetry/resources 等。接著,撰寫 tracer.ts 來初始化 OpenTelemetry SDK,透過 @opentelemetry/instrumentation-http 與 @opentelemetry/instrumentation-nestjs-core 來自動收集 HTTP 請求與 NestJS 相關資訊。最後,實作了三個服務來模擬 Trace 的過程,並運用上一篇介紹的 OpenTelemetry Collector、Grafana Tempo 與 Grafana 來實現 Trace 的查詢與分析。
服務可觀測性的部分到此告一段落,這幾天充分學習到 Metrics、Log 與 Trace 在 NestJS 應用程式中要如何實現以及該如何與熱門的工具做整合。下一篇文章我們將進入 微服務的管理策略篇,敬請期待!