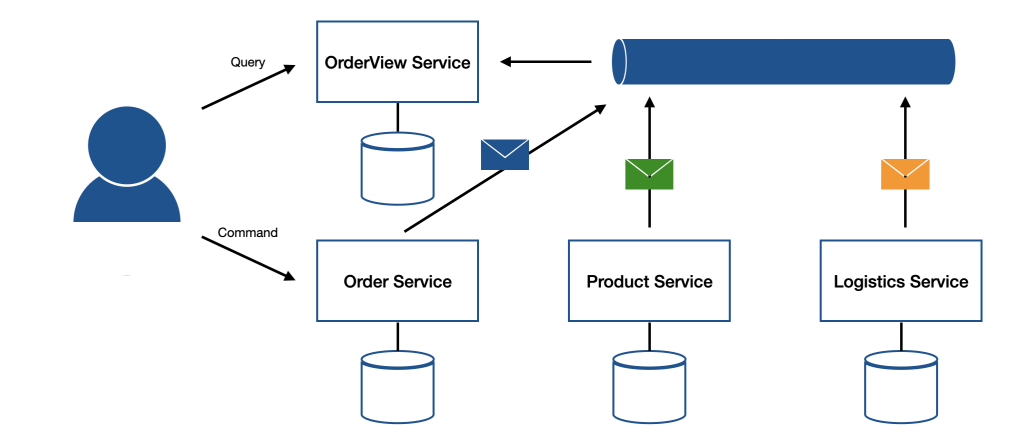
前一篇文章有提到,在微服務架構下,可以運用 CQRS 的概念來實現 查詢專用服務,比如:查詢訂單頁面的專用服務。這類型的服務僅提供使用者進行 Query 不會提供 Command 操作,而它的存在,主要是用來解決複雜、跨多個服務的查詢問題,讓查詢本身變得單純,進而加速查詢的處理速度。在這樣的設計下,使用者如果要針對資料做新增、修改、刪除,就會向該領域的服務發送請求,並在該操作實現時,發送相關事件讓訂閱其事件的查詢專用服務可以知道有這筆異動,進而針對自身保有的資料做處理,產生只能讀取的 Read Model,而這種預算的查詢結果又稱 Materialized View。

以這種方式進行設計具體來說有以下幾個優點:
當然這個設計也有幾個缺點:
接下來會使用 NestJS 來實現極簡版的查詢專用服務,該服務會提供使用者查詢訂單頁面的資訊,所以又稱訂單查詢服務,而它會依賴於以下幾個服務:
整體情境流程如下:
order.created 的事件讓訂單查詢服務接收並建立 Materialized View。product.decreased 的事件讓訂單查詢服務接收並更新 Materialized View。order.updated 的事件讓訂單查詢服務接收並更新 Materialized View。logistics.created 的事件讓訂單查詢服務接收並更新 Materialized View。logistics.updated 的事件讓訂單查詢服務接收並更新 Materialized View。注意:接下來的實作內容會使用 Kafka 作為微服務應用程式溝通的媒介,相關教學可以參考前面介紹的 Kafka Transporter。
注意:接下來的內容為了簡化實作邏輯將 不會 使用真正的資料庫,也 不會 把上述的三個服務建置起來,主要是將查詢專用服務的實現邏輯呈現出來,若有需要可以自行實作呦。
為了方便我們取用不同 Domain 的 Type,這裡透過 Nx 建立了名為 domain 的 Library 來保存訂單、商品、物流單以及訂單頁面資訊的 type。
注意:針對 Domain Type 要如何透過 Library 進行管理有許多方式,我會建議依照 Domain 性質各自拆分不同的 Library,比如:
order-domain、logistics-domain、product-domain、order-view-domain。不過因為這篇文章的重點是在實現 Materialized View,所以就統一放在domainLibrary 中,避免失焦。
下方是範例程式碼,在 domain Library 新增 logistics.ts 並宣告物流單相關的 type:
export type LogisticsOrderId = string;
export type LogisticsOrderStatus =
  | 'preparing'
  | 'shipping'
  | 'fulfilled'
  | 'cancelled';

export type LogisticsOrder = {
  id: LogisticsOrderId;
  address: string;
  status: LogisticsOrderStatus;
};
新增 product.ts 並宣告商品的 type:
export type ProductId = string;

export type Product = {
  id: Product;
  name: string;
  price: number;
};
新增 order.ts 並宣告訂單相關的 type:
export type OrderId = string;
export type OrderStatus = 'pending' | 'ongoing' | 'done' | 'cancelled';

export type Order = {
  id: OrderId;
  owner: string;
  status: OrderStatus;
  details: Array<OrderDetail>;
  logistics: OrderLogisticsDetail | null;
};

export type OrderDetail = {
  productId: string;
  count: number;
};

export type OrderLogisticsDetail = {
  logisticsOrderId: string;
};
新增 order-view.ts 並宣告訂單頁面資訊的 type,這裡需要特別注意,由於建立訂單的流程不會立即完成減少可銷售庫存,對於訂單服務來說並不會持有商品服務的邏輯,所以在訂單建立時bdetails 會是 Array<OrderDetail>,直到商品服務完成減少可銷售庫存,訂單查詢服務才會透過 Message Broker 取得來自商品服務的事件,進而將 details 替換成 Array<OrderViewDetail>:
import { LogisticsOrder } from './logistics';
import { OrderDetail, OrderId, OrderStatus } from './order';
import { Product } from './product';

export type OrderView = {
  orderId: OrderId;
  owner: string;
  status: OrderStatus;
  details: Array<OrderViewDetail> | Array<OrderDetail>;
  logistics: LogisticsOrder | null;
};

export type OrderViewDetail = {
  product: Product;
  count: number;
};
新增 message.ts 並宣告非同步事件的 type,這些事件都會以 messageId 作為 RelationID,以便更新對應的商品頁面資訊:
import { LogisticsOrder } from './logistics';
import { Order } from './order';
import { Product } from './product';

export type Message<T> = { data: T; messageId: string };

export type OrderCreatedMessage = Message<Order>;
export type ProductDecreasedMessage = Message<
  Array<{ product: Product; count: number }>
>;
export type OrderUpdatedMessage = Message<Order>;
export type LogisticsOrderCreatedMessage = Message<LogisticsOrder>;
export type LogisticsOrderUpdatedMessage = Message<LogisticsOrder>;
最後,在 index.ts 匯出這些檔案的內容:
export * from './lib/order';
export * from './lib/product';
export * from './lib/logistics';
export * from './lib/order-view';
export * from './lib/message';
透過 Nx 建立一個名為 order-view-service 的 Application。首先,修改 main.ts 的內容,這裡要運用 connectMicroservice 的方式來建立微服務應用程式,原因是這個服務必須同時提供查詢功能的 API:
import { Logger } from '@nestjs/common';
import { NestFactory } from '@nestjs/core';
import { MicroserviceOptions, Transport } from '@nestjs/microservices';
import { AppModule } from './app/app.module';

async function bootstrap() {
  const app = await NestFactory.create(AppModule);
  const microservice = app.connectMicroservice<MicroserviceOptions>({
    transport: Transport.KAFKA,
    options: {
      client: {
        brokers: ['localhost:9094'],
      },
    },
  });
  const globalPrefix = 'api';
  app.setGlobalPrefix(globalPrefix);
  const port = process.env.PORT || 3000;
  await microservice.listen();
  await app.listen(port);
  Logger.log(
    `🚀 Application is running on: http://localhost:${port}/${globalPrefix}`
  );
}
bootstrap();
接著,設計一個 OrderViewRepository 來模擬操作資料庫,共需要提供用來建立 OrderView 的 create、取得 OrderView 的 getByOrderId、更新 status 的 updateStatusByOrderId、更新 details 的 updateDetailsByOrderId 以及更新 logistics 的 updateLogisticsByOrderId:
import { Injectable } from '@nestjs/common';
import {
  LogisticsOrder,
  OrderDetail,
  OrderId,
  OrderStatus,
  OrderView,
  OrderViewDetail,
} from '@nestjs-microservices/DAY29/domain';

export type CreateOrderView = {
  orderId: string;
  status: OrderStatus;
  owner: string;
  details: Array<OrderDetail>;
};

@Injectable()
export class OrderViewRepository {
  private readonly orderViews: Array<OrderView> = [];

  async create(params: CreateOrderView) {
    const orderView: OrderView = {
      orderId: params.orderId,
      status: params.status,
      owner: params.owner,
      details: params.details,
      logistics: null,
    };
    this.orderViews.push(orderView);
    return orderView;
  }

  async getByOrderId(orderId: OrderId) {
    return (
      this.orderViews.find((orderView) => orderView.orderId === orderId) ?? null
    );
  }

  async updateStatusByOrderId(orderId: OrderId, status: OrderStatus) {
    const orderView = this.orderViews.find(
      (orderView) => orderView.orderId === orderId
    );
    if (!orderView) {
      return null;
    }
    orderView.status = status;
    return orderView;
  }

  async updateDetailsByOrderId(
    orderId: OrderId,
    details: Array<OrderViewDetail>
  ) {
    const orderView = this.orderViews.find(
      (orderView) => orderView.orderId === orderId
    );
    if (!orderView) {
      return null;
    }
    orderView.details = details;
    return orderView;
  }

  async updateLogisticsByOrderId(orderId: OrderId, logistics: LogisticsOrder) {
    const orderView = this.orderViews.find(
      (orderView) => orderView.orderId === orderId
    );
    if (!orderView) {
      return null;
    }
    orderView.logistics = logistics;
    return orderView;
  }
}
將 OrderViewRepository 放入 OrderViewRepositoryModule 的 providers 內並匯出:
import { Module } from '@nestjs/common';
import { OrderViewRepository } from './order-view.repository';

@Module({
  providers: [OrderViewRepository],
  exports: [OrderViewRepository],
})
export class OrderViewRepositoryModule {}
接著,設計 EventReceiverController 來接收訂單服務、商品服務與物流服務的事件,進而建立、修改訂單資訊頁面的資料:
import { Controller, Logger } from '@nestjs/common';
import { EventPattern, Payload } from '@nestjs/microservices';
import {
  LogisticsOrderCreatedMessage,
  LogisticsOrderUpdatedMessage,
  OrderCreatedMessage,
  OrderUpdatedMessage,
  ProductDecreasedMessage,
} from '@nestjs-microservices/DAY29/domain';
import { OrderViewRepository } from '../repositories';

@Controller()
export class EventReceiverController {
  constructor(private readonly orderViewRepository: OrderViewRepository) {}

  @EventPattern('order.created')
  async onOrderCreated(@Payload() message: OrderCreatedMessage) {
    await this.orderViewRepository.create({
      orderId: message.data.id,
      status: message.data.status,
      owner: message.data.owner,
      details: message.data.details,
    });
    Logger.log('Order View Created!');
  }

  @EventPattern('product.decreased')
  async onProductDecreased(@Payload() message: ProductDecreasedMessage) {
    await this.orderViewRepository.updateDetailsByOrderId(
      message.messageId,
      message.data
    );
    Logger.log('Order View Details Updated!');
  }

  @EventPattern('order.updated')
  async onOrderUpdated(@Payload() message: OrderUpdatedMessage) {
    const status = message.data.status;
    await this.orderViewRepository.updateStatusByOrderId(
      message.data.id,
      status
    );
    Logger.log('Order View Status Updated!');
  }

  @EventPattern('logistics.created')
  async onLogisticsCreated(@Payload() message: LogisticsOrderCreatedMessage) {
    await this.orderViewRepository.updateLogisticsByOrderId(
      message.messageId,
      message.data
    );
    Logger.log('Order View Logistics Created!');
  }

  @EventPattern('logistics.updated')
  async onLogisticsUpdated(@Payload() message: LogisticsOrderUpdatedMessage) {
    await this.orderViewRepository.updateLogisticsByOrderId(
      message.messageId,
      message.data
    );
    Logger.log('Order View Logistics Updated!');
  }
}
將 EventReceiverController 放入 EventReceiverModule 的 controllers 內,並匯入 OrderViewRepositoryModule 以便取用 OrderViewRepository:
import { Module } from '@nestjs/common';
import { EventReceiverController } from './event-receiver.controller';
import { OrderViewRepositoryModule } from '../repositories';

@Module({
  imports: [OrderViewRepositoryModule],
  controllers: [EventReceiverController],
})
export class EventReceiverModule {}
調整 AppModule 的內容,將 EventReceiverModule 與 OrderViewRepositoryModule 同時匯入,待會會需要在 AppController 實作取得訂單頁面資訊的 API:
import { Module } from '@nestjs/common';
import { AppController } from './app.controller';
import { EventReceiverModule } from './event-receiver';
import { OrderViewRepositoryModule } from './repositories';

@Module({
  imports: [EventReceiverModule, OrderViewRepositoryModule],
  controllers: [AppController],
})
export class AppModule {}
修改 AppController 的內容,設計 getOrderViewByOrderId 方法來透過訂單 ID 取得訂單頁面資訊:
import { Controller, Get, Param } from '@nestjs/common';
import { OrderViewRepository } from './repositories';

@Controller()
export class AppController {
  constructor(private readonly orderViewRepository: OrderViewRepository) {}

  @Get('orders/:id')
  getOrderViewByOrderId(@Param('id') id: string) {
    return this.orderViewRepository.getByOrderId(id);
  }
}
注意:在啟動
order-view-service之前,請先使用 DAY8 文中提到建立 Topic 的指令將訂閱的 Topic 都先建立起來。
由於將焦點放在實現 Materialized View 的訂單查詢服務,省去了其他服務的實作,這邊將會直接透過 bitnami/kafka 裡面的 Shell Script 來發送事件。打開終端機輸入下方指令啟動 Producer,並指定 order.created 為要寫入的 Topic:
$ docker run --network <NETWORK_NAME> --rm -it bitnami/kafka kafka-console-producer.sh --topic order.created --bootstrap-server <HOSTNAME>:9092
輸入下方內容來模擬訂單服務在建立訂單後所發送的事件:
{"data":{"id":"1","status":"pending","owner":"HAO","details":[{"productId":"a","count":10},{"productId":"b","count":5}],"logistics":null},"messageId":"1"}
退出當前的 Producer,並改成指定 product.decreased 為要寫入的 Topic:
$ docker run --network <NETWORK_NAME> --rm -it bitnami/kafka kafka-console-producer.sh --topic product.decreased --bootstrap-server <HOSTNAME>:9092
輸入下方內容來模擬商品服務在減少可銷售庫存後所發送的事件:
{"data":[{"product":{"id":"a","name":"NestJS book","price":500},"count":10},{"product":{"id":"b","name":"CD","price":300},"count":5}],"messageId":"1"}
退出當前的 Producer,並改成指定 order.updated 為要寫入的 Topic:
$ docker run --network <NETWORK_NAME> --rm -it bitnami/kafka kafka-console-producer.sh --topic order.updated --bootstrap-server <HOSTNAME>:9092
輸入下方內容來模擬訂單服務在更新訂單狀態後所發送的事件:
{"data":{"id":"1","status":"ongoing","owner":"HAO","details":[{"productId":"a","count":10},{"productId":"b","count":5}],"logistics":null},"messageId":"1"}
退出當前的 Producer,並改成指定 logistics.created 為要寫入的 Topic:
$ docker run --network <NETWORK_NAME> --rm -it bitnami/kafka kafka-console-producer.sh --topic logistics.created --bootstrap-server <HOSTNAME>:9092
輸入下方內容來模擬物流服務建立物流單後所發送的事件:
{"data":{"id":"abc-123","address":"test road","status":"preparing"},"messageId":"1"}
退出當前的 Producer,並改成指定 logistics.updated 為要寫入的 Topic:
$ docker run --network <NETWORK_NAME> --rm -it bitnami/kafka kafka-console-producer.sh --topic logistics.updated --bootstrap-server <HOSTNAME>:9092
輸入下方內容來模擬物流服務更改物流單狀態後所發送的事件:
{"data":{"id":"abc-123","address":"test road","status":"fulfilled"},"messageId":"1"}
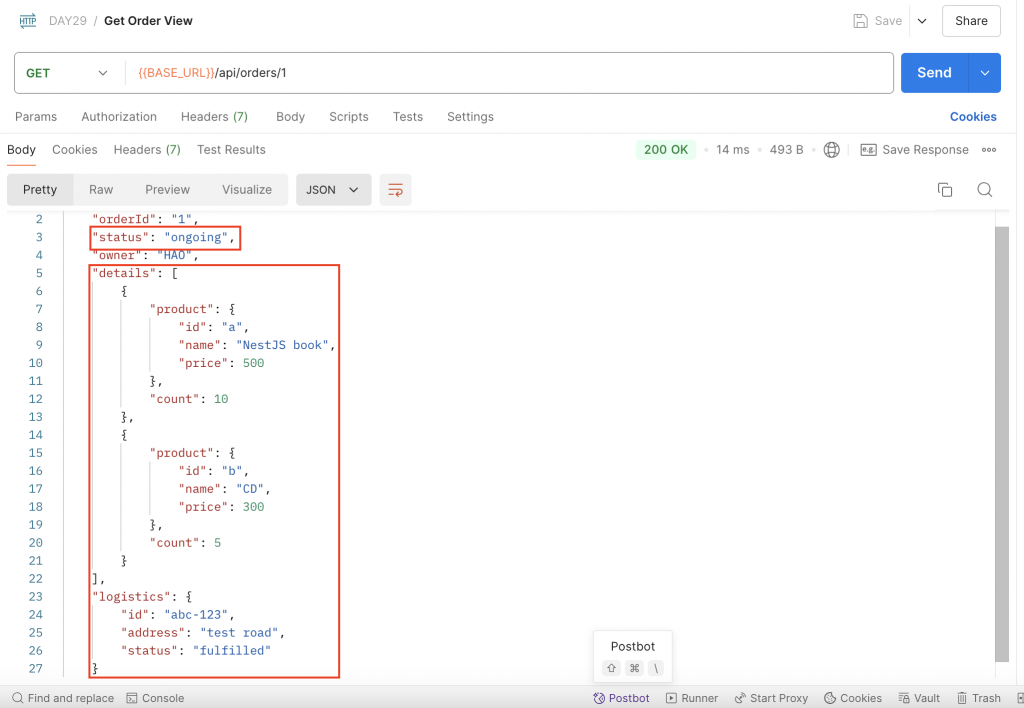
最後,使用 Postman 透過 GET 方法存取 http://localhost:3000/api/orders/1,訂單資訊服務會以非常快的速度將事前準備好的 Materialized View 提供出去,因為對該服務而言,只是一個很簡單的查詢:

回顧一下今天的重點內容,上篇已經掌握了 CQRS 的基本概念,這篇就將它應用在微服務架構下,並解釋要如何實作以及採用這個設計帶來的優劣。在介紹完之後,使用 NestJS 與 Kafka 實現了查詢專用服務,並將 Materialized View 的概念實作出來,也可以從實作的結果觀察到查詢的效益非常顯著。
本次的系列文將進入尾聲,明天的內容將會著重在本系列文的感言與總結,謝謝各位的支持!
