在介紹 Netflix 的 MLOps 時,怎麼能夠不提到他們開發的開源框架——Metaflow。
這是一個用來簡化 data scientists 和 machine learning engineers 在建構機器學習專案的過程,包含從資料處理、模型訓練和部署整個過程,提供方便好用的 workflow 定義方式和版本控制,大幅提升管理效率。
具體來說,我們在建立一個機器學習專案時,會經過資料載入、資料處理、模型載入、訓練模型、測試模型,和結果視覺化等等的步驟。每個階段可能涉及多個任務,有時還需要整合多方面的結果。而 Metaflow 利用 DAG 的概念,將每個步驟串接成清楚的 pipeline,讓整個流程更加條理分明,方便大家管理所有任務。
以前面提過的 Netflix match cutting 為例,這個過程涉及到多個複雜步驟。首先,每次影片載入之後,會先經過 (1) 偵測場景變化和 (2) 標記出音訊中的音樂和語音部分;接著,進行 shot segmentation,將影片分割,並儲存其中的每一幀。再來,會經由 shot deduplication 以移除相似的 shots。最後,才會進入 (1) frame matching 和 (2) action matching 的模型,並將結果整合進 Netflix 的媒體庫中。
整個流程如下圖所示:

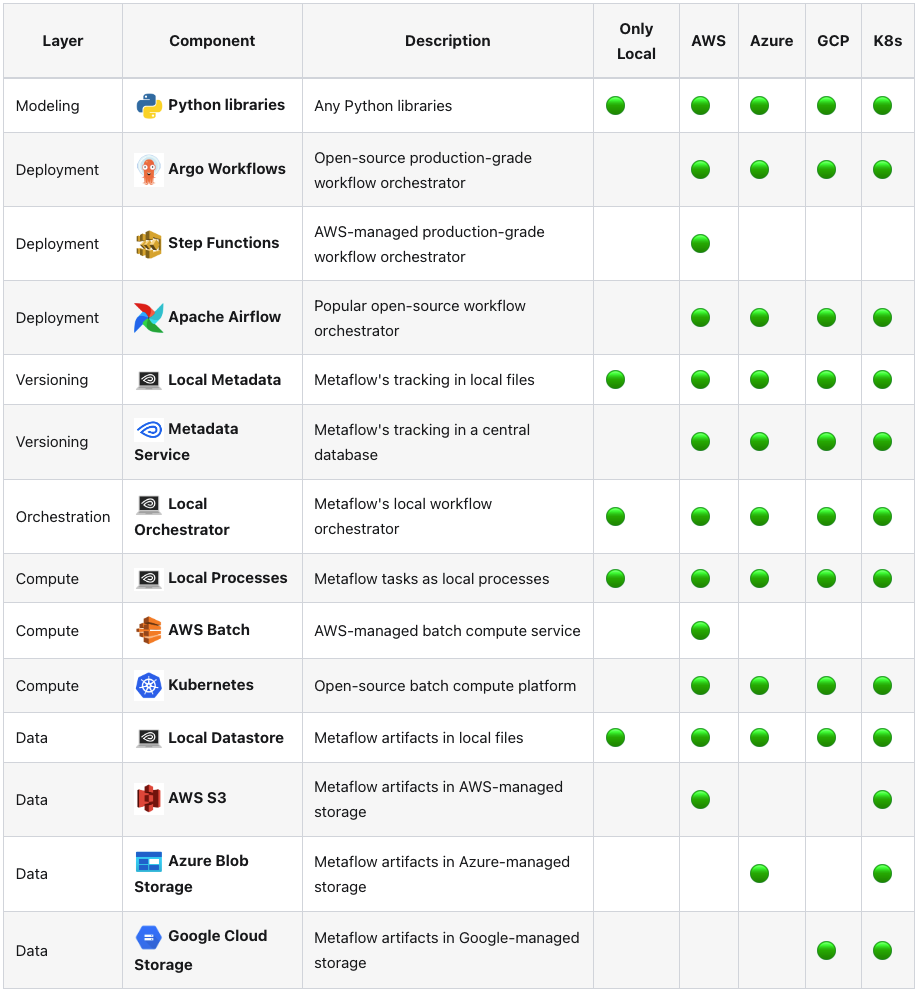
為了要管理這麼多的步驟,Netflix 可以利用 metaflow 來串連整個步驟。由於 Metaflow 的以下特點,讓整個專案從 prototype 到 production 的轉換更加無阻力。

圖片來源:[1]
我們可以藉由 metaflow 這個框架,將本次系列文提到的所有步驟都串連起來,變成一個完整的專案。
好啦,講了這麼多,Metaflow 到底要怎麼用呢?讓我們一起來看看吧!
請先安裝套件:pip install metaflow。
Metaflow 的官方範例:https://docs.metaflow.org/getting-started/tutorials
Metaflow 的基本概念是 flow,一個 flow 是由多個 steps 所組合而成,上面的 match cutting 流程就是一條完整的 flow,包含多個資料處理以及呼叫模型的 steps。
我們來看一個簡單的範例:
from metaflow import FlowSpec, step

class HelloFlow(FlowSpec):
    """
    A flow where Metaflow prints 'Hi'.
    """

    @step
    def start(self):
        """
        This is the 'start' step. All flows must have a step named 'start' that
        is the first step in the flow.

        """
        print("HelloFlow is starting.")
        self.next(self.hello)

    @step
    def hello(self):
        """
        A step for metaflow to introduce itself.
        """
        print("Metaflow says: Hi!")
        self.next(self.end)

    @step
    def end(self):
        """
        This is the 'end' step. All flows must have an 'end' step, which is the
        last step in the flow.

        """
        print("HelloFlow is all done.")


if __name__ == "__main__":
    HelloFlow()
這個 HelloFlow 分為三個 step:
start:每個 flow 都會從這邊開始,這是一定要包含的 step。hello:使用者自己定義的,可以有很多個步驟end:每個 flow 都會從這邊結束,這是一定要包含的 step。我們可以看到,在 start() 跟 hello() 中,分別利用 self.next() 來指定下一個步驟是哪一個 step。如在 start() 中指定 self.next(self.hello),因此在 start() 執行完畢後,會執行 next()。
Metaflow 的執行方式如下:
python3 helloworld.py show
python3 helloworld.py run
若執行 python3 helloworld.py show,會在 terminal 的顯示這個 flow 跟每個 step 的 description,還有每個 step 的執行方向,如下所示:
Metaflow 2.12.23 executing HelloFlow for user:min_hsu

A flow where Metaflow prints 'Hi'.

Step start
    This is the 'start' step. All flows must have a step named 'start' that
    is the first step in the flow.
    => hello

Step hello
    A step for metaflow to introduce itself.
    => end

Step end
    This is the 'end' step. All flows must have an 'end' step, which is the
    last step in the flow.
若執行 python3 helloworld.py run,會執行這個檔案,以及在 terminal 顯示執行結果。
Metaflow 2.12.23 executing HelloFlow for user:min_hsu
Validating your flow...
    The graph looks good!
Running pylint...
    Pylint not found, so extra checks are disabled.
2024-10-03 20:57:24.993 Workflow starting (run-id 1727960244989874):
2024-10-03 20:57:25.014 [1727960244989874/start/1 (pid 30266)] Task is starting.
2024-10-03 20:57:25.217 [1727960244989874/start/1 (pid 30266)] HelloFlow is starting.
2024-10-03 20:57:25.248 [1727960244989874/start/1 (pid 30266)] Task finished successfully.
2024-10-03 20:57:25.260 [1727960244989874/hello/2 (pid 30268)] Task is starting.
2024-10-03 20:57:25.544 [1727960244989874/hello/2 (pid 30268)] Metaflow says: Hi!
2024-10-03 20:57:25.581 [1727960244989874/hello/2 (pid 30268)] Task finished successfully.
2024-10-03 20:57:25.592 [1727960244989874/end/3 (pid 30271)] Task is starting.
2024-10-03 20:57:25.815 [1727960244989874/end/3 (pid 30271)] HelloFlow is all done.
2024-10-03 20:57:25.851 [1727960244989874/end/3 (pid 30271)] Task finished successfully.
2024-10-03 20:57:25.852 Done!
好,以上是最簡單的方式,接下來介紹一點進階的用法。
Metaflow 的 flow 有三種建構方式:
start -> hello -> end。steps,Metaflow 會在多個 CPU 或是多個 cloud instances 上執行步驟。每個 branch 都必須使用 join 步驟連接。steps。不過不同的是,foreach 會根據輸入的 list 大小,同時對 list 中的所有 items 執行同一個任務。foreach 迴圈也必須使用 join 步驟連接。在上面的 match cutting 流程圖中,顯示在載入影片後,需要同時 (1) 偵測場景變化 和 (2) 標記出音訊中的音樂和語音部分,這個可以利用 Metaflow 的 branch 處理能力,允許我們同時執行多個任務,進而提高工作流程的效率。同時,也可以使用 foreach 來同時處理多個影片。
讓我們來看看程式碼範例。
先以前三個步驟來做示範,請看以下的程式碼和註解的說明。
我們可以看到這個 flow 分為:(1) scene_detection 和 (2) audio_analysis 兩個 steps,在分別處理完之後,會在 join 這個 step 中將結果結合起來,並且存好要傳到下一步驟的資料(利用 inputs.scene_detection 和 inputs.audio_analysis 獲得個別 step 中有用到的變數,如果不在此 step 儲存的話,下一個 step 就呼叫不到了)。
from metaflow import FlowSpec, step, Parameter

class NetflixMatchCuttingFlow(FlowSpec):
    video_path = Parameter('video_path', help='Path to the input video')

    @step
    def start(self):
        """ Load the videos """
        self.video = load_video(self.video_path)

        ### [1] 同時呼叫兩個任務,分為兩個 branches 處理 ###
        self.next(self.scene_detection, self.audio_analysis)

    ### [2.1] branch 的第一個任務 ###
    @step
    def scene_detection(self):
        """ Detect the scene changes in the video """
        self.scenes = detect_scene_changes(self.video)
        self.next(self.join)

    ### [2.2] branch 的第二個任務 ###
    @step
    def audio_analysis(self):
        """ Analyze the audio """
        self.audio_segments = analyze_audio(self.video)
        self.next(self.join)

    ### [3.1] 將兩邊的結果結合起來 ###
    @step
    def join(self, inputs):   ### [3.2] 一定需要傳入 inputs,獲得兩邊處理的結果 ###
        """ Join the result from scene_detection and audio_analysis """

        ### [3.3] 將兩個任務處理的結果儲存起來,才會傳到下一個 step ###
        self.scenes = inputs.scene_detection.scenes
        self.audio_segments = inputs.audio_analysis.audio_segments

        ### [3.4] 因為下一個 step 也會用到 video 資訊,所以也需要存起來 ###
        self.video = inputs.audio_analysis.video
        self.next(self.shot_segmentation)

    @step
    def shot_segmentation(self):
        """  Segment shots based on scenes and audio_segments """
        self.shots = segment_shots(self.video, self.scenes, self.audio_segments)
        self.next(self.shot_deduplication)

    @step
    def end(self):
        """ Finish the shot segmentation process """
        print("Finished segmentation successfully!")

if __name__ == '__main__':
    NetflixMatchCuttingFlow()
foreach 的概念跟 branch 有一點不同,以下面的程式碼為例。
我們這邊先只執行 scene_detection 就好。跟上面不同的是,這次在載入影片時,會同時載入多個 videos,foreach 會同時在所有 videos 上進行 scene_detection 的處理。

from metaflow import FlowSpec, step, Parameter

class NetflixMatchCuttingFlow(FlowSpec):
    video_path = Parameter('video_path', help='Path to the input video')

    @step
    def start(self):
        """ Load the videos """

        ### [1.1] 假設我們在這邊會載入多個 videos  ###
        ### 例如 self.videos = [video1, video2, video3]
        self.videos = load_video(self.video_path)

        ### [1.2] 將所有 videos 利用 foreach 的方式進行 scene_detection 處理
        self.next(self.scene_detection, foreach='videos')

    ### [2] 所有 videos 都會分別被處理 ###
    @step
    def scene_detection(self):
        """ Detect the scene changes in the video """
        self.scenes = detect_scene_changes(self.video)
        self.next(self.join)

    ### [3.1] 結合所有的結果 ###
    @step
    def join(self, inputs):
        ### [3.2] 可以利用 input 來得到每一個各自處理的結果 ###
        self.results = [input.scenes for input in inputs]
        print(f"Processed scenes: {self.results}")
        self.next(self.end)

    @step
    def end(self):
        """ Finish the scene detection process """
        print("Finished scene detection successfully!")

if __name__ == '__main__':
    NetflixMatchCuttingFlow()
好,我們今天介紹了 Metaflow 的基本概念和最基本的使用方式,希望你也有大致的概念了。不過現在才講完 ML 生命週期的資料處理步驟而已。如同上面的表格所示,他還有很多其他功能等著我們探索,那就明天再回來看吧!
謝謝讀到最後的你,如果喜歡這系列,別忘了按下喜歡和訂閱,才不會錯過最新更新。
如果有任何問題想跟我聊聊,或是想看我分享的其他內容,也歡迎到我的 Instagram(@data.scientist.min) 逛逛!
我們明天見!
Reference
[1] https://docs.metaflow.org/
