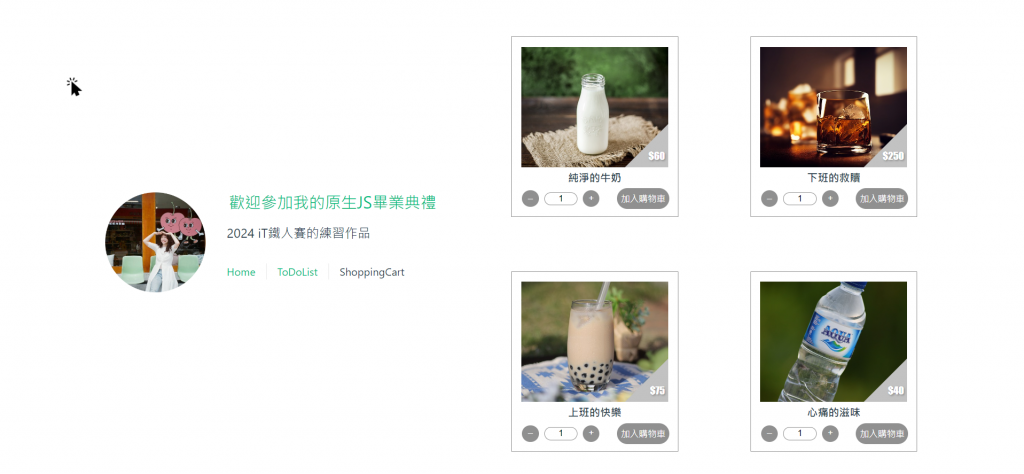
對於基礎觀念和常用功能我們都有一定程度的概念了,最重要還是如何活用這些技術。今天的練習是購物車實作,試著先不參考網路範例…看看是否能順利寫出來吧!
◎題外話:在學Vue之前,其實我也都沒寫過這些常用範例(無論是ToDoList還是購物車),真是很新鮮,對我也是一種好好學基礎功的訓練呢!
介面上會有兩個主要組件:

商品選擇頁看起來是一個群組,由同樣規格的單一商品所組成,所以我們應該建立一個商品SFC(Product.vue),讓商品選擇頁去引用它、並給予它不同參數去呈現每項商品:
//Product.vue
<template>
<div v-for="product in products" :key="product.id" class="singleProduct">
    <div class="imgDiv" :style="{backgroundImage:`url(${product.img})`}">
        <div class="priceDiv">
            <p>{{'$'+product.price}}</p>
        </div>
        <div class="priceBackGround"></div>
    </div>
    <div class="nameDiv">
        <text>{{product.name}}</text>
    </div>
    <div class="countDiv">
        <span>
            <button class="btnMath" id="minus">–</button>
            <input type="text" value="1"/>
            <button class="btnMath" id="add">+</button>
        </span>
        <button class="btnCart" id="cart">加入購物車</button>
    </div>
</div>
</template>
<style lang="scss" src="@/assets/SCSS/shoppingcartstyle.scss"></style>
//productstyle.scss
$dark-color: #909090 ;

@mixin margin_set($top,$right,$bottom,$left) {
    margin: $top $right $bottom $left;
}

.singleProduct {
    width: 250px;
    height: 270px;
    border: 1px solid $dark-color;
    display: flex;
    flex-direction: column;
    align-items: center;
    @include margin_set($top:15px,$right:0,$bottom:10px,$left:0px);
}

.imgDiv {
    width: 220px;
    height: 180px;
    background-size: cover;
    background-position: center;
    @include margin_set($top:15px,$right:0,$bottom:0,$left:0);
    display: flex;
    justify-content: end;
    align-items: flex-end;
}

.priceDiv {
    font-family: fantasy;
    z-index: 1;
    position: absolute;
    @include margin_set($top:0,$right:5px,$bottom:5px,$left:0);
    color: white;
    text-shadow: $dark-color 0.1em 0.1em 0.2em;
}

.priceBackGround {
    width: 50px;
    height: 50px;
    top: 100%;
    float: inline-end;
    position: sticky;
    border-top: 65px solid transparent;
    border-right: 65px solid #c2c2c2;
}

.nameDiv {
    margin: 3px;

    text {
        font-family: emoji;
        font-size: 16px;
        font-weight: bolder
    }
}

.countDiv {
    width: 90%;
    display: flex;
    justify-content: space-between;
}

.btnMath {
    color: white;
    width: 25px;
    height: 25px;
    border: none;
    border-radius: 100%;
    background-color: $dark-color;
    margin: 3px
}

input {
    width: 50px;
    border: 1px solid $dark-color;
    border-radius: 50px;
    @include margin_set($top:0,$right:5px,$bottom:0,$left:5px);
    text-align: center;
}

.btnCart {
    color: white;
    border: none;
    border-radius: 50px;
    background-color: $dark-color
}

button:hover {
    color: #2e2e2e;
    background-color: #d1d1d1
}
▲@mixin的用法看起來有點多此一舉,不過都寫了就先留起來
我們把模板刻好之後,因為沒有連線DB的關係,還是先創一個Array裝資料,包含id、name、price、img、store,測試看看渲染結果是否ok:
//Product.vue
<script setup>
import { ref } from 'vue'
const products = ref([
    {
        id:1,
        name: '純淨的牛奶',
        price: 60,
        img: '../../src/assets/milk.jpg',
        store:20
    },
    {
        id: 2,
        name: '下班的救贖',
        price: 250,
        img: '../../src/assets/beer.jpg',
        store: 12
    },
    {
        id: 3,
        name: '上班的快樂',
        price: 75,
        img: '../../src/assets/boba.jpg',
        store: 10
    },
    {
        id: 4,
        name: '心痛的滋味',
        price: 40,
        img: '../../src/assets/water.jpg',
        store: 50
    },
])
</script>
當然別忘記在父組件上引用這個Product.vue!
//ShoppingCartView.vue
<script setup>
    import Product from '@/components/Product.vue'
</script>

<template>
    <div class="product">
        <Product />
    </div>
</template>

<style type="text/css" scoped>
    .product {
        min-height: 100vh;
        display: flex;
        align-items: center;
        flex-wrap:wrap;
        width:100%;
        justify-content:space-between
    }
</style>
Product.vue我們讓它單純呈現商品模板,把原先在裡面的Array移到ShoppingCartView.vue,讓父組件用Props的方式傳入資料:
//ShoppingCartView.vue
import { ref } from 'vue'
    const products = ref([
        {
            id: 1,
            name: '純淨的牛奶',
            price: 60,
            img: '../../src/assets/milk.jpg',
            store: 20
        },
        {
            id: 2,
            name: '下班的救贖',
            price: 250,
            img: '../../src/assets/beer.jpg',
            store: 12
        },
        {
            id: 3,
            name: '上班的快樂',
            price: 75,
            img: '../../src/assets/boba.jpg',
            store: 10
        },
        {
            id: 4,
            name: '心痛的滋味',
            price: 40,
            img: '../../src/assets/water.jpg',
            store: 50
        },
    ])
...
  <Product :products="products" />
//Product.vue
  const props = defineProps({
      products: {
          type:Array
      }
  })
看起來跟上圖一樣就對了!
又是被模板折騰的一天,不過真的有越寫越順手的感覺了!今天的參考資料竟然是如何用css畫出三角形(笑),明天繼續GoGo!
參考資料
用CSS畫出三角形圖案
