今天最後的任務就是端出剩下的購物車UI介面,再把所有資料都串在一起!究竟Product.vue和Cart.vue兩個子組件要如何做到即時同步呢?就讓我們繼續看下去!
前情回顧,我們已經能夠把父組件的商品內容丟給Product.vue來呈現了,也完成了個別數量調整儲存的Array,那麼「加入購物車」要怎麼做呢?
//Product.vue
const emit = defineEmits(['sendCount'])
//商品在陣列中對應的位置剛好為id-1
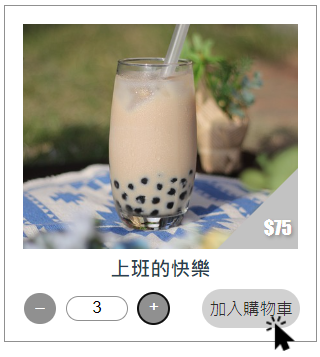
function sendCount(id) {
emit("sendCount", id, showCount.value[id - 1])
//清除介面選擇數量
showCount.value[id - 1]=0
}
<button class="btnCart" @click="sendCount(product.id)">加入購物車</button>
//ShoppingCartView.vue
  const handleSendCount = (id, count) => {
      products.value = products.value.map(product => product.id === id ? { ...product,count: count, store: product.store - count } : product)
      //有商品加入購物車,需要改變圖示參數
      imgAdd.value = "Add"
      //呼叫function切換顯示icon
      lightCart()
  }
  ...
  <Product :products="products" @send-count="handleSendCount" />
▲父組件更新內部count資料(這是後來加的,紀錄當前加進購物車中的數量)和store庫存
上面好像有看到關於icon的參數?這邊來說明一下:
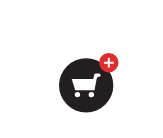
當我們把東西加入購物車之後,我希望它可以動態更新有商品的提示圖案!(所以現在介面有四張圖要進行切換,真是複雜)直接上語法:
//ShoppingCartView.vue
    //用於改變圖案顯示
    const imgAdd=ref('')
    //用來控管是否顯示提示文字
    const chatShow=ref(false)

    const imgSrc = ref('./src/assets/cartIcon.svg')
    function darkCart() {
        imgSrc.value = './src/assets/cartIcon2' + imgAdd.value +'.svg'
    }
    function lightCart() {
        imgSrc.value = './src/assets/cartIcon' + imgAdd.value + '.svg'
        chatShow.value = false
    }
    //點擊購物車觸發開啟購物車
    function checkCart() {
       if (imgAdd.value == "") {
           chatShow.value = true
       } else {
       //有參數表示購物車有資料,這裡會開啟購物車
       }
   }
    ...
     <div v-show="chatShow" class="remindChat"><text>還沒有商品喔!</text></div>
     <img class="iconStyle" v-if="!cartShow" @click="checkCart" @mouseover="darkCart" @mouseout="lightCart" :src="imgSrc">

現在我們的介面已經能告訴使用者,「有東西來了」,那要怎麼取得那些資料呢?在父組件上面我們去判斷哪些商品的count大於0(表示已經被選取的數量):
//ShoppingCartView.vue
 //用來存放加進購物車的內容
 const buys = computed(() => {
     //檢查當前有沒有商品在購物車
     if (products.value.filter(product => product.count > 0).length == 0) {
         imgAdd.value = ""
     }
     return products.value.filter(product => product.count > 0)
 })
▲透過buys取得products中數量大於0的商品
講了老半天的購物車練習,終於要把購物車端出來了!!!
//Cart.vue
<script setup>
    const props = defineProps({
        buys: {
            type: Array
        }
    })
</script>

<template>
    <div class="cart">
        <div v-for="buy in buys" v-if="buys.length > 0" :key="buy.id" class="buyList">
            <img :src="`${buy.img}`" />
            <div class="buyCount">
                <text>{{buy.name + ' / $' + buy.price}}</text>
                <span>
                    <button class="btnMath">–</button>
                    <input type="text" v-model="buy.count" readonly/>
                    <button class="btnMath">+</button>
                </span>
            </div>
            <div class="buyTotal">
                <text>{{'$'+ buy.price * buy.count}}</text>
            </div>
        </div>
        <div v-else>
             <h1>還沒有商品,快去選購吧!</h1>
        </div>
    </div>
</template>
<style lang="scss" src="@/assets/SCSS/cartstyle.scss" scoped></style>
//cartstyle.scss
$dark-color: #909090;
$light-color:white;

@mixin size_set($width,$height) {
    width: $width;
    height: $height;
}

@mixin div_set($justify: center,$align: center) {
    display: flex;
    justify-content: $justify;
    align-items: $align;
}

.cart {
    width: 100%
}

.buyList {
    @include size_set($width:88%,$height:150px);
    background-color: #f5f5f5;
    display: inline-flex;

    img {
        @include size_set($width:40%,$height:150px);
        background-size: cover;
        background-position: center;
        @include div_set($justify:end,$align:flex-end);
    }
}

.buyCount {
    @include size_set($width:40%,$height:55%);
    margin-top: auto;
    margin-bottom: auto;
    @include div_set($justify:space-around,$align:center);
    flex-direction: column;
    text-align: center;

    text {
        font-size: 16px;
        font-weight: bolder;
    }
}

.btnMath {
    @include size_set($width:25px,$height:25px);
    color: $light-color;
    border: none;
    border-radius: 100%;
    background-color: $dark-color;
    margin: 3px
}

.buyTotal {
    @include size_set($width:20%,$height:100%);
    color: $light-color;
    font-weight: bolder;
    font-size: 16px;
    background-color: $dark-color;
    @include div_set();
}

input {
    width: 50px;
    border: 1px solid $dark-color;
    border-radius: 50px;
    margin:0 5px 0 5px;
    text-align: center;
}

button:hover {
    color: #2e2e2e;
    background-color: #d1d1d1
}
▲加入style記得都要用scoped把它鎖起來喔
為了能順利看到資料顯示,記得回ShopingCartView.vue調整一下顯示邏輯:
//ShopingCartView.vue
//用來控管,切換是否顯示購物車內容
const cartShow = ref(false)
//點擊購物車觸發開啟購物車
function checkCart() {
    if (imgAdd.value != "") {
        cartShow.value = true
    } else {
        chatShow.value = true
        cartShow.value = false
    }
}
...
  <Product v-if="!cartShow" :products="products" @send-count="handleSendCount" />
  <Cart v-else :buys="buys" />
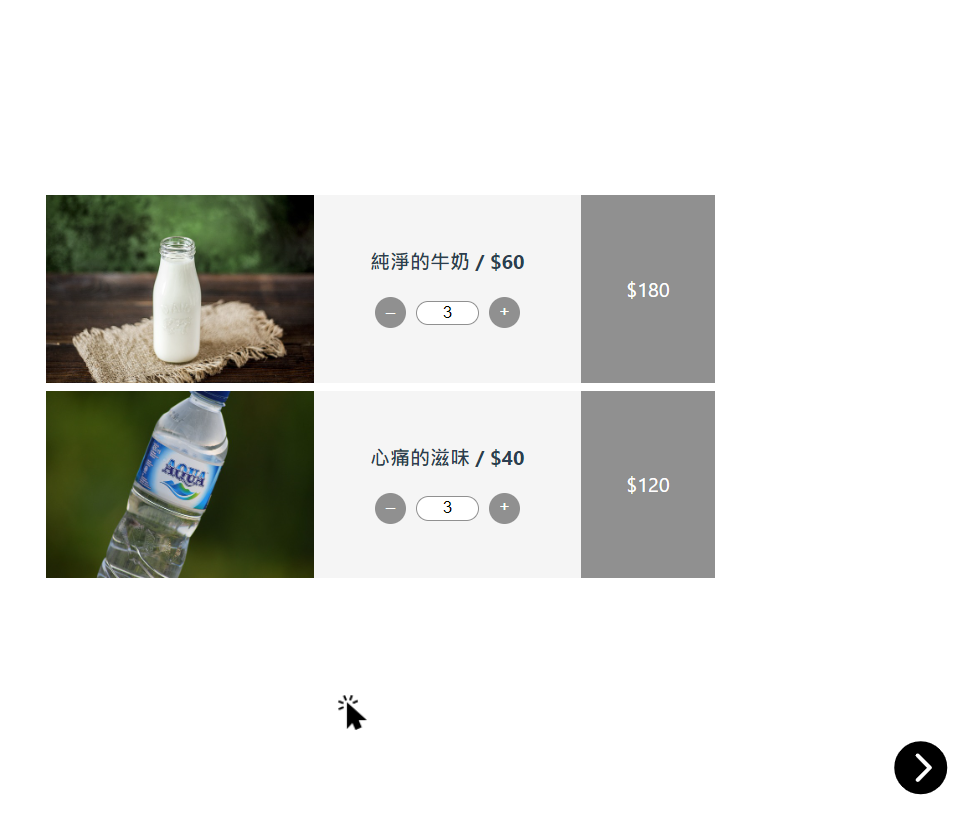
東西都來啦!別忘了要做一個返回鍵,回到商品頁:
//ShopingCartView.vue
 <img class="iconStyle" v-else @click="cartShow=!cartShow" src="@/assets/back.svg">
我們的資料是從products過來,那對於數量的異動就要回頭去更新products,因此一樣是用到emits發送更新需求給父組件:
//Cart.vue
const emit = defineEmits(['addCount', 'minusCount'])
function addCount(id) {
    if (props.buys.find(buy => buy.id === id).store == 0) {
        alert("已超出庫存!")
    } else {
        emit('addCount', id)
    }
}
function minusCount(id) {
    emit('minusCount', id)
}
...
 <button class="btnMath" @click="minusCount(buy.id)">–</button>
 <button class="btnMath" @click="addCount(buy.id)">+</button>
//ShoppingCartView.vue
    //處理購物車裡面新增商品
    const handleaAddCount = (id) => {
        products.value = products.value.map(product => product.id === id ? { ...product, count: product.count + 1, store: product.store -1 } : product)
    }
    //處理購物車裡面減少商品
    const handleaMinusCount = (id) => {
        products.value = products.value.map(product => product.id === id ? { ...product, count: product.count - 1, store: product.store + 1 } : product)
    }
...
  <Cart v-else :buys="buys" @add-count="handleaAddCount" @minus-count="handleaMinusCount" />

沒想到真的可以不參考網路範例就寫出來!真的好欣慰,也表示過去2/3的參賽時間也好好吸收了吧!相信未來回頭再來寫一次一定有更精確的作法,Vue專案的練習也暫告一段落,後面我們會推出.NET Core MVC ft.Vue.js的用法,再敬請期待!

