在過去,Monolithic 架構讓 Client 呼叫的 API 基本上就會是該 Monolithic 所提供的 API,但在微服務架構下,就不再是單一服務所提供的 API,而是由多個服務提供,那麼是否應該讓所有服務都暴露給 Client,這是值得討論的問題,就讓我們看看這樣的設計會帶來什麼樣的問題。
假如有一套購物系統,背後有以下服務:
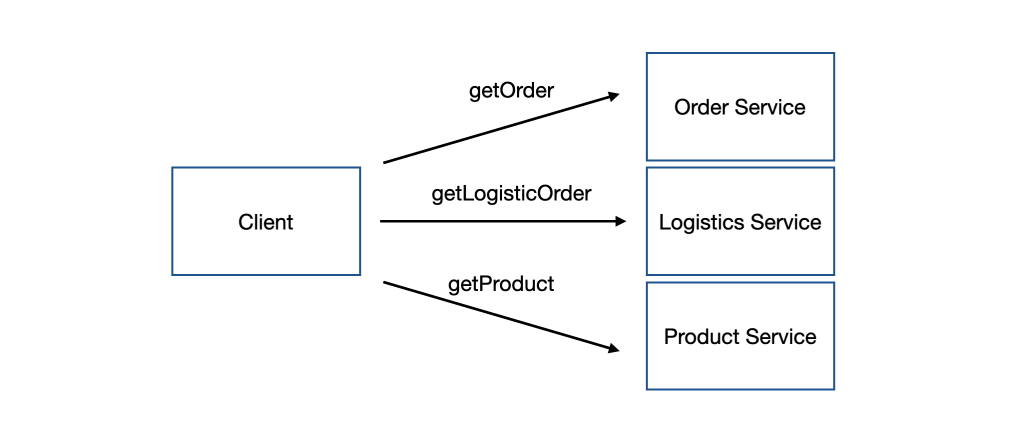
該購物系統的某個頁面允許使用者查看訂單的狀態、商品資訊及物流狀態,為了要把該頁面的資訊 組合(Compose) 起來,Client 承擔起 API 組合(API Composition) 的責任,透過訂單服務取得訂單的資訊,再從訂單資訊中得知商品相關的 ID 與 物流單的 ID,再分別向商品服務與物流服務發送請求,最終整合所有資訊,如下圖所示:

從上方的例子可以看出,光是要把一個頁面的資訊組合起來,就需要讓 Client 花費三次 API 請求,如果是較複雜的頁面,API 請求次數將會變得很可觀,進而導致糟糕的使用者體驗。
以上方購物系統的例子來說明,假如訂單服務本身提供了基於 NATS 傳輸訂單異動的事件,要讓 Client 進行接收,這時候基於網站的 Client 就不太適合,但如果服務本身要為所有不同類型的 Client 去實作不同 Protocol 的傳輸方式又顯得不切實際。
由於服務本身直接讓 Client 使用,缺少了一層封裝,導致服務跟 Client 之間產生了耦合,服務本身的異動會直接影響 Client 的運作,糟一點的情況是同一個服務在多個 Client 中使用,當服務要進行調整時,這些 Client 都會因此受到影響。身為開發者都十分清楚,服務要永遠不變是不太可能的事情,基於這個前提,如果有多個第三方服務也取用該服務所提供的 API,當服務因需求調整 API 格式時,會因第三方服務的依賴而難以推動,因為要讓所有第三方服務都配合修改非常困難,就算成功了也可能會因此失去第三方的信賴。
從上述問題可以得知,在有一定規模的微服務下,直接讓 Client 相依於服務是不好的選擇,為了解決這些問題,使用 API Gateway 這個 Pattern 或許是不錯的選擇。
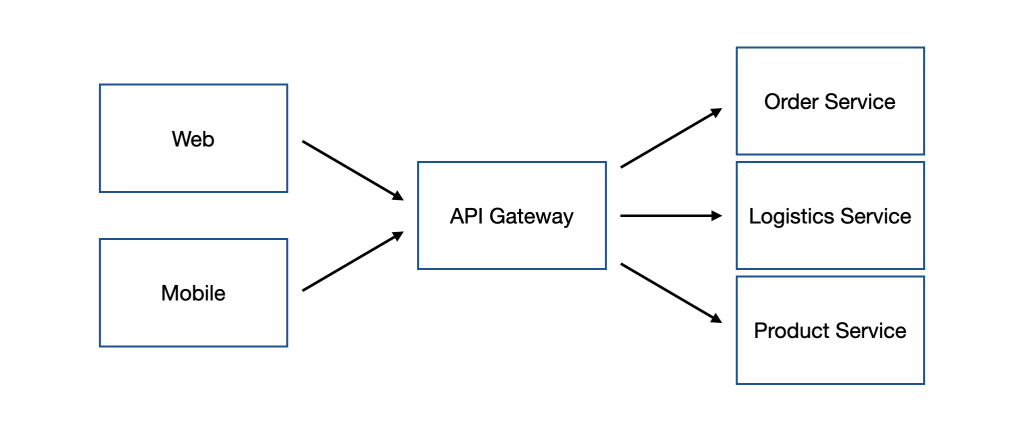
API Gateway 可以想像成是微服務世界的 外觀模式(Facade Pattern),由 API Gateway 針對 Client 所需的服務進行封裝、組合,將多個服務提供的功能收束在 API Gateway 底下,這樣的設計對於 Client 來說並不知道服務的存在,也不需要知道那麼多個服務,因為它只需要知道 API Gateway 提供了哪些功能即可。

那麼 API Gateway 具體來說解決了什麼問題?又帶來了什麼新的問題呢?我們先來看看優點的部分:
缺點的部分如下:
接下來會以上方購物系統為例來實現 API Gateway 的概念,會需要實作四個服務,分別是:訂單服務、商品服務、物流服務與 API Gateway。由 API Gateway 擔任 API Composition 的角色,提供單一 API 取得訂單頁面所需的資訊。
注意:由於會實作四個服務,接下來將會使用 Nx 來進行統一管理與開發,建議可以先參考前面的文章來建立 Nx Workspace,並掌握建立 Application 與 Library 的技巧。
為了方便我們取用不同 Domain 的 Type,這邊透過 Nx 建立了名為 domain 的 Library 來保存訂單、物流訂單、商品的 type。
注意:針對 Domain Type 要如何透過 Library 進行管理有許多方式,我會建議依照 Domain 性質各自拆分不同的 Library,比如:
order-domain、logistics-domain、product-domain。不過因為這篇文章的重點是在 API Gateway,所以就統一放在domainLibrary 中,避免失焦。
下方是範例程式碼,在 domain Library 新增 order.ts 並宣告訂單相關的 type:
export type Order = {
  id: string;
  logisticsId: string;
  details: Array<OrderDetail>;
};

export type OrderDetail = {
  productId: string;
  count: number;
};
接著,新增 logistics.ts 來宣告物流訂單相關的 type:
export type LogisticsOrder = {
  id: string;
  address: string;
  status: 'pending' | 'shipping' | 'arrived';
};
接著,新增 product.ts 來宣告商品相關的 type:
export type Product = {
  id: string;
  name: string;
  price: number;
};
最後,在 index.ts 匯出這三個檔案的內容:
export * from './lib/logistics';
export * from './lib/order';
export * from './lib/product';
透過 Nx 建立一個名為 order-service 的 Application。修改 AppController 的內容,宣告一個 private 的 orders 來暫存所有訂單,並設計 getOrdersById 的 Handler 來提供取得訂單資訊的 API:
import { Controller, Get, Param } from '@nestjs/common';
import { Order } from '@nestjs-microservices/DAY22/domain';

@Controller('orders')
export class AppController {
  private readonly orders: Array<Order> = [
    {
      id: '1',
      logisticId: 'a',
      details: [
        {
          productId: 'test',
          count: 5,
        },
      ],
    },
  ];

  @Get(':id')
  getOrderById(@Param('id') id: string) {
    return this.orders.find((order) => order.id === id);
  }
}
注意:上方存放訂單資訊的方式僅作為示範使用,在生產環境通常會搭配資料庫。
接著,我們需要為每一個不同的服務指定啟動的 Port,預設情況下,Nx 建立的 NestJS Application 會以 PORT 環境變數當作啟動的 Port,我們可以在 apps/order-service 目錄下新增 .env 檔,Nx 在執行 serve Application 時會自動讀取其內容並放入 Runtime 環境變數中。下方是範例設定檔,指定 PORT 為 3001:
PORT=3001
透過 Nx 建立一個名為 product-service 的 Application。修改 AppController 的內容,宣告一個 private 的 products 來暫存所有物流訂單,並設計 getProductById 的 Handler 來提供取得商品資訊的 API:
import { Controller, Get, Param } from '@nestjs/common';

import { Product } from '@nestjs-microservices/DAY22/domain';

@Controller('products')
export class AppController {
  private readonly products: Array<Product> = [
    {
      id: 'test',
      name: 'Tea',
      price: 30,
    },
  ];

  @Get(':id')
  getProductById(@Param('id') id: string) {
    return this.products.find((product) => product.id === id);
  }
}
接著,與 order-service 相同,在 apps/product-service 目錄下新增 .env 檔,並將 PORT 指定為 3002:
PORT=3002
透過 Nx 建立一個名為 logistics-service 的 Application。修改 AppController 的內容,宣告一個 private 的 logisticsOrders 來暫存所有物流訂單,並設計 getLogisticsOrderById 的 Handler 來提供取得物流訂單資訊的 API:
import { Controller, Get, Param } from '@nestjs/common';

import { LogisticsOrder } from '@nestjs-microservices/DAY22/domain';

@Controller('logistics')
export class AppController {
  private readonly logisticsOrders: Array<LogisticsOrder> = [
    {
      id: 'a',
      address: 'Taipei, Taiwan',
      status: 'shipping',
    },
  ];

  @Get(':id')
  getLogisticsOrderById(@Param('id') id: string) {
    return this.logisticsOrders.find((order) => order.id === id);
  }
}
接著,與 product-service 相同,在 apps/logistics-service 目錄下新增 .env 檔,並將 PORT 指定為 3003:
PORT=3003
透過 Nx 建立一個名為 api-gateway 的 Application。修改 AppController 的內容,設計 getOrderView Handler 來提供訂單頁面所需的資訊,流程如下:
order-service 提供的 /api/orders/:id 取得 Order。Order 內 details 所包含的 productId 拿去存取 product-service 提供的 /api/products/:id 來獲得 Product。Order 內的 logisticsId 拿去存取 logistics-service 提供的 /api/logistics/:id 來獲得 LogisticsOrder。Order 內的 logisticsId 置換成 logistics,其對應到的資料即 LogisticsOrder,不過將 id 濾掉,因為訂單頁面不需要這個資訊。另外,將 productId 置換成 product,其對應到的資料即 Product。下方為範例程式碼:
import { Controller, Get, Param } from '@nestjs/common';
import {
  LogisticsOrder,
  Order,
  OrderDetail,
  Product,
} from '@nestjs-microservices/DAY22/domain';
import { HttpService } from '@nestjs/axios';
import { concatMap, EMPTY, forkJoin, iif, map, Observable, of } from 'rxjs';

type OrderView = {
  id: string;
  details: Array<{ product: Product; count: number }>;
  logistics: Omit<LogisticsOrder, 'id'>;
};

@Controller()
export class AppController {
  constructor(private readonly httpService: HttpService) {}

  @Get('/views/orders/:id')
  getOrderView(@Param('id') orderId: string): Observable<OrderView> {
    const getOrder = (id: string) =>
      this.httpService
        .get<Order | null>(`http://localhost:3001/api/orders/${id}`)
        .pipe(map((res) => res.data));

    const getProduct = (id: string) =>
      this.httpService
        .get<Product | null>(`http://localhost:3002/api/products/${id}`)
        .pipe(map((res) => res.data));

    const getLogistics = (id: string) =>
      this.httpService
        .get<LogisticsOrder | null>(`http://localhost:3003/api/logistics/${id}`)
        .pipe(map((res) => res.data));

    const getOrderViewDetail = (
      detail: OrderDetail
    ): Observable<OrderView['details'][number]> => {
      return getProduct(detail.productId).pipe(
        concatMap((product) =>
          iif(() => !!product, of(product as Product), EMPTY)
        ),
        map((product) => ({ product, count: detail.count }))
      );
    };

    // 透過 `getOrder` 取得 `Order`
    return getOrder(orderId).pipe(
      concatMap((order) => iif(() => !!order, of(order as Order), EMPTY)),
      concatMap((order) => {
        // 取得 `details` 內的 `Product`
        const details = forkJoin(
          order.details.map((detail) => getOrderViewDetail(detail))
        );
        // 取得 `LogisticsOrder`
        const logistics = getLogistics(order.logisticsId).pipe(
          concatMap((logistics) =>
            iif(() => !!logistics, of(logistics as LogisticsOrder), EMPTY)
          )
        );
        return forkJoin({ details, logistics }).pipe(
          // 合併結果
          map(({ details, logistics }) => ({
            id: order.id,
            details,
            logistics: {
              address: logistics.address,
              status: logistics.status,
            },
          }))
        );
      })
    );
  }
}
注意:記得要在
AppModule匯入HttpModule才能使用HttpService呦。
注意:範例程式碼中,使用
iif來判斷 API 回傳的資料是否為空值,如果是空值就使用EMPTY中斷流程。這個作法 不建議 在生產環境使用,建議可以針對空值的情況實作錯誤處理,由於這裡的重點是在 API Gateway 實現 API Composition 的效果,所以就沒有特別做處理。
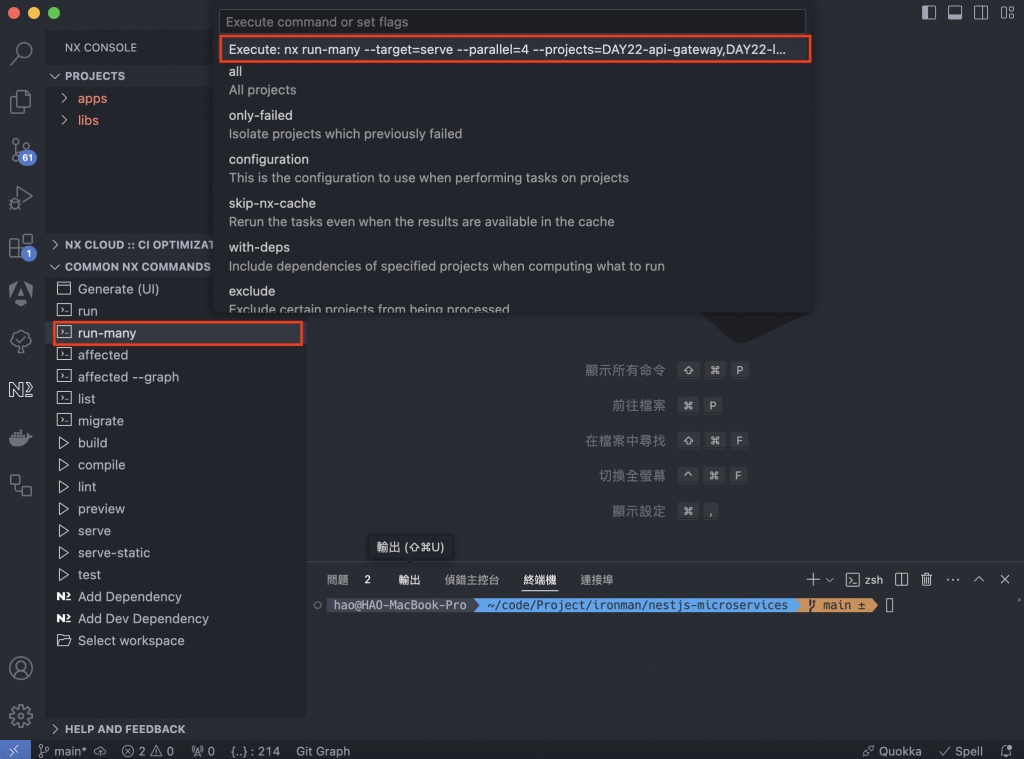
現在,我們可以透過 Nx Console 來啟動所有的服務,在「Common Nx Commands」區塊選擇 run-many 並點選 serve 來同時啟動多個服務:

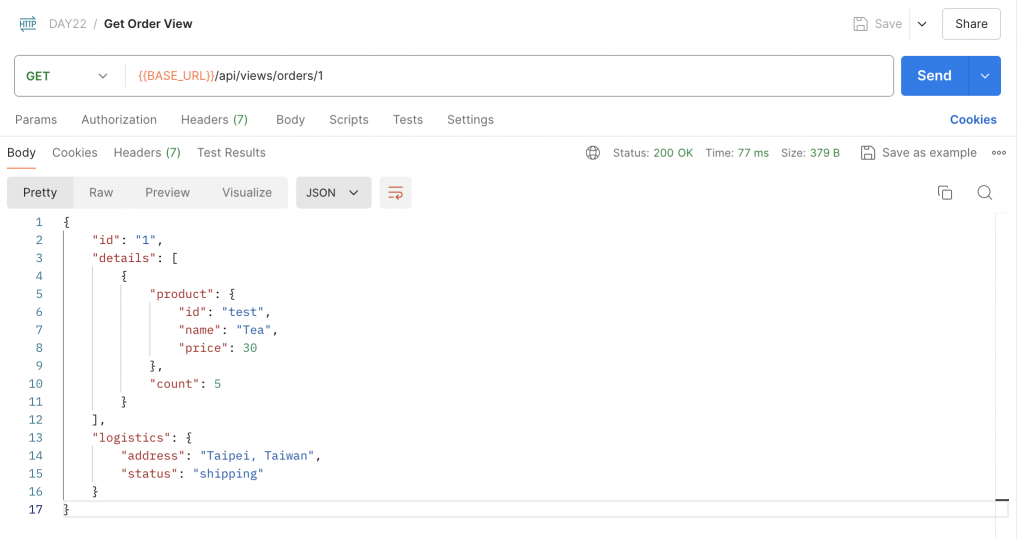
由於我們已經在 order-service 內產生 id 為 1 的 Order,所以我們可以使用 Postman 透過 GET 存取 http://localhost:3000/api/views/orders/1 來查看結果:

回顧一下今天介紹的內容,在一開始先提出 Client 直接存取服務的問題,像是:Network Latency、協議不一定適合、服務與 Client 高度耦合。接著點出 API Gateway 這個 Pattern 如何解決上述問題,甚至可以帶出更多的附加價值。最後,透過實際的 NestJS 範例程式碼來實現 API Gateway 的概念。
雖然本篇只有簡單實作基本的 API Gateway,但重要的還是將這個 Pattern 點出並透過實作來對其有更進一步的理解,另外,也可以從中看出 NestJS 要實作一個 API Gateway 的難度並不高。如果不想要自己實作一套 API Gateway,市面上有許多現成工具可以使用,如:KrakenD、APISIX 等,這些工具都是不錯的選擇,有興趣的朋友也可以參考看看。
