
Bot Server的Kafka Consumer實踐中,我們以關係圖的方式說明相關Bean的註冊與取用關係,幫助你更清晰地了解Beans是如何被設定與取用,以及它們最終如何被Spring Kafka執行的關聯性。根據官方說明,我們只需要在Bot Server加入以下的程式碼,就可以讓一個Consumer運作:
@SpringBootApplication
public class Application {

    @KafkaListener(id = "myId", topics = "topic1")
    public void listen(String in) {
        System.out.println(in);
    }

}
StringDeserializer
JsonDeserializer
@EnableKafka, 及@Configuration的Class做設定程式碼如下:
package com.cancerpio.nextpagelinebotserver;

import java.util.HashMap;
import java.util.Map;

import com.cancerpio.nextpagelinebotserver.model.UserData;
import org.apache.kafka.clients.consumer.ConsumerConfig;
import org.apache.kafka.common.serialization.StringDeserializer;
import org.springframework.beans.factory.annotation.Value;
import org.springframework.context.annotation.Bean;
import org.springframework.context.annotation.Configuration;
import org.springframework.kafka.annotation.EnableKafka;
import org.springframework.kafka.config.ConcurrentKafkaListenerContainerFactory;
import org.springframework.kafka.core.ConsumerFactory;
import org.springframework.kafka.core.DefaultKafkaConsumerFactory;
import org.springframework.kafka.support.serializer.JsonDeserializer;

@EnableKafka
@Configuration
public class KafkaConsumerConfig {
    @Value("${spring.kafka.bootstrap-servers}")
    private String bootstrapServer;
    @Value("${spring.kafka.consumer.groupId}")
    private String groupId;
    @Value("${spring.kafka.consumer.autoOffsetReset}")
    private String autoOffsetReset;

    // 設定一個客製化的ConsumerFactory並註冊給Spring: 因為我們需處理JSON格式的資料,所以這邊要指定Key和Value的Deserializer
    @Bean
    public ConsumerFactory<String, UserData> userDataConsumerFactory() {
	return new DefaultKafkaConsumerFactory<>(consumerProps(), new StringDeserializer(),
		new JsonDeserializer<>(UserData.class));
    }

    @Bean
    // 設定給@kafkaListener的ContainerFactory,並且指定ConsumerFactory為上面客製化後的ConsumerFactory
    // 需注意: @KafkaListener必須指定containerFactory為此Bean名稱: "userDataListenerContainerFactory"
    // 否則Spring會使用預設的containerFactory
    ConcurrentKafkaListenerContainerFactory<String, UserData> userDataListenerContainerFactory(
	    ConsumerFactory<String, UserData> consumerFactory) {
	ConcurrentKafkaListenerContainerFactory<String, UserData> factory = new ConcurrentKafkaListenerContainerFactory<>();
	factory.setConsumerFactory(userDataConsumerFactory());
	return factory;
    }

    private Map<String, Object> consumerProps() {
	Map<String, Object> props = new HashMap<>();
	props.put(ConsumerConfig.BOOTSTRAP_SERVERS_CONFIG, this.bootstrapServer);
	props.put(ConsumerConfig.GROUP_ID_CONFIG, this.groupId);
	props.put(ConsumerConfig.KEY_DESERIALIZER_CLASS_CONFIG, StringDeserializer.class);
	props.put(ConsumerConfig.VALUE_DESERIALIZER_CLASS_CONFIG, JsonDeserializer.class);
	props.put(ConsumerConfig.AUTO_OFFSET_RESET_CONFIG, this.autoOffsetReset);
	// ...
	return props;
    }

}
ConsumerFactory的角括號<>中指定值的型態為我們自訂的Class: UserData。這個配置與前面提到的一樣,使得Jackson能夠在背後自動將從Kafka獲取的資料映射到UserData這個類別。@Component中配置@KafkaListener,並且在@KafkaListener中指定剛剛我們客製好的ContainerFactory及ConsumerFactory。相關程式片段如下:package com.cancerpio.nextpagelinebotserver.service;
import com.cancerpio.nextpagelinebotserver.model.MessageContent;
import com.cancerpio.nextpagelinebotserver.model.MessageContentTrainingLog;
import com.cancerpio.nextpagelinebotserver.model.OpenAIResponse;
import com.cancerpio.nextpagelinebotserver.model.UserData;
import com.fasterxml.jackson.databind.ObjectMapper;
import com.linecorp.bot.client.LineMessagingClient;
import com.linecorp.bot.client.LineSignatureValidator;
import com.linecorp.bot.model.ReplyMessage;
import com.linecorp.bot.model.message.TextMessage;
import org.springframework.beans.factory.annotation.Autowired;
import org.springframework.data.mongodb.core.MongoTemplate;
import org.springframework.kafka.annotation.KafkaListener;
import org.springframework.stereotype.Component;
import java.util.List;
import java.util.concurrent.ExecutionException;
@Component
class KafkaConsumer {
@Autowired
LineSignatureValidator lineSignatureValidator;
@Autowired
LineMessagingClient lineMessagingClient;
@Autowired
OpenAiApiService openAiApiService;
@Autowired
ObjectMapper objectMapper;
@Autowired
MongoTemplate mongoTemplate;
// 設定@KafkaListener,並指定要監聽的topic和containerFactory
// 這邊的containerFactory必須指定為我們在KafkaConsumerConfig中客製的"userDataListenerContainerFactory",來正確的處理JSON資料
@KafkaListener(id = "${spring.kafka.consumer.id}", topics = "${spring.kafka.consumer.topic}", containerFactory = "userDataListenerContainerFactory")
public void UserDataListener(UserData userData) {
try {
String replyToken = userData.getReplyToken();
String userId = userData.getUserId();
String text = userData.getText();
String openAiResponse = openAiApiService.sendMessage(null, text);
boolean storeStatus = saveTrainingDataToMongodb(openAiResponse, userId);
String replyMessage = "Your message is: " + text + "\nResponse: " + openAiResponse + "\n storeStatus: " + storeStatus;
lineMessagingClient.replyMessage(new ReplyMessage(replyToken, new TextMessage(replyMessage))).get()
.getMessage();
} catch (InterruptedException e) {
e.printStackTrace();
} catch (ExecutionException e) {
e.printStackTrace();
}
}
...
}
@KafkaListener時,我們設定相關配置,並同時指定了UserDataListener這個Function,作為Consumer拿到訊息,並做完反序列化後的處理方法。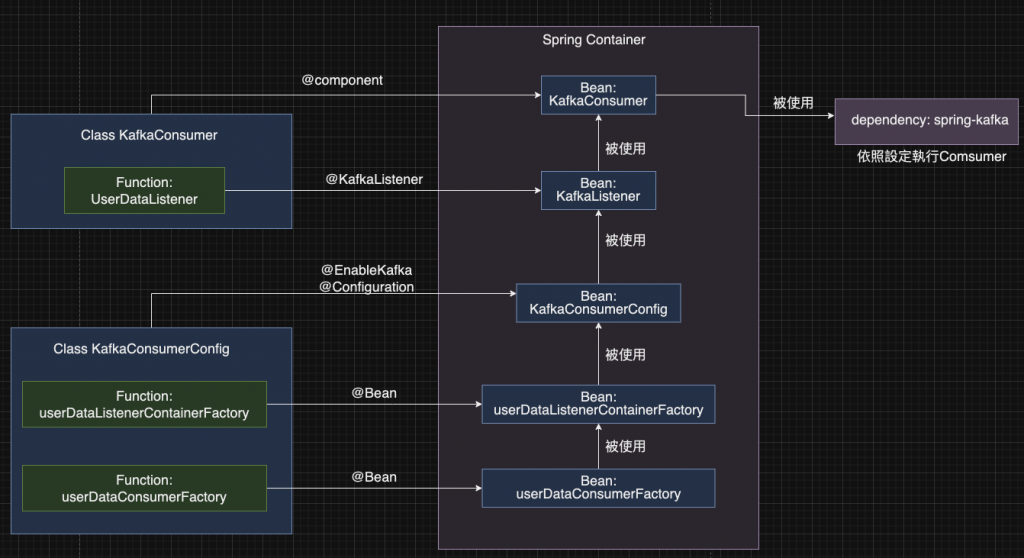
@EnableKafka, 及@Configuration的Class中,設定兩個Bean:
StringDeserializer
JsonDeserializer
@Component Class中指定Function為@KafkaListener
https://docs.spring.io/spring-kafka/reference/kafka/receiving-messages/listener-annotation.html
