今天要帶來一個蠻進階的案例:服務預約系統。
之所以說進階,
是因為這個案例將會同時使用到前端、後端,
而且讓前後端是可以互相溝通的!
做完這個案例,
你也許就可以自稱自己是一個全端工程師了。
只是年資經驗很淺而已😆
但這是個起點,
當你搞懂這一篇的基本範例,
接下來就可以自行發揮創意了!
有些公司裡有常駐視障按摩師,既能符合進用障礙人士的勞動法規,
又能順便作為員工福利的一環。
為了有效地安排每個人的按摩時段,我們就需要做一個客製化的預約系統。
其實在最簡單的情況下我們可以用 Google 行事曆來當預約系統就可以了。
誰要預約哪個時段,就發一個會議邀請過去即可。
但一般的行事曆有幾個缺點,
第一他沒有辦法限定每個人的預約時間長度。
造成有人預約15分鐘,結果有人預約長達1小時。
第二就是一般行事曆沒辦法限制每個人只能預約一次。
怕有人濫用佔用大家的福利。
基本上也是遵循「我有什麼食材,我想用什麼手法,我想做出什麼料理」的提問概念:
我在 Google Sheets 上有一個日曆表格如下:
Time Slot Monday Tuesday Wednesday Thursday Friday
09:00 - 09:15
09:15 - 09:30
09:30 - 09:45
09:45 - 10:00
10:00 - 10:15
10:15 - 10:30
10:30 - 10:45
10:45 - 11:00
11:00 - 11:15
11:15 - 11:30
11:30 - 11:45
11:45 - 12:00
12:00 - 12:15
12:15 - 12:30
12:30 - 12:45
12:45 - 13:00
13:00 - 13:15
13:15 - 13:30
13:30 - 13:45
13:45 - 14:00
14:00 - 14:15
14:15 - 14:30
14:30 - 14:45
14:45 - 15:00
15:00 - 15:15
15:15 - 15:30
15:30 - 15:45
15:45 - 16:00
16:00 - 16:15
16:15 - 16:30
16:30 - 16:45
16:45 - 17:00
17:00 - 17:15
17:15 - 17:30
17:30 - 17:45
17:45 - 18:00
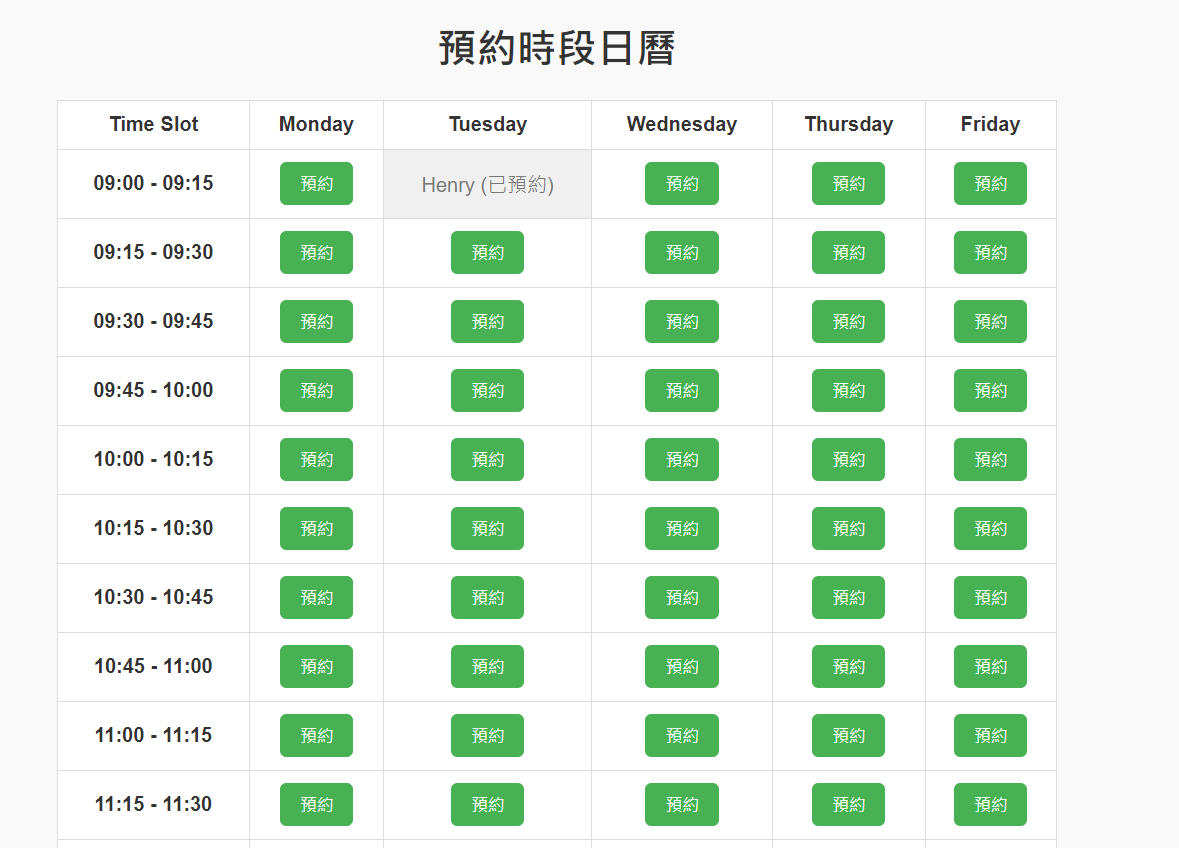
我想要基於這個表格,在網頁上顯示出一樣的表格,
並且在每個空格裡提供一個「預約」的按鍵,
讓使用者在網頁上按下去之後,可以填入姓名,並且自動回填至 Google Sheets 上。
當某一個已經有人預約之後,
網頁上的該格子就要讓「預約」按紐 gary out,不讓使用者再按。
跟 ChatGPT 來回的微調討論過程我就不贅述了,
歡迎直接看完整對話紀錄:https://chatgpt.com/share/6703ebfc-3448-800e-969c-1efe51b1a7ce
在此附上最終程式碼
function doGet() {
    return HtmlService.createHtmlOutputFromFile('index');
  }

  function getCalendarData() {
    const sheet = SpreadsheetApp.getActiveSpreadsheet().getSheetByName('calendar'); // 假設你的表格名稱是 'Sheet1'
    const dataRange = sheet.getDataRange();
    const data = dataRange.getValues();
    return data;
  }

  function bookSlot(row, col, name) {
    const sheet = SpreadsheetApp.getActiveSpreadsheet().getSheetByName('calendar');
    const currentValue = sheet.getRange(row, col).getValue();
    if (currentValue === "") {
      sheet.getRange(row, col).setValue(name);
      return true; // 預約成功
    } else {
      return false; // 已被預約
    }
  }
  <!DOCTYPE html>
  <html>
    <head>
      <base target="_top">
      <style>
        body {
          font-family: Arial, sans-serif;
          background-color: #f9f9f9;
          color: #333;
          text-align: center;
          padding: 20px;
        }
        table {
          width: 100%;
          max-width: 800px;
          margin: 0 auto;
          border-collapse: collapse;
        }
        table, th, td {
          border: 1px solid #ddd;
        }
        th, td {
          padding: 10px;
          text-align: center;
        }
        th {
          background-color: #4CAF50;
          color: white;
        }
        td {
          background-color: #fff;
        }
        td.booked {
          background-color: #f0f0f0;
          color: #777;
        }
        button {
          padding: 8px 16px;
          background-color: #4CAF50;
          color: white;
          border: none;
          cursor: pointer;
          border-radius: 5px;
          transition: background-color 0.3s;
        }
        button:hover {
          background-color: #45a049;
        }
        button:disabled {
          background-color: #ccc;
          cursor: not-allowed;
        }
      </style>
    </head>
    <body>
      <h1>預約時段日曆</h1>
      <div id="calendar"></div>

      <script>
        function loadCalendar() {
          google.script.run.withSuccessHandler(renderCalendar).getCalendarData();
        }

        function renderCalendar(data) {
          const calendarDiv = document.getElementById('calendar');
          calendarDiv.innerHTML = ''; // 清空舊的內容

          const table = document.createElement('table');

          data.forEach((row, rowIndex) => {
            const tr = document.createElement('tr');

            row.forEach((cell, colIndex) => {
              const td = document.createElement('td');
              if (rowIndex === 0 || colIndex === 0) {
                // 表頭
                td.textContent = cell;
                td.style.fontWeight = 'bold';
              } else {
                if (cell === "") {
                  const button = document.createElement('button');
                  button.textContent = '預約';
                  button.onclick = function() {
                    const name = prompt("請輸入您的姓名:");
                    if (name) {
                      google.script.run.withSuccessHandler((success) => {
                        if (success) {
                          alert("預約成功!");
                          loadCalendar(); // 重新載入日曆
                        } else {
                          alert("該時段已被預約,請選擇其他時段。");
                        }
                      }).bookSlot(rowIndex + 1, colIndex + 1, name);
                    }
                  };
                  td.appendChild(button);
                } else {
                  td.textContent = cell + ' (已預約)';
                  td.classList.add('booked');
                }
              }
              tr.appendChild(td);
            });

            table.appendChild(tr);
          });

          calendarDiv.appendChild(table);
        }

        loadCalendar();
      </script>
    </body>
  </html>

這個範例很基本,
所以後續還可以做的改善還很多。
例如可以加上:
- 讓使用者使用Google帳號登入再進行預約
- 讓使用者只能預約一次
- 讓使用者可以取消他先前的預約
- 在預約時間快到的前半小時自動發信提醒使用者
其實一般正統的程式設計師是不會這樣子做的。
一般的預約系統的所有資料,包含姓名、時間等等,
通常會存在一個非常結構化的資料庫表格裡面。
但是正因為我們不是專業的工程師我們才能跳脫思考的框框,
改成用Google Sheets的表格直接來當作儲存的載體。
直接以日曆視覺化的方式儲存,
而且也可以把後端儲存的東西直接原樣照搬到前端上。
是一個蠻有意思的解決方案!