先前的部分可以從Day15 觀看,看完Day22後,再來看這一篇,把原本的專案進化成高併發專案。
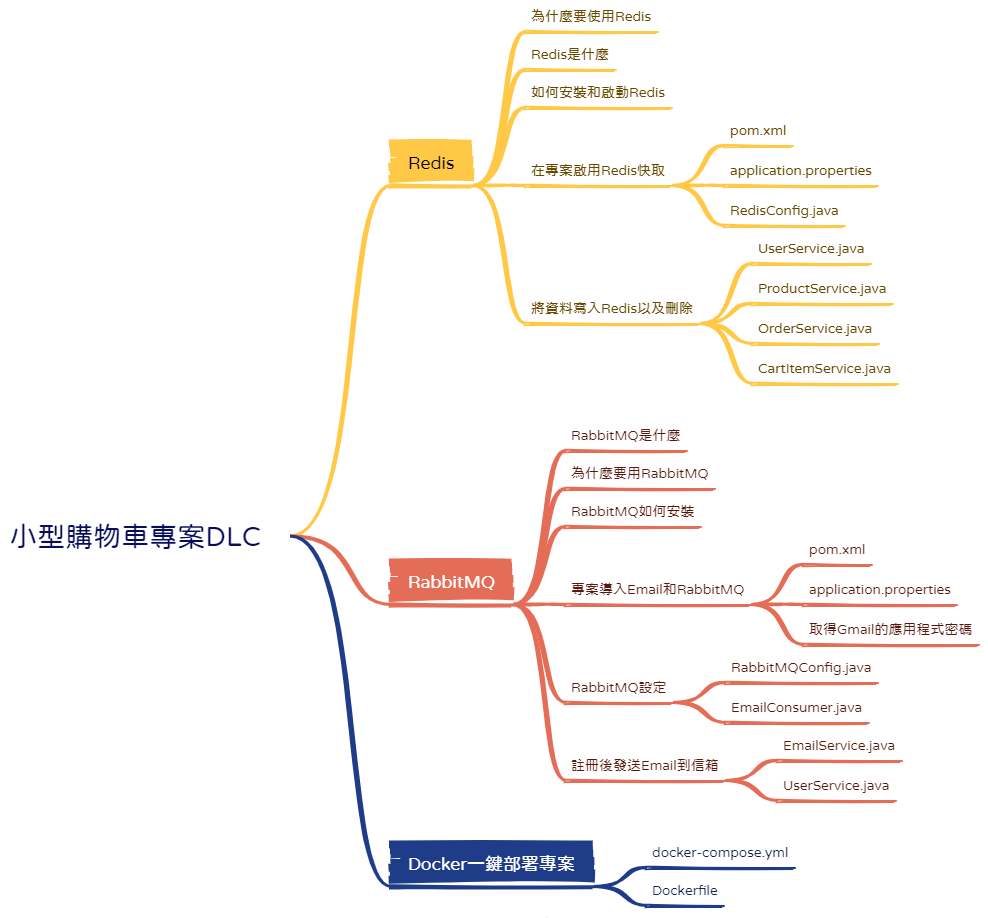
這篇文章的大綱,提供給大家參考。

需要頻繁讀取資料時,資料庫的讀取速度可能會成為瓶頸,特別是高併發的情況。
使用Redis可以將資料快取,專案就能從RAM(Redis)讀取資料,減少讀取資料庫(MariaDB)的次數,降低延遲。
Redis是一種NoSQL資料庫,可以用於快取和即使存取資料。
跟MariaDB不同,Redis是採用key-value的格式儲存資料,並且使用RAM保存Redis資料庫的內容,因此讀取和寫入的速度極快。
Redis只支援Unix、Linux系統,所以Windows需要使用Docker,才能安裝和啟動Redis。
以下是如何使用Docker安裝Redis的步驟:
docker run --name my-redis -d redis
完成以上步驟後,就能正常使用Redis資料庫。
接下來,我們要讓專案能夠用Redis快取。
pom.xml,添加Redis套件。
		<dependency>
			<groupId>org.springframework.boot</groupId>
			<artifactId>spring-boot-starter-data-redis</artifactId>
		</dependency>
在application.properties,加上設定,讓專案能夠連接Redis。
spring.data.redis.port=6379
spring.data.redis.host=localhost
添加Config/RedisConfig.java,用來設定如何使用Redis進行快取。
@Configuration
public class RedisConfig {
    @Bean
    public RedisTemplate<String, Object> redisTemplate(RedisConnectionFactory factory){
        //建立RedisTemplate
        RedisTemplate<String, Object> redisTemplate = new RedisTemplate<>();
        //使用factory來建立Redis連接
        redisTemplate.setConnectionFactory(factory);

        //設定ObjectMapper,使用Jackson時需要ObjectMapper

        ObjectMapper objectMapper = new ObjectMapper();
        //可以接收Object所有的屬性,private的屬性也包含在內
        objectMapper.setVisibility(PropertyAccessor.ALL, JsonAutoDetect.Visibility.ANY);
        //處理Object的資料形態(Entity),以便Jackson在Deserialize時自動賦予資料形態
        objectMapper.activateDefaultTyping(
                //允許所有的資料形態
                LaissezFaireSubTypeValidator.instance,
                //會處理除了Final以外的資料形態
                ObjectMapper.DefaultTyping.NON_FINAL,
                //將Object轉換成JSON,夾帶Object的資料形態
                JsonTypeInfo.As.WRAPPER_ARRAY
        );
        //Deserialize時忽略未知的屬性,不會直接觸發Exception
        objectMapper.configure(DeserializationFeature.FAIL_ON_UNKNOWN_PROPERTIES, false);

        //使用上面設定好的objectMapper來建立Jackson2JsonRedisSerializer,用它來Serialize、Deserialize
        //把Java的Object轉換成JSON格式(Serialize)、將JSON轉換回Java的Object(Deserialize)
        Jackson2JsonRedisSerializer<Object> jackson2JsonRedisSerializer = new Jackson2JsonRedisSerializer<>(objectMapper, Object.class);

        //Key會使用StringRedisSerializer,Serialize成字串,或從字串Deserialize
        redisTemplate.setKeySerializer(new StringRedisSerializer());
        redisTemplate.setHashKeySerializer(new StringRedisSerializer());

        //Value會使用jackson2JsonRedisSerializer,Serialize成JSON,或從JSON Deserialize
        redisTemplate.setValueSerializer(jackson2JsonRedisSerializer);
        redisTemplate.setHashValueSerializer(jackson2JsonRedisSerializer);
        //確認對redisTemplate的設定,並啟用
        redisTemplate.afterPropertiesSet();

        return redisTemplate;
    }

    @Bean
    public RedisCacheManager redisCacheManager(RedisTemplate<String, Object> redisTemplate){
        //管理Redis Cache時,不加鎖,提高性能表現
        RedisCacheWriter redisCacheWriter = RedisCacheWriter.nonLockingRedisCacheWriter(Objects.requireNonNull(redisTemplate.getConnectionFactory()));
        //採用預設的Cache設定,serialize的方式採用redisTemplate中的設定,也就是jackson2JsonRedisSerializer
        RedisCacheConfiguration redisCacheConfiguration = RedisCacheConfiguration.defaultCacheConfig()
                .serializeValuesWith(RedisSerializationContext.SerializationPair.fromSerializer(redisTemplate.getValueSerializer()));
        return new RedisCacheManager(redisCacheWriter, redisCacheConfiguration);
    }
}
我們要在Service設定資料的快取。
從Service/UserService.java開始,修改findUserByEmail、findUserById的部分。
如果能夠在快取找到,就立刻回傳。否則,從資料庫取得後存入快取,這樣下次就能更快的讀取。
設定快取過期的時間是30到39分鐘,因為User的內容不會頻繁變化,而且各種操作都需要查詢User,設定較長的過期時間比較適合。
我們使用隨機的過期時間,是為了避免快取同時過期,導致同時要快取所有過期的資料,並且如果同時有湧入大量的請求,就會發生延遲。
那麼設定很長的過期時間,讓Redis一直保存,是否就能避免以上情形。確實能避免,但是會有另一個問題,RAM會被大量占用,造成浪費。
@Service
public class UserService {
    //...
    private final RedisTemplate<String, Object> redisTemplate;
    private final RabbitTemplate rabbitTemplate;
    private final int USER_REDIS_CACHE_MINUTES = 30;

    public UserService(UserRepository userRepository, PasswordEncoder passwordEncoder, JWTProvider jwtProvider, RedisTemplate<String, Object> redisTemplate, RabbitTemplate rabbitTemplate) {
        //...
        this.redisTemplate = redisTemplate;
        this.rabbitTemplate = rabbitTemplate;
    }

    public void createUser(User user) throws Exception {
        //...
    }

    public User findUserByEmail(String email){
        String cacheKey = "user:email:" + email;
        User cachedUser = (User) redisTemplate.opsForValue().get(cacheKey);
        if (cachedUser != null) {
            return cachedUser;
        }

        User user = userRepository.findByEmail(email);
        if (user != null) {
			int random_delay = random.nextInt(10);
            redisTemplate.opsForValue().set(cacheKey, user, USER_REDIS_CACHE_MINUTES + random_delay, TimeUnit.MINUTES);
        }

        return user;
    }

    public User findUserByJWT(String jwt) throws Exception{
        //...
    }

    public User findUserById(Long id) throws Exception{
        String cacheKey = "user:id:" + id;
        User cachedUser = (User) redisTemplate.opsForValue().get(cacheKey);
        if (cachedUser != null) {
            return cachedUser;
        }

        Optional<User> opt = userRepository.findById(id);
        if(opt.isPresent()){
            User user = opt.get();
			int random_delay = random.nextInt(10);
            redisTemplate.opsForValue().set(cacheKey, user, USER_REDIS_CACHE_MINUTES + random_delay, TimeUnit.MINUTES);
            return user;
        }
        throw new Exception("Error: User not found with id: " + id);
    }
}
ProductService.java
大部分和UserService.java的部分相同,這邊多了刪除商品時,也從快取刪除資料,避免錯誤讀取到已經被刪除的內容。
@Service
public class ProductService {
    //...
    private final RedisTemplate<String, Object> redisTemplate;
    private final int PRODUCT_REDIS_CACHE_MINUTES = 1;
    Random random = new Random();

    public ProductService(ProductRepository productRepository, RedisTemplate<String, Object> redisTemplate) {
        //...
        this.redisTemplate = redisTemplate;
    }

    public Product addProduct(Product product) {
        //...
    }

    public String deleteProduct(Long id){
        productRepository.deleteById(id);
        //刪除Redis快取
        String cacheKey = "product:" + id;
        redisTemplate.delete(cacheKey);
        return "Product deleted successfully";
    }

    public Product getProductById(Long id) throws Exception{
        //從Redis取得快取資料
        String cacheKey = "product:" + id;
        Product cachedProduct = (Product) redisTemplate.opsForValue().get(cacheKey);
        if (cachedProduct != null) {
            return cachedProduct;
        }
        //沒有在Redis快取中,必須從資料庫取得
        Optional<Product> opt = productRepository.findById(id);
        if(opt.isPresent()){
            Product product = opt.get();
            //存入Redis快取,設定過期規則
            int random_delay = random.nextInt(3);
            redisTemplate.opsForValue().set(cacheKey, product, PRODUCT_REDIS_CACHE_MINUTES + random_delay, TimeUnit.MINUTES);
            return product;
        }
        throw new Exception("Product not found");
    }

    public Page<Product> getProductsByFilter(String category, Integer minPrice, Integer maxPrice,
                                             String sort, Integer pageNumber, Integer pageSize) {
        //取得第pageNumber(頁數是從0開始),每頁有pageSize個產品
        Pageable pageable = PageRequest.of(pageNumber, pageSize);
        List<Product> products;

        //在快取中尋找
        String cacheKey = "products:filter:category:" + category +
                ":minPrice:" + minPrice +
                ":maxPrice:" + maxPrice +
                ":sort:" + sort +
                ":page:" + pageNumber +
                ":size:" + pageSize;
        List<Product> cachedProducts = (List<Product>) redisTemplate.opsForValue().get(cacheKey);

        if (cachedProducts != null) {
            //直接將快取的資料放入products
            products = cachedProducts;
        }
        else{
            //沒在快取中
            //從資料庫取得符合條件的產品
            products = productRepository.findProductsByFilter(category, minPrice, maxPrice, sort);
            int random_delay = random.nextInt(3);
            redisTemplate.opsForValue().set(cacheKey, products, PRODUCT_REDIS_CACHE_MINUTES + random_delay, TimeUnit.MINUTES);
        }

        //設定從哪裡開始取資料,哪裡結束
        int startIndex = (int) pageable.getOffset();//取得指定頁數前有多少資料,等於pageNumber*pageSize
        //如果剩餘的資料>=pageSize,就只取pageSize筆。
        //如果剩餘的資料<pageSize,將剩下的資料全部取得。
        int endIndex = Math.min((startIndex + pageable.getPageSize()), products.size());

        //從過濾後的產品列表,截取對應頁數和數量的產品
        List<Product> pageContent = products.subList(startIndex, endIndex);

        //回傳內容、分頁資訊(頁碼、一頁有幾筆資料)、符合過濾條件的產品數量
        return new PageImpl<>(pageContent, pageable, products.size());
    }
}
剩下的部分都和前面相同
OrderService.java
@Service
public class OrderService {
    //...
    private final RedisTemplate<String, Object> redisTemplate;
    private final int ORDER_REDIS_CACHE_MINUTES = 1;
    Random random = new Random();

    public OrderService(OrderRepository orderRepository, RedisTemplate<String, Object> redisTemplate){
        //...
        this.redisTemplate = redisTemplate;
        //...
    }

    //建立Stripe支付的Session
    //import Session時選擇com.stripe.model.checkout
    public Session createCheckoutSession(int amount) throws StripeException {
        //...
    }

    //建立訂單
    public Order createOrder(String sessionId, Integer totalPrice, String status, String url, Long userId) throws Exception {
        //...
    }

    //使用用戶ID查詢用戶的訂單資訊,查詢時同時更新資料
    public List<Order> findOrderByUserId(Long userId) throws Exception {
        String cacheKey = "orders:userId:" + userId;
        List<Order> cachedOrders = (List<Order>) redisTemplate.opsForValue().get(cacheKey);
        if (cachedOrders != null) {
            return cachedOrders;
        }

        List<Order> orders = orderRepository.findOrderByUserId(userId);
        List<Order> updated_orders = new ArrayList<>();
        for(Order order: orders){
            updateOrder(order.getId());
            updated_orders.add(order);
        }
        int random_delay = random.nextInt(3);
        redisTemplate.opsForValue().set(cacheKey, updated_orders, ORDER_REDIS_CACHE_MINUTES + random_delay, TimeUnit.MINUTES);
        return updated_orders;
    }

    //更新訂單資訊的付款狀態
    public void updateOrder(Long id) throws Exception {
        //...
    }

}
CartItemService.java
@Service
public class CartItemService {
    //...
    private final RedisTemplate<String, Object> redisTemplate;
    private final int CARTITEM_REDIS_CACHE_MINUTES = 1;
    Random random = new Random();

    public CartItemService(CartItemRepository cartItemRepository, UserService userService, RedisTemplate<String, Object> redisTemplate) {
        //...
        this.redisTemplate = redisTemplate;
    }

    //檢查商品是否在購物車中
    public CartItem isCartItemInCart(Cart cart, Product product) {
        //...
    }

    //創建並儲存cartItem到資料庫中
    public CartItem createCartItem(CartItem cartItem) {
        //...
    }

    //更新CartItem,重新計算數量和價格,並儲存到資料庫。
    public CartItem updateCartItem(Long userId, Long id, CartItem cartItem) throws Exception {
        CartItem item = findCartItemById(id);
        User user = userService.findUserById(item.getCart().getUser().getId());
        //確認發送請求的用戶和購物車的擁有者是同一人
        if(user.getId().equals(userId)) {
            item.setQuantity(cartItem.getQuantity());
            item.setPrice(item.getQuantity() * item.getProduct().getPrice());

            //刪除快取
            String cacheKey = "cartItem:" + id;
            redisTemplate.delete(cacheKey);
        }

        return cartItemRepository.save(item);
    }

    //用ID查詢CartItem
    public CartItem findCartItemById(Long id) throws Exception {
        //尋找快取
        String cacheKey = "cartItem:" + id;
        CartItem cachedCartItem = (CartItem) redisTemplate.opsForValue().get(cacheKey);
        if (cachedCartItem != null) {
            return cachedCartItem;
        }
        //cache miss
        Optional<CartItem> optionalCartItem = cartItemRepository.findById(id);
        if(optionalCartItem.isPresent()) {
            CartItem cartItem = optionalCartItem.get();
            int random_delay = random.nextInt(3);
            redisTemplate.opsForValue().set(cacheKey, cartItem, CARTITEM_REDIS_CACHE_MINUTES + random_delay, TimeUnit.SECONDS);
            return cartItem;
        }
        throw new Exception("CartItem not found with id : " + id);
    }

    //移除購物車的商品
    public void removeCartItem(Long userId, Long id) throws Exception {
        CartItem item = findCartItemById(id);
        User user = userService.findUserById(item.getCart().getUser().getId());
        User reqUser = userService.findUserById(userId);
        if(user.getId().equals(reqUser.getId())) {
            cartItemRepository.deleteById(id);
            //刪除快取
            String cacheKey = "cartItem:" + id;
            redisTemplate.delete(cacheKey);
            return;
        }
        throw new Exception("Can't remove another users item");
    }
}
下個部分是:完成註冊後,發送通知郵件到信箱。
RabbitMQ的核心功能是充當訊息傳遞的中間層,將訊息送到Queue,Queue根據設定轉發到Comsumers。
RabbitMQ還能透過多種不同類型的Exchanges(交換器),靈活地將消息路由到不同的Queue。
某些耗時的操作會影響專案的回應速度,使用RabbitMQ可以改善。
以用戶註冊為例,當新用戶註冊後,系統會發送Email到信箱。
如果沒有RabbitMQ,用戶需要等待Email的流程結束後,才能繼續操作,導致使用者的體驗不佳。
導入RabbitMQ後,可以將耗時的操作(發送Email)轉移到Queue中,用戶就能立刻得到註冊成功的結果。
發送Email則是由Comsumer非同步處理,避免系統被長時間阻塞。
雖然Windows可以直接安裝RabbitMQ,但是需要另外安裝Erlang。
建議使用Docker安裝比較容易。
docker run -it --rm --name rabbitmq -p 5672:5672 -p 15672:15672 rabbitmq:4-management
pom.xml,添加Mail、AMQP套件。
		<dependency>
			<groupId>org.springframework.boot</groupId>
			<artifactId>spring-boot-starter-mail</artifactId>
		</dependency>
		<dependency>
			<groupId>org.springframework.boot</groupId>
			<artifactId>spring-boot-starter-amqp</artifactId>
		</dependency>
修改application.properties,添加email和RabbitMQ的設定。
spring.mail.host=smtp.gmail.com
spring.mail.port=587
spring.mail.username=${GMAIL_ADDRESS}
spring.mail.password=${GMAIL_PASSWORD}
spring.mail.properties.mail.smtp.auth=true
spring.mail.properties.mail.smtp.starttls.enable=true

spring.rabbitmq.host=localhost
spring.rabbitmq.port=5672
spring.rabbitmq.username=guest
spring.rabbitmq.password=guest
在繼續之前,我們先取得應用程式密碼。
這樣我們就能使用Gmail免費發送郵件。
建立Config/RabbitMQConfig.java,設定RabbitMQ的Queue的Exchange。
@Configuration
public class RabbitMQConfig {
    public static final String QUEUE_NAME = "emailQueue";
    public static final String EXCHANGE_NAME = "emailExchange";

    @Bean
    //RabbitMQ產生持久化的Queue,可以依序完成要求的功能(送Email)
    public Queue queue() {
        return new Queue(QUEUE_NAME, true);
    }

    @Bean
    //RabbitMQ Exchange,接收Producer的要求,送到對應的Queue中
    public TopicExchange exchange() {
        return new TopicExchange(EXCHANGE_NAME);
    }

    @Bean
    //將Queue綁定到指定的Exchange,當routingKey相同時,才會分到Queue中
    public Binding binding(Queue queue, TopicExchange exchange) {
        return BindingBuilder.bind(queue).to(exchange).with("email.routing.key");
    }
}
建立Service/EmailConsumer.java,設定消費者從Queue接收到訊息時的動作。
@Component
public class EmailConsumer {
    private final EmailService emailService;

    public EmailConsumer(EmailService emailService){
        this.emailService = emailService;
    }

    //當指定的Queue接收到訊息時,會自動執行裡面的內容
    @RabbitListener(queues = RabbitMQConfig.QUEUE_NAME)
    public void receiveMessage(String to) {
        //發送郵件
        emailService.sendSimpleEmail(to);
    }
}
新增Service/EmailService.java,處理發送Email的細節。
@Service
public class EmailService {
    private final JavaMailSender javaMailSender;

    public EmailService(JavaMailSender javaMailSender){
        this.javaMailSender = javaMailSender;
    }

    //處理送出Email的細節
    public void sendSimpleEmail(String to) {
        Dotenv dotenv = Dotenv.load();

        //編寫郵件內容
        SimpleMailMessage message = new SimpleMailMessage();
        //寄到哪邊
        message.setTo(to);
        //Email主旨
        message.setSubject("Welcome to Shopping Cart, " + to + " !");
        //Email內容
        message.setText("Thank you for choosing Shopping Cart. We look forward to serving you and making your shopping experience enjoyable.\n" +
                "Best regards,\n" +
                "The Shopping Cart Team");
        //寄件人是誰
        message.setFrom(dotenv.get("GMAIL_ADDRESS"));
        //送出Email
        javaMailSender.send(message);
    }
}
修改UserService.java,在註冊成功時將發送Email透過Exchange傳送到對應的Queue。
@Service
public class UserService {
    //...
    private final RabbitTemplate rabbitTemplate;

    public UserService(UserRepository userRepository, PasswordEncoder passwordEncoder, JWTProvider jwtProvider, RedisTemplate<String, Object> redisTemplate, RabbitTemplate rabbitTemplate) {
        //...
        this.rabbitTemplate = rabbitTemplate;
    }

    public void createUser(User user) throws Exception {
        //找尋資料庫中是否有使用同樣的email的用戶
        User isEmailExists = userRepository.findByEmail(user.getEmail());

        //如果有,代表這個email被註冊了
        if(isEmailExists != null) {
            throw new Exception("Error: Email is already registered.");
        }

        User createdUser = new User();
        createdUser.setEmail(user.getEmail());
        //將密碼加密,提升安全性
        createdUser.setPassword(passwordEncoder.encode(user.getPassword()));
        //寄出恭喜註冊的郵件到註冊Email
        sendEmail(user.getEmail());
        userRepository.save(createdUser);
    }

    //使用RabbitMQ完成發出Email的功能
    public void sendEmail(String to) {
        rabbitTemplate.convertAndSend(RabbitMQConfig.EXCHANGE_NAME, "email.routing.key", to);
    }

	//...
}
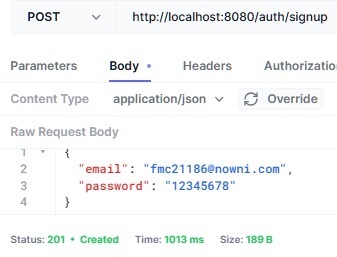
註冊的結果是這樣

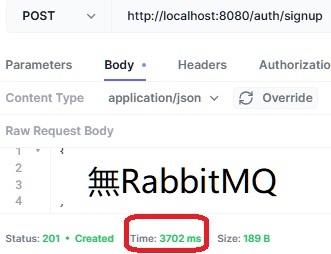
覺得延遲很嚴重?那來看看沒有RabbitMQ的情形,延遲更長了3702ms。

等1秒還可以接受。等3秒的話,我想大部分的人會認為是不是當機了。
安裝MariaDB、Redis、RabbitMQ的過程,有些人可能認為很困難。
現在,我們使用Docker打包一切,從環境設定到自動編譯和啟動。
只要準備好專案的原始碼和.env,然後專案的根目錄編寫docker-compose.yml、Dockerfile,就能自動完成這一切。
我們先完成docker-compose.yml,處理環境(MariaDB、Redis、RabbitMQ)相關的設定。
services:
  db:
    #使用最新的mariadb穩定版
    image: mariadb:latest
    #將容器取名為mariadb_book
    container_name: mariadb_cart
    #意外停止後,會自動重新啟動
    restart: always
    environment:
      #設定mariadb root的密碼
      MARIADB_ROOT_PASSWORD: 12345678
      #建立資料庫
      MARIADB_DATABASE: cart_db
    #使用的port,AAAA:BBBB,AAAA是外部連接容器使用的port,BBBB是容器內部的port
    ports:
      - "3306:3306"
    #將Mariadb的資料存入這個位置,確保容器重新啟動時,資料庫的資料不會消失
    volumes:
      - db_data:/var/lib/mysql

  #redis相關的設定
  redis:
    image: redis:latest
    container_name: redis_cart
    restart: always
    ports:
     - "6379:6379"

  rabbitmq:
    image: rabbitmq:4-management
    container_name: rabbitmq_cart
    restart: always
    ports:
      - "5672:5672"
      - "15672:15672"
    environment:
      RABBITMQ_DEFAULT_USER: guest
      RABBITMQ_DEFAULT_PASS: guest
    volumes:
      - rabbitmq_data:/var/lib/rabbitmq

  #專案相關的設定
  app:
    #使用同目錄下的Dockerfile,來建立app容器
    build: .
    container_name: java_cart
    restart: always
    ports:
      - "8080:8080"
    #spring專案設定
    environment:
      #改寫application.yaml中的spring: datasource: url:
      #db是資料庫容器的名稱,這邊不能再使用localhost,會無法連接
      SPRING_DATASOURCE_URL: jdbc:mariadb://db:3306/cart_db
      SPRING_DATASOURCE_USERNAME: root
      SPRING_DATASOURCE_PASSWORD: 12345678
      #改寫application.yaml中的spring: data: redis: host:
      #redis是容器的名稱
      SPRING_DATA_REDIS_HOST: redis
      #RabbitMQ設定
      SPRING_RABBITMQ_HOST: rabbitmq

volumes:
  db_data:
  rabbitmq_data:
Dockerfile,完成自動編譯並執行的設定。
#使用maven
FROM maven:3-amazoncorretto-17 AS build

#將目錄下的檔案複製到app資料夾中
COPY . /app

#設定之後執行操作的位置
WORKDIR /app

#使用maven打包,不經過測試
RUN mvn clean package -DskipTests

#使用amazoncorretto
FROM amazoncorretto:17-alpine

#從上面build的部分取得jar,複製到新容器中
COPY --from=build /app/target/*.jar app.jar
#將.env複製到容器中
COPY ./.env .env

#使用port 8080
EXPOSE 8080

#啟動Spring Boot專案
ENTRYPOINT ["java", "-jar", "app.jar"]
我們就能使用一行命令,完成環境並啟動專案。
docker-compose up
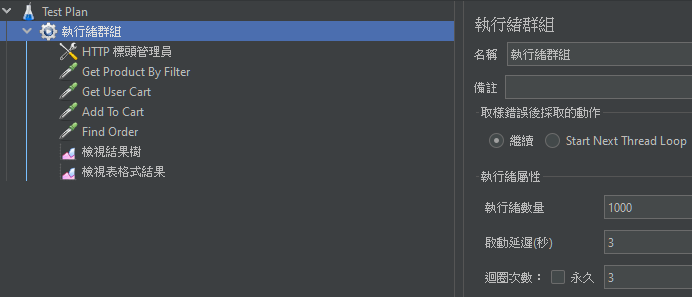
使用JMeter來測試高併發專案
設定1000*4(Get Product By Filter、Get User Cart、Add To Cart、Find Order)*3=12000個Request,對於專案是個很大的挑戰。

測試的結果,我們先看最大的延遲是多少,從下圖可以得知為2845ms,在這樣的壓力下能得到這種結果已經很不錯了,而且是100%的通過,沒有任何錯誤。

最低的時候,可以達到5ms的低延遲表現。

我們的高併發專案通過了壓力測試,並且是在17秒內湧入12000個Request的情況下,驗證它擁有處理高併發的能力。
