我們現在遇到一個大問題,登入後切換頁面,就會讓token消失,使用router.push可以暫時解決,但按F5重新整理也會讓token消失。
最終,我們必須將token持久化保存,這樣就能保存一輩子的token。
安裝pinia持久化套件
bun install pinia-plugin-persistedstate
修改main.js,啟用pinia持久化
import piniaPluginPersistedstate from 'pinia-plugin-persistedstate';

pinia.use(piniaPluginPersistedstate)
修改auth.js,將token持久化
export const useAuthStore = defineStore('auth', {
  state: () => ({
    //...
  }),
  getters: {
    //...
  },
  actions: {
    //...
  },
  persist: true,//啟用pinia持久化
});
重新整理、切換頁面token都不會消失了。
注意:token過期後,會因為持久化保存殘留token,需要手動logout來清除token。
建立AddProduct.vue,大部分的內容來自LoginForm.vue,只是需要多幾個div,修改axios的URL,傳送時加上token。
因為我們在SpringBoot的設定,為了一次接收多筆產品資料,使用了Product[],因此data需要多出[],就算只傳一筆也要加[]。
<template>
<div className="flex justify-center min-h-screen items-center bg-gray-100">
<form
method="post"
role="form"
className="bg-white p-6 rounded-lg shadow-md w-full max-w-md"
@submit.prevent="handleSubmit"
>
<div className="mb-4">
<label className="text-gray-700 font-bold mb-2"> Name </label>
<input
placeholder="Enter product name"
type="text"
className="shadow border rounded w-full py-2 px-3 text-gray-700"
name="name"
v-model="name"
/>
</div>
<div className="mb-4">
<label className="text-gray-700 font-bold mb-2"> Description </label>
<input
placeholder="Enter product description"
type="text"
className="shadow border rounded w-full py-2 px-3 text-gray-700"
name="description"
v-model="description"
/>
</div>
<div className="mb-4">
<label className="text-gray-700 font-bold mb-2"> Price </label>
<input
placeholder="Enter product price"
type="text"
className="shadow border rounded w-full py-2 px-3 text-gray-700"
name="price"
v-model="price"
/>
</div>
<div className="mb-4">
<label className="text-gray-700 font-bold mb-2"> Image URL </label>
<input
placeholder="Enter product image URL"
type="text"
className="shadow border rounded w-full py-2 px-3 text-gray-700"
name="image"
v-model="image"
/>
</div>
<div className="mb-4">
<label className="text-gray-700 font-bold mb-2"> Category </label>
<input
placeholder="Enter product category"
type="text"
className="shadow border rounded w-full py-2 px-3 text-gray-700"
name="category"
v-model="category"
/>
</div>
<button
type="submit"
className="bg-blue-500 hover:bg-blue-700 text-white font-bold py-2 px-4 rounded"
>
Add
</button>
</form>
</div>
</template>
<script>
import { ref } from "vue";
import { useRouter } from "vue-router";
import axios from "axios";
import { useAuthStore } from "@/stores/auth";
export default {
setup() {
const router = useRouter();
const authStore = useAuthStore();
const name = ref("");
const description = ref("");
const price = ref("");
const image = ref("");
const category = ref("");
const handleSubmit = async () => {
try {
const token = authStore.token;
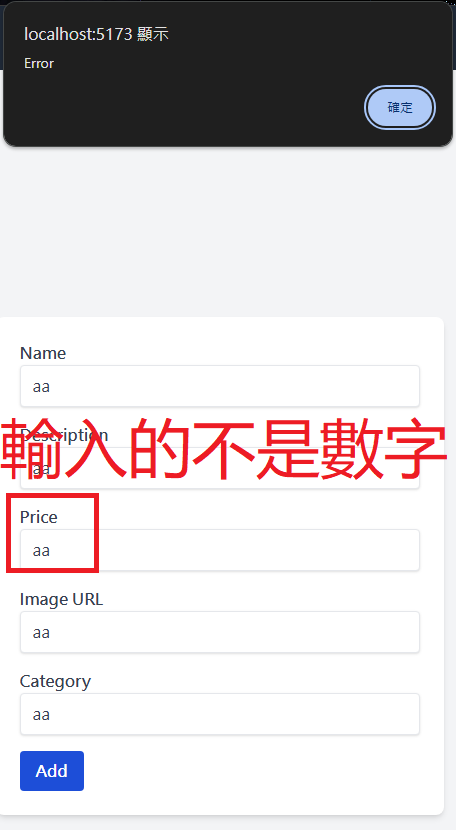
if(!name.value || !description.value || !price.value || !image.value || !category.value || isNaN(price.value)){
throw new Error("商品資料格式錯誤");
}
const data = [{
name: name.value,
description: description.value,
price: parseInt(price.value),
image: image.value,
category: category.value,
}];
const response = await axios.post(
"http://localhost:8080/api/product/",
data,
{
headers: {
'Authorization': `Bearer ${token}`
}
}
);
console.log(response.data);
router.push("/");
} catch (error) {
alert("Error");
console.log(error);
}
};
return {
name,
description,
price,
image,
category,
handleSubmit,
};
},
};
</script>
在router/index.js添加路由
  routes: [
    {
      //
    },
    {
      //
    },
    {
      path: '/add',
      name: 'add',
      component: AddProduct
    }
  ]
點擊Add Product, 嘗試新增商品資料。
也測試沒填內容或不是數字的價格,會彈出Error視窗。
新增HomePage.vue,用來顯示商品列表。
<template>
	<div v-if="isAuthenticated" class="p-4 bg-gray-50 min-h-screen">
		<div
			v-for="product in products"
			:key="product.id"
			class="flex items-center border-b border-gray-200 py-4"
		>
			<img
				:src="product.image"
				:alt="product.name"
				class="w-16 h-16 object-cover rounded-lg shadow-sm mr-4"
			/>
			<div class="flex-1">
				<h2 class="text-lg font-bold text-gray-900">{{ product.name }}</h2>
				<p class="text-gray-700 text-sm">{{ product.description }}</p>
				<p class="text-green-600 font-semibold text-sm mt-1">
					Price: {{ product.price }}
				</p>
				<p class="text-gray-500 text-xs mt-1">
					Category: {{ product.category }}
				</p>
			</div>
		</div>
	</div>
	<div v-else class="p-4">
		<p class="text-red-600 font-medium">Please log in to see the products.</p>
	</div>
</template>

<script setup>
import { useAuthStore } from "@/stores/auth";
import { computed, onMounted, ref } from "vue";
import axios from "axios";

const authStore = useAuthStore();
const isAuthenticated = computed(() => authStore.isAuthenticated);
//將商品資料提供給template
const products = ref([]);

const getProducts = async () => {
	try {
		const response = await axios.get(
			"http://localhost:8080/api/product/?minPrice=&maxPrice=&category=&sort=&pageNumber=0&pageSize=20",
			{
				headers: {
					Authorization: `Bearer ${authStore.token}`,
				},
			}
		);
		//把取得的商品資料放入products
		products.value = response.data.content;
		console.log(response.data);
	} catch (error) {
		console.log(error);
	}
};

//等待template載入完成,再把商品資料放入template
onMounted(() => {
	if (isAuthenticated.value) {
		getProducts();
	}
});
</script>
在router/index.js添加路由
  routes: [
    {
      //...
    },
    //...
    {
      path: '/',
      name: 'home',
      component: HomePage
    }
  ]
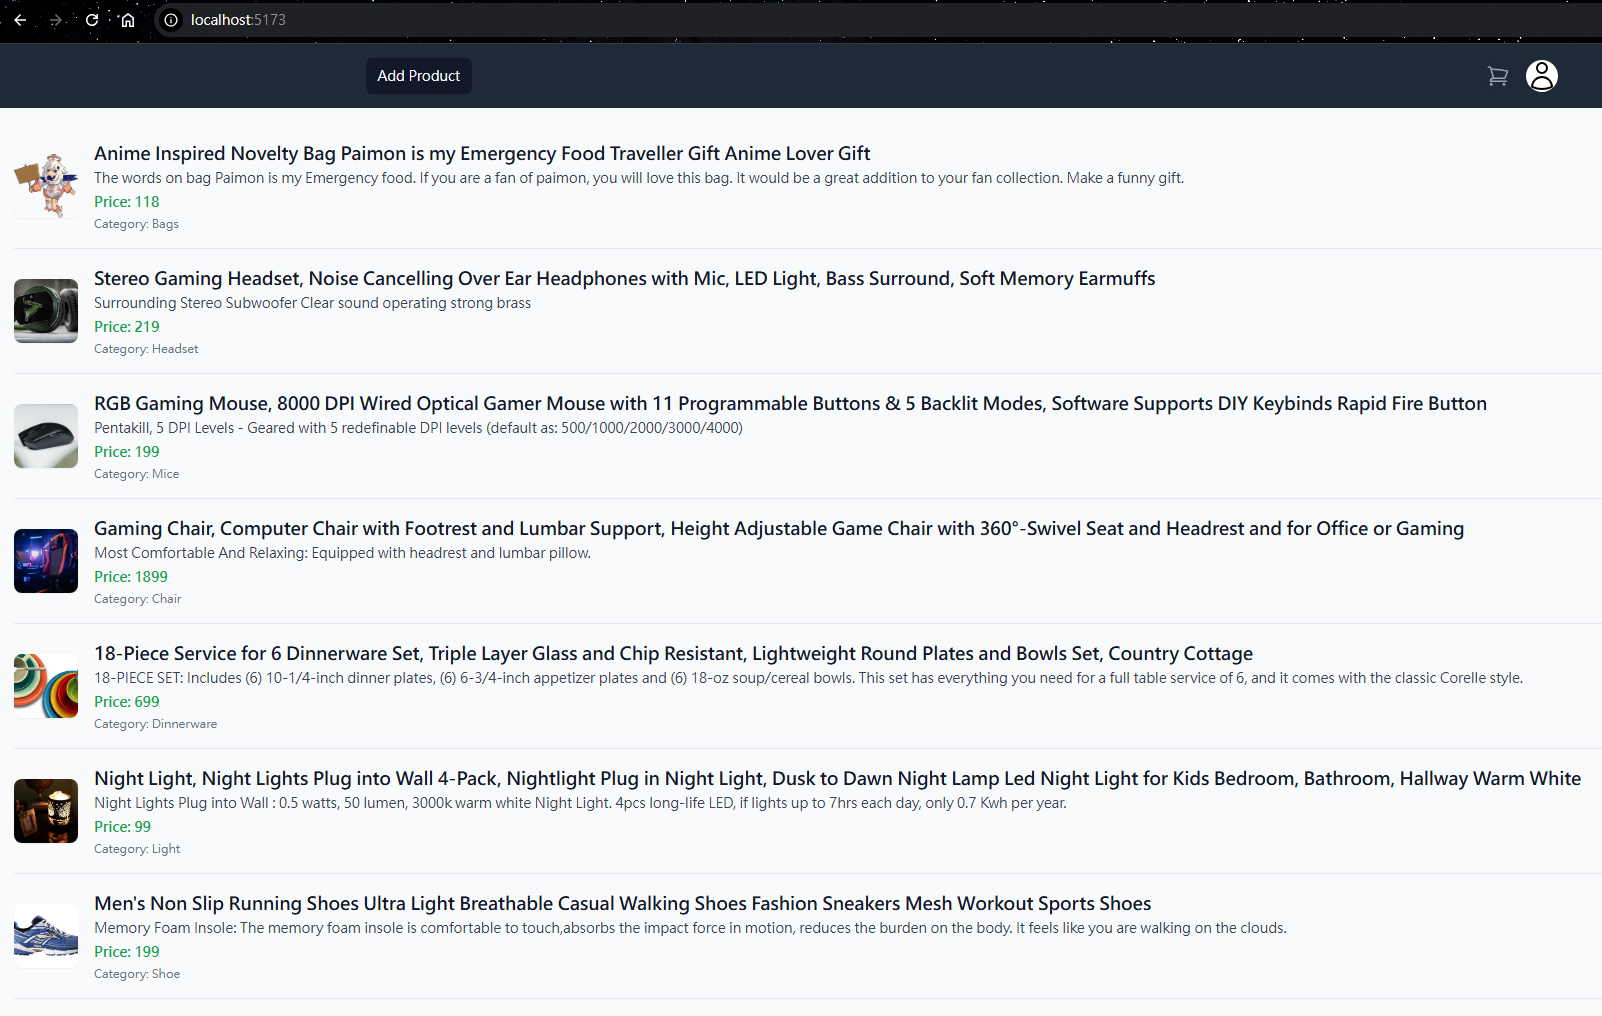
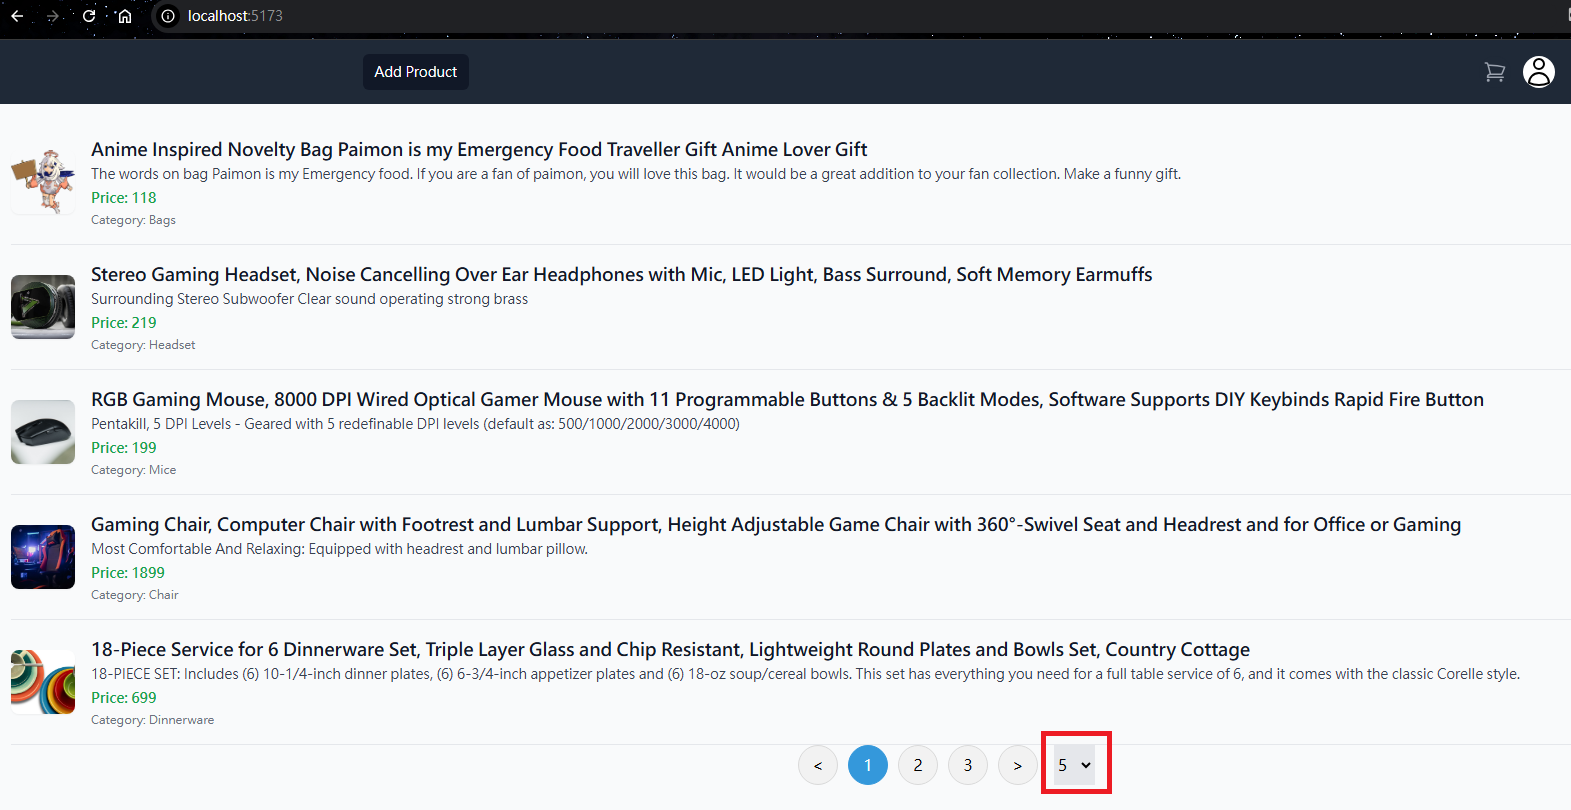
登入後就能看到資料庫的商品。
接下來,我們完成換頁的功能。
安裝vue-awesome-paginate
bun i vue-awesome-paginate
我們參考官方提供的範例https://www.npmjs.com/package/vue-awesome-paginate#usage,修改HomePage.vue
<template>
	<div v-if="isAuthenticated" class="p-4 bg-gray-50 min-h-screen">

		<div
			v-for="product in products"
			:key="product.id"
			class="flex items-center border-b border-gray-200 py-4"
		>
			//...
		</div>
		<div class="flex justify-center">
			<vue-awesome-paginate
				:total-items="50"
				:items-per-page="5"
				:max-pages-shown="5"
				v-model="currentPage"
				@click="onClickHandler"
			/>
		</div>
	</div>
	<div v-else class="p-4">
		//...
	</div>
</template>

<script setup>
//...

const onClickHandler = (page) => {
	console.log(page);
};
const currentPage = ref(1);

onMounted(() => {
	//...
});
</script>

<style>
.pagination-container {
	display: flex;

	column-gap: 10px;
}

.paginate-buttons {
	height: 40px;

	width: 40px;

	border-radius: 20px;

	cursor: pointer;

	background-color: rgb(242, 242, 242);

	border: 1px solid rgb(217, 217, 217);

	color: black;
}

.paginate-buttons:hover {
	background-color: #d8d8d8;
}

.active-page {
	background-color: #3498db;

	border: 1px solid #3498db;

	color: white;
}

.active-page:hover {
	background-color: #2988c8;
}
</style>
修改main.js,增加
import VueAwesomePaginate from 'vue-awesome-paginate';
import "vue-awesome-paginate/dist/style.css";

//...

app.use(VueAwesomePaginate)
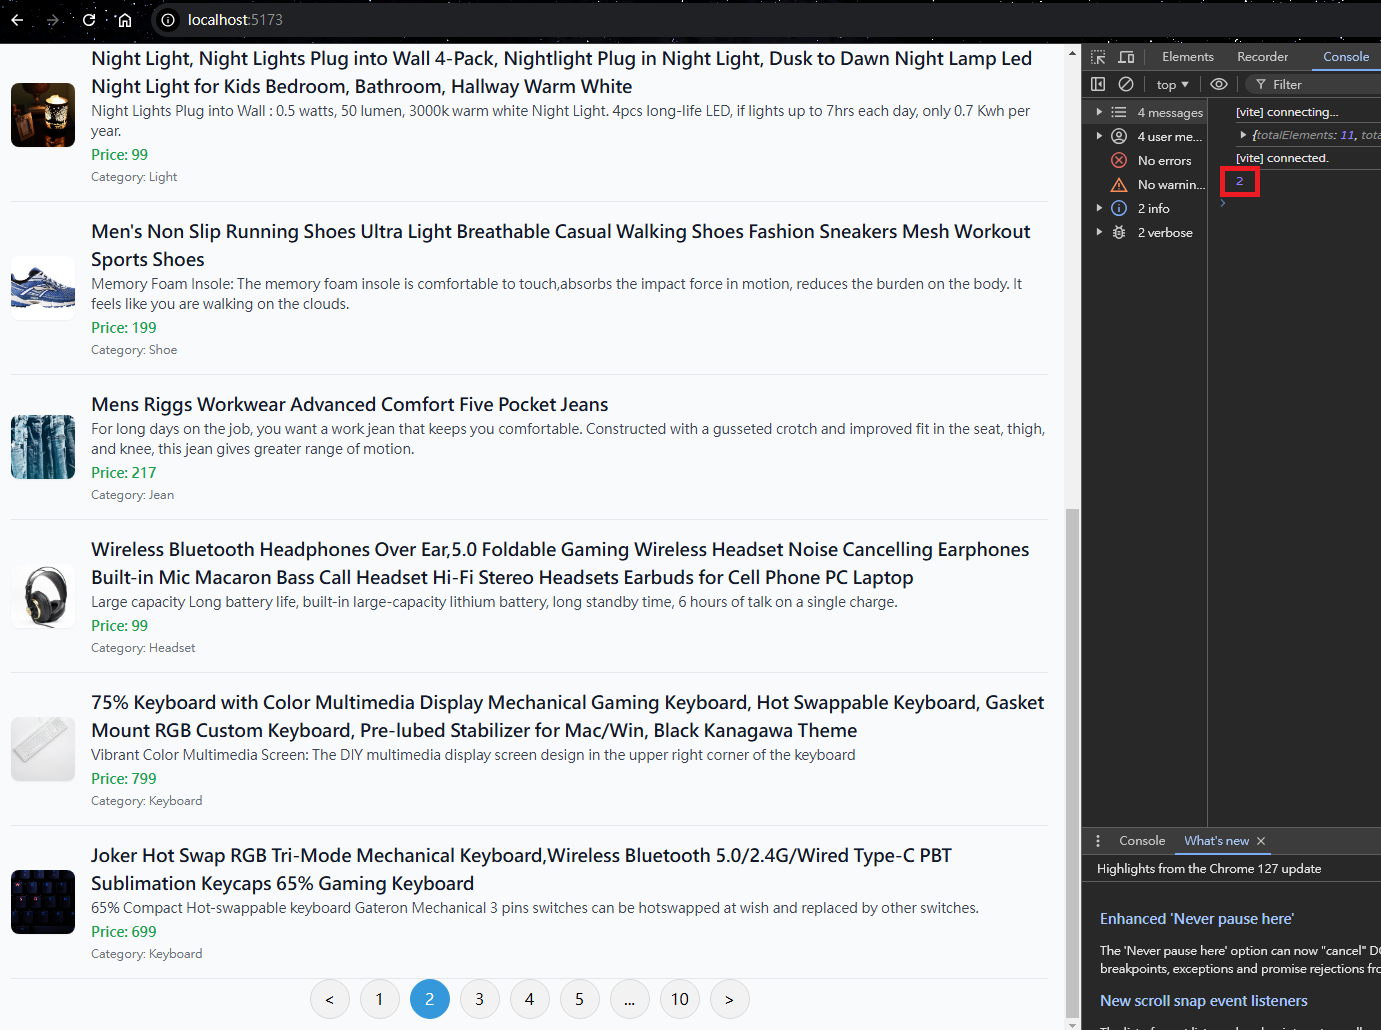
找到選擇頁面的地方,按下<、>和數字,觀察Console顯示的內容,是否和選擇的頁數相同。
我們按下2,Console也顯示2。
我們增加一個可以選擇顯示商品數量的地方
<template>
//...
<div class="flex justify-center">
			<vue-awesome-paginate
				:total-items="50"
				:items-per-page="5"
				:max-pages-shown="5"
				v-model="currentPage"
				@click="onClickHandler"
			/>
				<select class="ml-4 bg-gray-200" name="pageSize" id="pageSize" v-model="pageSize" @change="onChangeHandler">
					<option value="5">5</option>
					<option value="10">10</option>
					<option value="15">15</option>
					<option value="20">20</option>
				</select>
		</div>
</template>

<script setup>
//...
const pageSize = ref(5);

const onChangeHandler = () => {
	console.log(pageSize.value);
};
</script>
我們依序選擇10、15、20、5,在內容變化時,能在Console看到對應的輸出。
因為預設值是5,選5的話,內容沒有變化,必須選10、15、20才符合變化的條件。

接下來,讓頁面的內容隨著我們的點擊改變。
讓vue-awesome-paginate,接收來自後端的總商品數量,調整顯示最後一頁的頁碼。
<template>
//...
<div class="flex justify-center">
			<vue-awesome-paginate
				:total-items="totalElement"
				:items-per-page="parseInt(pageSize)"
				:max-pages-shown="5"
				v-model="currentPage"
				@click="onClickHandler"
			/>
				<select class="ml-4 bg-gray-200" name="pageSize" id="pageSize" v-model="pageSize" @change="onChangeHandler">
					<option value="5">5</option>
					<option value="10">10</option>
					<option value="15">15</option>
					<option value="20">20</option>
				</select>
		</div>
		//...
</template>
修改axios根據前端設定的頁碼和每頁數量,取得商品資料,頁數因為資料庫從0開始,網頁從1開始,所以要-1。
<script setup>
//...
const totalElement = ref(1);

const getProducts = async (page, size) => {
	try {
		const response = await axios.get(
			`http://localhost:8080/api/product/?minPrice=&maxPrice=&category=&sort=&pageNumber=${page - 1}&pageSize=${parseInt(size)}`,
			{
				headers: {
					Authorization: `Bearer ${authStore.token}`,
				},
			}
		);
		//把取得的商品資料放入products
		products.value = response.data.content;
		totalElement.value = response.data.totalElements;
		console.log(response.data);
	} catch (error) {
		console.log(error);
	}
};
當切換頁碼和改變每頁顯示數量時,內容也要更新
const onClickHandler = () => {
	getProducts(currentPage.value, pageSize.value);
};

const onChangeHandler = () => {
	currentPage.value = 1;
	getProducts(currentPage.value, pageSize.value);
};
因為我們修改了getProducts的傳入參數,onMounted的部分增加參數
onMounted(() => {
	if (isAuthenticated.value) {
		getProducts(currentPage.value, pageSize.value);
	}
});
</script>
在前端確認修改結果,可以看到我們選擇5,網頁上顯示的商品數量也是5個。
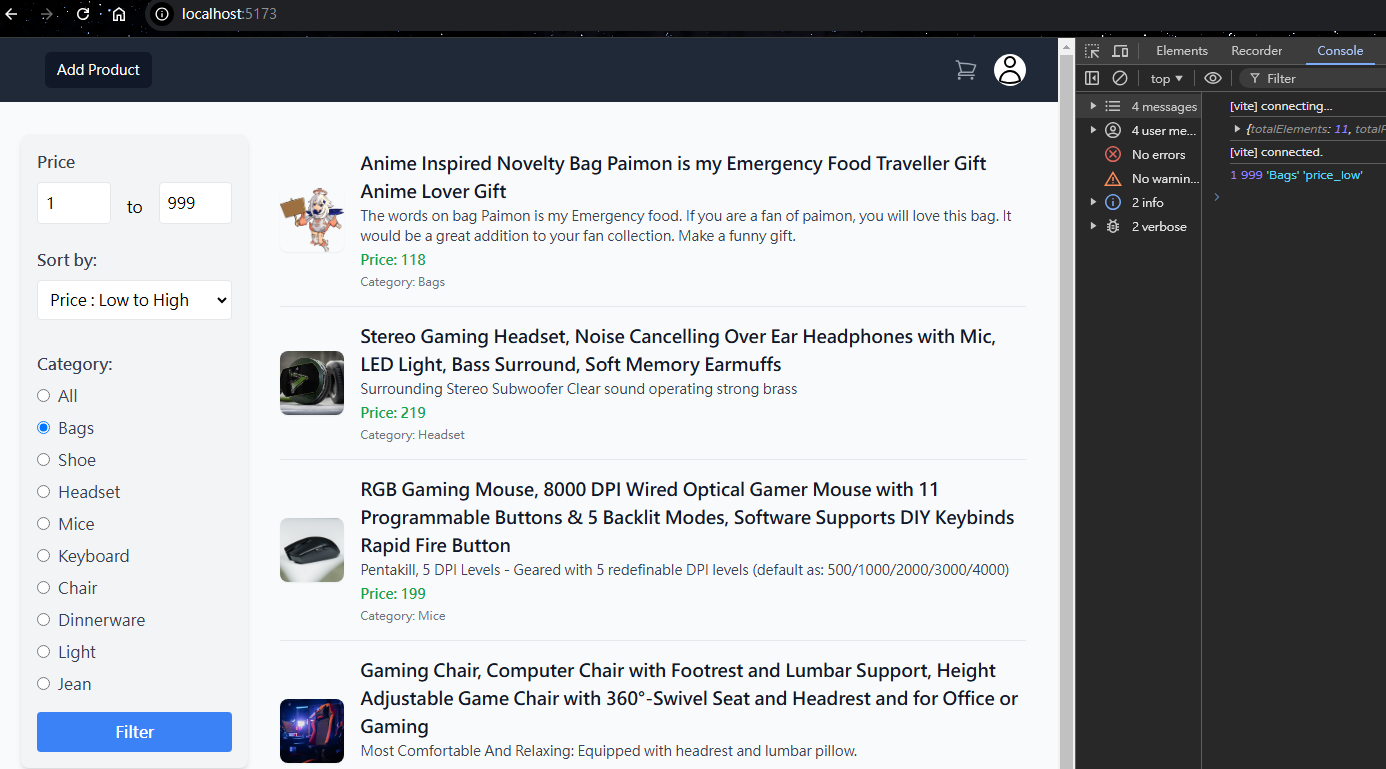
我們將在左邊放置篩選用的列表,右邊放商品內容。
<template>
	<div v-if="isAuthenticated" class="p-4 bg-gray-50 min-h-screen flex">
		<div class="w-1/4 p-4">
			<div class="p-4 bg-gray-100 rounded-lg shadow-md">
				<div class="mb-4">
					<label class="block text-gray-700 font-bold mb-2">Price</label>
					<div class="flex items-center">
						<input
							placeholder="min"
							type="number"
							class="border p-2 mb-2 w-full mr-2 rounded"
							v-model="minPrice"
						/>
						<span class="mx-2">to</span>
						<input
							placeholder="max"
							type="number"
							class="border p-2 mb-2 w-full ml-2 rounded"
							v-model="maxPrice"
						/>
					</div>
				</div>
				<div class="mb-4">
					<label class="block text-gray-700 font-bold mb-2">Sort by:</label>
					<select class="border p-2 mb-4 w-full rounded" v-model="sortBy">
						<option value="">Default</option>
						<option value="price_low">Price : Low to High</option>
						<option value="price_high">Price : High to Low</option>
					</select>
				</div>
				<div class="mb-4">
				<label class="block text-gray-700 font-bold mb-2">Category:</label>
				<div v-for="category in categories" :key="category" class="mb-2">
					<input
						type="radio"
						:value="category"
						v-model="categoryType"
						class="mr-2"
					/>
					<label class="text-gray-700">{{ category ? category : "All" }}</label>
				</div>
				</div>
				<button
					class="bg-blue-500 hover:bg-blue-700 text-white font-bold py-2 px-4 rounded w-full"
					@click="filterHandler"
				>
					Filter
				</button>
			</div>
		</div>
		<div class="w-3/4 p-4">
			<div
				v-for="product in products"
				:key="product.id"
				class="flex items-center border-b border-gray-200 py-4"
			>
				//...
			</div>
			//...
		</div>
	</div>
	<div v-else class="p-4">
		<p class="text-red-600 font-medium">Please log in to see the products.</p>
	</div>
</template>

<script setup>
//...
const categories = [
	"",
	"Bags",
	"Shoe",
	"Headset",
	"Mice",
	"Keyboard",
	"Chair",
	"Dinnerware",
	"Light",
	"Jean",
];
const categoryType = ref("");
const minPrice = ref("");
const maxPrice = ref("");
const sortBy = ref("");

//...

const filterHandler = () => {
	console.log(minPrice.value, maxPrice.value, categoryType.value, sortBy.value);
};

//...
</script>
填寫最低價、最高價、排序方式、商品類別後,按下Filter按鈕,就能看到預計傳給後端的參數。
可以看到和我們選擇的內容一樣,有相同的數值。
確認參數沒問題後,完成過濾商品功能。
修改getProducts的輸入參數,使用到getProducts的地方也要增加傳入的參數。
const getProducts = async (min, max, category, sort, page, size) => {
	try {
		const response = await axios.get(
			`http://localhost:8080/api/product/?minPrice=${
				min
			}&maxPrice=${
				max
			}&category=${category}&sort=${sort}&pageNumber=${
				page - 1
			}&pageSize=${parseInt(size)}`,
			{
				headers: {
					Authorization: `Bearer ${authStore.token}`,
				},
			}
		);
		products.value = response.data.content;
		totalElement.value = response.data.totalElements;
		console.log(response.data);
	} catch (error) {
		console.log(error);
	}
};
const onClickHandler = () => {
	getProducts(minPrice.value, maxPrice.value, categoryType.value, sortBy.value, currentPage.value, pageSize.value);
};

const onChangeHandler = () => {
	currentPage.value = 1;
	getProducts(minPrice.value, maxPrice.value, categoryType.value, sortBy.value, currentPage.value, pageSize.value);
};

const filterHandler = () => {
	currentPage.value = 1;
	getProducts(minPrice.value, maxPrice.value, categoryType.value, sortBy.value, currentPage.value, pageSize.value);
};

onMounted(() => {
	if (isAuthenticated.value) {
		getProducts(minPrice.value, maxPrice.value, categoryType.value, sortBy.value, currentPage.value, pageSize.value);
	}
});
我們可以修改最低價、最高價、排序設定、商品類別,觀察商品的變化。
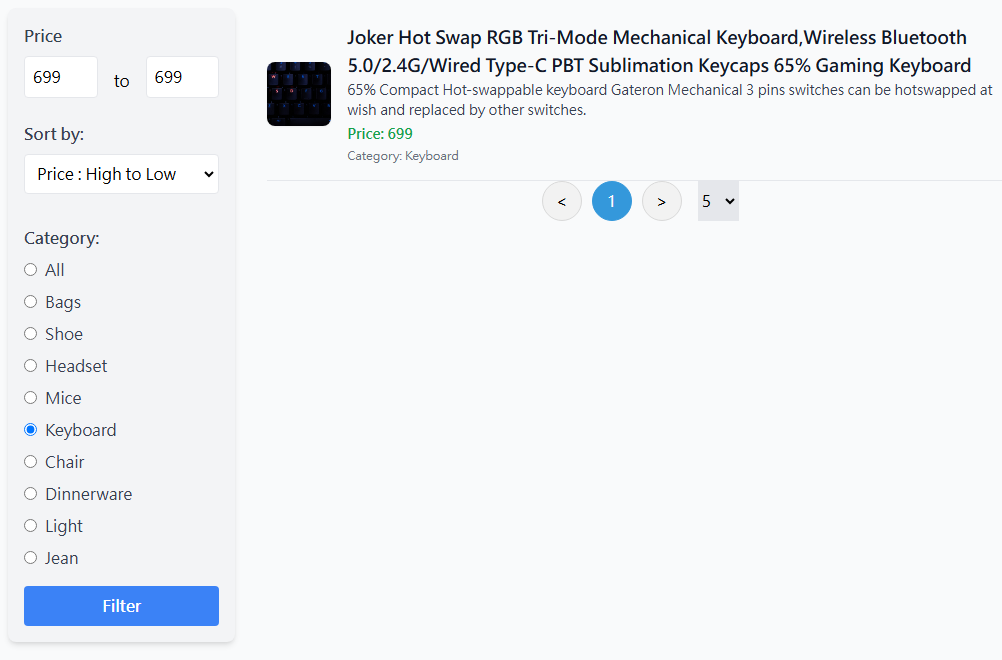
顯示價格從200到999的商品,價格由低到高排序。

只會顯示699的Keyboard商品