今天我們要繼續昨天的進度,實作消費清單的編輯與儲存功能。當使用者掃描到 QRCode 後,會顯示出消費清單,點擊每一個項目後可以進行編輯,並且按下完成按鈕時,會將這個項目更新至快取中,最終當所有編輯完成後,使用者可以將清單中的物品儲存到資料庫。如果使用者在清單中還有未儲存的物品卻嘗試返回上一頁,會顯示提示,確認是否要放棄所有未儲存的物品。
今天的實作主要目標為:
昨天我們建立的 ScannedItem 只有簡單的名稱、數量和價錢,並沒有像 Item 一樣有分類、地點、日期等資訊,所以我們要擴充 ScannedItem,方便我們後續在資料傳遞使用。
struct ScannedItem: Identifiable, Equatable {
    var id = UUID()
    var name: String
    var quantity: Int
    var price: Double
    var category: ItemCategory?
    var location: Location?
    var dateAdded: Date?
    var expiryDate: Date?

    init(id: UUID = UUID(), name: String, quantity: Int, price: Double, category: ItemCategory? = nil, location: Location? = nil, dateAdded: Date? = nil, expiryDate: Date? = nil) {
        self.id = id
        self.name = name
        self.quantity = quantity
        self.price = price
        self.category = category
        self.location = location
        self.dateAdded = dateAdded
        self.expiryDate = expiryDate
    }
}
關於實作 ViewModel 的部分,和 Day12 的 ViewModel 十分相近,這邊就不重複贅述了。不過我們有新增一個返回 ScannedItem 的 func。
func updateItem() -> ScannedItem {
    return ScannedItem(
        id: originalItem.id,
        name: name,
        quantity: quantity,
        price: Double(price) ?? 0,
        category: category,
        location: location,
        dateAdded: dateAdded
    )
}
這裡的 categories 和 locations 會從 ShoppingListViewModel 傳遞過來,這樣就不用一直重複抓取了。以下提供完整程式碼:
class ShoppingModifyItemViewModel: ObservableObject {
    @Published var name: String
    @Published var quantity: Int
    @Published var price: String = ""
    @Published var category: ItemCategory?
    @Published var location: Location?
    @Published var dateAdded: Date = Date()
    @Published var expiryDate: Date = Date()
    @Published var shouldRemindExpiryDate = false
    @Published var categories: [ItemCategory] = []
    @Published var locations: [Location] = []

    var originalItem: ScannedItem

    init(item: ScannedItem, categories: [ItemCategory], locations: [Location]) {
        self.originalItem = item
        self.name = item.name
        self.quantity = item.quantity
        self.price = String(item.price)
        self.dateAdded = item.dateAdded ?? Date()
        self.categories = categories
        self.locations = locations
        self.category = item.category ?? categories[0]
        self.location = item.location ?? locations[0]
    }

    func updateItem() -> ScannedItem {
        return ScannedItem(
            id: originalItem.id,
            name: name,
            quantity: quantity,
            price: Double(price) ?? 0,
            category: category,
            location: location,
            dateAdded: dateAdded
        )
    }
}
我們需要一個 ShoppingModifyItemView 來進行物品編輯。編輯完成後,按下完成按鈕將資料回傳到 ShoppingListView,這些資料暫時儲存在快取中,直到使用者確認將清單中的物品全部儲存到資料庫。
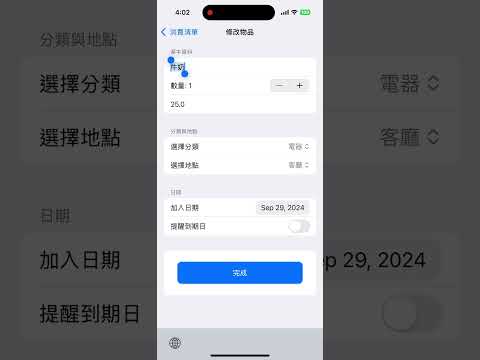
ShoppingModifyItemView 的 UI 畫面和新增物品的畫面差不多,所以我們可以從 AddItemView 複製程式碼。
struct ShoppingModifyItemView: View {
    @ObservedObject var viewModel: ShoppingModifyItemViewModel

    var body: some View {
        VStack {
            Form {
                Section(header: Text("基本資料")) {
                    TextField("物品名稱", text: $viewModel.name)

                    Stepper(value: $viewModel.quantity, in: 1...100) {
                        Text("數量: \(viewModel.quantity)")
                    }

                    TextField("價格", text: $viewModel.price)
                        .keyboardType(.decimalPad)
                }

                Section(header: Text("分類與地點")) {
                    Picker("選擇分類", selection: $viewModel.category) {
                        ForEach(viewModel.categories, id: \.id) { category in
                            Text(category.name).tag(category as ItemCategory?)
                        }
                    }
                    Picker("選擇地點", selection: $viewModel.location) {
                        ForEach(viewModel.locations, id: \.id) { location in
                            Text(location.name).tag(location as Location?)
                        }
                    }
                }

                Section(header: Text("日期")) {
                    DatePicker("加入日期", selection: $viewModel.dateAdded, displayedComponents: .date)

                    Toggle("提醒到期日", isOn: $viewModel.shouldRemindExpiryDate)

                    if viewModel.shouldRemindExpiryDate {
                        DatePicker("到期日", selection: $viewModel.expiryDate, displayedComponents: .date)
                    }
                }

                Button(action: {

                }) {
                    Text("完成")
                        .frame(maxWidth: .infinity)
                        .padding()
                        .background(Color.blue)
                        .foregroundColor(.white)
                        .cornerRadius(10)
                }
                .padding()
            }
        }
        .navigationBarTitle("修改物品", displayMode: .inline)
    }
}
在 ShoppingModifyItemView 中,必須要將編輯完成的資料回傳到列表(ShoppingListView)並自動回到上一頁,因此我們必須宣告兩個變數:presentationMode 和 onSave。
@Environment(\.presentationMode) var presentationMode

var onSave: (ScannedItem) -> Void
接著我們在「完成」按鈕中實作「傳遞資料」和「關閉頁面」這兩個動作。
Button(action: {
    let updatedItem = viewModel.updateItem()
    onSave(updatedItem)
    self.presentationMode.wrappedValue.dismiss()
}) // 略...
剛剛在實作 ShoppingModifyItemViewModel 時有說到,categories 和 locations 會從這裡傳遞到下一頁,因此我們必須在這裡先把資料抓出來。
class ShoppingListViewModel: ObservableObject {
    // 略...
    private let dataManager: DataManager
    var categories: [ItemCategory] = []
    var locations: [Location] = []

    init(shoppingItems: [ScannedItem], dataManager: DataManager = DataManager()) {
        self.shoppingItems = shoppingItems
        self.dataManager = dataManager
        fetchItemCategory()
        fetchLocation()
    }

    func fetchItemCategory() {
        categories = dataManager.fetchItemCategories()
    }

    func fetchLocation() {
        locations = dataManager.fetchLocations()
    }

    // 略...
}
當收到編輯完成回傳的資料後,要讓消費清單中的物品暫存在 ShoppingListViewModel,因此需要實作一個 updateItem 來更新 shoppingItems 的資料。這樣一來,收到回傳資料後 UI 也就馬上會更新。
func updateItem(_ item: ScannedItem) {
    if let index = shoppingItems.firstIndex(where: { $0.id == item.id }) {
        shoppingItems[index] = item
    }
}
最後要實作點擊按鈕後將清單內的物品加入到資料庫中,在新增完畢後,必須要自動跳回上一頁,因此新增 shouldNavigateBack 來控制是否關閉當前頁。
@Published var shouldNavigateBack = false
// 略...
func addItemsToInventory() {
    for scannedItem in shoppingItems {
        if categories.isEmpty || locations.isEmpty {
            print("缺少分類或地點,無法儲存商品: \(scannedItem.name)")
            failHandle = (isFail: true, title: "發生錯誤")
            break
        }

        let success = dataManager.addItem(
            name: scannedItem.name,
            quantity: scannedItem.quantity,
            price: scannedItem.price,
            dateAdded: scannedItem.dateAdded ?? Date(),
            expiryDate: scannedItem.expiryDate,
            category: scannedItem.category ?? categories[0],
            location: scannedItem.location ?? locations[0]
        )

        if success {
            print("成功儲存商品: \(scannedItem.name)")
        } else {
            print("儲存失敗: \(scannedItem.name)")
        }
    }

    clearItems()  // 清空已儲存的項目
}

func clearItems() {
    shoppingItems.removeAll()
    shouldNavigateBack = true
}
以下附上完整程式碼:
import SwiftUI
import AlertToast

struct ShoppingListView: View {
    @ObservedObject var viewModel: ShoppingListViewModel
    @Environment(\.presentationMode) var presentationMode
    @State private var showUnsavedAlert = false  // 控制是否顯示未儲存的提示框
    @State private var isNavigatingBack = false  // 控制是否繼續返回

    var body: some View {
        VStack {
            List {
                ForEach(viewModel.shoppingItems) { item in
                    NavigationLink(
                        destination: ShoppingModifyItemView(
                            viewModel: ShoppingModifyItemViewModel(item: item, categories: viewModel.categories, locations: viewModel.locations),
                            onSave: { updatedItem in
                                viewModel.updateItem(updatedItem)
                            }
                        )
                    ) {
                        HStack {
                            Image(systemName: "cart.fill")
                                .resizable()
                                .frame(width: 40, height: 40)
                                .foregroundColor(.blue)
                                .padding(.trailing, 10)

                            VStack(alignment: .leading, spacing: 5) {
                                Text(item.name)
                                    .font(.headline)
                                    .foregroundColor(.black)

                                HStack {
                                    Text("數量: \(item.quantity)")
                                        .font(.subheadline)
                                        .foregroundColor(.gray)
                                    Spacer()
                                    Text("價格: \(String(format: "%.2f", item.price)) 元")
                                        .font(.subheadline)
                                        .foregroundColor(.gray)
                                }
                            }

                            Spacer()
                        }
                        .padding(.vertical, 10)
                    }
                }
                .onDelete(perform: viewModel.deleteItem)
            }

            Button(action: {
                viewModel.addItemsToInventory()  // 確認並儲存到資料庫
            }) {
                Text("新增物品到家用品清單")
                    .frame(maxWidth: .infinity)
                    .padding()
                    .background(Color.blue)
                    .foregroundColor(.white)
                    .cornerRadius(10)
            }
            .padding()
        }
        .navigationBarTitle("消費清單", displayMode: .inline)
        .toast(isPresenting: $viewModel.failHandle.isFail, alert: {
            AlertToast(type: .error(Color.red), title: viewModel.failHandle.title)
        })
        .navigationBarBackButtonHidden(true)  // 隱藏系統自帶的返回按鈕
        .navigationBarItems(leading: Button(action: {
            if viewModel.shoppingItems.isEmpty {
                presentationMode.wrappedValue.dismiss()  // 如果列表為空,直接返回
            } else {
                showUnsavedAlert = true  // 否則顯示提示
            }
        }) {
            HStack {
                Image(systemName: "chevron.left")
            }
        })
        .alert(isPresented: $showUnsavedAlert) {
            Alert(
                title: Text("尚未儲存資料"),
                message: Text("你還有尚未儲存的清單項目,確定要返回嗎?所有未儲存的項目將會消失。"),
                primaryButton: .destructive(Text("確定")) {
                    isNavigatingBack = true
                    presentationMode.wrappedValue.dismiss()  // 確定返回
                },
                secondaryButton: .cancel(Text("取消"))
            )
        }
        .onChange(of: viewModel.shouldNavigateBack) { shouldNavigate in
            if shouldNavigate {
                presentationMode.wrappedValue.dismiss()
            }
        }
    }
}

#Preview {
    ShoppingListView(viewModel: ShoppingListViewModel(shoppingItems: [ScannedItem(name: "Apple", quantity: 1, price: 100)]))
}
歷經三天!終於完成掃描 QRCode 可以新增家用品的功能!雖然不管是 UI 的呈現還是處理邏輯、架構等,還有很多地方可以優化,不過我們這次就先把整個雛形做出來就好了~
其實大部分預計要實作的功能,都實作完畢了,不過鐵人賽還剩下四天的時間,我們就來看看有哪些地方可優化吧!我們明天再見!