今天來到了第5天,我們今天來畫俄羅斯方塊的背景吧
在Hiearchy裡右鍵Create empty然後把它命名為BackGroundDrawer,接著像之前幫方塊加程式那樣,幫他加一個叫做Draw_BG的new script,接著把下面這段程式碼貼上
using UnityEngine;


public class Draw_BG : MonoBehaviour
{
    public int height = 20;
    public int width = 10;
    public float linewidth = 0.1f;
    public Material lineMaterial;
    public Color lineColor;
    public Vector3 origin = Vector3.zero;
    private void Start()
    {

        DrawGrid();
    }
    void DrawGrid()
    {
        for(int y = 0; y <= height; y++)
        {
            CreateLine(new Vector3(origin.x, origin.y + y, 0), new Vector3(origin.x + width, origin.y + y, 0));
        }
        for(int x = 0; x <= width; x++)
        {
            CreateLine(new Vector3(origin.x + x, origin.y, 0), new Vector3(origin.x + x, origin.y + height, 0));
        }
    }
    void CreateLine(Vector3 start,Vector3 end)
    {
        var go = new GameObject("DrawLine");
        go.transform.SetParent(this.transform, false);
        var lr = go.AddComponent<LineRenderer>();
        lr.positionCount = 2;
        lr.SetPositions(new[] { start, end });
        lr.startWidth = lr.endWidth = linewidth;
        lr.useWorldSpace = true;
        lr.material = lineMaterial;
        lr.startColor = lr.endColor = lineColor;
        lr.numCapVertices = 2;
        lr.shadowCastingMode = UnityEngine.Rendering.ShadowCastingMode.Off;
        lr.receiveShadows = false;
    }

}
看到BackGroundDrawer的inspector可以看到Draw_BG底下有好幾個欄位,沒有初始值,需要我們手動填的有Line Material跟Line Color,我們可以點擊Line Material欄位右邊的小圓球,目前先選擇一個自己喜歡的就可以了,我選的是Default-PracticalSystem,然後Line Color的部分只要點擊欄位本身選一個自己喜歡的顏色就可以了。
貼心提醒,所有變更都需要在沒有進行遊戲的情況下進行才算數喔!
然後我們順便把攝像機比例調整成適合我們玩俄羅斯方塊的比例,選到Game->點擊free aspect,然後按下面的加號->x改成9 y改成16,按下OK。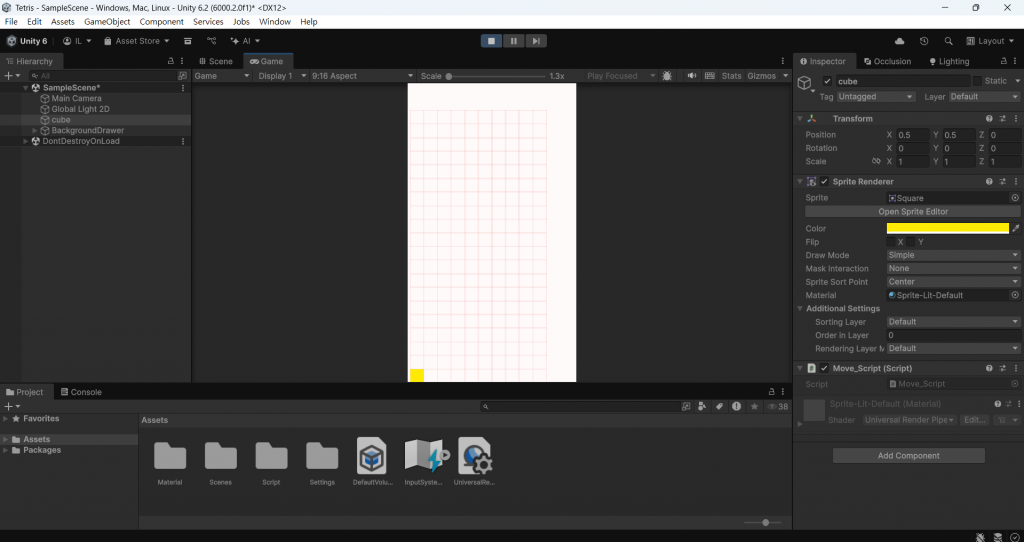
執行起來就會長這樣。(把方塊的x、y都改成0.5就可以剛好卡在格子中間,因為方塊的位置是看它的中心)
如果執行沒有問題的話接著我們來看程式
首先是
public int height = 20;
public int width = 10;
public float linewidth = 0.1f;
public Material lineMaterial;
public Color lineColor;
public Vector3 origin = Vector3.zero;
這些都是後面會用到的變數,在這邊先定義好,public的意思就是讓我們可以在Unity裡面去調整這個變數,而不用每次都跑進程式裡面修改,後面接著的是變數的型別還有它的名稱,比較特別的有float、Material、Color
float 就是浮點數的意思,就是小數的概念
Material、Coloer分別是材質跟顏色,而材質跟顏色的差別在哪裡呢?
材質包含像是它的發光、反光、粗糙度、金屬度等等很多屬性,而顏色就只是單純的顏色而已,可以說材質代表怎麼畫,而顏色代表用甚麼顏色畫。
進到start之後讓它呼叫DrawGrid函式,這個DrawGrid應該是今天最難的程式了,所以我們直接來看它是甚麼意思吧!
 void DrawGrid()
    {
        for(int y = 0; y <= height; y++)
        {
            CreateLine(new Vector3(origin.x, origin.y + y, 0), new Vector3(origin.x + width, origin.y + y, 0));
        }
        for(int x = 0; x <= width; x++)
        {
            CreateLine(new Vector3(origin.x + x, origin.y, 0), new Vector3(origin.x + x, origin.y + height, 0));
        }
    }
for(int y = 0;y<=height; y++)
定義一個叫做y的變數,然後每執行一次就把y+1,一直執行到y<=height為止。所以以我們這邊來說,它會執行21次。
CreateLine(new Vector3(origin.x, origin.y + y, 0), new Vector3(origin.x + width, origin.y + y, 0));
這個東西會呼叫CreateLine函式,而傳入的兩個Vector3分別是畫的線的起始位置跟終點位置。
重複執行21次之後就會完成橫線的繪製。
下面的for迴圈也是一樣,只是把橫線換成直線而已。
最後是CreateLine函式
var go = new GameObject("DrawLine"); //創建一個叫做Drawline的遊戲物件,go變數代表這個物件
go.transform.SetParent(this.transform, false);
//把go設為Draw_BG的子類別,false代表讓位置以父座標為基準,防止Unity為了讓世界座標保持不變而亂調位置

var lr = go.AddComponent<LineRenderer>(); //把go新增一個叫做LineRenderer的Component
lr.positionCount = 2; //代表要畫的只有兩個點
lr.SetPositions(new[] { start, end }); //兩個點的座標
lr.startWidth = lr.endWidth = linewidth;
/*設定線寬,起點跟終點都要設定是因為LineRenderer允許起點跟終點線寬不一樣,就會造成線段逐漸變粗或逐漸變細*/
lr.useWorldSpace = true; //使用世界座標
lr.material = lineMaterial; //設定Material
lr.startColor = lr.endColor = lineColor; //設定color
lr.numCapVertices = 2; //數字越大線段就會越圓角
lr.shadowCastingMode = UnityEngine.Rendering.ShadowCastingMode.Off; //不會產生陰影
lr.receiveShadows = false; //不會反射陰影
解釋程式好累:(
明天見囉:)


 iThome鐵人賽