昨天我們成功建立了 RKE2 管理叢集,今天要在這個穩固的基礎上安裝 Rancher Server!這就像在我們建好的地基上蓋起漂亮的管理大樓,從此以後我們就能透過網頁介面輕鬆管理整個 Kubernetes 生態系統。準備好迎接數位牧場的管理中心華麗登場吧!
Rancher Server 是一個基於 Kubernetes 的容器管理平台,提供:
為什麼使用 Helm 安裝 Rancher?
# 下載 Helm 安裝腳本
curl -fsSL -o get_helm.sh https://raw.githubusercontent.com/helm/helm/main/scripts/get-helm-3

# 設定執行權限
chmod 700 get_helm.sh

# 執行安裝
./get_helm.sh

# 驗證安裝
helm version --short

# 清理安裝檔案
rm get_helm.sh
K9s 是一個強大的 Kubernetes CLI 管理工具,方便 debug 和監控:
# 下載並安裝 K9s
wget https://github.com/derailed/k9s/releases/latest/download/k9s_linux_amd64.deb
sudo apt install ./k9s_linux_amd64.deb
rm k9s_linux_amd64.deb

# 啟動 K9s
k9s

# 常用快捷鍵:
# :pod - 查看 Pods
# :svc - 查看 Services
# :ns - 切換 Namespace
# q - 退出
RKE2 的網路分配依賴 iptables,需要確保正確安裝:
# 安裝 iptables
sudo apt update
sudo apt install -y iptables

# 清理可能的網路配置問題
sudo rm -rf /var/lib/cni/networks/k8s-pod-network

# 重新啟動 RKE2 讓配置生效
sudo systemctl restart rke2-server

# 等待服務完全啟動
sleep 30

# 驗證網路組件
kubectl get pods -n kube-system | grep -E "canal|coredns"
# 確認節點狀態
kubectl get nodes

# 檢查系統 Pods
kubectl get pods -A

# 檢查網路連通性
kubectl run test-pod --image=busybox --rm -it --restart=Never -- ping -c 3 8.8.8.8
# 新增 Rancher 穩定版本倉庫
helm repo add rancher-stable https://releases.rancher.com/server-charts/stable

# 更新 Helm 倉庫
helm repo update

# 驗證倉庫
helm search repo rancher-stable/rancher
# 建立 cattle-system namespace(安裝時也會自動建立)
kubectl create namespace cattle-system

# 檢視可用的 Rancher 配置選項
helm show values rancher-stable/rancher | head -50
# 使用 Helm 安裝 Rancher
helm install rancher rancher-stable/rancher \
  --namespace cattle-system \
  --set hostname=ithome-rancher.duckdns.org \
  --set tls=external \
  --set replicas=1 \
  --create-namespace

# 檢查安裝狀態
helm status rancher -n cattle-system
# 即時監控 Pod 狀態
kubectl get pods -n cattle-system -w

# 檢查 Rancher 部署狀態
kubectl rollout status deployment/rancher -n cattle-system

# 查看詳細事件
kubectl get events -n cattle-system --sort-by='.firstTimestamp'
部署成功的標誌:
NAME                       READY   STATUS    RESTARTS   AGE
rancher-5d4b8c7f9b-xxxxx   1/1     Running   0          2m
# 編輯 hosts 檔案
sudo nano /etc/hosts

# 新增以下行
192.168.0.116 ithome-rancher.duckdns.org

# 驗證解析
ping -c 3 ithome-rancher.duckdns.org
# 檢查 Service 配置
kubectl get svc -n cattle-system

# 檢查 Service 詳細資訊
kubectl describe svc rancher -n cattle-system
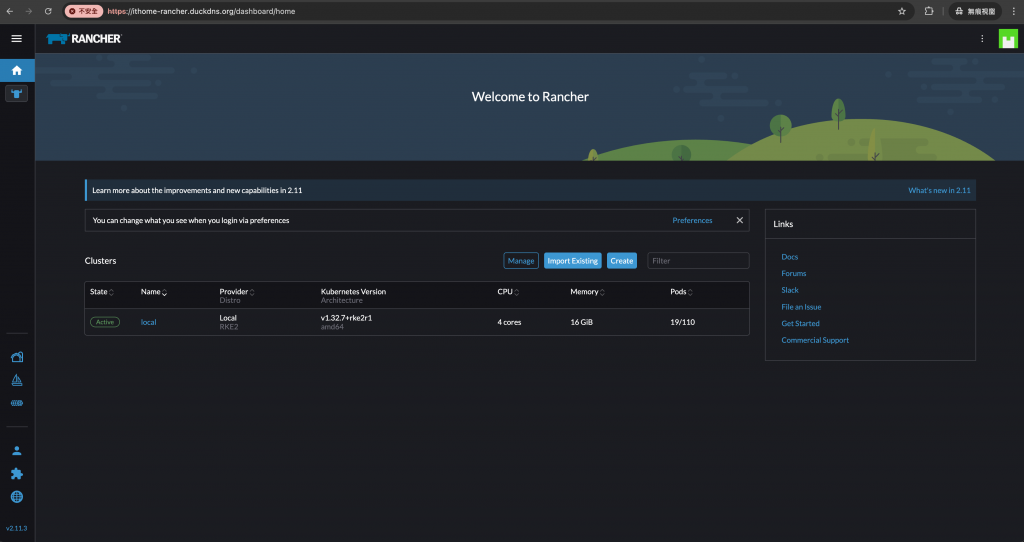
https://ithome-rancher.duckdns.org
# 取得 bootstrap 密碼
kubectl get secret --namespace cattle-system bootstrap-secret -o go-template='{{.data.bootstrapPassword|base64decode}}{{"\n"}}'

# 範例輸出:
# p4ssw0rd123456
https://ithome-rancher.duckdns.org
# 檢查 Rancher 部署狀態
kubectl get all -n cattle-system

# 檢查 Rancher 日誌
kubectl logs -n cattle-system deployment/rancher --tail=50

# 檢查資源使用量
kubectl top pods -n cattle-system
1. Rancher Pod 無法啟動
# 檢查詳細錯誤
kubectl describe pod -n cattle-system -l app=rancher

# 檢查資源限制
kubectl describe nodes
2. 無法存取 Web 介面
# 檢查 Service 狀態
kubectl get svc -n cattle-system rancher

# 測試內部連線
kubectl exec -it -n cattle-system deployment/rancher -- curl localhost
3. SSL 相關錯誤
# 檢查 TLS 設定
helm get values rancher -n cattle-system

# 確認使用 external TLS
curl -k https://ithome-rancher.duckdns.org
今天我們成功讓 Rancher Server 華麗登場!數位牧場的管理中心已經準備就緒,你現在可以透過美觀的 Web 介面來管理 Kubernetes 叢集了。
重點回顧:
明天我們將建立第一個 Custom Cluster,學習如何將額外的工作節點加入到我們的數位牧場中,開始體驗 Rancher 的多叢集管理魔法!
💡 牧場主小提示:記得妥善保管 Rancher 的管理員帳號密碼!另外,
tls=external設定表示 SSL 終端會在 HAProxy 處理,這樣可以統一管理憑證。如果 Web 介面載入慢,是正常現象,Rancher 需要一些時間來初始化所有組件!


 iThome鐵人賽