
昨天咱們已經有一個 IDD Status Reader Control Point 的雛形了,雖然可以沿著這雛形設計下去,但是 IDD Status Reader Control Point、IDD Command Control Point 和 IDD Record Access Control Point 都具有相似的命令結構,比如以下是 IDD Status Reader Control Point 的命令格式: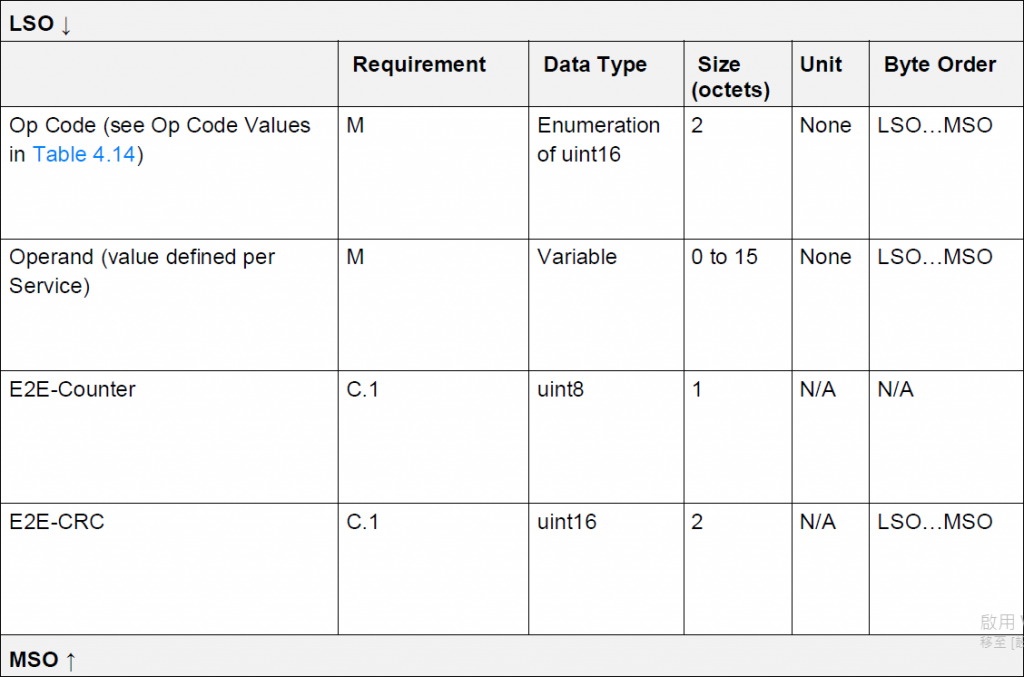
為了能減少重複邏輯的實作,所以先設計一個 IDS 專用的基礎 Control Point 類別來處理這些事情。
class BaseCP(ble.mixin.WriteMixin, ble.mixin.IndicateMixin, ble.stack.Characteristic):
    def __init__(self, uuid: int | str):
        ble.stack.Characteristic.__init__(self, uuid, write=True, indicate=True)
        ble.mixin.IndicateMixin.__init__(self)

    def _check_att_error(self, data: bytes) -> int:
        if ble.global_var.is_cp_in_progress:
            return ble.consts.ATT_ERR_PROCEDURE_ALREADY_IN_PROGRESS

        elif not self._ind_enabled:
            return ble.consts.ATT_ERR_CCCD_IMPROPERLY_CONFIGURED

        elif len(data) < 2:
            return ble.consts.ATT_ERR_VALUE_NOT_ALLOWED

        else:
            return 0

    def _get_operand(self, data: bytes) -> bytes:
        return data[2:]

    def _respond_error(self, opcode: int, error_code: int):
        ble.stack.BleTxScheduler().add(
            ble.stack.ACT_INDICATE,
            self.send_data,
            self.value_handle,
            (self._build_response_code_payload, opcode, error_code),
        )

    def _build_response_code_payload(
        self, buf: bytearray | memoryview, opcode: int, error_code: int
    ) -> int:
        raise NotImplementedError

    def _build_indicate_payload(self, buf: bytearray | memoryview, arg) -> int:
        fn, *args = arg
        return fn(buf, *args)
_get_operand()
_respond_error() 和 _build_response_code_payload()
_build_response_code_payload() 須由子類別負責設計IndicateMixin._build_indicate_payload() 來建立每個指令要回覆的訊息。然後建立 IDD Status Reader Control Point 類別:
class IddStatusReaderCP(BaseCP):
    def __init__(self):
        super().__init__(0x2B24)
        self._fn_on_opcode = self._on_opcode

    def _parse_write_data(self, data: bytes):
        ble.global_var.is_cp_in_progress = True
        micropython.schedule(self._fn_on_opcode, data)

    def _on_opcode(self, data: bytes):
        common.logger.write(
            f"IDD Status Reader CP: {common.utils.array_to_hex_str(data)}"
        )

        opcode = data[0] | data[1] << 8
        asyncio.create_task(self._on_not_supported_opcode(opcode))

    async def _on_not_supported_opcode(self, opcode: int):
        self._respond_error(opcode, _OP_CODE_NOT_SUPPORTED)

        state = machine.disable_irq()
        ble.global_var.is_cp_in_progress = False
        machine.enable_irq(state)

    def _build_response_code_payload(
        self, buf: bytearray | memoryview, opcode: int, error_code: int
    ) -> int:
        common.utils.write_uint16(buf, 0, _RESPONSE_CODE)
        common.utils.write_uint16(buf, 2, opcode)
        buf[4] = error_code
        return 5
_parse_write_data() 是在 ISR 裡被呼叫,而 ISR 裡不應做耗時的作業,所以使用 micropython.schedule() 呼叫 _on_opcode(),讓其執行 Op Code 的相關作業。micropython.schedule() 安排的函數也不能長時間占用執行時間,而有些 Op Code 可能會執行較久,所以安排協程來處理。ble.global_var.is_cp_in_progress 前,須先禁用中斷,因為此變數會在 ISR 裡被存取。ble.global_var.is_cp_in_progress = False 是原子操作,且在中斷函數裡只是讀取,那便不須要停用中斷。那麼,現在咱們的 IDS Server 若與 nRF Connect app 進行寫入 IDD Status Reader Control Point 的測試,只要傳送任何大於 1 byte 的指令,IDS Server 都會回應 Op Code Not Supported 的訊息。
現在為 IddStatusReaderCP 類別增加 E2E-Protection 的支援。先來看架構說明:
# IndicateMixin   WriteMixin
#           \      /
#            BaseCP
#              |
#       Control Point    E2ECPMixin = E2ETxMixin + E2ERxMixin
#              |         /
#          E2E Control Point
#
# IndicateMixin:
#     負責資料的組成和送出
#
# WriteMixin:
#     負責接收資料與檢查 ATT Error
#
# BaseCP:
#     IDS 所有 Control Point 的基礎類別
#
# Control Point:
#     執行 Op Code 的指令與送出回應
#
# E2ECPMixin:
#     實作部分 BaseCP 的功能,以加強 E2E 特有部分。
#     因若讓 E2ECPMixin 繼承 BaseCP 再覆寫,會產生繼承鏈的混亂。
#     維護寫入與傳送資料的 Counter 與 CRC 的計算
#     E2E 相關 ATT Error 的檢查
#     取出非 E2E 部分的資料
#     將送出的資料附加上 E2E 保護機制
#
# E2E Control Point:
#     將 Control Point 送出的資料附加上 E2E 保護機制
首先製作 E2ERxMixin:
class E2ERxMixin:
    def __init__(self):
        self._rx_counter = ble.e2e.RxCounter()
        ble.stack.register_irq_handler(self._isr_e2e_rx_mixin)

    def _after_write(self):
        self._rx_counter.inc_counter()

    def check_rx_counter(self, received_counter: int) -> bool:
        return self._rx_counter.check(received_counter)

    def _isr_e2e_rx_mixin(self, event, data):
        if event == _IRQ_CENTRAL_DISCONNECT:
            self._rx_counter.reset()
它和第 12 天介紹的 E2ETxMixin 基本是一樣的,只是多了檢查 E2E-Counter 的部分。
接下來定義 E2ECPMixin:
class E2ECPMixin(ble.mixin.E2ETxMixin, ble.mixin.E2ERxMixin):
    def __init__(self):
        ble.mixin.E2ERxMixin.__init__(self)
        ble.mixin.E2ETxMixin.__init__(self)

    def _check_att_error(self, data: bytes) -> int:
        data_len = len(data)

        if data_len < 5:
            return ble.consts.ATT_ERR_VALUE_NOT_ALLOWED

        crc = data[-1] << 8 | data[-2]
        target = ble.e2e.Crc.calc_crc(data, data_len - 2)

        if crc != target:
            return ble.consts.ATT_ERR_INVALID_CRC

        if not self.check_rx_counter(data[-3]):
            return ble.consts.ATT_ERR_INVALID_COUNTER

        return 0

    def _get_operand(self, data: bytes) -> bytes:
        return data[2:-3]

    def _fill_tx_e2e(self, buf: bytearray | memoryview, data_len: int) -> int:
        return ble.ids.utils.fill_e2e(buf, data_len, self._tx_counter)
_check_att_error()
_get_operand()
_fill_tx_e2e()
那麼,最後咱們來建立 E2E-Protection 版的 IDD Status Reader Control Point:
class E2EIddStatusReaderCP(E2ECPMixin, IddStatusReaderCP):
    def __init__(self):
        IddStatusReaderCP.__init__(self)
        E2ECPMixin.__init__(self)

    def _check_att_error(self, data: bytes) -> int:
        att_err = IddStatusReaderCP._check_att_error(self, data)
        if att_err:
            return att_err

        att_err = E2ECPMixin._check_att_error(self, data)
        if att_err:
            return att_err

        return 0

    def _build_indicate_payload(self, buf: bytearray | memoryview, arg) -> int:
        return self._fill_tx_e2e(buf, super()._build_indicate_payload(buf, arg))
如此,當啟用 E2E-Protection 後,便可以收到相應的資料了。

 iThome鐵人賽