
IDS 定義了許多系統運作期間可留下的使用歷程,以確保醫師或相關維修人員在需要時可以追蹤問題,現在咱們就來實現這個功能。但目前咱們的 IDS Server 只實現了 Set Bolus,且歷史資料格式都是大同小異,所以只說明 Bolus Programmed 這個歷史資料。
首先來看歷史紀錄的整體格式: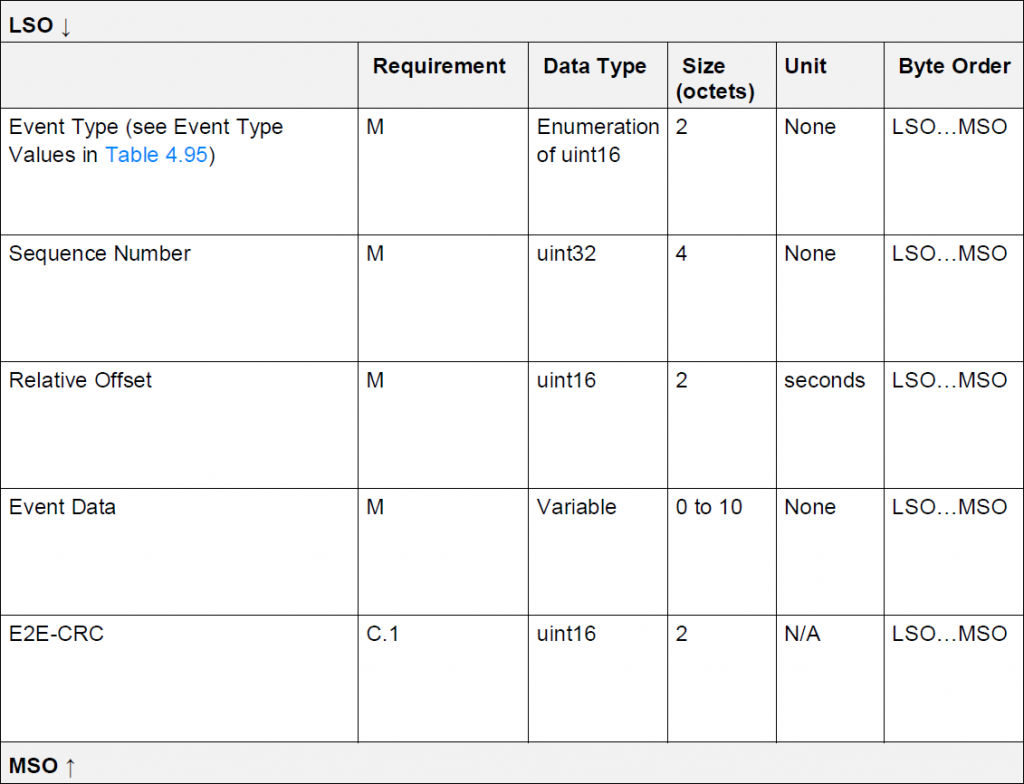
咱們根據上表來建立基礎類別:
_buf = bytearray(20)
_buf_mv = memoryview(_buf)

class BaseHistory:
    def __init__(self, event_type: int):
        self.event_type = event_type
        self.sequence_number = 0
        self.relative_offset = 0

    def _get_header(self, buf: memoryview):
        common.utils.write_uint16(buf, 0, self.event_type)
        common.utils.write_uint32(buf, 2, self.sequence_number)
        common.utils.write_uint16(buf, 6, self.relative_offset)

    def _get_event_data(self, buf: memoryview) -> int:
        return 0

    def to_bytes(self) -> memoryview:
        self._get_header(_buf_mv)
        event_len = self._get_event_data(_buf_mv[8:])
        return _buf_mv[: 8 + event_len]
to_bytes(),所以為避免頻繁創建 bytearray 等新物件,使用事先建構好的緩衝區來執行轉換作業。_get_event_data() 的實作由具有 Event Data 欄位的子類別來實作。_get_event_data() 的參數 buf 的存取是由 0 開始,因為在 to_bytes() 裡,是將 _buf_mv 切片後才傳進 _get_event_data()。因 IDS 制定的時候是在藍牙 4.0,它每次傳送的最大負載長度為 20 bytes(藍牙 4.2 開始支援到 251 bytes),扣除其他負載,Event Data 最長只有 10 bytes,因此此紀錄會分為 Bolus Programmed Part 1 of 2 和 Bolus Programmed Part 2 of 2。
此紀錄的 Event Data 結構如下:
咱們可如下設計其類別:
class BolusProgrammedPart1History(core.history.base.BaseHistory):
    def __init__(self, bolus: core.insulin.bolus.Bolus):
        super().__init__(core.history.consts.BOLUS_PROGRAMMED_PART_1)
        self._bolus = bolus

    def _get_event_data(self, buf: bytearray | memoryview) -> int:
        common.utils.write_uint16(buf, 0, self._bolus.id)
        buf[2] = self._bolus.type
        common.utils.write_as_sfloat(
            buf,
            3,
            float(self._bolus.fast_programmed) if self._bolus.fast_programmed else 0,
        )
        common.utils.write_as_sfloat(
            buf,
            5,
            (
                float(self._bolus.extended_programmed)
                if self._bolus.extended_programmed
                else 0
            ),
        )
        common.utils.write_uint16(
            buf,
            7,
            (
                self._bolus.duration_programmed // 60
                if self._bolus.duration_programmed
                else 0
            ),
        )
        return 9
此紀錄的 Event Data 結構: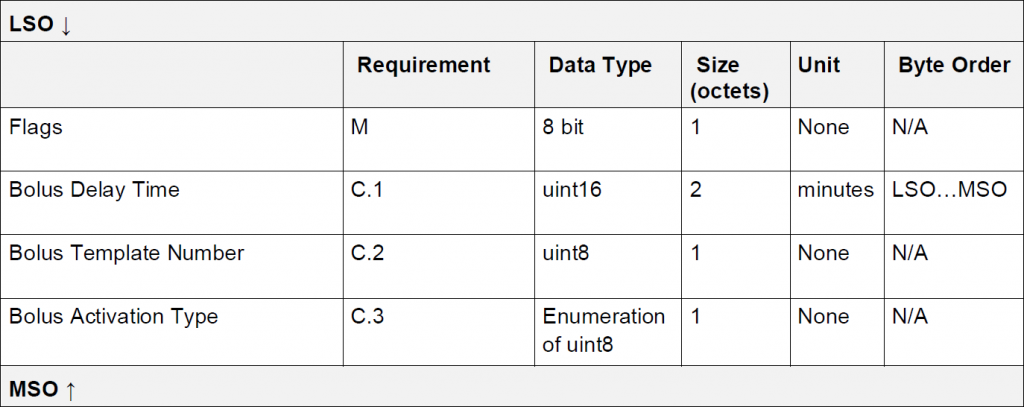
對應的類別:
class BolusProgrammedPart2History(core.history.base.BaseHistory):
    def __init__(self, bolus: core.insulin.bolus.Bolus):
        super().__init__(core.history.consts.BOLUS_PROGRAMMED_PART_2)

        self._bolus = bolus

    def _get_event_data(self, buf: bytearray | memoryview) -> int:
        data_len = 1

        buf[0] = self._bolus.flags

        if self._bolus.delay_programmed is not None:
            common.utils.write_uint16(buf, 1, self._bolus.delay_programmed)
            data_len += 2

        if self._bolus.template is not None:
            buf[data_len] = self._bolus.template
            data_len += 1

        if self._bolus.activation is not None:
            buf[data_len] = self._bolus.activation
            data_len += 1

        return data_len
為了在後續的 IDD Record Access Control Point 快速取得資料,咱們會使用 MicroPython 的 btree - simple BTree database:
class HistoryManager:
    def _init_db(self):
        path = self._config.history_db_path

        if path in os.listdir():
            self._fp = open(path, "r+b")
        else:
            self._fp = open(path, "w+b")

        self._db = btree.open(self._fp)
_init_db() 會在根目錄搜尋是否有此指定的檔案 self._config.history_db_path
接著來看 HistoryManager 怎麼將資料寫入資料庫:
class HistoryManager:
    def __init__(self, config: config.Config):
        self._config = config

        # 用來計算 Relative Offset 時的基準
        self._base_timestamp = 0

        self._init_db()
        common.eventbus.subscribe(
            core.events.EVENT_HISTORY_ADDING, self._on_history_adding
        )

    def _on_history_adding(
        self, timestamp: int, *histories: core.history.base.BaseHistory
    ):
        for h in histories:
            self._add_history(timestamp, h)

        self._db.flush()

        common.eventbus.publish(
            core.events.EVENT_IDD_STATUS_ADDING, core.events.HISTORY_EVENT_RECORDED
        )

    def _add_history(self, timestamp: int, history: core.history.base.BaseHistory):
        history.relative_offset = timestamp - self._base_timestamp
        history.sequence_number = self._get_next_id()
        self._db[self._get_key(history.sequence_number)] = history.to_bytes()

        if history.event_type == core.history.consts.REFERENCE_TIME:
            self._base_timestamp = timestamp

    @staticmethod
    def _get_key(sn: int | None) -> bytes | None:
        return struct.pack(">I", sn) if sn is not None else None
HistoryManager 會訂閱事件 EVENT_HISTORY_ADDING
EVENT_HISTORY_ADDING 後,將歷史紀錄儲存到資料庫EVENT_IDD_STATUS_ADDING,通知有 HISTORY_EVENT_RECORDED 事件btree 資料庫的 key 和 value 都是 bytes
key - sn 是整數,若想要在後續能依照數值大小存取, sn 須以 big-endian 來編碼要觸發 Bolus Programmed 歷史資料很簡單。在昨天啟用 Bolus設計的函數 activate_bolus() 裡,新增以下程式片段:
class InsulinManager:
    def activate_bolus(self, timestamp: int, bolus: core.insulin.bolus.Bolus):
        ...

        common.eventbus.publish(
            core.events.EVENT_HISTORY_ADDING,
            timestamp,
            core.history.bolus.BolusProgrammedPart1History(bolus),
            core.history.bolus.BolusProgrammedPart2History(bolus),
        )
如此,當送出 Set Bolus 指令後,便可輕易地在資料庫裡儲存兩筆歷史資料。

 iThome鐵人賽