昨天找到設定的方法,今天來試著實作吧!
把 deploy_agent.py 載入 Agent 的地方改為從本地 Package 載入:
# ==== init ====
...
# ==== agent ====
from multi_tool_agent.agent import root_agent

from vertexai.preview import reasoning_engines

app = reasoning_engines.AdkApp(
    agent=root_agent,
    enable_tracing=True,
)
# ==== deploy ====
...
部屬的地方改成用環境變數判斷要建立還是更新 Agent ,並且加上 extra_packages 參數指定本地 Agent package 的目錄:
# ==== init ====
...
# ==== agent ====
...
# ==== deploy ====
from vertexai import agent_engines

if not AGENT_ID:
    remote_agent = agent_engines.create(
        app,
        requirements=['google-cloud-aiplatform[agent_engines,adk]'],
        display_name=AGENT_DISPLAY_NAME,
        extra_packages=[
            './multi_tool_agent/'
        ],
    )
else:
    remote_agent = agent_engines.update(
        resource_name=AGENT_ID,
        agent_engine=app,
        requirements=['google-cloud-aiplatform[agent_engines,adk]'],
        display_name=AGENT_DISPLAY_NAME,
        extra_packages=[
            './multi_tool_agent/'
        ],
    )
運行後就可以獲得一個名稱為 AGENT_DISPLAY_NAME 的 Agent Engine :

準備好 requirements.txt 並建立 cloudbuild.yaml:
steps:
  - name: 'python:3.10'
    entrypoint: 'bash'
    args:
      - '-c'
      - |
        pip install --upgrade pip
        pip install -r requirements.txt
        python deploy_agent.py

timeout: '950s'
建立 Cloud Build Trigger,並設定一些敏感的環境變數:
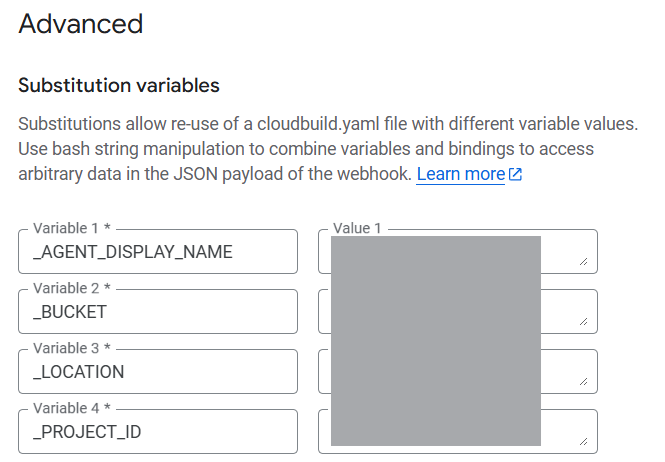
要注意的是這邊設定的環境變數要由底線開頭,應該是因為 Cloud Build 支援一些預設的環境變數如 PROJECT_ID 會自動設定成當前的專案 ID ,為了加以區隔而設計,所以在 deploy_agent.py 內讀取時要注意一下。
把專案 Push 上 GitHub 後就開始建置了!但是馬上就遇到了下面的問題:
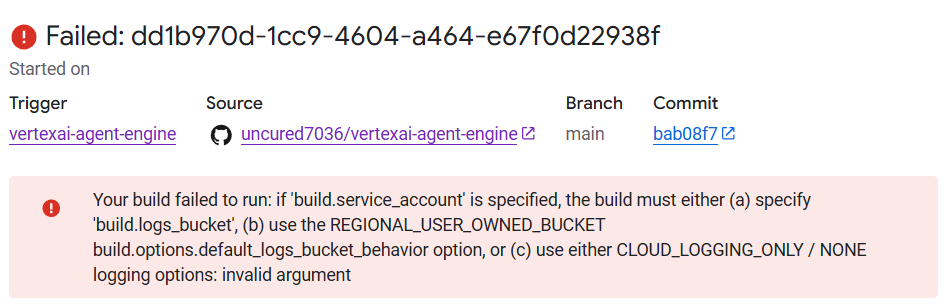
問了 Gemini 之後發現,當使用 Service Account 建置專案時,必須額外指定 Logging options。而在建立 Cloud Build Trigger 時也一定要選擇對應的 Service Account。由於我沒有正確設定,導致 Logging 沒有正常啟用。最簡單的解法是將 Log 導入預設的 CLOUD_LOGGING_ONLY,這樣就能正常運作:
steps:
  ...
options:
  logging: CLOUD_LOGGING_ONLY
timeout: '950s'
修好了之後又再次遇到問題說我應該要提供 staging_bucket 參數:
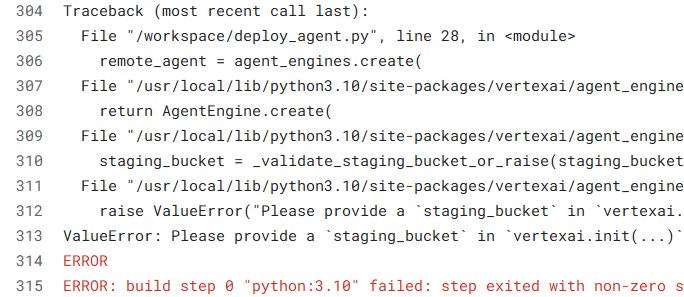
索性直接在 deploy_agent.py 內把變數都印出來,發現根本是空的:
PROJECT_ID: None
LOCATION: None
AGENT_DISPLAY_NAME: None
AGENT_ID: None
STAGING_BUCKET: None
Traceback (most recent call last):
  File "/workspace/deploy_agent.py", line 33, in <module>
    remote_agent = agent_engines.create(
  File "/usr/local/lib/python3.10/site-packages/vertexai/agen
看了看 Cloud Build 對於變數設定的文件 Substituting variable values,發現這些設定好的變數要自己 Mapping 進去:
steps:
# Uses the ubuntu build step:
# to run a shell script; and
# set env variables for its execution
- name: 'ubuntu'
  args: ['bash', './myscript.sh']
  env:
  - 'BUILD=$BUILD_ID'
  - 'PROJECT_ID=$PROJECT_ID'
  - 'PROJECT_NUMBER=$PROJECT_NUMBER'
  - 'REV=$REVISION_ID'
或是直接加個自動對應的選項:
options:
  automapSubstitutions: true
不是阿, Gemini 直接跟我說 deploy_agent.py 可以吃到阿,是幻覺還是之前的版本可以 (?) ,但為了安全性不要偷懶,只對應要用的變數就好,降低資訊洩漏的風險。
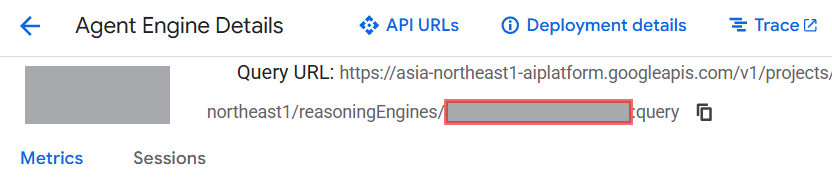
設定完後就能成功由 GitHub push 觸發 Cloud Build 並將 Vertex AI Agent Engine 部屬上去了!不過要注意的是第一次建立後才會產生 AGENT_ID,要把它填回 Cloud Build 的環境變數內,否則每次 Push 都會建立一個新的 Agent Engine。而 AGENT_ID 就是以下 URL 紅色框框內的值:
所以環境變數總共要設定這些:
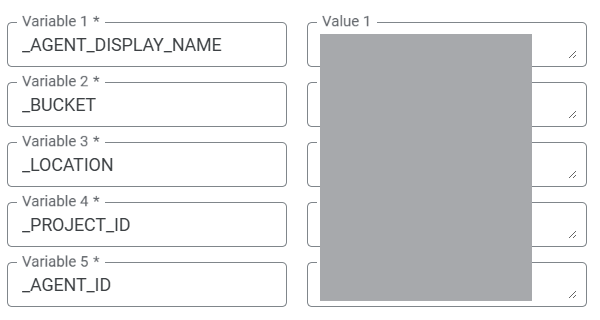
其中 _PROJECT_ID 和 _LOCATION 可以直接使用預設的取代,如果要看我完整的專案可以參考 uncured7036/vertexai-agent-engine。
LLM 雖然方便但在一些比較少資料或變動過快的領域還是會受限,還是要保持對技術的熟悉度才能順利解決問題,今天終於完成了 Vertex AI Agent Engine 的自動部署,接下來可以開始實作功能或是審視架構有沒有其他問題。

