我們使用 NodeJS HTTP Server 來實作
import send from "send";
import httpServer from "../httpServer";

httpServer.on("request", function requestListener(req, res) {
  const url = new URL(`http://localhost:5000${req.url}`);
  const qsCase = url.searchParams.get("case") || "1";
  if (url.pathname === "/favicon.ico") return faviconListener(req, res);
  if (url.pathname === "/image.jpg" || url.pathname === "/example.txt") {
    // 確保請求有抵達 Origin Server
    res.setHeader("Is-Origin-Server", "true");
    // 印出訊息
    console.log(req.url, req.headers);

    // Last-Modified + If-Modified-Since
    if (qsCase === "1") {
      const sendStream = send(req, url.pathname, {
        root: __dirname,
        etag: false,
        lastModified: true,
        cacheControl: true,
        maxAge: 5000,
        immutable: true,
      });
      sendStream.on("end", () => {
        console.log("Response headers:", JSON.stringify(res.getHeaders()));
        console.log("Status code:", res.statusCode);
      });
      sendStream.pipe(res);
      return;
    }
  }
  return notFoundListener(req, res);
});
瀏覽器打開 http://localhost:5000/image.jpg?case=1 ,在 Disable Cache 勾選/不勾選的情況,各重整五次
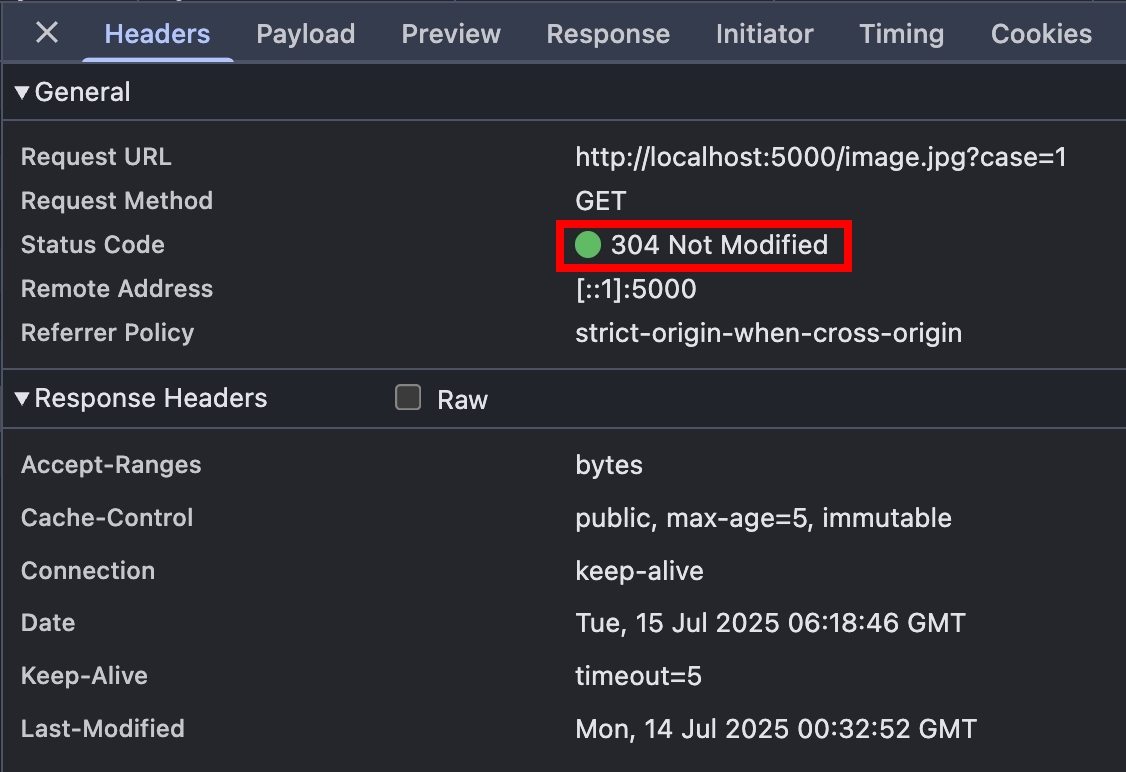
可以看到 304 Not Modified 的平均響應毫秒比較快,且資料傳輸量小很多,因為不需要傳送 response body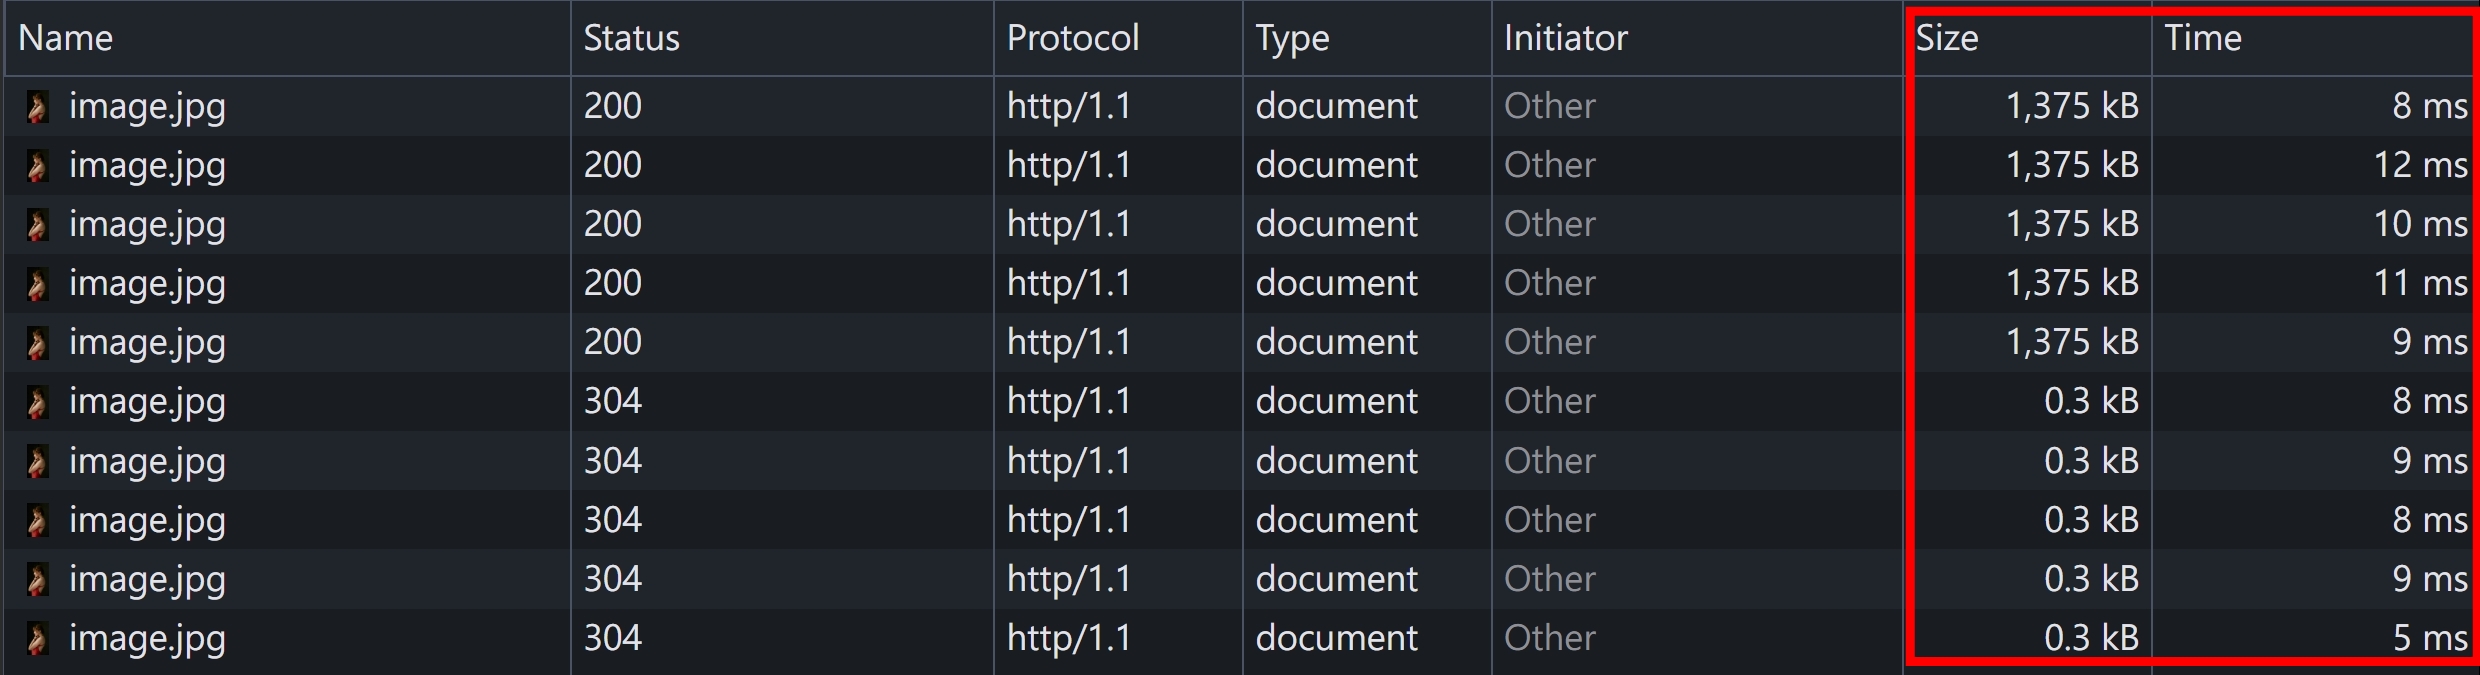
再來比較 200 跟 304 的 response headers,304 由於沒有 response body,所以也就沒有 Content-* 的 response headers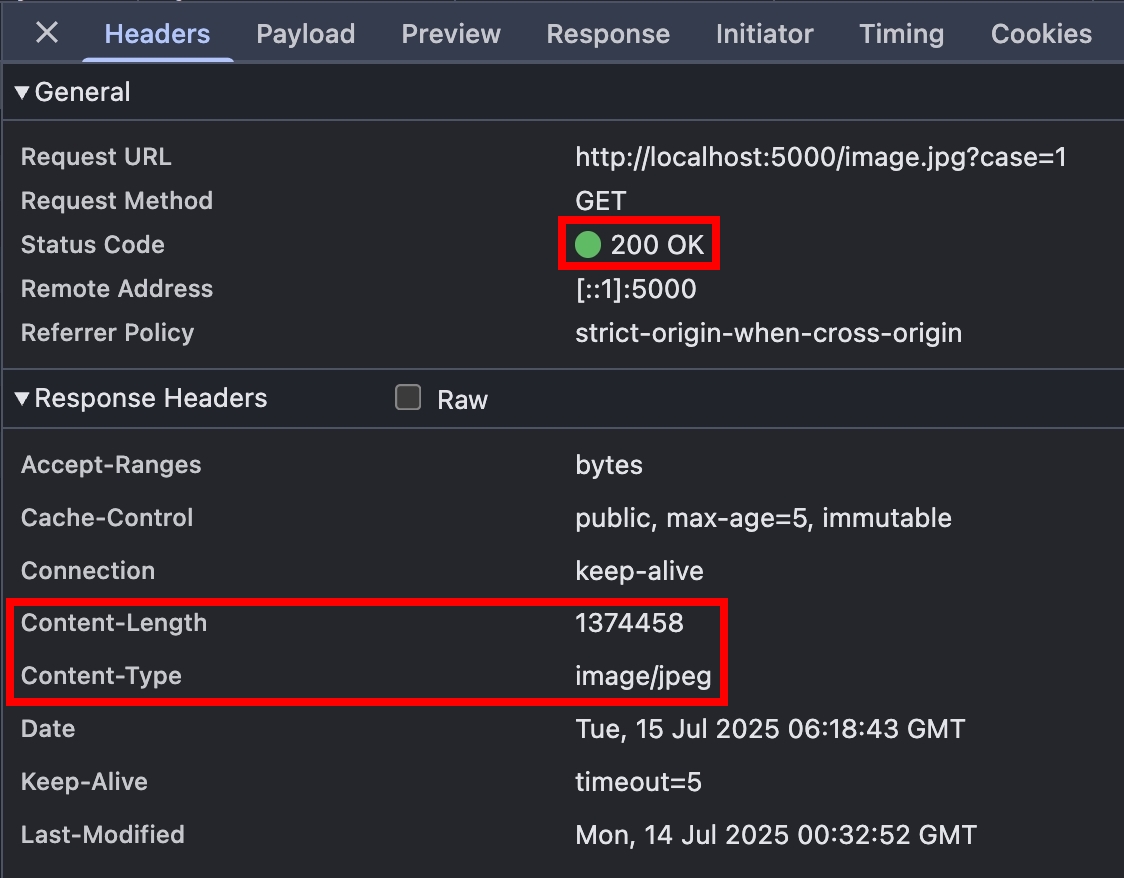
要注意!實際上這 10 個 HTTP Request 都有到達 Origin Server,因為我們現在還沒有中間層。如果要避免 HTTP Request 送到 Origin Server,直接使用 Browser Cache 的話,可以把 Disable Cache 不勾選,並且在 cache 還是 fresh 的期間(5 秒內),F12 > Console 輸入
fetch("http://localhost:5000/image.jpg?case=1");
就會看到 200 OK (from disk cache),原因是 fetch 預設的 cache 模式 會先從 Browser Cache 拿資料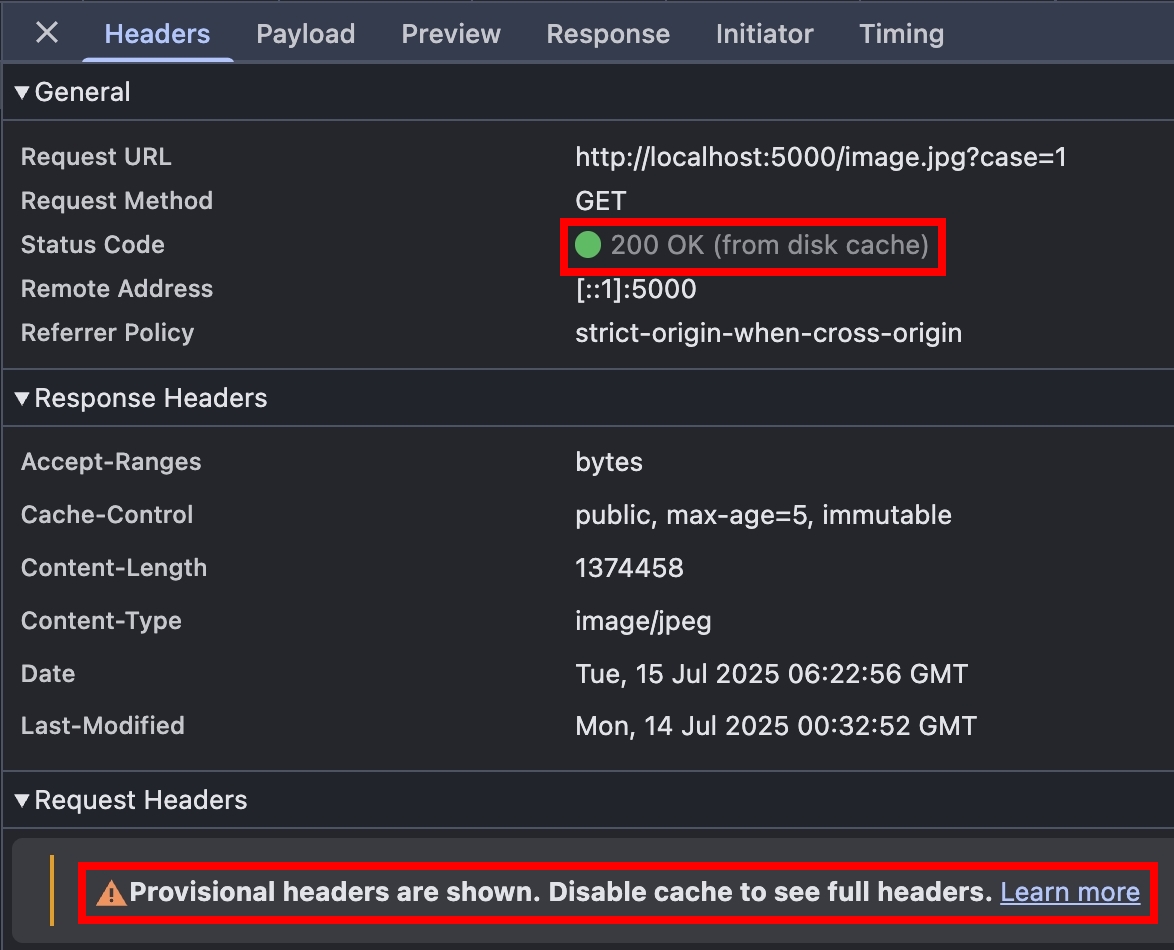
分別把上面三種請求模式,整理成時序圖

實務上,通常會有很多中間層,例如 Web Server, CDN 等等,這些中間層都扮演著重要的 Cache 角色,分擔 Origin Server 的流量,讓 HTTP Reqeust 在中間層就處理掉,所以我們接下來要把架構升級成 Browser --> Nginx --> Origin Server
在 nginx.conf 新增以下設定(以 Mac M系列晶片 + homebrew 為例)
http {
    ...
    # proxy_cache_path path keys_zone=name:size;
    # 在 /opt/homebrew/etc/nginx/ 底下建一個資料夾 my_5000_cache;
    # 1m = One megabyte zone can store about 8 thousand keys.
    proxy_cache_path /opt/homebrew/etc/nginx/my_5000_cache keys_zone=my_5000_cache:1m;

    server {
        ...
        location / {
            # proxy_cache zone
            # 這邊的 my_5000_cache 就是在 proxy_cache_path 定義的 keys_zone
            proxy_cache my_5000_cache;
            proxy_pass http://localhost:5000;
        }
    }
}
接下來的測試,一律都在 "Disable cache" 不勾選的情況下測試~
沿用 Browser "Disable cache" 測試 的 NodeJS HTTP Server,由於我們設定 max-age: 5,所以我們就來觀察 cache 超過 5 秒的情況,Browser 會不會發送 Conditional Request
瀏覽器打開 http://localhost:8080/image.jpg?case=1&v=2 ,並且重整 4 次,總共是 5 個請求
If-Modified-Since Request Header,由於 cache 還是 fresh,Nginx 這層就會處理掉,所以請求不會到 Origin ServerIf-Modified-Since Request Header,由於 cache 變成 stale,所以 Nginx 會跟 Origin Server 更新快取我們將上面的 5 個請求畫成時序圖

眼尖的小夥伴應該有發現,第 5 個請求的 Nginx --> Origin Server 這段,If-Modified-Since 被拿掉了。這部分我查閱了官方文件的描述,確實有說到這個行為:
https://nginx.org/en/docs/http/ngx_http_proxy_module.html#proxy_set_header
If caching is enabled, the header fields “If-Modified-Since”, “If-Unmodified-Since”, “If-None-Match”, “If-Match”, “Range”, and “If-Range” from the original request are not passed to the proxied server.
https://nginx.org/en/docs/http/ngx_http_proxy_module.html#proxy_cache_revalidate
Enables revalidation of expired cache items using conditional requests with the “If-Modified-Since” and “If-None-Match” header fields.
等於說 Nginx 就是直接跟 Origin Server 請求新的 resource,拿到 200 以後,再拿 Nginx Proxy Cache 的 Last-Modified 跟 response 的 Last-Modified 去比對,如果一致,就回傳 304,非常聰明的策略,把 public cache 的優勢發揮得淋漓盡致
但其實第 5 個請求可以再優化,如果要讓第 5 個請求的 Nginx --> Origin Server 這段也走 Conditional Request,可以把 proxy_cache_revalidate 這個模組也打開,好處是如果 Origin Server 的 resource 沒變,Origin Server 可以直接回傳 304,就可以省下很多流量的傳輸
調整 nginx 的設定,並重啟
location / {
    proxy_cache my_5000_cache;
    proxy_cache_revalidate on;
    proxy_pass http://localhost:5000;
}
瀏覽器打開 http://localhost/image.jpg?case=1&v=10 ,5 秒後再重整一次
將這兩次的請求畫成時序圖,可以看到第二個請求的 Origin Server ->> Nginx 這一段從 200 變成 304,大幅減少傳輸的資料量

先用瀏覽器請求 http://localhost:8080/example.txt ,再打開 nginx/my_5000_cache 資料夾,會看到以下資料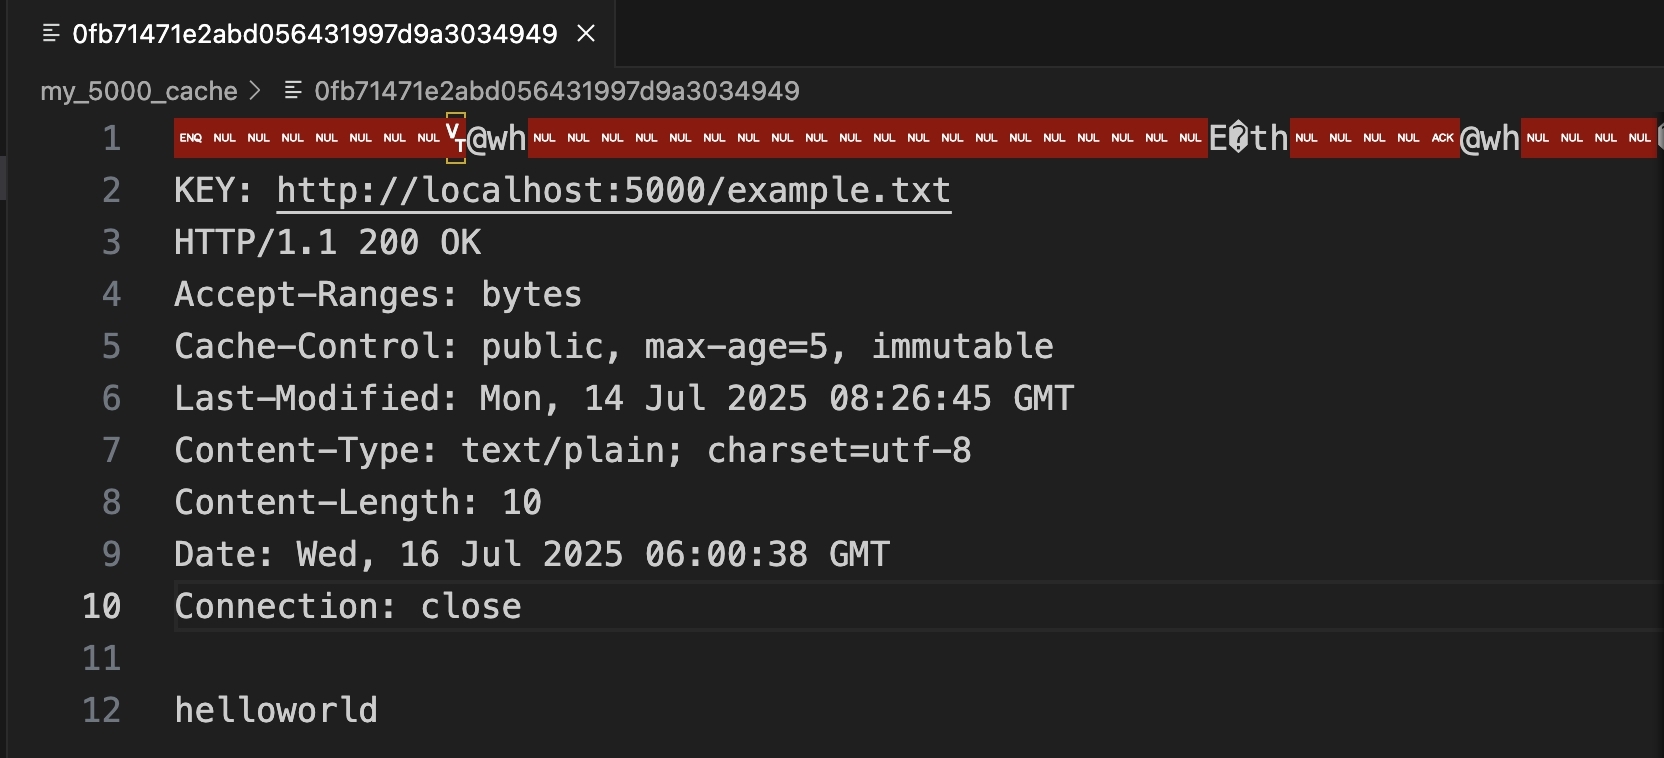
首先是檔名,根據 Nginx 官方文件 的描述
Sets the path and other parameters of a cache. Cache data are stored in files. The file name in a cache is a result of applying the MD5 function to the cache key.

Default: proxy_cache_key $scheme$proxy_host$request_uri;
若拿 http://localhost:5000/example.txt 去做 MD5 Hash,確實會得到 0fb71471e2abd056431997d9a3034949
再來是檔案內容,格式可被拆解成以下
第一行看不懂,可能是什麼 binary data
KEY: $scheme$proxy_host$request_uri
RAW HTTP Response
其實也沒什麼魔法,就是把整個 RAW HTTP Response 存起來,用完整的 URL 當作 KEY,就是這麼樸實無華且高效
本篇文章,帶大家探索 Browser --> Nginx --> Origin Server 的架構,多了一層中間層,可以保護 Origin Server,讓請求在 Nginx 這層就被擋下,也學習了 Nginx 跟 proxy_cache 相關的 module 設定。接著,會帶大家實作 ETag 跟 If-None-Match~


 iThome鐵人賽